Table des Matières
Publicité
Les langues disponibles
Les langues disponibles
Liens rapides
Publicité
Table des Matières

Manuels Connexes pour Ergomotion 390 Série


Sommaire des Matières pour Ergomotion 390 Série
- Page 1 OWNER’S MANUAL installation & operation Series 390...
-
Page 2: Table Des Matières
table of contents Safety Precautions and Usage Statements . . . . . . . . . . . . . . . . . . . . . . . . . . . . . . . . . . . . . . . . . . . . . . . 1-2 Parts List . -
Page 3: Safety Precautions And Usage Statements
In-Home Use and Hospital Disclaimer: Discontinue use of the bed base and contact a qualified service center Ergomotion adjustable bed bases are designed solely for in-home if: it has a damaged cord or plug, if it is not working properly, or it has use. - Page 4 safety precautions and usage statements smothering risk to small children and pets. To avoid injury, it is not Acoustics: advised to allow children and small pets to play on or under the bed. The massage function will emit a noticeable tone during operation. Children should not operate the bed base without adult supervision.
-
Page 5: Parts List
All electronics and components that need to be installed are located in boxes under the base or attached to the frame. Wireless Remote Control and (3) AAA batteries Mattress Retainer Bar (1)* (Optional, can be purchased from Ergomotion directly) Legs (4) Power Cord (1) Power Supply (1) -
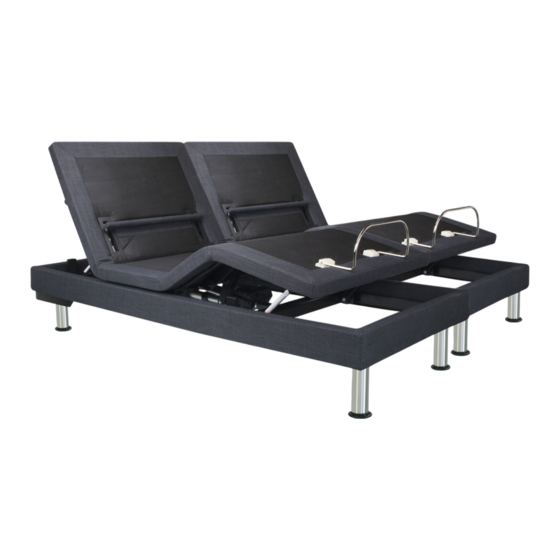
Page 6: Base Overview
base overview Foot Motor Head Foot Massage Massage Motor Head Tilt Motor Lumbar Motor Head Motor Control Box Power Down Box... -
Page 7: Quick Reference Guide
quick reference guide Not to scale. For illustration purposes only. Read all instructions before beginning installation. Connection to media faceplates (installed VIBRATION under the base) VIBRATION Audio Audio System (in- Power Cord stalled under the base) Control Box Connection ports to all motors (installed under base) Power Cord... -
Page 8: Installation Guide
Power Supply . To install the legs, thread the washer over the bolt of the leg with the recessed side facing the leg, and tighten by hand . Do not over tighten. For customer support, visit www.ergomotion.com or call: 1-888-550-3746... - Page 9 To reduce risk of electric shock, unplug the base before cleaning. To safely disconnect, ensure the base is in a flat position with all motors off, and unplug from power source. For customer support, visit www.ergomotion.com or call: 1-888-550-3746...
-
Page 10: Remote Control
remote control REMOTE OVERVIEW MASSAGE FEATURE 10, 20, 30 Minute Massage Timer Lights The MASSAGE button turns head and foot massage ON/OFF . Press to cycle through 3 levels and off. Massage Timer Head Massage Intensity The HEAD + and - buttons adjust the head massage intensities . - Page 11 remote control ADJUST ONE TOUCH BUTTONS One touch LIGHT button The HEAD arrows lift activates and turns off the and lower the head section safety lighting feature . of the base . The FOOTarrows lift and lower the foot section of One touch ZERO G preset ®...
-
Page 12: Headboard Bracket Installation Guide
headboard bracket installation guide A 9/16” & 1/2” socket and crescent wrench are necessary to complete installation. STEP 1 a .) Align the hole in the bracket to the brass sleeve into which the leg threads . Hold the bracket in place and screw the leg into the base until it is snug . - Page 13 headboard bracket installation guide A 9/16” & 1/2” socket and crescent wrench are necessary to complete installation. STEP 2 STEP 3 You may now connect your headboard to the attachment plates Attach the plastic spacer and T-Bracket . using the remaining short bolts and nuts to secure it to the brackets .
-
Page 14: Emergency Power Down Box
emergency power down box In the event that the base is stuck in an articulated position during a power outage- the Power Down Box will return the base to a flat position. (2) 9 Volt batteries are required to operate the power down feature and are NOT included. STEP 1 STEP 2 Locate the Power Down Box under the base . -
Page 15: Pair Remote
pair remote The original remote that comes in the box is already paired to the bed base. No further action is required. In the event that the remote is not paired with the base, follow the steps below. STEP 1 STEP 3 Remove back cover from remote Press and hold button on the back of the remote . -
Page 16: Setting Up Two Bases
setting up two bases If any split setup is being installed, plastic connecting straps are provided (one per base) to se- cure the bases together. Use both straps to secure the head and foot portions together. STEP 1 STEP 2 Slide side (a) of the connecting strap onto leg bolt . - Page 17 setting up two bases If simultaneous operation of two bases is desired, use the SmartSync Cord to connect the ™ electronics of both bases together. STEP 1 STEP 4 Unplug base from power source . Connect each power-down box male connection to the sync cord female connection (Refer to the illustration below) .
-
Page 18: Troubleshooting
Remove and replace full batteries in the remote control and re-pair the remote to the base (see page 19). If issue is not resolved by following the instructions above, locate serial number on warranty card or back of remote and call Ergomotion Customer Service: US 1-888-550-3746... -
Page 19: Notes
notes... - Page 20 UTILISATION À DOMICILE : sont bloquées . Gardez les entrées d’air sans peluches, cheveux ou toute Les sommiers ajustables Ergomotion sont conçus seulement pour l’utilisation autre matière . Ne laissez tomber ni insérez aucun objet dans les ouvertures . à domicile . Ce sommier n’a pas été conçu comme lit d’hôpital et n’est pas Cessez l’emploi du sommier et contactez un centre de service qualifié...
- Page 21 . Ceci devrait réaligner les mécanismes d’activation du sommier à la bonne position d’opération . Lors de l’emploi normal du Tous les sommiers ajustables Ergomotion, selon leur marque et modèle, sommier, les roues – qui permettent au lit d’être à une certaine distance sont conçus et fabriqués pour fonctionner selon des paramètres précis de...
- Page 22 français sommier ajustable – ceci peut venir de notre processus de fabrication . Les moteurs de levage ne sont pas conçus pour opérer de manière continue Cette odeur est normale et disparaît habituellement avant que le produit ne pour plus que [2] minutes pendant une période de [18] minutes ou environ vous parvienne .
- Page 23 † Inclus seulement pour les tailles Twin, Twin Long, Queen Split, et Cet appareil est conforme à la norme CNR-102 d’Industrie Canada pour un Cal King Split . environnement noncontrôlé . Cet appareil doit être installé et opéré à une ‡ Optionnel . Cet article peut être acheté séparément Ergomotion .
- Page 24 électrique . Pour service Tilt Motor = Moteur de la fonction incliner consommateurs, allez au site web www .ergomotion .com ou appelez le numéro vert : 1-888-550-3746 Pg. 5 - Guide Rapide de Référence: Pas à l’échelle . En raison d’illustration seulement .
- Page 25 français Sélectionnez matelas Serta sont compatibles avec le panneau de fixation bouton une quatrième fois pour arrêter le massage . La lumière en haut de la télécommande signale laPg. 13 - Télécommande: matelas de retenue installé sur le MotionCustom®II . Ajuster: Placez le matelas sur la base .
- Page 26 français être TROP SERRÉ . Trop de force peut causer le pied de tourner librement . prise en état de marche . b) Alignez l’étiquette et le trou dans la charpente (située vers le pied de Pg. 13 - Grouper la Télécommande: La télécommande originale est déjà la base) et utilisez le boulon court et un écrou pour attacher l’équerre .
- Page 27 . manuel ou à l'arrière à distance et appeler Ergomotion Service à la clientèle: 1-888-550-3746 Etats-Unis Pg. 15 - Joindre deux Lits: Si vous voulez utilisez les deux bases simultanément, utilisez le fil connecteur SmartSyncTM pour attacher les systèmes électroniques des deux bases ensemble .
- Page 28 Nationwide Customer Service ©2016 Ergomotion Inc V002_12/2018 Phone 1.888.550.3746 1.805.979.9399 Email info@ergomotion.com www.ergomotion.com Serial Number:...