Publicité
Les langues disponibles
Les langues disponibles
Liens rapides
Fitting
Instruction
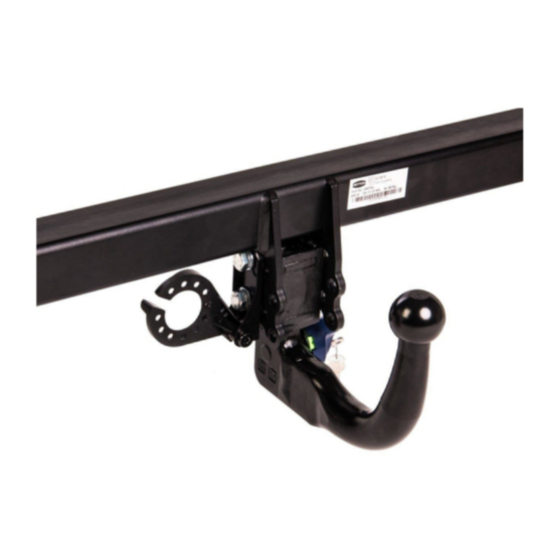
MATERIALS
A
1
Cross Bar
B
1
Electrical Plate ZEP 1
C
1
Electrical Plate Bracket ZEQ1
D
1
Left hand side arm
E
1
Right hand side arm
F
4
M8 x 45 x 1.25 Bolt, Nyloc Nuts and 8 off Washer (25 mm O.D.)
G
4
M8 x 25 x 1.25 Bolt, Lock Washer and Washers (25 mm O.D.)
H
1
M10 x 50 x 1.5 Bolt, Lock Washer and Washers (25 mm O.D.)
J
1
M10 x 30 x 1.5 Bolt, Lock Washer and Washers (25 mm O.D.)
K
1
M10 x 25 x 1.5 Bolt, Nut, Lock Washer and Washer (20 mm O.D.)
For use with either
PG49 Flange neck option – ZF3006. Note: This towbar must be used with either a Witter Towball (part number
Z11) or Class A50-1 or A50-X tow ball dimensionally Conforming to A50-1 with a 'D' and 'S' value greater than or equal
to that of the towbar.
PG49Q Detachable neck option – ZQ3003. Please refer to ZQ fitting instructions for installation
FITTING
1.
Check to ensure that you have all the necessary parts.
2.
Disconnect and remove the rear light clusters: access to fixings is achieved by removing the inner boot
lining.
3.
Dismount the rear bumper and disconnect the number plate lights: Remove x2 screws in light cluster area, x2
torx screws under each wheel arch, x5 torx screws on the bottom edge of the bumper, x1 nut on lower
central bumper support and finally x2 screws on each of the left and right hand upper edge of the
bumper. Note, access to these x4 screws can be found through the previously removed inner boot lining
covers. If necessary, remove number plate.
4.
Dismount the rear crash beam: Remove the x8 screws and hand redundant crash beam to customer.
5.
Fully clear any mastic compound on the forward face of the rear panel. Finger tighten cross bar (A) to back panel
using upper fixings (G).
6.
Connect side arms (D&E) to cross bar (A) by fully threading bolts (F) rearward through the existing lower set of
M8 holes .
7.
Locate side arms (D & E) to the existing holes in the chassis rail and finger tighten bolts (H) and (J) into the
existing captive nuts. Note: existing holes are covered in tape and Bolt (H) is longer for the bush on the
exhaust side.
8.
Fully tighten every fixing to recommended torque settings. If there are any exposed holes from rear panel
then seal with suitable sealant.
9.
Unclip and remove the redundant plastic wiring guide (bottom off-side edge of the bumper), and reassemble
the rear bumper and light clusters in the reverse order to above.
10. Attach detachable neck (ZQ) as per additional fitting instructions, and Electrical Plate Bracket (ZEQ1). Attach
Electrical plate (ZEP1) to Bracket using fixing (K). Fully tighten all remaining fixings to the recommended
torque setting.
Note: This towbar must be used with either a Witter Towball (part number Z11) or Class A50-1 or A50-X towball
dimensionally
Conforming to A50-1 with a 'D' and 'S' value greater than or equal to that of the towbar. Also for use with Witter
Quantum Detachable Towball Unit (part number ZQ3003). Please refer to the vehicle specification for the trailer
weight and nose limits, which must be observed.
Recommended torque settings: M8 - 27Nm, M10 - 53 Nm, M16 - 214 Nm
W0001PG49Q-FIT$010811200000{Ä
W0001PG49Q-FIT$010811200000
TOWBAR
For PEUGEOT 407 SALOON
Inc 2.2 HDI
PG49AU
Publicité

Manuels Connexes pour Witter PG49AU


Sommaire des Matières pour Witter PG49AU
- Page 1 Conforming to A50-1 with a ‘D’ and 'S' value greater than or equal to that of the towbar. Also for use with Witter Quantum Detachable Towball Unit (part number ZQ3003). Please refer to the vehicle specification for the trailer weight and nose limits, which must be observed.
- Page 3 Pour une utilisation avec soit: Coude fixe optionnel PG49AU – ZF3006. Remarque: Cet attelage doit être utilisé avec soit une rotule Witter (Référence Z11) ou une rotule de classe A50-1 ou A50-X dimensionnée conformément à la classe A50-1 avec une valeur ‘D’ et 'S' supérieure ou égale à celle de l’attelage.