Table des Matières
Publicité
Les langues disponibles
Les langues disponibles
Liens rapides
Karbu Link I
EN
Karbu Link I
FR
www.bodet-time.com
Upon reception, check the product was not damaged during shipping, and report any such damage to the carrier.
S'assurer à réception que le produit n'a pas été endommagé durant le transport pour réserve au transporteur.
Karbu Link
Installation and operation manual
Notice d'installation et de mise en service
BODET SA
BP30001
49340 TREMENTINES I France
Tel. support France: 02.41.71.72.99
Tel. support export: +33.241.71.72.00
Fax France: 02.41.71.72.01
Fax Export : +33.241.71.72.02
1
Publicité
Table des Matières

Manuels Connexes pour Bodet Karbu Link I


Sommaire des Matières pour Bodet Karbu Link I
- Page 1 Karbu Link Karbu Link I Installation and operation manual Karbu Link I Notice d’installation et de mise en service BODET SA BP30001 49340 TREMENTINES I France Tel. support France: 02.41.71.72.99 Tel. support export: +33.241.71.72.00 Fax France: 02.41.71.72.01 www.bodet-time.com Fax Export : +33.241.71.72.02 Upon reception, check the product was not damaged during shipping, and report any such damage to the carrier.
-
Page 2: Table Des Matières
Table of contents - General presentation - Installation 2.1 Karbu Link 2.2 Safety instructions 2.3 CPU control board 2.4 Extension card 2.5 Power supply - Using the Karbu Link remote control 3.1 Button functions 3.2 Pairing the remote control 3.3 User menu 3.4 Technician menu - Technical characteristics - FAQ... - Page 3 Sommaire - Présentation générale - Installation 2.1 Karbu Link 2.2 Consignes de sécurité 2.3 Carte de commande UC 2.4 Carte extension 2.5 Alimentation - Utilisation du pupitre Karbu Link 3.1 Description des touches 3.2 Appairage du pupitre 3.3 Menu utilisateur 3.4 Menu technicien - Caractéristiques techniques - Que faire si...? ...Vérifier.
-
Page 4: I - General Presentation
- General presentation The Karbu Link kit makes it possible to manage the display of fuel prices on petrol price signs equipped with LED lines (refer to corresponding technical sheet for more information on LED lines). The Karbu Link can manage 1 to 10 LED lines*; >Single-sided: maximum display of 10 prices. -
Page 5: Installation
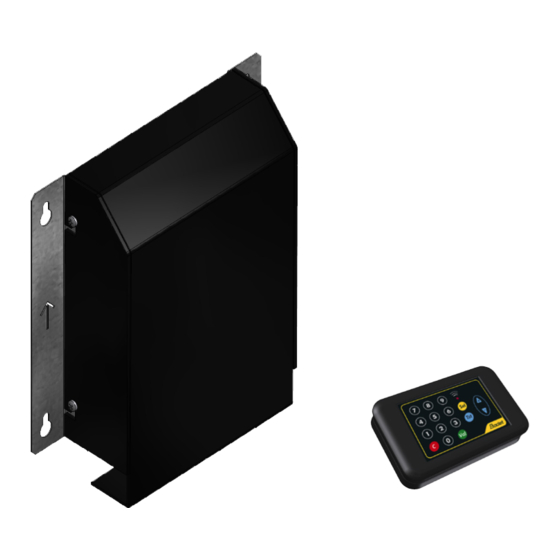
- Installation 2.1 Karbu Link The Karbu Link receives data from the control panel and transmits it to the price lines on the petrol station totem. Dimensions in mm: R3.1 2.2 Safety instructions Installation and maintenance must be carried out by a qualified person. The product is connected to the 230V AC mains power supply. - Page 6 We recommend the following installation precautions: • The hole for the cables must be pointing downwards (to avoid moisture entering the enclosure). • The cables must be long enough and connected to the electronics board, as in the diagram opposite, with the water droplet principle (cable passes under the Karbu Link box).
-
Page 7: Cpu Control Board
2.3 CPU control board LED RS422/485 protocol: Red when sending signal. Green when receiving signal. LED RS232 protocol: Red when sending signal. Green when receiving signal. LED 4-20mA* current loop protocol: Red when sending signal. Green when receiving signal. LED network light: Green flashing rapidly = connection to network in progress. -
Page 8: Extension Card
2.4 Extension card Connection of CPU board power supply. Connection of LED lines power supply. Communication to LED lines. Connection with CPU control board. 2.5 Power supply To check that you have the right number of power supply modules for your LED lines, see the table below: Number of LED lines Colours Sizes (cm) -
Page 9: Using The Karbu Link Remote Control
– Using the Karbu Link remote control 3.1 Button functions C (Cancel/Annuler) button to black out a line. Val (Validate/Valider) button to validate the input. Numeric keypad to input prices. LED for transmitting the HF radio signal. Sel (Selection/ Sélection) button to select a line. Tst (Test) button to test all the LED lines. - Page 10 Blacking out a price line After selecting a line, black it out by pressing The line displays: - - - (flashing). Validate black-out by pressing . The petrol price sign returns to static display with the previously blacked-out line switched off. Blacking out a digit After selecting a line, input the price using the numeric keypad.
-
Page 11: Technician Menu
3.4 Technician menu 1. 1 29 1. 2 29 Enter the technician menu: Input 4 9 3 4 + Starting display. 1. 6 41 “4 9 3 4” + Enter the brightness menu Enter the price Position menu Enter the protocol Test menu Software version... - Page 12 Brightness menu Choice of automatic brightness level in sunny day mode. Choose from 3 levels with _ : low : medium : high Choice of automatic brightness level in cloudy day mode. Choice of automatic brightness level in night mode. Choice of manual brightness level (from 1 to 9 with no loop).
- Page 13 Price Position menu: choice of the position of prices on the petrol price sign. manual price inputting mode. P. . if communication with the register is operational, then Pxx will be replaced by the price defined at the register.
- Page 14 Protocol Test menu Safety: unplug the register before plugging in the dongle for the protocol test. Communication not OK. Check dongle is present. Communication OK.
-
Page 15: Technical Characteristics
– Technical characteristics Karbu Link Karbu Link remote control Aluminium (floor) casing and black/transparent polycarbonate Construction PMMA (protective glass). Operating T° -20°C to +70°C Weight (kg) 0.600 0.145 Power supply 100-240V AC 2 1.5V LR5 batteries Consumption 0.35A to 230V AC LED lines - dimensions Sxx-2 Sxx-1... -
Page 16: Faq
LED lines - consumption No. of digits x Sizes 3 x 25 + 3 x 30 + 3 x 20 3 x 25 3 x 30 4 x 15 4 x 20 4 x 25 4 x 30 4 x 42 (cm) 1 x 20 1 x 20... -
Page 17: I - Présentation Générale
- Présentation générale Le kit de commande Karbu Link permet de piloter l’affichage des prix des carburants sur les totems équipés de lignes LED (se reporter à la fiche technique correspondante pour plus d’informations sur les lignes LED). Le Karbu Link standard permet de piloter 1 à 10 lignes LED*: >... -
Page 18: Installation
- Installation 2.1 Karbu Link Le Karbu Link reçoit les informations venant du pupitre de commande pour les transmettre aux lignes de prix du totem essence. Dimensions en mm: R3.1 2.2 Consignes de sécurité Intervention d’installation et de maintenance par une personne habilité. Le produit est raccordé... - Page 19 Nous recommandons les précautions d’installation suivantes: • Le passage pour les câbles doit être dirigé vers le bas (pour éviter l’infiltration de l’humidité à l’intérieur du coffret). • Les câbles doivent être assez longs et connectés à la carte électronique, selon le schéma ci-contre, avec le principe de la goutte d’eau (le câble passe sous le boîtier Karbu Link).
-
Page 20: Carte De Commande Uc
2.3 Carte de commande UC LED protocole RS422/485: Rouge lors de la transmission du signal. Verte lors de la réception du signal. LED protocole RS232: Rouge lors de la transmission du signal. Verte lors de la réception du signal. LED protocole boucle de courant 4/20mA*: Rouge lors de la transmission du signal. -
Page 21: Carte Extension
2.4 Carte extension Branchement de l’alimentation de la carte UC. Branchement de l’alimentation des lignes LED. Communication vers les lignes LED. Connexion avec la carte de commande UC. 2.5 Alimentation Afin de vérifier que vous disposez du bon nombre d’alimentations en fonction de vos lignes LED, consultez le tableau ci-dessous: Nombre de lignes LED Couleurs... -
Page 22: Utilisation Du Pupitre Karbu Link
- Utilisation du pupitre Karbu Link 3.1 Description des touches Touche C (Canceled / Annuler) pour la mise au noir d’une ligne. Touche Val (Validate / Valider) pour la validation de la saisie. Clavier numérique pour la saisie des prix. Led d’émission du signal radio HF. - Page 23 Mise au noir d’une ligne de prix Après la sélection d’une ligne, la mise au noir de la ligne s’effectue en appuyant sur La ligne affiche : - - - (en clignotant). Valider la mise au noir en appuyant sur .
-
Page 24: Menu Technicien
3.4 Menu technicien 1. 1 29 1. 2 29 Rentrer dans le menu technicien: Saisir 4 9 3 4 + Affichage de départ. 1. 6 41 «4 9 3 4» + Entrer dans le menu luminosité Entrer dans le menu position des prix Entrer dans le menu test des protocoles Version logicielle... -
Page 25: Menu Luminosité
Menu luminosité Choix du niveau de luminosité automatique en mode jour ensoleillé. Choisir parmis 3 niveaux avec _ : faible : moyen : fort Choix du niveau de luminosité automatique en mode jour nuageux. Choix du niveau de luminosité automatique en mode nuit. Choix du niveau de luminosité... - Page 26 Menu position des prix: choix de la position des prix sur le totem. : mode saisie de prix manuel. P. . : si la communication avec la caisse est opérationnelle, alors Pxx sera remplacé par le prix défini en caisse.
- Page 27 Menu test des protocoles Sécurité: débrancher la caisse afin de brancher le bouchon pour le test du protocole. Communication non OK. Vérifier la présence du bouchon. Communication OK.
-
Page 28: Caractéristiques Techniques
- Caractéristiques techniques Karbu Link KarbuPad Coffret en aluminium (fond) et polycarbonate noir/transparente Construction PMMA (vitre de protection). T° de fonctionnement -20°C à +70°C. Poids (kg) 0,600 0,145 Alimentation 100-240V AV 2 piles LR5 1,5V Consommation 0,35A à 230V AC Lignes LED - dimensions Sxx-1 Sxx-2... -
Page 29: Que Faire Si
Lignes LED - consommations Nb chiffres x Tailles 3 x 25 + 3 x 30 + 3 x 20 3 x 25 3 x 30 4 x 15 4 x 20 4 x 25 4 x 30 4 x 42 (cm) 1 x 20 1 x 20... - Page 30 The document is concerning the following products: 940 401 Karbu Link © 2016 BODET SA. All rights reserved.