
Manuels Connexes pour Fleurco Amalfi B022


Sommaire des Matières pour Fleurco Amalfi B022
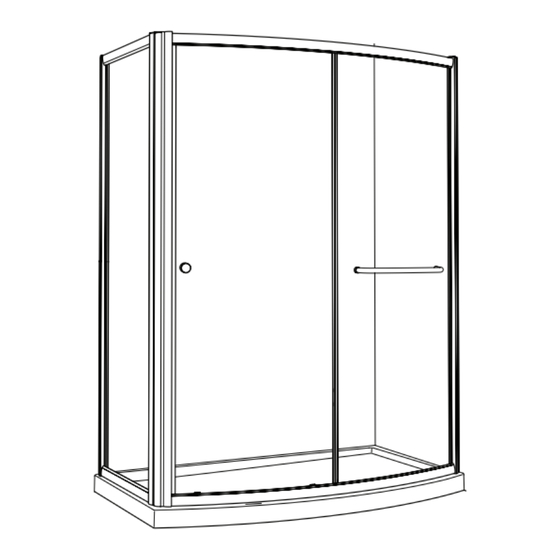
- Page 1 GUIDE D’INSTALLATION - INSTRUCTION MANUAL B022 Douche à facade bombée / Bow Front Shower Enclosure 05.13...
-
Page 2: Instructions Générales
Veuillez conserver ce manuel et le code de produit pour des références futures, et au besoin, la commande les pièces de rechange. Please keep this manual and product code number for future reference and re- placement parts ordering if necessary. INSTRUCTIONS GÉNÉRALES GENERAL INSTRUCTIONS •... - Page 3 GUIDE D’INSTALLATION INSTALLATION MANUAL OUTILS ET MATERIAUX REQUIS TOOLS AND MATERIAL REQUIRED PINCE SERRE ÉTAU TOURNEVIS PERÇEUSE LONG NOSE LOCKING PLIER SCREWDRIVERS DRILL BLOC MÈCHE 1/4˝ & 1/16˝ SCELLANT 1/4˝& 1/16˝ DRILL BITS SILICONE BLOCK CRAYON PINCE COUPANTE RUBAN À MESURER PENCIL CUTTING PLIER TAPE MEASURE...
- Page 4 GUIDE D’INSTALLATION INSTALLATION MANUAL INSTALLATION DES COMPOSANTES | INSTALLATION OF COMPONENTS ÉTAPE / STEP 1 & 2 ÉTAPE / STEP3 • Jambage • L’accessoires • Extenseur • Rail inférieur, • Accessories rail supérieur voir page 9 • Wall Jamb see page 9 • Expander • Top Guide, Bottom Guide voir page 6 - 8 see page 6 - 8 ÉTAPE / STEP 6...
- Page 5 GUIDE D’INSTALLATION INSTALLATION MANUAL LISTE DES PIÈCES / PARTS LISTING ITEM PIÈCES - PARTS JAMBAGE - WALL JAMB EXTENSEUR - EXPANDER PANNEAU FIXE - SIDE PANEL POIGNÉE - KNOB JOINT LATÉRAL / JOINT POUR LE PORTE - SIDE GASKET / DOOR GASKET ASSEMBLÉ...
- Page 6 GUIDE D’INSTALLATION INSTALLATION MANUAL INSTALLATION DES JAMBAGE / WALL JAMB INSTALLATION CETTE PROCÉDURE D’INSTALLATION S’APPLIQUE POUR D’INSTALLATION DE PANNEAUX DE RETOUR AVEC OU SANS ACCESSOIRE ADDITIONNEL TEL QUE LA BARRE À SERVIETTE. THIS INSTALLATION PROCEDURE APPLIES FOR ALL RETURN PANELS INSTALLATION REGARDLESS OF QUANTITY OR ADDITIONAL FIXTURE SUCH AS TOWEL BAR. Marquer le centre du seuil de la base à l’aide d’un ruban à mesurer. Use a measuring tape to mark the center of the threshold. Placer les jambages au mur en centrant l’ouverture sur la ligne marquée précédemment pour que les trous soient vers l’intérieur de la douche. Assurer la verticalité du jambage à l’aide du niveau. Percer...
- Page 7 GUIDE D’INSTALLATION INSTALLATION MANUAL INSTALLATION DU CADRE / FRAME INSTALLATION Assembler le cadre de la porte avec les rails su- périeur, inférieur et les extenseurs en utilisant les vis 1 1/4’’ (8). Placer l’extenseur magnétique (11) du côté où la porte ferme. Assemble the door frame with the magnetic expander, top rail, bottom rail and the expanders by using screws 1 1/4’’ (8). Place the magnetic expander (11) on the side where the door will be opening. INTÉRIEUR DE DOUCHE Assembler le cadre du panneau de retour avec INTERIOR...
- Page 8 GUIDE D’INSTALLATION INSTALLATION MANUAL INSTALLATION DU CADRE / FRAME INSTALLATION CALFEUTRAGE / SEALING INTÉRIEUR DE LA DOUCHE INTÉRIEUR DE INTERIOR LA DOUCHE SHOWER SIDE INTERIOR SHOWER SIDE RECOUVREZ LES DENTS DE LA PINCE AFIN DE NE PAS GRAFIGNER LES PIÈCES EN ALUMINIUM. COVER THE PLIER’S TEETH BEFOREHAND TO AVOID SCRATCHING THE ALUMINUM PARTS.
- Page 9 GUIDE D’INSTALLATION INSTALLATION MANUAL INSTALLATION DES ACCESSOIRES / ACCESSORIES INSTALLATION Placer les couvercles sur les extenseurs et la column du centre. Place the expander caps on the expanders and the center column. Visser les butées dans les rails supérieur et inférieur. La butée A est placée sur le rail supérieur près de l’extenseur magnétique. La INTÉRIEUR DE LA DOUCHE butée B est placée sur le rail inférieur près de INTERIOR l’extenseur. SHOWER SIDE Screw bumper A to the top rail near the mag- netic expander. Bumper B is located on the bottom rail opposite of the opening of the door. INTÉRIEUR DE INTÉRIEUR DE LA DOUCHE LA DOUCHE INTERIOR INTERIOR SHOWER SIDE SHOWER SIDE INTÉRIEUR DE LA DOUCHE...
- Page 10 GUIDE D’INSTALLATION INSTALLATION MANUAL INSTALLATION DU PANNEAU FIXE / FIXED PANEL INSTALLATION Installer et visser les supports de verre en-haut et en bas du panneau fixe en poussant le pan- neau de verre au fond de l’extenseur. Placer le RAIL SUPÉRIEUR côté texturé à l’extérieur de la douche. TOPT RACK Install the glass support on top and bottom of INTÉRIEUR DE the fix panel. Place the fix panel on the guide LA DOUCHE and screw the supports onto the top and bot- INTERIOR SHOWER SIDE tom rail. The textured side of the glass must be placed towards the outside the shower. Installer à l’aide d’un maillet le joint latéral côté jambage et le joint latéral sur le panneau fixe. SUPPORTD EV ERRE Use a mallet to install the gasket wall jamb GLASS SUPPORT side between the expander and the glass VERRE GLASS...
- Page 11 GUIDE D’INSTALLATION INSTALLATION MANUAL INSTALLATION DU PANNEAU DE PORTE / DOOR PANEL INSTALLATION 5a. Installer à l’aide d’un maillet le joint magné- tique latéral et le joint latéral sur le panneau de porte. Placer le côté texturé à l’extérieur de la douche. INTÉRIEUR DE INTÉRIEUR DE LA DOUCHE LA DOUCHE Panneau de porte/ INTERIOR IN T ER IOR Use a mallet to install the magnet gasket Door panel SHOWER SIDE SH OW ER SID E and the side gasket on the door panel. En- sure the textured side of the glass panel is located towards the outside the shower.
- Page 12 GUIDE D’INSTALLATION INSTALLATION MANUAL INSTALLATION DU PANNEAU DE PORTE / DOOR PANEL INSTALLATION CALFEUTRAGE / SEALING Placer les roulettes du panneau de porte sur le rail supérieur et enfoncer les guides du bas pour les engager dans le rail inférieur. Place the rollers of the door panel on the top rail and push on the bottom sliders to INTÉRIEUR DE engage them in to the bottom rail. LA DOUCHE INTERIOR SHOWER SIDE Dévisser légèrement les vis des roulettes du panneau de porte et revisser en assurant la verticalité du panneau de verre à l’aide d’un niveau. Slightly unscrew the screws of the rollers of the door panel and screw it back by ensuring verticality with the level. ENFONCER PUSH DOWN INTÉRIEUR DE LA DOUCHE INTERIOR...
- Page 13 GUIDE D’INSTALLATION INSTALLATION MANUAL INSTALLATION DES ACCESSOIRES / ACCESSORIES INSTALLATION Installer la poignée sur la porte. Install the knob to the door assembly. Installer la barre à serviette si applicable. Install the towel bar if applicable. INTÉRIEUR DE LA DOUCHE INTERIOR SHOWER SIDE...
- Page 14 GUIDE D’INSTALLATION INSTALLATION MANUAL CALFEUTRAGE / SEALING Calfeutrer l’extérieur du cadre entre le mur et le jambage, le long des rails inférieurs, en bas du panneau fixe et en bas du panneau de retour si applicable. Silicone the outside of the frame between the wall and the wall jamb, along the bottom rail, bellow of the fix panel and at the bottom of the return panel if applicable. Attendre 24 heures avant de faire fonctionner la douche pour laisser le silicone séché. Wait 24 hours before using the shower to dry the silicon. HEURES HOURS...