Publicité
Liens rapides
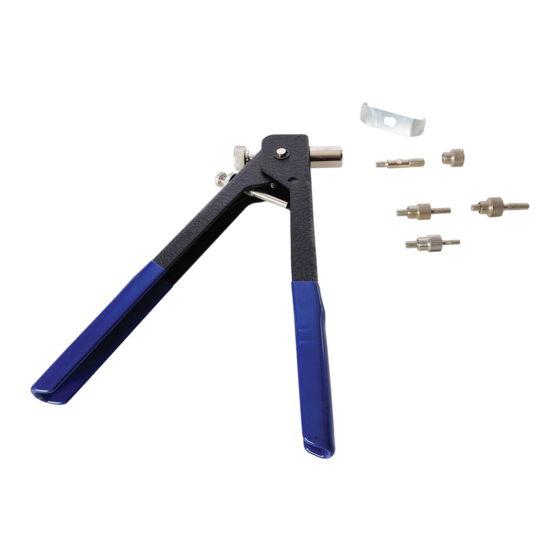
Threaded Rivet Insert Tool
Pince à rivets filetés
A
Product
Specification
Familiarisation
Mandrel sizes: ........................................
........4, 5, 6, & 8mm (M4, M5, M6, & M8)
1. Handle
Rivnuts: ........................ Aluminium only
2. Spacer Knob
3. Rear Knob
Primary material: ............................Steel
4. Threaded Holder
Weight: ........................................0.80kg
5. Mandrel Tool
6. Mandrel
7. Mandrel Sleeve
8. Additional Mandrels
and Sleeves
9. Micro Adjuster
General Safety
Tool for installing threaded rivnuts, also known as rivet nuts, blind nuts or nutserts.
To be used with aluminium rivnuts only. Mandrel sizes for 4, 5, 6, and 8mm rivnuts.
Includes a mandrel tool.
Caractéristiques
Descriptif
produit
techniques
Taille des porte-outils : ............................
1. Poignée
.....4, 5, 6, et 8 mm (M4, M5, M6, et M8)
2. Molette de réglage de
l'écarteur
Rivets : ........ En aluminium uniquement
3. Bouton arrière
Matériau principal : ........................Acier
4. Système de retenue
Poids : ........................................0,80 kg
fileté
5. Instrument pour le
porte-outil
6. Porte-outil
7. Douille du porte-outil
8. Porte-outils et douilles
supplémentaires
9. Molette de
micro-réglage
Usage conforme
Pince spécialement conçue pour la pose de rivets filetés, également connus sous
le nom d'écrous prisonniers ou écrous cage. Cette pince doit être utilisée avec des
rivets filetés en aluminium uniquement. Porte-outil pour rivets de 4, 5, 6 et 8 mm.
Comprend un instrument pour le porte-outil.
Gewindenietzange
Remachadora para remaches roscados
Rivettatrice a inserto filettato
Popnageltang met verwisselbare kop
B
Operation
WARNING: This tool is to be used with threaded ALUMINIUM rivnuts only. DO NOT
use steel or stainless steel rivnuts. Using rivnuts other than aluminium may damage
the tool.
Note: The Mandrels and Sleeves are left-hand thread.
1. Select correct size Mandrel (6 and 8) and Sleeve (7 and 8)
2. Screw the selected Mandrel into the Threaded Holder (4) and tighten with the
Mandrel Tool (5), which has a hole in the middle to insert the Mandrel into and a
spanner notch for the flattened edges on the Mandrel (see A)
3. Screw on the matching Mandrel Sleeve (7) until finger tight
4. With the Handle (1) open, screw a threaded rivnut onto the Mandrel until the flat
end of the rivnut is against the Sleeve (see B)
5. Drill a hole in the material slightly larger than the threaded rivnut's diameter
(see C)
6. Insert the Mandrel with the attached threaded rivnut into the hole
7. Gently squeeze the Handles together until the threaded rivnut is compacted and
firm against the material, but do not over tighten. Doing so may strip the thread in
the rivnut
Instructions d'utilisation
AVERTISSEMENT : Cette pince doit être utilisée avec des rivets filetés en
aluminium UNIQUEMENT. NE PAS utiliser des rivets en acier ni en acier inoxydable.
Le fait d'utiliser cette pince avec des rivets autres qu'en aluminium pourrait l'abîmer.
Remarque : Les porte-outils et les douilles ont un filetage à gauche.
1. Choisissez la taille du porte-outil (6 et 8) et de la douille (7 et 8).
2. Vissez le porte-outil sur le système de retenue fileté (4) et resserrez bien
l'ensemble à l'aide de l'instrument spécialement prévu pour le porte-outil (5), qui
est pourvu d'un trou au centre servant à y insérer le porte-outil et disposant aussi
d'une encoche spécialement prévue pour les bords aplatis du porte-outil (voir A).
3. Vissez la douille du porte-outil (7) correspondante et serrez bien à la main.
4. Tout en gardant la poignée (1) ouverte, vissez un rivet fileté sur le porte-outil
jusqu'à ce que l'extrémité plate du rivet se retrouve la douille (voir B).
5. Percez un trou dans le matériau légèrement plus grand que le diamètre du rivet
(voir C).
6. Insérez le porte-outil pourvu du rivet fileté dans le trou.
7. Appuyez légèrement sur les poignées jusqu'à ce que le rivet soit complètement
compact et pressé fermement contre le matériau. Toutefois, veillez à ne pas trop
serrer car cela pourrait abîmer le filetage du rivet.
4 - 8 m m
C
3
4
2
1
9
D
Note: If installing multiple threaded rivnuts into the same material, use the Spacer
Knob (2) to set how much the handles will close. Do this by installing one threaded
rivnut in steps 1–7 then with the handles squeezed together at the desired amount
for step 7 turn the Spacer Knob until the end reaches the other handle, and secure
with the locking Micro Adjuster (9). This will prevent over-tightening of threaded
rivnuts and will assist in faster repeated installations in the same material.
8. Once the threaded rivnut is installed, turn the Rear Knob (3) anti-clockwise to
unscrew the Mandrel from the threaded rivnut (see E)
Maintenance
• Keep tool clean
• A small amount of non-corrosive, all-purpose lubricant may be applied to the
moving parts in the hinge
• Keep the threaded Mandrels free from aluminium shavings and swarf, which may
obstruct the application of rivnuts to the Mandrel
Remarque : Si vous devez poser plusieurs rivets sur un même matériau, servez-
vous de la molette de réglage de l'écarteur (2) pour établir combien les poignées
vont se refermer. Suivez les étapes de 1 à 7 pour placer un rivet puis, alors que vous
avez atteint l'étape 7, tout en gardant les poignées serrées, tournez la molette de
réglage de l'écarteur jusqu'à ce que l'extrémité atteigne l'autre poignée et fixez en
place grâce à la molette de micro-réglage (9). Cela permet d'éviter tout risque de
serrage excessif des rivets filetés et favorisera une pose rapide de plusieurs rivets
dans un même matériau.
8. Une fois que le rivet a été posé, tournez le bouton arrière (3) dans le sens
contraire des aiguilles d'une montre afin de détacher le porte-outil du rivet fileté
en le dévissant (voir E).
Entretien
• Gardez votre pince propre en permanence.
• Vous pouvez appliquer une petite quantité de lubrifiant tout usage non corrosif au
niveau des pièces mobiles de la charnière.
• Veillez à ce que les porte-outils filetés soient exempts de copeaux et dépôts
d'aluminium qui pourraient gêner la fixation des rivets au porte-outil.
www.silverlinetools.com
633942
5
6
7
8
E
Publicité

Manuels Connexes pour Silverline 633942


Sommaire des Matières pour Silverline 633942
- Page 1 633942 4 - 8 m m Gewindenietzange Remachadora para remaches roscados Threaded Rivet Insert Tool Rivettatrice a inserto filettato Pince à rivets filetés Popnageltang met verwisselbare kop Product Specification Operation Note: If installing multiple threaded rivnuts into the same material, use the Spacer Knob (2) to set how much the handles will close.
- Page 2 Übersicht Technische Daten Hinweis: Die Gewindedorne und -hülsen verfügen über Linksgewinde. Hinweis: Wenn ein Materialteil mit mehreren Gewindenieten versehen werden soll, verwenden Sie die Abstandsschraube (2) zur Einstellung der Schenkelhublänge. 1. Nehmen Sie einen Gewindedorn (6 und 8) und eine Gewindehülse (7 und 8) der Gewindedorne: ........