Table des Matières
Publicité
Les langues disponibles
Les langues disponibles
Liens rapides
X-CM35
CD Receiver System | Micro chaîne CD | CD-Receiversystem |
Sistema CD con amplificatore | CD Receiver System |
Sistema receptor de CD | Система ресивера CD
Discover the benefits of registering your product online at
http://www.pioneer.co.uk
Découvrez les nombreux avantages offerts en enregistrant
votre produit en ligne maintenant sur
http://www.pioneer.fr
Bitte nutzen Sie die Möglichkeit zur Registrierung Ihres
Produktes unter
http://www.pioneer.eu)
Registra il tuo prodotto su
http://www.pioneer.eu) e scopri subito quali vantaggi puoi
ottenere!
Ontdek nu de voordelen van online registratie! Registreer uw
Pioneer product via
http://www.pioneer.be
Registre su producto en
http://www.pioneer.eu) Descubra los beneficios de
registrarse on-line:
Зарегистрируйте Baшe изделие на
http://www.pioneer-rus.ru
Oзнакомьтесь с преимуществами регистрации в Интернет
Operating Instructions
Mode d'emploi
Bedienungsanleitung
Istruzioni per l'uso
Handleiding
Manual de instrucciones
Инструкции по эксплуатации
-K/-W/-R/-L/-N/-D/-Y
(or http://www.pioneer.eu).
(ou http://www.pioneer.eu).
http://www.pioneer.de
http://www.pioneer.it
http://www.pioneer.nl -
(of http://www.pioneer.eu)
http://www.pioneer.es
(или http://www.pioneer.eu).
(oder
(o
(o en
Publicité
Chapitres
Table des Matières
Dépannage

Manuels Connexes pour Pioneer X-CM35-K


Sommaire des Matières pour Pioneer X-CM35-K
- Page 1 Bitte nutzen Sie die Möglichkeit zur Registrierung Ihres http://www.pioneer.de Produktes unter (oder http://www.pioneer.eu) http://www.pioneer.it Registra il tuo prodotto su http://www.pioneer.eu) e scopri subito quali vantaggi puoi ottenere! Ontdek nu de voordelen van online registratie! Registreer uw http://www.pioneer.nl - Pioneer product via http://www.pioneer.be (of http://www.pioneer.eu) http://www.pioneer.es...
-
Page 2: Power-Cord Caution
A damaged power cord can cause a fire or give you an electrical shock. Check the power cord once in a while. When you find it damaged, ask your nearest PIONEER authorized service center or your dealer for a replacement. S002*_A1_En... - Page 3 (including products supported by this unit). • Pioneer is not responsible for any malfunction of the compatible Pioneer product due to communication error/malfunctions associated with your network connection and/or your connected equipment.
-
Page 4: Table Des Matières
Thank you for buying this Pioneer product. Please read through these operating instructions so that you will know how to operate your model properly. After you have finished reading the instructions, put them in a safe place for future reference. -
Page 5: Before You Start
Before you start Chapter 1: Before you start • Do not heat batteries, disassemble them, or throw them into flames or water. What’s in the box • Batteries may have different voltages, even if they are the Please confirm that the following accessories are in the box same size and shape. -
Page 6: Part Names And Functions
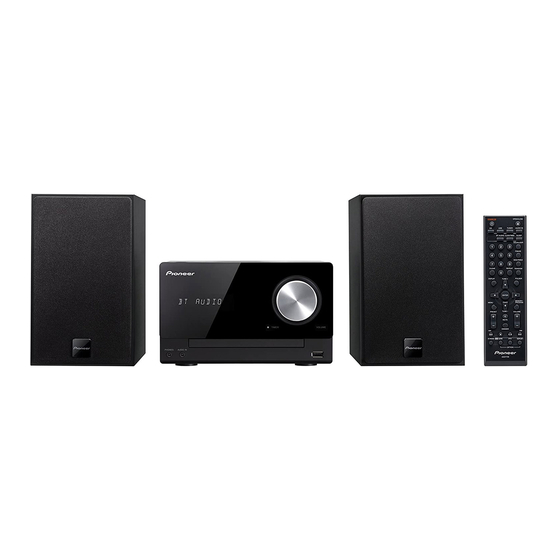
Part names and functions Chapter 2: Part names and functions STANDBY/ON Remote control Switches the receiver between standby and on (page 18). Input function buttons Use to select the input source to this receiver (page 18). STANDBY/ON OPEN/CLOSE BT AUDIO ... -
Page 7: Speaker System
Part names and functions 11 Tuner control buttons Speaker system ST/MONO Use to switch the sound mode between stereo and monaural. (page 24) RDS ASPM Use to search for RDS Auto station program memory (page 25). RDS PTY Use to search for RDS program types (page 25). RDS DISPLAY Press to change the RDS display for information mode (page 25). -
Page 8: Attaching The Non-Skid Pads
Part names and functions Attaching the Non-skid pads Apply the accessory non-skid pads to the bottom surfaces of the speakers. Important • Use the speaker is usually in an upright position. When placing speakers upright When placing the speakers vertically upright, attach the non- skid pads to the bottom surface of the speakers. -
Page 9: Front Panel
Part names and functions Front panel TIMER VOLUME PHONES AUDIO IN Main display Remote sensor Receives the signals from the remote control. Volume control Use to set the listening volume (page 13). Disc tray Place the disc, label side up (page 18). Volume illumination Light when the power on. -
Page 10: Top Panel
Part names and functions Top panel STANDBY/ON INPUT STANDBY/ON INPUT Switches the receiver between standby and on (page 18). Selects the input source. Long press to change to BT STANDBY mode. NFC area Touching the NFC-equipped smartphone to this area, this Disc tray open/close button unit can establish Bluetooth connection simply (See Pairing... -
Page 11: Connections
Connections Chapter 3: Connections • Do not connect the supplied speakers to any amplifier CAUTION other than the one supplied with this system. • Be sure to turn off the power and unplug the power cord Connection to any other amplifier may result in from the power outlet whenever making or changing malfunction or fire. -
Page 12: Connecting Antennas
Connections Using external antennas Connecting antennas To improve FM reception • Connect the AM loop antenna and the FM wire antenna Use a PAL connector (not supplied) to connect an external FM as shown below. antenna. • To improve reception and sound quality, connect external antennas (see Using external antennas). -
Page 13: Getting Started
Getting started Chapter 4: Getting started To turn the power on General control Press the STANDBY/ON to turn the power on. Input function After use: When the INPUT on main unit is pressed, the current function Press the STANDBY/ON to enter the power stand-by mode. will change to different mode. -
Page 14: Sound Controls
Getting started Sound controls Setting the wake-up timer Used to change the existing timer setting, or to set a new Equalizer timer. When the EQUALIZER is pressed, the current mode setting Press STANDBY/ON to turn the power on. will be displayed. To change to a different mode, press the EQUALIZER repeatedly until the desired sound mode Press and hold CLOCK/TIMER on the remote appears. -
Page 15: Calling The Wake-Up Timer
Getting started Calling the wake-up timer Using Headphones It can be used to re-use an existing timer setting. Connect to the jack plug of the headphones. As well as steps 1 through 3 in “Setting the When the headphones are connected, there is no sound wake-up timer”. -
Page 16: Ipod/Iphone/Ipad Playback
iPad Air begin playing automatically. Note • Pioneer does not guarantee that this unit plays iPod/ iPhone/iPad models other than the ones specified. • Some functions may be restricted depending on the model or software version. • iPod/iPhone/iPad is licensed for reproduction of non- copyrighted materials or materials the user is legally permitted to reproduce. -
Page 17: Playing Ipad
iPod/iPhone/iPad playback Playing iPad Connect your iPad. If an iPad is connected when this unit is on, playback of the iPad will not begin. Press USB as the input source. “USB/IPOD” is shown on the main display. When the recognition is completed, will begin playing automatically. -
Page 18: Disc Playback
Disc playback Chapter 6: Disc playback This system can play back a standard CD, CD-R/RW in the CD CAUTION format and CD-R/RW with MP3 or WMA files, but cannot • Do not place two discs in one disc tray. record on them. Some audio CD-R and CD-RW discs may not •... -
Page 19: Advanced Cd Or Mp3/Wma Disc Playback
Disc playback Repeat play Advanced CD or MP3/WMA disc Repeat play can play one track, all tracks or a programmed sequence continuously. playback To repeat one track: Press REPEAT repeatedly until “RPT ONE” appears. Press DISPLAY FOLDER TUNE+ STANDBY/ON OPEN/CLOSE ENTER. -
Page 20: Programmed Play (Cd Or Mp3/Wma)
Disc playback Programmed play (CD or MP3/WMA) About downloading MP3/WMA You can choose up to 32 selections for playback in the order There are many music sites on the internet that you can you like. download MP3/WMA music files. Follow the instructions from the website on how to download the music files. -
Page 21: Specify The Folder To Play
Disc playback Specify the folder to play Switch the display contents Specify the folder to play, do the follwing steps. Press DISPLAY. If the title, artist and album name has been written to the file, DISPLAY FOLDER TUNE+ STANDBY/ON OPEN/CLOSE that information will be displayed. -
Page 22: Usb Playback
To repeat one track: interface on the front of this receiver. • Pioneer does not guarantee that any file recorded on a Press REPEAT repeatedly until “RPT ONE” appears. Press USB storage device will play or that power will be ENTER. -
Page 23: Specify The Folder To Play
USB playback Specify the folder to play Playing in the desired order Specify the folder to play, do the follwing steps. (Programmed Play) Press USB, and connect the USB storage device. • This unit can play repeatedly folders stored in the USB storage device. -
Page 24: Using The Tuner
Using the tuner Chapter 8: Using the tuner To receive an FM stereo transmission: Listening to the radio broadcasts Press ST/MONO to select stereo mode and “AUTO” will be displayed. The following steps show you how to tune in to FM and AM Improving poor FM reception: radio broadcasts using the automatic (search) and manual (step) tuning functions. -
Page 25: To Recall A Memorised Station
Using the tuner To recall a memorised station You can search the following program types: NEWS – News SOCIAL – Social affairs Press PRESET +/– to select the desired AFFAIRS – Current Affairs RELIGION – Programs concerning religion INFO – General Information station. -
Page 26: Information Provided By Rds
Using the tuner • If no station can be found, “NO FOUND” will appear for Note 4 seconds. • If the same station is broadcasting on different frequencies, the strongest frequency will be stored in Information provided by RDS memory. Each time the RDS DISPLAY is pressed, the display will switch •... -
Page 27: Other Connections
Other connections Chapter 9: Other connections Connect the rear panel LINE IN audio jacks to your auxiliary CAUTION playback component. • Before making or changing the connections, switch off the power and disconnect the power cord from the AC outlet. This unit’s rear panel Connecting auxiliary components Connect the front panel... -
Page 28: Bluetooth® Audio Playback
Bluetooth® Audio playback Chapter 10: ® Bluetooth Audio playback Music playback using Bluetooth wireless Remote control operation technology The remote control supplied with this unit allows you to play and stop media, and perform other operations. Note Bluetooth wireless technology enabled device: •... -
Page 29: Listen To Music On The Unit From A Bluetooth Capable
Bluetooth® Audio playback Note BT STANDBY • This unit will be displayed as “X-CM35” on all Bluetooth • The following can be done when the unit is on standby capable devices that you have. with the BT STANDBY switched ON. Pairing will start. -
Page 30: Pairing And Connection Using Nfc
Bluetooth® Audio playback • NFC can also be used to quickly cancel a Bluetooth connection. If you perform Step 1 using a NFC- Pairing and connection using NFC equipped smartphone that is already connected via NFC stands for Near Field Communication. If a NFC- Bluetooth , the connected will be cancelled. -
Page 31: Scope Of Operation
Bluetooth® Audio playback Scope of operation Use of this unit is limited to home use. (Transmission distances may be reduced depending on communication environment). In the following locations, poor condition or inability to receive radio waves may cause the audio to be interrupted or stopped: •... -
Page 32: Additional Information
If the trouble cannot be rectified even after exercising the checks listed below, ask your nearest Pioneer authorized service center or your dealer to carry out repair work. • If the unit does not operate normally due to external effects such as static electricity disconnect the power plug from the outlet and insert again to return to normal operating conditions. - Page 33 Additional information When a USB storage device is connected Problem Check Remedy USB storage device is not Is the USB storage device properly Connect the device securely (all the way in). recognized. connected? Is the USB storage device connected This unit does not support USB hubs. Connect the USB storage via a USB hub? device directly.
-
Page 34: Playable Discs And Formats
Additional information When the Bluetooth wireless technology device is connected or operated Problem Remedy The Bluetooth wireless technology device cannot be connected or Check that no object that emits electromagnetic waves in the 2.4 operated. GHz band (microwave oven, wireless LAN device or Bluetooth Sound from the Bluetooth wireless technology device is not emitted wireless technology apparatus) is near the unit. -
Page 35: Regarding Copy Protected Cds
Avoid the following locations: for some reason it should malfunction due to dust or dirt, • Places exposed to direct sunlight consult your nearest Pioneer authorized service center. • Humid or poorly ventilated places Although lens cleaners for players are commercially •... -
Page 36: Handling Discs
Additional information Handling discs About iPod/iPhone/iPad Storing • Always place discs in their cases and store them vertically, avoiding hot, humid places, places exposed to direct sunlight and extremely cold places. “Made for iPod” and “Made for iPhone” and “Made for iPad” •... -
Page 37: Specifications
... . FH-SS (Frequency Hopping Spread Spectrum) “Pioneer” is a trademark of Pioneer Corporation, and is Supported Bluetooth profiles....A2DP, AVRCP used under license. -
Page 38: Milieu De Fonctionnement
électrique. Vérifier le câble d’alimentation de temps en temps. Contacter le service après-vente Milieu de fonctionnement PIONEER le plus proche ou le revendeur pour un Température et humidité du milieu de fonctionnement : remplacement. De +5 °C à +35 °C (de +41 °F à +95 °F) ; Humidité... - Page 39 Dans ce cas, augmentez la distance entre la prise d’entrée d’antenne et cet appareil (y compris les produits pris en charge par cet appareil). • Pioneer n’est pas responsable d’un mauvais fonctionnement du produit Pioneer compatible due à une erreur/défaillance de la connexion réseau et/ou de l’appareil raccordé.
- Page 40 Nous vous remercions d’avoir acheté ce produit Pioneer. Veuillez lire attentivement ce mode d'emploi de manière à pouvoir utiliser votre modèle correctement. Lorsque vous avez terminé, rangez ces instructions en lieu sûr afin de pouvoir vous y référer à l’avenir.
-
Page 41: Préparatifs
Préparatifs Chapitre 1 : Préparatifs • Ne chauffez pas les piles, ne les ouvrez pas et ne les jetez pas au feu ou dans l’eau. Contenu de l’emballage • Les piles peuvent avoir des tensions différentes, même Veuillez vérifier que les accessoires suivants sont présents si elles ont une taille et une forme identiques. -
Page 42: Les Organes Et Leurs Fonctions
Les organes et leurs fonctions Chapitre 2 : Les organes et leurs fonctions STANDBY/ON Télécommande Cette touche permet d’allumer le récepteur et de le mettre en veille (page 18). Touches de fonction d’entrée STANDBY/ON OPEN/CLOSE Pour sélectionner la source d’entrée de ce récepteur ... -
Page 43: Enceintes Acoustiques
Les organes et leurs fonctions MUTE Enceintes Acoustiques Permet de couper/restaurer le son (page 14). 10 Touches de commande de la fonction de lecture Ces touches permettent de contrôler chacune des fonctions après avoir sélectionné la fonction désirée à l’aide des touches de fonctions d’entrée (page 18). -
Page 44: Fixation Des Coussinets Antidérapants
Les organes et leurs fonctions Fixation des coussinets antidérapants Installez les patins antidérapants sur la surface inférieure des enceintes. Important • Les enceintes sont normalement placées verticalement. En cas d’installation verticale des enceintes Si vous installez les enceintes verticalement, fixez les coussinets antidérapants sur la surface inférieure des enceintes. -
Page 45: Panneau Avant
Les organes et leurs fonctions Panneau avant TIMER VOLUME PHONES AUDIO IN Afficheur principal Capteur de télécommande Reçoit les signaux provenant de la télécommande. Commande de volume Pour ajuster le volume d’écoute (page 13). Tiroir d’insertion du disque Placez le disque côté étiquette vers le haut (page 18). Éclairage du bouton de volume S’allume quand l’appareil est sous tension. -
Page 46: Panneau Supérieur
Les organes et leurs fonctions Panneau supérieur STANDBY/ON INPUT STANDBY/ON INPUT Cette touche permet d’allumer le récepteur et de le mettre en Permet de sélectionner la source d’entrée. veille (page 18). Une pression longue permet de passer en mode BT STANDBY. -
Page 47: Connexions
Connexions Chapitre 3 : Connexions • Ne raccordez à ce système aucun haut-parleur autre ATTENTION que ceux qui sont fournis. • Veillez à mettre l’appareil hors tension et à débrancher le • Ne raccordez pas les haut-parleurs fournis à un cordon d’alimentation de la prise secteur à... -
Page 48: Raccordement Des Antennes
Connexions Utilisation des antennes externes Raccordement des antennes Pour améliorer la réception FM • Raccordez l’antenne cadre AM et l’antenne filaire FM Utilisez un connecteur de type PAL (non fourni) pour comme indiqué ci-dessous. raccorder une antenne FM externe. • Pour améliorer la réception et la qualité du son, raccordez les antennes externes (voir la section Utilisation des antennes externes ci-dessous). -
Page 49: Pour Commencer
Pour commencer Chapitre 4 : Pour commencer Remarque Pour allumer l’appareil • Remettre l’horloge à l’heure lorsque l’alimentation est Appuyez sur la touche STANDBY/ON pour mettre rétablie après que l’appareil ait été rebranché ou après l’appareil sous tension. une panne d’électricité. Après utilisation : Appuyez sur ... -
Page 50: Sourdine
Pour commencer Sourdine Réglage de l’alarme de réveil Pour couper le son temporairement, maintenez enfoncé la touche MUTE de la télécommande. Appuyer de nouveau pour Vous pouvez modifier les réglages de l’alarme de réveille- restaurer le volume. matin en cours ou définir une nouvelle alarme. Appuyez sur ... -
Page 51: Rappel De L'alarme De Réveil
Pour commencer Rappel de l’alarme de réveil Utilisation avec un casque Cette procédure permet de réutiliser les réglages d’une alarme existante. Branchez le casque sur la prise PHONES située sur le panneau avant de l’appareil. Suivez les étapes 1 à 3 de la procédure Lorsque le casque est branché, les enceintes ne fournissent «... -
Page 52: Lecture D'une Source Ipod/Iphone/Ipad
Une fois l’équipement connecté reconnu, la Remarque lecture commence automatiquement. • Pioneer ne garantit pas que cet appareil convienne à des iPod/iPhone/iPad, autres que ceux qui sont spécifiés. • Certaines fonctions peuvent ne pas être accessibles en fonction du modèle et de la version du logiciel. -
Page 53: Lecture Via Un Ipad
Lecture d’une source iPod/iPhone/iPad Lecture via un iPad Connectez votre iPad. Si l’iPad est connecté alors que cet appareil est sous tension, la lecture à partir de l’iPad ne commencera pas. Sélectionnez USB comme source d’entrée. L’indication « USB/IPOD » apparaît sur l’affichage de l’appareil. -
Page 54: Lecture De Disque
Lecture de disque Chapitre 6 : Lecture de disque Ce système peut lire un disque CD standard, un disque CD-R/ RW en format CD et un CD-R/RW avec un fichier MP3 ou WMA, mais ne peut pas enregistrer sur ces types de CD. Certains disques audio CD-R et CD-RW peuvent être illisibles à... -
Page 55: Lecture Avancée De Disques Mp3/Wma Ou Cd
Lecture de disque Lecture répétée Diverses fonctions de disque Avec répétition lecture, l’appareil peut relire continuellement Fonction Appareil Télé- Opération principal commande une piste toutes les pistes ou une séquence programmée. Pour répéter la lecture d’une piste : Presser en mode d’arrêt. Lecture ... -
Page 56: Lecture Des Morceaux Programmés (Cd Ou Mp3/Wma)
Lecture de disque Lecture des morceaux programmés (CD À propos du téléchargement de ou MP3/WMA) fichiers MP3/WMA On peut sélectionner 32 morceaux (maxi) pour la lecture dans Il y a de nombreux sites de musique sur l’Internet d’où on peut un ordre souhaité. -
Page 57: Spécifiez Le Dossier De Lecture Souhaité
Lecture de disque Spécifiez le dossier de lecture souhaité Sélection des informations affichées Spécifiez le dossier de lecture souhaité en suivant les étapes Appuyez sur la touche DISPLAY. ci-après. Si le titre, le nom de l’artiste et le nom de l’album ont été enregistrés dans le fichier, ces informations apparaissent sur DISPLAY TUNE+... -
Page 58: Lecture Usb
USB située à l’avant de ce récepteur. est connecté à la page 33. • Pioneer ne garantit pas que tout fichier enregistré sur un • Si une clé mémoire USB n’est pas en cours de lecture et périphérique de stockage USB puisse être lu par que l’appareil n’est pas utilisé... -
Page 59: Lecture Aléatoire
Lecture USB Lecture aléatoire Lecture dans l’ordre souhaité Un fichier sur un périphérique de stockage USB peut être lu automatiquement en ordre aléatoire. (Lecture programmée) Pour lire tous les morceaux dans un ordre • Les dossiers stockés sur le périphérique de stockage aléatoire : USB peuvent être lus par l’appareil en mode de lecture répétée. -
Page 60: Utilisation Du Tuner
Utilisation du tuner Chapitre 8 : Utilisation du tuner • Lorsqu’une station de radio RDS (Radio Data System) Écoute d’émissions de radio est trouvée, sa fréquence s’affiche en premier. Le nom de la station apparaît ensuite. Les étapes suivantes décrivent la façon de régler les bandes •... -
Page 61: Rappel D'une Station Mémorisée
Utilisation du tuner L’une des fonctions du système RDS permet d’effectuer une Appuyez sur la touche MEMORY/ recherche par type de programme. Par exemple, vous pouvez PROGRAM pour enregistrer la station dans la rechercher une station qui diffuse une émission ayant pour mémoire. -
Page 62: Informations Données Par Rds
Utilisation du tuner Appuyez sur la touche TUNER de la Remarque télécommande. • Si l’affichage arrête de clignoter, renouveler l’opération depuis l’étape 2. Si l’appareil trouve une émission Appuyez sans relâcher sur la touche RDS correspondant au type de programme sélectionné, le ASPM de la télécommande. -
Page 63: Autres Raccordements
Autres raccordements Chapitre 9 : Autres raccordements Connectez l’équipement de lecture auxiliaire aux prises LINE ATTENTION IN situées sur le panneau arrière de l’appareil. • Avant d’effectuer ou de modifier les raccordements, mettez l’appareil hors tension et débranchez le cordon Panneau arrière de cet appareil d’alimentation au niveau de la prise secteur. -
Page 64: Lecture Audio Bluetooth
Lecture audio Bluetooth® Chapitre 10 : ® Lecture audio Bluetooth • Onkyo ne garantit pas que cet appareil se connecte et Lecture de musique par la technologie fonctionne correctement avec tous les périphériques dotés de la technologie sans fil Bluetooth. sans fil Bluetooth Fonctionnement par télécommande Périphérique optimisé... -
Page 65: Écouter De La Musique Sur L'appareil À Partir D'un Périphérique Sans Fil Bluetooth
Lecture audio Bluetooth® Mettez le périphérique sans fil Bluetooth BT STANDBY que vous souhaitez associer sous tension et effectuez la procédure d’association sur le • Les opérations suivantes peuvent être effectuées lorsque l’appareil est en veille avec la fonction BT périphérique. -
Page 66: Association Et Connexion Via La Technologie Nfc
Lecture audio Bluetooth® • Si une connexion n’est pas établie, déplacez le Association et connexion via la smartphone équipé de la technologie NFC pour le maintenir au-dessus de cet appareil. technologie NFC Une fois la connexion avec le smartphone NFC est l’acronyme de l’anglais « Near Field équipé... -
Page 67: Limite De Fonctionnement
Lecture audio Bluetooth® Précautions relatives aux connexions à d’antenne de votre téléviseur, ou avec votre équipement vidéo, radio satellite, etc. Dans ce cas, éloignez le des produits pris en compte par cet connecteur d’entrée d’antenne par rapport au appareil périphérique sans fil Bluetooth ou à cet appareil (y compris des éléments pris en charge par cet appareil). -
Page 68: Informations Supplémentaires
Examinez les autres composants et les appareils électriques utilisés. Si le problème ne peut pas être résolu en dépit des vérifications ci-dessous, consultez le service après-vente Pioneer le plus proche pour faire réparer l’appareil. • Si l’appareil ne fonctionne pas normalement en raison d’effets extérieurs comme l’électricité statique, débranchez la fiche d’alimentation de la prise de courant et rebranchez-la pour revenir aux conditions normales de fonctionnement. -
Page 69: Lorsqu'un Périphérique De Stockage Usb Est Connecté
Informations supplémentaires Lorsqu’un périphérique de stockage USB est connecté Problème éventuel Vérification Solution Le périphérique de stockage Le périphérique de stockage USB Connectez le périphérique correctement (en l’engageant à fond). USB n’est pas reconnu. est-il connecté correctement ? Le périphérique de stockage USB L’appareil ne prend pas en charge les concentrateurs USB. -
Page 70: Lorsqu'un Périphérique Sans Fil Bluetooth Est Connecté Ou Utilisé
Informations supplémentaires Lorsqu’un périphérique sans fil Bluetooth est connecté ou utilisé : Problème éventuel Solution Le périphérique à technologie sans fil Bluetooth ne peut pas être Vérifiez qu’aucun objet émettant des ondes électromagnétiques raccordé ou utilisé. dans la bande 2,4 GHz (four à micro-ondes, périphérique LAN sans Le son en provenance du périphérique à... -
Page 71: Types De Disque Et Formats De Fichier Lisibles
Informations supplémentaires Types de disque et formats de fichier lisibles • CD Audio en vente dans le commerce CD audio • Disques CD-R/-RW/-ROM contenant de la musique enregistrée en format CD-DA Fichiers WMA enregistrés sur des disques CD-R/ -RW/ -ROM ou sur des périphériques de stockage USB Fichiers MP3 enregistrés sur des disques CD-R/ -RW/ -ROM ou sur des périphériques de stockage USB Emplacement d’installation •... -
Page 72: Nettoyage De L'appareil
Pioneer. Bien que divers produits de nettoyage pour lentille de lecteur soient en vente dans le commerce, nous déconseillons leur utilisation, car certains d’entre eux risquent, en fait, d’endommager la lentille. -
Page 73: Configuration De La Fonction De Mise Hors Tension Automatique
Puissance de sortie RMS : ....15 W + 15 W droits de marque aux États-Unis et dans d’autres pays. (1 kHz, 10 %, T.H.D., 8 ) «Pioneer» est une marque de commerce de Pioneer • Section tuner Corporation et est utilisée sous licence. - Page 74 Ein beschädigtes Netzkabel kann einen Brand oder elektrischen Schlag verursachen. Prüfen Sie das Netzkabel von Zeit zu Zeit. Sollte es beschädigt sein, wenden Sie sich an Ihre nächste autorisierte PIONEER-Kundendienststelle oder Ihren Betriebsumgebung Händler, um es zu ersetzen. Betriebstemperatur und Betriebsluftfeuchtigkeit: S002*_A1_De +5 °C bis +35 °C, 85 % rel.
- Page 75 In diesem Fall vergrößern Sie den Abstand zwischen dem Antenneneingangsanschluss und dieser Einheit (einschließlich von dieser Einheit unterstützte Produkte). • Pioneer übernimmt keine Verantwortung für jegliche Fehlfunktionen am kompatiblen Pioneer-Produkt aufgrund von Fehlern/Fehlfunktionen, die mit der Netzwerkverbindung und/oder Ihren anderen angeschlossenen Geräten zusammenhängen.
- Page 76 Wir danken Ihnen dafür, dass Sie sich für dieses Produkt von Pioneer entschieden haben. Bitte lesen Sie diese Bedienungsanleitung vor der Inbetriebnahme aufmerksam durch, damit Sie Ihr neues Gerät richtig bedienen und stets seine optimale Leistung erzielen können. Bitte bewahren Sie diese Anleitung anschließend für spätere Bezugnahme griffbereit auf.
-
Page 77: Vor Der Inbetriebnahme
Vor der Inbetriebnahme Kapitel 1: Vor der Inbetriebnahme • Batterien dürfen nicht erhitzt, zerlegt oder in ein Feuer oder in Wasser geworfen werden. Lieferumfang • Batterien können unterschiedliche Spannungen Bitte überzeugen Sie sich, dass sich das folgende Zubehör in besitzen, selbst wenn sie die gleiche Größe und Form der Box befindet, wenn Sie sie öffnen. -
Page 78: Bezeichnungen Und Funktionen Der Teile
Bezeichnungen und Funktionen der Teile Kapitel 2: Bezeichnungen und Funktionen der Teile STANDBY/ON Fernbedienung Schaltet den Receiver zwischen Eingeschaltet und Bereitschaftsmodus um (Seite 18). Eingangsfunktion-Tasten STANDBY/ON OPEN/CLOSE Wird zur Wahl der Eingangsquelle für diesen Receiver verwendet (Seite 18). BT AUDIO TUNER AUDIO IN... -
Page 79: Lautsprecher
Bezeichnungen und Funktionen der Teile /// (TUNE +/–), ENTER Lautsprecher Verwendung zur Auswahl/Umschaltung der Systemeinstellungen und -modi sowie zur Bestätigung von Aktionen. Die Verwendung von TUNE +/– kann dem Finden von Radiofrequenzen dienen (Seite 24). PRESET-Einstelltasten Zum Wählen voreingestellter Radiosender (Seite 24). MUTE Schaltet den Ton stumm/Stellt den Ton wieder her (Seite 13). -
Page 80: Befestigung Der Rutschfesten Füße
Bezeichnungen und Funktionen der Teile Befestigung der rutschfesten Füße Bringen Sie die mitgelieferten Anti-Rutsch-Unterlagen an den unteren Flächen der Lautsprecher an. Wichtig • Der Lautsprecher wird normalerweise in einer aufrechten Position verwendet. Wenn die Lautsprecher aufrecht platziert werden. Wenn die Lautsprecher vertikal aufrecht platziert werden, dann bringen Sie an der Bodenfläche der Lautsprecher die rutschsicheren Pads an. -
Page 81: Vorderes Bedienfeld
Bezeichnungen und Funktionen der Teile Vorderes Bedienfeld TIMER VOLUME PHONES AUDIO IN Hauptdisplay Fernbedienungssignal-Sensor Empfängt die Signale der Fernbedienung. Lautstärkeregelung Verwenden Sie diese Taste, um die Hörlautstärke einzustellen CD-Schubfach (Seite 13). Legen Sie die Disc mit dem Etikett nach oben ein (Seite 18). Lautstärke-Beleuchtung TIMER-Anzeige Leuchtet, wenn der Strom eingeschaltet ist. -
Page 82: Oberseite
Bezeichnungen und Funktionen der Teile Oberseite STANDBY/ON INPUT STANDBY/ON INPUT Schaltet den Receiver zwischen Eingeschaltet und Wählt die Eingabequelle aus. Bereitschaftsmodus um (Seite 18). Lange drücken, um auf den Modus BT STANDBY zu wechseln. -
Page 83: Anschlüsse
Anschlüsse Kapitel 3: Anschlüsse ACHTUNG ACHTUNG • Achten sie darauf, immer dann, wenn Sie Anschlüsse • An den Lautsprecherklemmen dieses Gerätes liegt vornehmen oder ändern, vorher den Strom eine potentiell GEFÄHRLICHE Spannung an. Zur auszuschalten und das Netzkabel aus der Vermeidung von Stromschlaggefahr ist unbedingt Netzsteckdose zu ziehen. -
Page 84: Anschluss Der Antennen
Anschlüsse Verwendung externer Antennen Führen Sie die Lautsprecherkabel sicher in die Anschlüsse ein und überprüfen Sie, dass die betreffenden Kabel nicht leicht herausgezogen werden Zur Verbesserung des UKW-Empfangs können. Benutzen Sie eine PAL-Verbindung (nicht im Lieferumfang), um eine externe UKW-Antenne anzuschließen. Hinweis •... -
Page 85: Die Ersten Schritte
Die ersten Schritte Kapitel 4: Die ersten Schritte Hinweis Einschalten der Stromversorgung • Wenn die Stromzufuhr nach dem erneuten Anschließen Drücken Sie STANDBY/ON, um den Strom einzuschalten. des Gerätes oder nach einem Stromausfall wieder hergestellt ist, stellen Sie die Uhrzeit erneut ein. Nach Gebrauch: Drücken Sie ... -
Page 86: Lautstärkeregler
Die ersten Schritte Lautstärkeregler Einstellen des Weck-Timers Zur Änderung der momentanen Timer-Einstellung oder für Equalizer eine neue Timer-Einstellung verwendet. Wenn der EQUALIZER gedrückt wird, wird die momentane Drücken Sie STANDBY/ON, um das Gerät Modus-Einstellung angezeigt. Drücken Sie zur Änderung auf einzuschalten. -
Page 87: Anwählen Des Weck-Timers
Die ersten Schritte Anwählen des Weck-Timers Hinweis Kann für die Wiederverwendung einer existierenden Timer- • Die Einschlaf-Zeitschaltuhr kann erneut eingestellt Einstellung verwendet werden. werden, indem Sie SLEEP drücken, während die Restzeit angezeigt wird. Wie die Schritte 1 – 3 in „Einstellen des Weck-Timers“. -
Page 88: Bestätigen, Was Für Ipod/Iphone/ Ipad-Modelle Unterstützt Werden
iPhone 3GS homeav/support/ios/eu/). • Das Installieren von anderen Software- Versionen als iPhone 4 den auf der Website von Pioneer angezeigten auf Ihrem iPhone 4s iPod/iPhone/iPad kann dazu führen, dass diese inkompatibel mit diesem System werden. iPhone 5 •... -
Page 89: Abspielen Mit Dem Ipod/Iphone
iPod/iPhone/iPad-Wiedergabe - Ist das iPod/iPhone/iPad richtig angeschlossen? Abspielen mit dem iPod/iPhone Schließen Sie das iPod/iPhone/iPad erneut an dieses Gerät an. - Ist der iPod/iPhone/iPad abgestürzt? Führen Sie eine Schließen Sie Ihr iPods/iPhones an. Rückstellung des iPod/iPhone/iPad aus, und Wenn ein iPod/iPhone angeschlossen wird, während dieses schließen Sie ihn dann erneut an dieses Gerät an. -
Page 90: Disc-Wiedergabe
Disc-Wiedergabe Kapitel 6: Disc-Wiedergabe Diese Anlage kann Standard-CDs und -CD-R/RWs im CD- Format sowie CD-R/RWs mit MP3- oder WMA-Dateien wiedergeben, sie kann diese aber nicht bespielen. Einige Audio-CD-Rs/CD-RWs können nicht abspielbar sein, abhängend vom Zustand der zur Aufnahme verwendeten Disc oder Vorrichtung. MP3: MP3 ist ein Kompressionsformat. -
Page 91: Weitere Wiedergabe Von Cds Oder Mp3/Wma-Discs
Disc-Wiedergabe Wiederholte Wiedergabe Verschiedene Disc-Funktionen Bei der wiederholten Wiedergabe können ein Titel, alle Titel Funktion Hauptgerät Fernbedienung Betrieb oder eine programmierte Reihenfolge fortlaufend abgespielt In der Stopp-Betriebsart Wiedergabe werden. drücken. Wiederholen eines Titels: Drücken Sie im Stopp Drücken Sie wiederholt REPEAT, bis „RPT ONE“ erscheint. ... -
Page 92: Programmierte Wiedergabe (Cd Oder Mp3/Wma)
Disc-Wiedergabe Programmierte Wiedergabe (CD oder Herunterladen von MP3/WMA MP3/WMA) Im Internet gibt es zahlreiche Musik-Seiten, von denen man Musik-Dateien MP3/WMA herunterladen kann. Befolgen Sie Zur Wiedergabe können Sie bis zu 32 Titel in der die Anweisungen auf der Website für das Herunterladen gewünschten Reihenfolge wählen. -
Page 93: Geben Sie Das Verzeichnis An, Das Wiedergegeben Werden Soll
Disc-Wiedergabe Geben Sie das Verzeichnis an, das Umschalten des Display-Inhalts wiedergegeben werden soll Drücken Sie DISPLAY. Zur Angabe des Verzeichnisses, das wiedergegeben werden Wenn der Titel, der Name des Interpreten und der Name des soll, sind die folgenden Schritte auszuführen. Albums auf der Datei aufgezeichnet sind, werden diese Informationen angezeigt. -
Page 94: Usb-Wiedergabe
Receivers ermöglicht es, Zweikanal-Audio zu hören. Abschnitt Wenn ein USB-Speichergerät angeschlossen ist auf Seite 33. • Pioneer garantiert nicht, dass jede Datei, die auf einem USB-Speicher gespeichert ist, wiedergegeben wird oder • Wenn momentan keine Wiedergabe vom USB- dass Strom an einen USB-Speicher geliefert wird. Bitte Speichergerät stattfindet und 20 Minuten lang kein... -
Page 95: Geben Sie Das Verzeichnis An, Das Wiedergegeben
USB-Wiedergabe Beenden der Zufallswiedergabe: Drücken Sie wiederholt RANDOM, bis „RDM OFF“ erscheint. Wiedergabe in einer gewünschten Drücken Sie ENTER. Reihenfolge Hinweis (Programmwiedergabe) • Wenn Sie während der Wiedergabe in zufälliger • Diese Einheit kann auf dem USB-Stick gespeicherte Reihenfolge drücken, können Sie sich zu dem Track Verzeichnisse wiederholt wiedergeben. -
Page 96: Verwendung Des Tuners
Verwendung des Tuners Kapitel 8: Verwendung des Tuners • Wenn Sie die automatische Senderwahl stoppen wollen, Anhören von Radiosendungen dann drücken Sie . • Wenn ein RDS-Sender (Radio Data System) eingestellt Die folgenden Schritte beschreiben die Einstellung von UKW- wird, wird zuerst die Frequenz angezeigt. Danach und MW-Radiosendungen mittels der automatischen erscheint der Sendername. -
Page 97: Abrufen Eines Gespeicherten Senders
Verwendung des Tuners Eine Funktion des RDS-Systems ist, dass Sie nach Art des Drücken Sie PRESET +/–, um die Programms suchen können. Zum Beispiel können Sie nach voreingestellte Nummer des Kanals zu wählen. einem Sender suchen, der gerade eine Sendung der Programmart JAZZ ausstrahlt. -
Page 98: Rds-Informationen
Verwendung des Tuners Drücken Sie TUNER auf der Fernbedienung. Hinweis • Hat das Display zu blinken aufgehört, wiederholen Sie Drücken Sie die Taste RDS ASPM auf der das Verfahren ab Schritt 2. Wenn die Einheit den Fernbedienung und halten Sie sie gedrückt. gewünschten Programmtyp findet, leuchtet die „ASPM“... -
Page 99: Andere Anschlüsse
Andere Anschlüsse Kapitel 9: Andere Anschlüsse Verbinden Sie die Audiobuchsen LINE IN auf dem hinteren ACHTUNG Bedienfeld mit Ihrem Wiedergabe-Nebengerät. • Schalten Sie, ehe Sie die Anschlüsse vornehmen oder ändern, den Strom aus und ziehen Sie das Netzkabel Rückwand dieses Gerätes aus der Netzsteckdose. -
Page 100: Bluetooth® Audio-Wiedergabe
Bluetooth® Audio-Wiedergabe Kapitel 10: ® Bluetooth Audio-Wiedergabe • Die Firma Onkyo garantiert nicht die richtige Verbindung Musikwiedergabe unter Einsatz von und den richtigen Betrieb dieser Einheit mit allen Geräten, die eine kabellose Bluetooth-Technologie Bluetooth drahtloser Technologie ermöglichen. Betrieb per Fernbedienung Mit kabelloser Bluetooth-Technologie ausgerüstetes Gerät: Mobiltelefon Die mit dieser Einheit mitgelieferte Fernbedienung... -
Page 101: Musik Auf Der Einheit Von Einem Bluetooth-Fähigen Gerät
Bluetooth® Audio-Wiedergabe Den Strom für das Bluetooth-fähige Gerät BT STANDBY einschalten, mit dem das Pairing erfolgen soll, und den Pairing-Vorgang am Gerät vornehmen. • Folgendes kann getan werden, wenn sich die Einheit mit dem BT STANDBY auf ON umgeschaltet im Standby Hinweis befindet. -
Page 102: Pairing Und Verbinden Unter Verwendung Von Nfc
Bluetooth® Audio-Wiedergabe Sobald die Verbindung mit dem NFC-fähigen Pairing und Verbinden unter Smartphone hergestellt ist, wird der Verwendung von NFC Gerätename auf dem Display an der Vorderseite der Einheit angezeigt. NFC steht für Near Field Communication. Wenn ein NFC- fähiges Smartphone in der Nähe der Einheit platziert wird, Starten Sie die Wiedergabe von Musik vom kann ein Bluetooth -Pairing und eine Bluetooth-Verbindung einfach hergestellt werden. -
Page 103: Einsatzbereich
Bluetooth® Audio-Wiedergabe Vorsichtshinweise zum Anschließen Antenneneingang und dem Gerät mit Bluetooth drahtloser Technologie bzw. dieser Anlage von Produkten, die von dieser Anlage (einschließlich von Produkten, die von dieser Anlage unterstützt werden unterstützt werden). • Wenn irgendein Gegenstand den Weg zwischen dieser •... -
Page 104: Zusätzliche Informationen
Punkte. Manchmal liegt das Problem bei einer anderen Komponente. Überprüfen Sie die anderen verwendeten Komponenten und die elektrischen Anschlüsse. Falls das Problem selbst nach dem Durchgehen der unten aufgeführten Checkliste nicht behoben werden kann, wenden Sie sich bitte an Ihr von Pioneer autorisiertes Service-Center oder Ihren Händler und lassen Sie eine Reparatur durchführen. - Page 105 Zusätzliche Informationen Wenn ein USB-Speichergerät angeschlossen ist Problem Prüfpunkt Maßnahme zur Behebung Der USB-Speicher wird nicht Ist der USB-Speicher richtig Schließen Sie den Speicher richtig an (bis zum Anschlag). erkannt. angeschlossen? Ist der USB-Speicher (Speichergerät) Diese Einheit unterstützt nicht USB-Hubs. Schließen Sie den USB- über einen USB-Hub Speicher (Speichergerät) direkt an.
- Page 106 Zusätzliche Informationen Wenn das mit der drahtlosen Bluetooth-Technologie ausgestattete Gerät angeschlossen ist oder betrieben wird. Problem Maßnahme zur Behebung Ein Gerät mit Bluetooth drahtloser Technologie kann nicht Prüfen Sie nach, dass sich kein Gerät in der Nähe dieser Anlage angeschlossen oder betätigt werden. befindet, das elektromagnetische Wellen auf dem 2,4-GHz-Band Das Gerät mit Bluetooth drahtloser Technologie gibt keinen Ton aus, abgibt (z.
-
Page 107: Abspielbare Discs Und Formate
Zusätzliche Informationen Abspielbare Discs und Formate • Handelsübliche Audio-CDs Audio-CD • CD-R/-RW/-ROM-Discs, die im CD-DA-Format aufgezeichnete Musikdaten enthalten WMA-Dateien, die auf CD-R/CD-RW/CD-ROM-Discs oder USB-Speicher (USB-Gerät) aufgenommen wurden. MP3- Dateien, die auf CD-R/CD-RW/CD-ROM-Discs oder USB-Speicher (USB-Gerät) aufgenommen wurden. Beschädigungen kann es kommen, wenn die Einheit mit •... -
Page 108: Hinweise Zu Kondensatbildung
Verwenden Sie keine derartigen Discs, da diese das Gerät Abtasterlinse angesammelt haben und eine beschädigen können. Funktionsstörung verursachen, wenden Sie sich bitte zwecks Reinigung der Linse an eine Pioneer-Kundendienststelle. Vom Gebrauch von handelsüblichen Linsenreinigern wird abgeraten, da derartige Reiniger die Abtasterlinse beschädigen können. -
Page 109: Einstellen Der Automatischen Stromabschaltung
Effektive Ausgangsleistung: ....15 W + 15 W (1 kHz, 10 %, THD, 8 ) „Pioneer” ist eine Marke der Pioneer Corporation und wird unter Lizenz verwendet. - Page 110 +5 °C a +35 °C, umidità relativa inferiore all‘85 % della PIONEER oppure al vostro rivenditore per la (fessure di ventilazione non bloccate) sostituzione del filo di alimentazione. Non installare l’apparecchio in luoghi poco ventilati, o S002*_A1_It in luoghi esposti ad alte umidità...
- Page 111 In tal caso, aumentare la distanza fra il connettore di ingresso dell’antenna e questa unità (compresi i prodotti da essa supportati). • Pioneer non è responsabile di malfunzionamenti del prodotto Pioneer compatibile dovuti ad errori / malfunzionamenti associati alla propria connessione di rete e / o alle attrezzature cui si è...
- Page 112 Vi ringraziamo per avere acquistato questo prodotto Pioneer. Prima di usare il prodotto, leggere questo manuale d’istruzioni in modo da saperlo utilizzare correttamente. Finito di leggerle, conservarle in un luogo sicuro per poterle riutilizzare in futuro. Indice 01 Prima di cominciare 07 Riproduzione USB Contenuto della confezione .
-
Page 113: Prima Di Cominciare
Prima di cominciare Capitolo 1: Prima di cominciare • Non riscaldare le batterie, non smontarle e non gettarle in acqua o nel fuoco. Contenuto della confezione • Le batterie possono avere voltaggio diverso anche se Assicurarsi che i seguenti accessori siano nella scatola al hanno la stessa dimensione e forma. -
Page 114: Nome Delle Parti E Loro Funzione
Nome delle parti e loro funzione Capitolo 2: Nome delle parti e loro funzione STANDBY/ON Telecomando Commuta il ricevitore tra standby e on (pagina 18). Selettori di entrata Usarlo per selezionare la sorgente di entrata a questo STANDBY/ON OPEN/CLOSE ricevitore (pagina 18). -
Page 115: Diffusori
Nome delle parti e loro funzione 10 Tasti di comando del playback Diffusori Usare per regolare qualsiasi funzione dopo averla selezionata tramite i tasti di entrata in funzione (pagina 18). 11 Tasti di comando Tuner ST/MONO Usare per commutare la modalità di suono tra stereo e mono (pagina 24). -
Page 116: Applicazione Dei Cuscinetti Antislittamento
Nome delle parti e loro funzione Applicazione dei cuscinetti antislittamento Applicare i cuscinetti anti-slittamento accessori sulla superficie inferiore degli altoparlanti. Importante • In genere, gli altoparlanti vengono usati in posizione eretta. Collocare gli altoparlanti verticalmente Se si collocano gli altoparlanti verticalmente, attaccare i cuscinetti anti-slittamento sulla parte inferiore degli altoparlanti. -
Page 117: Pannello Anteriore
Nome delle parti e loro funzione Pannello anteriore TIMER VOLUME PHONES AUDIO IN Display principale Sensore remoto Riceve i segnali dal telecomando. Controllo di volume Usati per impostare il volume d’ascolto (pagina 13). Carrellino disco Collocare il disco con l’etichetta verso l’alto (pagina 18). Illuminazione volume Si illumina quando la corrente è... -
Page 118: Pannello Superiore
Nome delle parti e loro funzione Pannello superiore STANDBY/ON INPUT STANDBY/ON INPUT Commuta il ricevitore tra standby e on (pagina 18). Seleziona la sorgente di entrata. Premere a lungo per commutare sulla modalità BT Area NFC STANDBY. -
Page 119: Collegamenti
Collegamenti Capitolo 3: Collegamenti • Non collegare alcun altoparlante che non sia uno di ATTENZIONE quelli in dotazione a questo sistema. • Assicurarsi di spegnere la corrente e togliere la spina del • Non collegare gli altoparlanti in dotazione a un cavo di corrente dalla presa mentre si eseguono o amplificatore che non sia quello in dotazione a questo modificano le connessioni. -
Page 120: Collegamento Delle Antenne
Collegamenti Uso delle antenne esterne Collegamento delle antenne Per migliorare la ricezione FM • Collegare l’antenna AM a telaio e l’antenna FM a filo Utilizzare un connettore PAL (non fornito) per collegare come segue. un’antenna FM esterna. • Per migliorare la ricezione e la qualità sonora, collegare le antenne esterne (vedi Uso delle antenne esterne sotto). -
Page 121: Come Iniziare
Come iniziare Capitolo 4: Come iniziare Per accendere l’apparecchio Comando generale Premere STANDBY/ON per attivare l’alimentazione. Entrata Dopo l’uso: Se si preme INPUT sull’unità principale, la funzione attuale si Premere STANDBY/ON per inserire la modalità di corrente commuterà in una modalità diversa. Premere INPUT stand-by. -
Page 122: Comandi Audio
Come iniziare Comandi audio Impostazione della sveglia Usato per cambiare le impostazioni esistenti dell’orologio o Equalizer per impostarne di nuove. Se si preme EQUALIZER, si visualizzeranno le impostazioni Premere STANDBY/ON per attivare della modalità corrente. Per selezionare una modalità diversa, l’alimentazione.CLOCK/TIMER premere EQUALIZER ripetutamente finché... -
Page 123: Regolare La Sveglia
Come iniziare Regolare la sveglia Usare le cuffie Può essere usato per riutilizzare un’impostazione esistente del timer. Connettersi allo spinotto jack delle cuffie. Se le cuffie sono collegate, non viene emesso alcun suono Gli stessi passaggi da 1 a 3 in “Impostare la dagli altoparlanti. -
Page 124: Il Playback Di Ipod/Iphone/Ipad
Il playback di iPod/iPhone/iPad Capitolo 5: Il playback di iPod/iPhone/iPad Semplicemente collegando un iPod/iPhone/iPad a questa • Pioneer non può accettare alcuna responsabilità in unità potrete riprodurre audio di alta qualità con l’iPod/ alcun caso per perdite dirette o indirette derivanti da iPhone/iPad. -
Page 125: Riprodurre L'ipad
Il playback di iPod/iPhone/iPad Riprodurre l’iPad Connettere l’iPad. Se si connette l’iPad mentre l’unità è accesa, non si avvierà il playback dell’iPad. Premere USB come sorgente in entrata. Si visualizzerà “USB/IPOD” sulla schermata principale. Quando il riconoscimento è stato completato, la riproduzione si avvierà automaticamente. -
Page 126: Riproduzione Di Dischi
Riproduzione di dischi Capitolo 6: Riproduzione di dischi Questo sistema può eseguire riproduzioni di CD standard, CD-R/RW nel formato CD e CD-R/RW con file MP3 o WMA, ma non può registrare su di essi. La riproduzione di alcuni dischi-CD-R e CD-RW potrebbe non essere possibile a causa delle condizioni del disco o dell’apparecchiatura usata per la registrazione. -
Page 127: Riproduzione D'avanguardia Di Un Cd O Disco
Riproduzione di dischi Ripetizione di lettura Varie funzioni del disco La funzione di ripetizione della riproduzione permette di Funzione Apparecchio Tele- Funzionamento principale comando eseguire la lettura continua di un brano, di tutti i brani o di una sequenza programmata. Premere mentre Riproduzione ... -
Page 128: Riproduzione Programmabile (Cd O Mp3/Wma)
Riproduzione di dischi Riproduzione programmabile (CD o Scaricare MP3/WMA MP3/WMA) Su Internet vi sono vari siti dedicati alla musica da cui scaricare file musicali MP3/WMA. Seguire le istruzioni del Si possono scegliere fino a 32 selezioni da riprodurre sito web per scaricare i file musicali. In seguito, è possibile nell’ordine preferito. -
Page 129: Specificare La Cartella Da Riprodurre
Riproduzione di dischi Specificare la cartella da riprodurre Commutare i contenuti della schermata Per specificare la cartella da riprodurre, eseguire i seguenti passaggi. Premere DISPLAY. DISPLAY FOLDER TUNE+ Se i nomi di titolo, artista e album sono stati scritti sul file, STANDBY/ON OPEN/CLOSE ... -
Page 130: Riproduzione Usb
È possibile ascoltare audio a due canali mediante l’interfaccia USB presente sul lato frontale del ricevitore. Ripetizione di lettura • Pioneer non garantisce che tutti i file registrati su qualsiasi dispositivo di memoria USB vengano letti o che La funzione di ripetizione della riproduzione permette di la corrente venga fornita al dispositivo di memoria USB. -
Page 131: Specificare La Cartella Da Riprodurre
Riproduzione USB • La funzione di lettura casuale permette la selezione e la lettura automatica dei brani. (Non sarà possibile Riproduzione in un ordine selezionare l’ordine delle piste). desiderato (Riproduzione • Durante la riproduzione casuale, non è possibile usare la riproduzione ripetuta. -
Page 132: Come Usare Il Sintonizzatore
Come usare il sintonizzatore Capitolo 8: Come usare il sintonizzatore • Quando si sintonizza su una stazione RDS (Radio Data Ascoltare trasmissioni radio System), innanzitutto si visualizzerà la frequenza. Infine, il nome della stazione apparirà. I seguenti punti mostrano come sintonizzare le trasmissioni •... -
Page 133: Per Richiamare Una Stazione Memorizzata
Come usare il sintonizzatore • Ripetere il procedimento dei punti 1 - 4 per impostare È possibile cercare i seguenti tipi di programmi: altre stazioni, oppure per cambiare una stazione NEWS – Notizie SOCIAL – Affari sociali preselezionata. Quando viene memorizzata una nuova AFFAIRS –... -
Page 134: Informazioni Fornite Da Rds
Come usare il sintonizzatore • Se si vuole ascoltare lo stesso tipo di programma di Per fermare l’operazione ASPM prima che essa un’altra stazione, premere RDS PTY mentre il numero di sia completata: canale o di stazione lampeggia. L’unità cercherà la Premere ... -
Page 135: Altri Collegamenti
Altri collegamenti Capitolo 9: Altri collegamenti Connettere le prese jack LINE IN del pannello posteriore a un ATTENZIONE componente di playback ausiliario. • Prima di eseguire o cambiare i collegamenti, spegnete l’apparecchio e scollegate la spina dalla presa AC. Il pannello posteriore di questa unità Connessione di componenti ausiliari Connettere la mini-presa jack AUDIO IN del pannello frontale... -
Page 136: Riproduzione Bluetooth® Audio
Riproduzione Bluetooth® Audio Capitolo 10: ® Riproduzione Bluetooth Audio Riproduzione con tecnologia wireless Funzionamento del telecomando Bluetooth Il telecomando fornito insieme all’apparecchio vi permette di leggere e fermare media e di eseguire altre operazioni. Nota Dispositivo con tecnologia wireless • I dispositivi dotati di tecnologia wireless Bluetooth Bluetooth: Telefono cellulare devono supportare i profili AVRCP. -
Page 137: Ascoltare La Musica Sull'unità Con L'apparecchio Abilitato A Tecnologia Bluetooth
Riproduzione Bluetooth® Audio Nota BT STANDBY • Questa unità sarà visualizzata come “X-CM35” su tutti gli • Le seguenti operazioni possono essere eseguite con BT apparecchi abilitati a tecnologia Bluetooth che STANDBY acceso su ON. possedete. • Selezionando un apparecchio a tecnologia Bluetooth L’accoppiamento si avvierà. -
Page 138: Accoppiamento E Connessione Tramite Nfc
Riproduzione Bluetooth® Audio Dopo che il collegamento con lo smartphone Accoppiamento e connessione tramite dotato di NFC è stato stabilito, sul display anteriore viene visualizzato il nome dell’unità. NFC significa Near Field Communication. Se uno Iniziare la riproduzione della musica dallo smartphone con funzionalità... -
Page 139: Campo Di Funzionamento
Riproduzione Bluetooth® Audio • Nel caso in cui siano presenti ostacoli nel percorso tra • Prima di cambiare i collegamenti audio o di altri cavi di questa unità (inclusi i dispositivi che supporta) e il prodotto supportati da questa unità, controllare di avere dispositivo con tecnologia wireless Bluetooth (ad spazio sufficiente per il lavoro. -
Page 140: Informazioni Aggiuntive
Esaminare gli altri componenti e le apparecchiature elettriche in uso. Se il problema non può essere risolto anche dopo aver effettuato i controlli sopra descritti, chiedere al centro di servizio Pioneer più vicino o al concessionario di svolgere i lavori di riparazione. - Page 141 Informazioni aggiuntive Quando si collega un dispositivo di memoria di massa USB Problema Controllare Soluzione Il dispositivo di memoria USB I dispositivo di memoria USB è stato Connettere il dispositivo in sicurezza (bene, fino in fondo). non viene riconosciuto. connesso correttamente? Il dispositivo di memoria USB è...
- Page 142 Informazioni aggiuntive Con un dispositivo Bluetooth a tecnologia wireless connesso e in funzione Problema Soluzione Il dispositivo dotato di tecnologia wireless Bluetooth non può essere Verificare che nelle vicinanze dell’unità non vi siano oggetti che collegato o messo in funzione. emettono onde elettromagnetiche nella banda a 2,4 GHz (forno a Non viene emesso l’audio dal dispositivo dotato di tecnologia microonde, dispositivo LAN wireless o dispositivo dotato di...
-
Page 143: Dischi E Formati Riproducibili
Informazioni aggiuntive Dischi e formati riproducibili • CD audio disponibili in commercio CD-Audio • CD-R/-RW/-ROM contenenti musica e registrati in formato CD-DA File WMA registrati su dischi CD-R/ -RW/ -ROM o su dispositivi di memoria USB File MP3 registrati su dischi CD-R/ -RW/ -ROM o su dispositivi di memoria USB Luogo di installazione •... -
Page 144: Pulizia Del Prodotto
Pioneer. Nonostante siano disponibili in commercio detergenti per lenti di lettori, se ne sconsiglia l’uso perché possono danneggiare la lente. -
Page 145: Impostazioni Di Spegnimento Automatico
Gamma di frequenza (FM) ..da 87,5 MHz a 108 MHz “Pioneer” è un marchio di fabbrica di proprietà di Pioneer Ingresso di antenna (FM)....75 asimmetrico Corporation, ed è... - Page 146 Kontroleer het netsnoer af en toe. Wanneer u de indruk krijgt dat het beschadigd is, dient u bij uw dichtstbijzijnde erkende PIONEER onderhoudscentrum of uw dealer een nieuw snoer te kopen.
- Page 147 Vergroot in een dergelijk geval de afstand tussen de ingangsaansluiting voor de antenne en dit toestel (inclusief door dit toestel ondersteunde apparatuur). • Pioneer kan niet aansprakelijk worden gesteld voor storingen of foutieve werking van het geschikte Pioneer product door communicatiefouten/storingen die samenhangen met uw netwerkverbinding en/of de aangesloten apparatuur.
- Page 148 Hartelijk dank voor de aanschaf van dit Pioneer produkt. Lees de handleiding aandachtig door zodat u volledig op de hoogte bent van de bediening en werking. Bewaar de handleiding op een veilige plaats voor eventuele naslag in de toekomst. Inhoudsopgave...
-
Page 149: Voordat U Begint
Voordat u begint Hoofdstuk 1: Voordat u begint • Leg de batterijen in de juiste richting in de afstandsbediening, zoals aangegeven door de Inhoud van de doos polariteitstekens ( en ). Controleer of de volgende onderdelen zich bij opening in de •... -
Page 150: Overzicht Van De Bedieningstoetsen
Overzicht van de bedieningstoetsen Hoofdstuk 2: Overzicht van de bedieningstoetsen STANDBY/ON Afstandsbediening Schakelen tussen ruststand en aan (bladzijde 18). Ingangsfunctieknoppen Gebruik deze toets om de ingangsbron van deze receiver te STANDBY/ON OPEN/CLOSE selecteren (bladzijde 18). BT AUDIO TUNER AUDIO IN Gebruiken om het audiobestand met gebruik van het... -
Page 151: Luidsprekersysteem
Overzicht van de bedieningstoetsen 10 Weergavebedieningstoetsen Luidsprekersysteem Gebruiken om elke functie te bedienen nadat u deze heeft geselecteerd via de invoerfunctietoetsen (bladzijde 18). 11 Tuner-bedieningsfuncties ST/MONO Gebruik deze functie om het geluid tussen stereo en mono te wijzigen (bladzijde 24). RDS ASPM RDS Auto station gebruiken om te zoeken naar stations voor geheugenopslag (bladzijde 25). -
Page 152: Bevestiging Van De Antislipkussentjes
Overzicht van de bedieningstoetsen Bevestiging van de antislipkussentjes Bevestig de meegeleverde antislipkussentjes aan de onderzijde van de speakers. Belangrijk • De speaker staat gewoonlijk rechtop. Plaatsing van de luidsprekers rechtop Bij plaatsing van de luidsprekers in verticale stand, moeten de antislipkussentjes aan de onderzijde van de luidsprekers worden bevestigd. -
Page 153: Voorpaneel
Overzicht van de bedieningstoetsen Voorpaneel TIMER VOLUME PHONES AUDIO IN Hoofddisplay Afstandsbedieningssensor Hier komen de signalen van de afstandsbediening binnen. Volumeregeling Gebruik deze toetsen om het volume in te stellen Schijven (bladzijde 13). Plaats de schijf met de label aan de bovenzijde (bladzijde 18). Verlichting van het volume TIMER indicator Gaat branden wanneer het apparaat wordt ingeschakeld. -
Page 154: Bovenpaneel
Overzicht van de bedieningstoetsen Bovenpaneel STANDBY/ON INPUT STANDBY/ON INPUT Selecteren van de ingangsbron. NFC-omgeving (Near-field communication) Ingedrukt houden om te wijzigen in de BT STANDBY-modus. Als de smartphone die met NFC is uitgerust in deze omgeving wordt aangeraakt, kan het systeem op eenvoudige wijze een Schijflade OPEN/CLOSE-toets Bluetooth-verbinding maken (zie Paring en verbinding via NFC... -
Page 155: Aansluitingen
Aansluitingen Hoofdstuk 3: Aansluitingen • Sluit geen andere luidsprekers aan dan die bij dit WAARSCHUWING systeem worden geleverd. • Zorg er te allen tijde voor dat het apparaat is • Sluit de bijgeleverde luidsprekers niet op een andere uitgeschakeld en verwijder het netsnoer van het versterker aan dan die bij dit systeem wordt geleverd. -
Page 156: Antennes Aansluiten
Aansluitingen Buitenantennes gebruiken Antennes aansluiten Om de FM-ontvangst te verbeteren • Sluit de AM-raamantenne en de FM-draadantenne aan Gebruik een PAL-connector (niet meegeleverd) om een zoals hieronder getoond. externe FM-antenne aan te sluiten. • Om de ontvangst en de geluidskwaliteit te verbeteren, kunt u buitenantennes aansluiten (zie Buitenantennes gebruiken hieronder). -
Page 157: Aan De Slag
Aan de slag Hoofdstuk 4: Aan de slag Opmerking Het apparaat inschakelen • Wanneer stroomvoorziening is weergegeven nadat het Druk op de toets STANDBY/ON om het apparaat in te apparaat weer is ingestoken of door vermogensuitval, schakelen. stel de klok in opnieuw. Na gebruik: Druk op de toets ... -
Page 158: Geluidsbediening
Aan de slag Geluidsbediening De wekkerfunctie instellen Gebruiken om de bestaande timerinstelling te wijzigen of om Equalizer een nieuwe timer in te stellen. Als de EQUALIZER wordt ingedrukt, wordt de huidige Druk op STANDBY/ON om het apparaat modusinstelling getoond. Om de modus te wijzigen, drukt u in te schakelen. -
Page 159: Activeren Van De Wekkerfunctie
Aan de slag Activeren van de wekkerfunctie Gebruik van hoofdtelefoons Deze kan worden gebruikt om een bestaande timerinstelling opnieuw te gebruiken. Aansluiting op de stekerplug van de hoofdtelefoon. Wanneer een hoofdtelefoon is aangesloten, wordt er geen En ook stappen 1 tot 3 bij “Instellen van de geluid weergegeven via de luidsprekers. -
Page 160: Weergave Van Ipod/Iphone/Ipad
Als een iPod/iPhone wordt aangesloten terwijl dit apparaat ingeschakeld is, zal de weergave van de iPod/iPhone niet beginnen. Opmerking • Pioneer kan niet garanderen dat dit apparaat werkt met Druk op USB als de ingangsbron. andere iPod/iPhone/iPad modellen dan die hieronder “USB/IPOD” verschijnt op de hoofddisplay. -
Page 161: Afspelen Van De Ipad
Weergave van iPod/iPhone/iPad Afspelen van de iPad Aansluiting van uw iPad. Als een iPad is aangesloten terwijl dit systeem is ingeschakeld, wordt de iPad niet afgespeeld. Druk op USB als de ingangsbron. “USB/IPOD” verschijnt op de hoofddisplay. Zodra het apparaat de iPod/iPhone heeft herkend, wordt deze automatisch afgespeeld. -
Page 162: Disc-Weergave
Disc-weergave Hoofdstuk 6: Disc-weergave Dit systeem kan een standaard CD, CD-R/RW in CD-formaat en CD-R/RW met MP3- of WMA-bestanden afspelen, maar kan deze niet opnemen. Bepaalde audio CD-R en CD-RW discs kunnen vanwege de status van de disc of opname- apparatuur niet worden afgespeeld. -
Page 163: Geavanceerde Weergave Van Een Cd Of Mp3/Wma-Disc
Disc-weergave Herhaalde weergave Diverse discfuncties In de herhalingsfunctie kan één fragment, alle fragmenten of Functie Hoofd- Afstands- Bediening toestel bediening een geprogrammeerde reeks herhaald worden afgespeeld. Indrukken tijdens de Herhalen van één fragment: Afspelen stopfunctie. Druk herhaaldelijk op REPEAT totdat “RPT ONE” verschijnt. Druk op ENTER. -
Page 164: Geprogrammeerde Weergave (Cd Of Mp3/Wma)
Disc-weergave Geprogrammeerde weergave (CD of Informatie over het downloaden van MP3/WMA) MP3/WMA U kunt maximaal 32 fragmenten voor weergave in de Op het Internet bevinden zich veel muziek-websites, waar u gewenste volgorde kiezen. MP3/WMA kunt downloaden. Volg de instructies van de website, hoe u de muziekbestanden kunt downloaden. -
Page 165: De Map Kiezen Die Moet Worden Afgespeeld
Disc-weergave De map kiezen die moet worden Wijzig de displayinhoud afgespeeld Druk op DISPLAY. Kies de map om af te spelen, en voer de volgende stappen uit. Als de titel, artiest en albumnaam naar het bestand zijn geschreven, dan wordt die informatie getoond. (Dit apparaat DISPLAY FOLDER TUNE+... -
Page 166: Usb-Weergave
33 voor receiver. verdere informatie. • Pioneer garandeert niet dat bestanden die op een USB- • Wanneer er geen USB-geheugenapparaat wordt opslagapparaat zijn opgenomen kunnen worden weergegeven en dit apparaat langer dan 20 minuten niet... -
Page 167: De Map Kiezen Die Moet Worden Afgespeeld
USB-weergave Annuleren van de willekeurige weergavevolgorde: Afspelen in de gewenste volgorde Druk herhaaldelijk op RANDOM totdat “RDM OFF” verschijnt. (Programma-weergave) Druk op ENTER. • Via dit systeem kunnen mappen die in het USB- opslagapparaat zijn opgeslagen herhaaldelijk worden Opmerking afgespeeld. •... -
Page 168: Gebruik Van De Tuner
Gebruik van de tuner Hoofdstuk 8: Gebruik van de tuner • Als op een RDS-station (Radio Data System) wordt Luisteren naar de afgestemd, wordt eerst de frequentie getoond. Tenslotte zal de naam van het station getoond worden. radiouitzendingen • RDS-stations kunnen geheel automatisch worden afgestemd via de functie Auto Station Program Memory Hieronder wordt beschreven hoe u afstemt op FM- en AM- (ASPM), zie bladzijde 26. -
Page 169: Instellen Van Een Voorkeurzender
Gebruik van de tuner • Herhaal de stappen 1 - 4 om andere zenders in te stellen U kunt naar de volgende soorten programma’s zoeken: of om een voorkeurzender te wijzigen. Wanneer een NEWS – Nieuws SOCIAL – ‘Human interest’, nieuwe zender in het geheugen opgeslagen wordt, zal de programma’s over sociale AFFAIRS –... -
Page 170: Via Rds Verzorgde Informatie
Gebruik van de tuner • Als u naar hetzelfde programmatype van een ander Voortijdig stoppen van de ASPM functie: station wilt luisteren, drukt u op de RDS PTY terwijl het Druk op tijdens het scannen door stations. De reeds in het kanaalnummer of de stationnaam knippert. -
Page 171: Overige Aansluitingen
Overige aansluitingen Hoofdstuk 9: Overige aansluitingen Sluit de LINE IN-audiostekers aan het achterpaneel aan op de WAARSCHUWING extra weergavecomponent. • Schakel het apparaat uit en verwijder het netsnoer van het wandcontact voordat u apparatuur aansluit of Het achterpaneel van dit apparaat aansluitingen wijzigt. -
Page 172: Bluetooth® Audioweergave
Bluetooth® audioweergave Hoofdstuk 10: ® Bluetooth audioweergave Muziek weergeven met behulp van Gebruik van de afstandsbediening Bluetooth draadloze technologie Met de afstandsbediening die bij dit systeem wordt geleverd kunt u media afspelen en stopzetten en andere bewerkingen uitvoeren. Apparaat met Bluetooth draadloze Opmerking technologie: Mobiele telefoon •... -
Page 173: Luister Naar Muziek Op Het Systeem Vanaf Een Met Bluetooth Uitgerust Apparaat
Bluetooth® audioweergave Opmerking BT STANDBY • Dit apparaat wordt getoond als “X-CM35” op alle bij u • Het volgende kan worden uitgevoerd als het systeem op beschikbare met Bluetooth uitgevoerde apparatuur. stand-by staat terwijl BT STANDBY is ingeschakeld De paring gaat van start. (ON). -
Page 174: Paring En Verbinding Via Nfc
Bluetooth® audioweergave Als de verbinding met de smartphone met Paring en verbinding via NFC NFC-functie gemaakt is, wordt de apparaatnaam weergegeven op de display op het voorpaneel NFC betekent Near Field Communication. Als een van dit toestel. smartphone met NFC-functie bij het toestel wordt gehouden, kunnen koppelen en verbinden via Bluetooth Begin met de weergave van de muziek via gemakkelijk worden uitgevoerd. -
Page 175: Omvang Van De Werking
Bluetooth® audioweergave Voorzorgsmaatregelen betreffende de • Als er iets is dat de baan blokkeert tussen dit apparaat (met inbegrip van apparaten die door dit apparaat aansluiting op producten die door dit worden ondersteund) en de apparatuur die is voorzien apparaat worden ondersteund van Bluetooth draadloze technologie (zoals een metalen deur, een betonwand of isolatie waarin aluminiumfolie is •... -
Page 176: Aanvullende Informatie
Als u het probleem aan de hand van de gegeven maatregelen niet kunt verhelpen, dient u contact op te nemen met uw dichtstbijzijnde officiële Pioneer servicecentrum of met uw dealer om het apparaat te laten repareren. - Page 177 Aanvullende informatie Wanneer er een USB-geheugenapparaat is aangesloten Probleem Controle Oplossing Het USB-opslagapparaat Is het USB-opslagapparaat op de Sluit het apparaat stevig aan (geheel ingestoken). wordt niet herkend. juiste wijze aangesloten? Is het USB-opslagapparaat via een Dit apparaat ondersteunt geen USB-hubs. Sluit het USB- USB-hub aangesloten? opslagapparaat rechtstreeks aan.
- Page 178 Aanvullende informatie Wanneer het apparaat dat is uitgevoerd met Bluetooth draadloze technologie wordt aangesloten of bediend Probleem Oplossing Het apparaat dat is voorzien van Bluetooth draadloze technologie Controleer of er geen voorwerp dat elektromagnetische straling kan niet worden aangesloten of bediend. uitzendt in de 2,4 GHz band (magnetrons, draadloze LAN- Er komt geen geluid uit het apparaat dat is voorzien van Bluetooth apparatuur of draadloze apparatuur die is voorzien van Bluetooth...
-
Page 179: Afspeelbare Schijven En Indelingen
Aanvullende informatie Afspeelbare schijven en indelingen • In de audiohandel verkrijgbare audio-CD’s Audio CD • CD-R/-RW/-ROM discs met muziek die is opgenomen in het CD-DA formaat WMA-bestanden die op CD-R/-RW/-ROM-schijven zijn opgenomen of USB-opslagapparatuur MP3-bestanden die op CD-R/-RW/-ROM-schijven of USB-opslagapparaten zijn opgenomen wordt vervoerd of verplaatst terwijl er zich een schijf in •... -
Page 180: Reiniging Van Het Product
Pioneer servicecentrum. Lensreinigers voor spelers zijn in de handel verkrijgbaar, maar sommige kunnen schade aan het lensje veroorzaken, dus we raden het gebruik ervan af. -
Page 181: Auto Power Off-Instelling
(1 kHz, 10 %, T.H.D., 8 ) • Tunergedeelte “Pioneer” is een handelsmerk van Pioneer Corporation Frequentiebereik (FM) ... . . 87,5 MHz tot 108 MHz en wordt gebruikt onder licentie. -
Page 182: Entorno De Funcionamiento
Revise el cable de alimentación está dañado, solicite el lugares expuestos a alta humedad o a la luz directa del reemplazo del mismo al centro de servicio autorizado sol (o de otra luz artificial potente). PIONEER más cercano, o a su distribuidor. D3-4-2-1-7c*_A1_Es S002*_A1_Es... - Page 183 En este caso, aumente la distancia entre el conector de entrada de antena y esta unidad (incluyendo los productos compatibles con esta unidad). • Pioneer no se hace responsable de ningún fallo del producto Pioneer compatible debido a un error de comunicación/fallos de funcionamiento asociados con su conexión a la red y/o su equipo conectado.
- Page 184 Gracias por comprar un producto Pioneer. Le sugerimos que lea atentamente estas manual de instrucciones a fin de que aprenda a utilizar su equipo de manera adecuada. Después de leer las instrucciones, guárdelas en un lugar seguro para futuras referencias.
-
Page 185: Antes De Comenzar
Antes de comenzar Capítulo 1: Antes de comenzar • No caliente las pilas ni las desmonte, y no las tire al fuego ni al agua. Contenido de la caja • Las pilas pueden tener diferente tensión, a pesar de ser Al abrir la caja, confirme que la misma contiene los del mismo tamaño y forma. -
Page 186: Nombres Y Funciones De Los Controles
Nombres y funciones de los controles Capítulo 2: Nombres y funciones de los controles STANDBY/ON Mando a distancia Alterna el receptor entre encendido y modo de espera (página 18). Botones de función de entrada STANDBY/ON OPEN/CLOSE Utilícelos para seleccionar la fuente de entrada para este ... -
Page 187: Sistema De Altavoces
Nombres y funciones de los controles 10 Botones para el control de reproducción Sistema de altavoces Permiten controlar cada función después de haberla seleccionado usando los botones de función de entrada (página 18). 11 Botones de control Tuner ST/MONO Permiten alternar el modo de sonido entre estéreo y monoaural (página 24). -
Page 188: Colocación De Las Almohadillas Antideslizantes
Nombres y funciones de los controles Colocación de las almohadillas antideslizantes Coloque las almohadillas antideslizantes en la superficie inferior de los altavoces. Importante • En condiciones normales, deberá utilizar el altavoz en posición vertical. Cuando coloque los altavoces en posición vertical Cuando coloque los altavoces en posición vertical, adhiera las almohadillas antideslizantes en la superficie inferior de los altavoces. -
Page 189: Panel Frontal
Nombres y funciones de los controles Panel frontal TIMER VOLUME PHONES AUDIO IN Display principal Sensor del mando a distancia Recibe las señales del mando a distancia. Control de volumen Úselo para ajustar el volumen de audición (página 13). Bandeja del disco Coloque el disco con la etiqueta mirando hacia arriba Iluminación del volumen (página 18). -
Page 190: Panel Superior
Nombres y funciones de los controles Panel superior STANDBY/ON INPUT STANDBY/ON INPUT Alterna el receptor entre encendido y modo de espera Permite seleccionar la fuente de entrada. (página 18). Púlselo de forma prolongada para cambiar al modo de BT STANDBY. -
Page 191: Conexiones
Conexiones Capítulo 3: Conexiones • No conecte ningún altavoz que no haya sido PRECAUCIÓN suministrado con este sistema. • Siempre que realice o modifique conexiones deberá • No conecte los altavoces suministrados a ningún apagar la unidad y desenchufar el cable de alimentación amplificador que no sea el que se suministra con este de la toma de corriente. -
Page 192: Conexión De Antenas
Conexiones Uso de antenas exteriores Conexión de antenas Para mejorar la recepción en FM • Conecte la antena de cuadro de AM y la antena de hilo Utilice un conector PAL (no suministrado) para conectar una de FM como se indica a continuación. antena de FM externa. -
Page 193: Primeros Pasos
Primeros pasos Capítulo 4: Primeros pasos Para encender la unidad Control general Pulse STANDBY/ON para conectar la alimentación. Función de entrada Después del uso: Al pulsar INPUT en la unidad principal, la función en curso Para colocar la unidad en el modo de espera, pulse cambiará... -
Page 194: Controles De Sonido
Primeros pasos Controles de sonido Configuración del despertador Para cambiar la configuración actual del despertador o Equalizer realizar una nueva configuración: Al pulsar EQUALIZER, se mostrará el ajuste del modo en Pulse STANDBY/ON para conectar la curso. Para cambiar a otro modo, pulse EQUALIZER varias alimentación. -
Page 195: Cómo Restablecer El Despertador
Primeros pasos Cómo restablecer el despertador Nota Permite volver a utilizar una configuración de despertador • El temporizador de desconexión automática puede existente. ajustarse presionando SLEEP mientras se visualiza el tiempo restante. Siga los pasos 1 a 3 indicados en “Configuración del despertador”. -
Page 196: Reproducción De Un Ipod/Iphone/Ipad
• Si instala versiones de software distintas de las iPod/iPhone/iPad Terminal USB indicadas en la página web de Pioneer en su iPod/ iPhone/iPad, puede derivar en la incompatibilidad con iPod nano 3G/4G/5G/6G este sistema. -
Page 197: Cómo Reproducir Un Ipad
Reproducción de un iPod/iPhone/iPad Cómo reproducir un iPad Conecte el iPad. Si conecta un iPad cuando esta unidad esté encendida, la reproducción del iPad no dará comienzo. Pulse USB como fuente de entrada. En el panel principal se mostrará “USB/IPOD”. Cuando el reconocimiento haya terminado, comenzará... -
Page 198: Reproducción De Discos
Reproducción de discos Capítulo 6: Reproducción de discos Este sistema puede reproducir un CD estándar, CD-R/RW en el formato CD y CD-R/RW con archivos MP3 o WMA, pero no puede grabar en ellos. Es posible que algunos discos CD-R y CD-RW de audio no puedan reproducirse debido al estado del disco o al aparato utilizado para su grabación. -
Page 199: Reproducción Avanzada De Cd O Disco De Mp3/Wma
Reproducción de discos Repetición de la reproducción Distintas funciones de los discos La repetición de lectura de una pista se puede realizar de Función Unidad Mando a Funcionamiento principal distancia forma que afecte a todas las pistas o a una secuencia programada de forma continua. -
Page 200: Reproducción Programada (Cd O Mp3/Wma)
Reproducción de discos Reproducción programada (CD o MP3/ Sobre la descarga de archivos MP3/ WMA) Podrá seleccionar hasta 32 selecciones para la reproducción Existen muchas páginas web que permiten descargar en el orden que usted prefiera. ficheros de música MP3/WMA. Siga las instrucciones de la página web acerca de cómo descargar los archivos de En el modo de parada, pulse MEMORY/ música. -
Page 201: Especifique La Carpeta Que Desea Reproducir
Reproducción de discos Especifique la carpeta que desea Cómo cambiar el contenido reproducir visualizado Para especificar la carpeta que desea reproducir, siga los Pulse DISPLAY. pasos siguientes. Si el archivo contiene el título, el nombre del artista y el nombre del álbum, esta información se mostrará. (En esta DISPLAY FOLDER TUNE+... -
Page 202: Reproducción Usb
USB de la parte delantera de este receptor. consulte Cuando se ha conectado un dispositivo de almacenamiento USB en la página 33. • Pioneer no garantiza que todos los ficheros grabados en un dispositivo de almacenamiento USB puedan • Cuando no haya ningún dispositivo de almacenamiento reproducirse, ni que se suministrará... -
Page 203: Especifique La Carpeta Que Desea Reproducir
Reproducción USB Para cancelar la reproducción aleatoria: Pulse RANDOM varias veces hasta que se muestre “RDM Reproducción en el orden deseado OFF”. Pulse ENTER. (reproducción programada) Nota • Esta unidad puede reproducir de forma repetida las carpetas guardadas en un dispositivo de •... -
Page 204: Uso Del Sintonizador
Uso del sintonizador Capítulo 8: Uso del sintonizador • Las emisoras RDS se pueden sintonizar de forma Cómo escuchar emisoras de radio totalmente automática utilizando la Memoria Automática de Estaciones Programadas (ASPM). El siguiente procedimiento describe cómo sintonizar Consulte página 26. emisoras de radio de FM o AM utilizando las funciones de Para recibir una transmisión de FM en estéreo: sintonización automática (búsqueda) y sintonización manual... -
Page 205: Para Recuperar Una Emisora Memorizada
Uso del sintonizador Se pueden buscar los siguientes tipos de programas: Nota NEWS – Noticias SOCIAL – Asuntos sociales • La función de backup protegerá las emisoras AFFAIRS – Temas de RELIGION – Programas memorizadas durante algunas horas en el caso de que actualidad relacionados con religión se produzca una interrupción en el suministro eléctrico... -
Page 206: Información Proporcionada Por Rds
Uso del sintonizador • Si desea escuchar el mismo tipo de programa en otra Para parar el funcionamiento de la ASPM emisora, pulse RDS PTY mientras el número de canal o antes de que haya finalizado: el nombre de la emisora está parpadeando. El aparato Presione ... -
Page 207: Otras Conexiones
Otras conexiones Capítulo 9: Otras conexiones Conecte las tomas de audio LINE IN del panel posterior al PRECAUCIÓN componente de reproducción auxiliar. • Antes de realizar o cambiar las conexiones, apague el sistema y desenchufe el cable de alimentación de la Panel posterior de este receptor toma de CA. -
Page 208: Reproducción De Audio Con Bluetooth
Reproducción de audio con Bluetooth® Capítulo 10: ® Reproducción de audio con Bluetooth • Onkyo no garantiza un funcionamiento y conexión Reproducción de música empleando la correctos de esta unidad con todos los dispositivos que dispongan de tecnología inalámbrica Bluetooth. tecnología inalámbrica Bluetooth Funcionamiento con mando a distancia Dispositivo habilitado con tecnología... -
Page 209: Cómo Escuchar Música En La Unidad Desde Un Dispositivo Habilitado Para Bluetooth
Reproducción de audio con Bluetooth® Encienda el dispositivo habilitado para BT STANDBY Bluetooth con el que desea sincronizar la unidad y lleve a cabo el procedimiento de sincronización. • Cuando la unidad esté en el modo de espera, con BT STANDBY ajustado a ON, podrá... -
Page 210: Sincronización Y Conexión Mediante Nfc
Reproducción de audio con Bluetooth® Una vez completada la conexión con el Sincronización y conexión smartphone que cuenta con NFC, se muestra el nombre del dispositivo en la pantalla del panel mediante NFC delantero. NFC significa Near Field Communication (comunicación de corte alcance). -
Page 211: Alcance De Operación
Reproducción de audio con Bluetooth® Precauciones relacionadas con los • Si hay algo que obstruya el paso entre esta unidad (incluyendo los productos compatibles con esta unidad) productos compatibles con esta y el dispositivo habilitado con tecnología inalámbrica unidad Bluetooth (como pueda ser una puerta metálica, un muro de hormigón o papel de aluminio aislante), es •... -
Page 212: Información Adicional
Si el problema no se puede solucionar después de comprobar los puntos indicados abajo, solicite al centro de servicio técnico autorizado de Pioneer o a su distribuidor que le haga los trabajos de reparación necesarios. - Page 213 Información adicional Cuando se ha conectado un dispositivo de almacenamiento USB Problema Verificación Solución El dispositivo de ¿Ha conectado correctamente el Conecte el dispositivo adecuadamente (introdúzcalo hasta el almacenamiento USB no se dispositivo de almacenamiento USB? fondo). reconoce. ¿Ha conectado el dispositivo de Esta unidad no es compatible con concentradores USB.
-
Page 214: Discos Y Formatos Que Pueden Reproducirse
Información adicional Cuando el dispositivo de tecnología inalámbrica Bluetooth esté conectado o se esté utilizando Problema Solución El dispositivo de tecnología inalámbrica Bluetooth no puede Compruebe que no haya ningún objeto que emita ondas electromagnéticas en la banda de 2,4 GHz (horno microondas, dispositivo inalámbrico LAN o un conectarse ni manejarse. -
Page 215: Acerca De Los Cd Protegidos Contra La Copia
Información adicional • No coloque el receptor encima de un televisor o monitor • Sólo pueden reproducirse los discos que han sido de color. Tampoco deberá colocarlo cerca de una platina finalizados. ni de otros dispositivos que puedan verse fácilmente •... -
Page 216: Limpieza De La Lente
Pioneer más cercano. Aunque se encuentran a la venta limpiadores de lentes para reproductores, no recomendamos utilizarlos porque podrían dañarlas. Manipulación de discos... -
Page 217: Configuración Del Apagado Automático
Entrada de antena (FM) ....75 no equilibrada “Pioneer” es una marca comercial de Pioneer Intervalo de frecuencia (AM) ..De 522 kHz a 1620 kHz Corporation, y se usa bajo licencia. - Page 218 времени проверяйте сетевой шнур. В случае обнаружения повреждения обратитесь за заменой в ближайший официальный сервисный центр Условия эксплуатации фирмы PIONEER или к Вашему дилеру. Изделие эксплуатируется при следующих S002*_A1_Ru температуре и влажности: +5 °C до +35 °C; влажность менее 85 % (не...
- Page 219 В таком случае увеличьте расстояние между входным гнездом антенны и данным аппаратом (включая изделия, поддерживаемые данным аппаратом). • Pioneer не несет ответственности за любые сбои на совместимых изделиях Pioneer по причине ошибок/сбоев связи, связанных с подключением к сети и/или подключенным оборудованием.
- Page 220 Благодарим за покупку этого изделия компании Pioneer. Для того чтобы правильно обращаться с приобретенной моделью устройства, прочтите, пожалуйста, внимательно данную инструкцию. После того как вы ознакомитесь с инструкцией, сохраните ее в надежном месте для обращения к ней в будущем. Содержание...
-
Page 221: Перед Началом Работы
Перед началом работы Раздел 1: Перед началом работы • Батарейки могут иметь различное напряжение, даже если они одинаковы по размеру и форме. Не используйте Комплект поставки одновременно батарейки различных типов. При вскрытии коробки убедитесь, что в ней присутствуют • Во избежание протекания электролита батареек извлеките... -
Page 222: Названия Частей И Функции
Названия частей и функции Глава 2: Названия частей и функции STANDBY/ON Пульт ДУ Используется для включения ресивера или его переключения в режим ожидания (стр. 18). Кнопки выбора входа STANDBY/ON OPEN/CLOSE Используется для выбора источника входа данного ресивера (стр. -
Page 223: Акустическая Система
Названия частей и функции 10 Кнопки управления воспроизведением Акустическая система Используйте для управления каждой функцией после ее выбора с помощью кнопок функций входа (стр. 18). 11 Кнопки управления Tuner ST/MONO Используется для переключения режима звучания между стереофоническим и монофоническим режимами (стр. - Page 224 Названия частей и функции Прикрепление нескользящих подкладок Прикрепите дополнительные нескользящие подкладки к нижним поверхностям громкоговорителей. ВАЖНО • Громкоговоритель обычно используется в вертикальном положении. При установке громкоговорителей в вертикальном положении При установке громкоговорителей в вертикальном положении прикрепите нескользящие подкладки к нижним поверхностям...
-
Page 225: Передняя Панель
Названия частей и функции Передняя панель TIMER VOLUME PHONES AUDIO IN Главный дисплей Датчик дистанционного управления Принимает сигналы от пульта ДУ. Регулирование громкости Лоток для дисков Используйте для регулировки уровня громкости прослушивания (стр. 13). Поместите диск, стороной с этикеткой вверх (стр. 18). Подсветка... -
Page 226: Верхняя Панель
Названия частей и функции Верхняя панель STANDBY/ON INPUT INPUT STANDBY/ON Используется для включения ресивера или его переключения Используется для выбора источника входа. в режим ожидания (стр. 18). Длительно нажимайте, чтобы перейти в режим BT STANDBY. Зона... -
Page 227: Подключение Громкоговорителей
Подключения Глава 3: Подключения • Не подключайте никаких динамиков, кроме тех, ПРЕДУПРЕЖДЕНИЕ которые входят в комплект поставки. • Обязательно выключите питание и отсоедините кабель • Не подключайте входящие в комплект динамики к питания от розетки при выполнении подключений или каким-либо усилителям, кроме того, что входит в изменении... -
Page 228: Подключение Антенн
Подключения Использование внешних антенн Подключение антенн Улучшение качества приема FM • Подключите рамочную антенну АМ и проволочную Для подключения внешней FM-антенны используйте PAL- антенну FM, как показано ниже. соединитель (приобретается отдельно). • Для улучшения приема и качества звука подключите внешние антенны (см. раздел Использование внешних антенн... -
Page 229: Начало Работы
Начало работы Глава 4: Начало работы Примечание Для включения питания • При восстановлении электропитания после повторного Нажмите кнопку STANDBY/ON для включения питания. подключения аппарата или после аварийного После использования: отключения питания, переустановите часы. Нажмите кнопку STANDBY/ON, чтобы войти в режим ожидания. -
Page 230: Настройка Таймера Включения
Начало работы Управление звуком Настройка таймера включения Используется для изменения текущей установки таймера или Эквалайзер для установки нового таймера. При нажатии кнопки EQUALIZER на дисплее будет Нажмите STANDBY/ON, чтобы отображаться настройка текущего режима. Для переключения включить питание. на другой режим нажмите несколько раз кнопку EQUALIZER, пока... -
Page 231: Вызов Таймера Включения
Начало работы Вызов таймера включения Использование наушников Может использоваться для повторного применения текущей установки таймера. Подсоедините штекер наушников к гнезду. При подключении наушников звук не будет Также выполните шаги с 1 до 3 в разделе воспроизводиться через громкоговорители. «Настройка таймера включения». Нажмите... - Page 232 устройству позволяет прослушивать высококачественный контролироваться с помощью данной системы, поэтому звук с iPod/iPhone/iPad. перед выполнением подключения рекомендуется отключать эквалайзер. • Компания Pioneer не может ни при каких обстоятельствах нести ответственность за какой-либо Подтверждение поддержки прямой или косвенный ущерб, причиненный моделей iPod/iPhone/iPad недостатками...
- Page 233 Воспроизведение iPod/iPhone/iPad Воспроизведение iPad Подключите ваш iPad. Если iPad подключается, когда данный аппарат включен, воспроизведение iPad не начнется. Нажмите USB для выбора в качестве входного источника. На основном дисплее показывается индикация «USB/IPOD». После завершения распознавания автоматически начнется воспроизведение. Примечание • Для получения подробных инструкций относительно использования...
-
Page 234: Воспроизведение Диска
Воспроизведение диска Глава 6: Воспроизведение диска В этой системе могут воспроизводиться стандартные диски CD, CD-R/RW в формате CD и CD-R/RW с файлами MP3 или WMA, но запись на них невозможна. Некоторые диски аудио CD-R и CD-RW могут не воспроизводиться из-за состояния диска... -
Page 235: Повторное Воспроизведение
Воспроизведение диска Различные функции для дисков Примечание Назначение Основной Пульт Операция • Нельзя выбрать номер дорожки, превышающий число блок ДУ дорожек на диске. Воспроизведение Нажмите в режиме Для остановки воспроизведения: остановки. Нажмите . Стоп Нажмите в режиме ... - Page 236 Воспроизведение диска О загрузке файлов MP3/WMA • При воспроизведении в случайной последовательности устройство будет выбирать и проигрывать дорожки В интернете имеется много музыкальных сайтов, где вы автоматически. (Нельзя выбирать последовательность можете загрузить музыкальные файлы в формате MP3/WMA. дорожек.) Для загрузки музыкальных файлов следуйте инструкциям на •...
- Page 237 Воспроизведение диска Выбор папки для воспроизведения Переключение содержимого дисплея Чтобы выбрать папку для воспроизведения, выполните Нажмите DISPLAY. следующие операции. Если в файл записана информация о названии песни, имени исполнителя и названии альбома, то эта информация будет DISPLAY FOLDER TUNE+ STANDBY/ON OPEN/CLOSE отображаться...
- Page 238 запоминающее устройство USB на стр. 33. устройств. • Когда не идет воспроизведение с запоминающего • Pioneer не гарантирует, что будет воспроизводиться устройства USB, если в течение 20 минут и дольше с любой файл, записанный на запоминающем устройстве устройством не выполняется никаких операций, питание...
-
Page 239: Переключение Содержимого Дисплея
Воспроизведение с USB Для воспроизведения всех дорожек в случайной последовательности: Воспроизведение в желаемом Нажмите несколько раз RANDOM, пока не появится порядке (запрограммированное индикация «RDM ON». Нажмите ENTER. воспроизведение) Для отмены воспроизведения в случайной • Данный аппарат может повторно воспроизводить папки, последовательности: сохраненные... -
Page 240: Прослушивание Радиопередач
Использование тюнера Раздел 8: Использование тюнера • При настройке на станцию RDS (Система радиоданных) Прослушивание радиопередач сначала будет отображаться частота. Наконец, появится название станции. В приведенных ниже пунктах описывается процедура • Полной автоматической настройки можно достичь для настройки на радиостанции диапазона FM и AM с станций... -
Page 241: Для Вызова Занесенной В Память Станции
Использование тюнера Нажмите кнопку MEMORY/PROGRAM, Одной из функций системы RDS является возможность поиска станции, транслирующей требуемый тип программы. чтобы сохранить эту станцию в памяти. Например, можно осуществлять поиск станции, которая Если до запоминания станции запрограммированный номер транслирует программы в жанре JAZZ (джаз). изменился... -
Page 242: Информация, Предоставляемая Системой Rds
Использование тюнера После загорания в течение 2 секунд выбранного типа Если некоторые станции уже сохранены в памяти, число программы, появится индикация «SEARCH», и начнется новых станций, которые можно сохранить, будет меньше. операция поиска. Нажмите TUNER на пульте дистанционного управления. Примечание •... -
Page 243: Другие Подключения
Другие подключения Раздел 9: Другие подключения Подключите гнезда аудио LINE IN на задней панели к ПРЕДУПРЕЖДЕНИЕ вспомогательному компоненту воспроизведения. • Перед выполнением или изменением соединений выключите питание и отсоедините кабель питания от Задняя панель данного устройства сетевой розетки. Подсоединение дополнительных компонентов... -
Page 244: Воспроизведение Bluetooth® Audio
Воспроизведение Bluetooth® Audio Глава 10: ® Воспроизведение Bluetooth Audio • Компания Onkyo не гарантирует правильное Воспроизведение музыки с помощью подключение и работу этого устройства со всеми устройствами, в которых используется беспроводная беспроводной технологии Bluetooth технология Bluetooth. Устройство с беспроводным Использование дистанционного интерфейсом... -
Page 245: Прослушивание Музыки На Аппарате С Устройством С Поддержкой Bluetooth
Воспроизведение Bluetooth® Audio Включите электропитание того BT STANDBY устройства с поддержкой Bluetooth, с которым нужно выполнить спаривание, и • Можно выполнить следующие действия, когда выполните процедуру спаривания. микросистема находится в режиме ожидания при переключении режима BT STANDBY в положение ON (ВКЛ). -
Page 246: Спаривание И Подключение С Помощью Технологии Nfc
Воспроизведение Bluetooth® Audio После установки соединения со Спаривание и подключение с помощью смартфоном с поддержкой NFC на дисплее технологии NFC передней панели данного устройства появится имя устройства. NFC означает Near Field Communication (ближняя бесконтактная связь). Если смартфон с поддержкой NFC Запустите... -
Page 247: Рамки Действия
Воспроизведение Bluetooth® Audio Меры предосторожности, касающиеся разъемом антенны и устройством, оснащенным беспроводной технологией Bluetooth, или данным соединений с аппаратами, устройством (включая аппараты, поддерживаемые поддерживаемыми данным данным устройством). • Если между данным устройством (включая аппараты, устройством поддерживаемые данным устройством) и устройством, •... -
Page 248: Дополнительная Информация
другим компонентом. Проверьте другие компоненты и используемые электрические приборы. Если неполадку не удается устранить даже после ознакомления с приведенными ниже рекомендациями, то обратитесь в ближайший авторизованный сервисный центр Pioneer или к вашему дилеру для выполнения ремонта. • Если устройство перестает нормально работать из-за внешнего воздействия, например из-за разрядов статического... - Page 249 Дополнительная информация Когда подключено запоминающее устройство USB Неполадка Проверьте Устранение Запоминающее устройство Запоминающее устройство USB Подключите устройство надежно (до упора). USB не распознается. подключено правильно? Подключено ли запоминающее Данное устройство не поддерживает концентраторы USB. устройство USB через концентратор Подключите запоминающее устройство USB напрямую. USB? Данное...
- Page 250 Дополнительная информация Когда подключено или работает устройство с беспроводным интерфейсом Bluetooth Неполадка Устранение Устройство, оснащенное беспроводной технологией Bluetooth, не Проверьте, нет ли рядом с устройством источников подключается или не работает. электромагнитного излучения в диапазоне 2,4 ГГц (микроволновые Не воспроизводится или прерывается звук с устройства, оснащенного печи, устройства...
-
Page 251: Воспроизводимые Диски И Форматы
Дополнительная информация Воспроизводимые диски и форматы • Имеющиеся в продаже звуковые компакт-диски (Audio CD) Audio CD • Диски CD-R/ -RW/ -ROM с музыкой, записанной в формате CD-DA Файлы WMA, записанные на диски CD-R/ -RW/ -ROM или запоминающие устройства USB Файлы MP3, записанные на диски CD-R/ -RW/ -ROM или запоминающие устройства USB •... -
Page 252: О Конденсации
загрязняется, но если она по какой-то причине начнет О дисках специальной формы работать неправильно из-за грязи или пыли, обратитесь в ближайший авторизованный сервисный центр Pioneer. Хотя в Диски особой формы (в виде сердца, шестиугольника и т. п.) продаже имеются средства очистки линз для проигрывателей, не... -
Page 253: Ipod/Iphone/Ipad
Дополнительная информация iPod/iPhone/iPad Настройка автоматического отключения питания Нажимайте кнопку на микросистеме в течение 3 секунд для настройки автоматического отключения питания на ON/OFF. • Операция может быть выполнена только при использовании на микросистеме. “Made for iPod” и “Made for iPhone” и “Made for iPad” •... -
Page 254: Технические Характеристики
Поддерживаемый кодек ... . . SBC (Subband Codec) «Pioneer» — это товарный знак Pioneer Corporation, и он Поддерживаемая защита материала....SCMS-T используется... - Page 255 Дополнительная информация Дату изготовления оборудования можно определить по серийному номеру, который содержит информацию о месяце и годе производства. Серийный номер 12 цифр 2 цифры 10 цифр Дата изготовления оборудования P1 - Год изготовления Год 2001 2002 2003 2004 2005 2006 2007 2008 2009...
- Page 256 Дополнительная информация...
- Page 257 Дополнительная информация...
- Page 258 O&P Corporation Haven 1087, Keetberglaan 1, 2-3-12, Yaesu, Chuo-Ku, Tokyo 9120 Melsele, Belgium 104-0028, Japan http://www.pioneer.eu [*] X-CM35-K, X-CM35-W, X-CM35-R, X-CM35-L, X-CM35-N, X-CM35-D, X-CM35-Y English: Dansk: Hereby, Pioneer, declares that this [*] is Undertegnede Pioneer erklærer in compliance with the essential herved, at følgende udstyr [*]...
- Page 259 Português: Slovenščina: Pioneer declara que este [*] está Pioneer izjavlja, da je ta [*] v skladu z conforme com os requisitos essenciais bistvenimi zahtevami in ostalimi e outras disposições da Directiva relevantnimi določili direktive 1999/5/CE. 1999/5/ES. Čeština: Română: Pioneer tímto prohlašuje, že tento [*] je Prin prezenta, Pioneer declara ca acest ve shodě...
- Page 260 © 2015 Onkyo & Pioneer Corporation. All rights reserved. © 2015 Onkyo & Pioneer Corporation. Tous droits de reproduction et de traduction réservés. <Germany> Hanns-Martin-Schleyer-Straße. 35, 47877 Willich, Germany Tel: +49(0)2154 913222 <UK>...