Table des Matières
Publicité
Les langues disponibles
Les langues disponibles
Liens rapides
CI 97I I S
Italiano
IT
Istruzioni per l'uso
CUCINA E FORNO
Sommario
Istruzioni per l'uso, 1
AVVERTENZA,2
Descrizione dell'apparecchio- Vista d'insieme,5
Descrizione dell'apparecchio- Pannello di controllo,5
Assistenza,9
Installazione,10
Avvio e utilizzo,12
Programmi di cottura,13
Utilizzo del piano cottura,17
Precauzioni e consigli,22
Manutenzione e cura,24
English
GB
Operating Instructions
COOKER AND OVEN
Contents
Operating Instructions,1
Warnings,2
Description of the appliance-Overall view,5
Description of the appliance-Control Panel,5
Assistance,9
Installation,26
Start-up and use,28
Cooking modes,29
Using the hob,33
Precautions and tips,38
Care and maintenance,40
Français
FR
Mode d'emploi
CUISINIERE ET FOUR
Sommaire
Mode d'emploi,1
Description de l'appareil-Vue d'ensemble, 5
Description de l'appareil-Tableau de bord,5
Assistance,9
Installation,42
Mise en marche et utilisation,44
Utilisation du plan de cuisson,45
Utilisation du plan,49
Précautions et conseils,54
Nettoyage et entretien,56
Nederland
NL
Gebruiksaanwijzing
FORNUIS EN OVEN
Inhoud
Gebruiksaanwijzing,1
AVERTISSEMENT,2
Beschrijving van het apparaat-Aanzichttekening,5
Beschrijving van het apparaat-Bedieningspaneel,5
Servicedienst,9
Installatie, 58
Starten en gebruik,60
Kookprogramm,61
De kookzones,65
Voorzorgsmaatregelen en advies,70
Onderhoud en verzorging,72
Publicité
Table des Matières

Manuels Connexes pour SCHOLTES CI 97I I S


Sommaire des Matières pour SCHOLTES CI 97I I S
- Page 1 CI 97I I S Italiano Français Istruzioni per l’uso Mode d’emploi CUCINA E FORNO CUISINIERE ET FOUR Sommario Sommaire Istruzioni per l’uso, 1 Mode d’emploi,1 AVVERTENZA,2 Descrizione dell’apparecchio- Vista d’insieme,5 Descrizione dell’apparecchio- Pannello di controllo,5 Description de l’appareil-Vue d’ensemble, 5 Assistenza,9 Description de l’appareil-Tableau de bord,5...
- Page 2 AVVERTENZA Warnings ATTENZIONE: Questo apparecchio e le sue WARNING: The appliance and its parti accessibili diventano molto caldi durante accessible parts become hot during use. l’uso. Care should be taken to avoid touching Bisogna fare attenzione ed evitare di toccare gli heating elements.
- Page 3 D’AVERTISSEMENT WAARSCHUWING ATTENTION : cet appareil ainsi que ses parties accessibles deviennent très chauds Zorg ervoor dat kinderen die kleiner dan pendant leur fonctionnement. 8 jaar oud zijn niet dichtbij het apparaat kunnen komen, tenzij onder constant Il faut faire attention de ne pas toucher les toezicht.
-
Page 4: Descrizione Dell'apparecchio
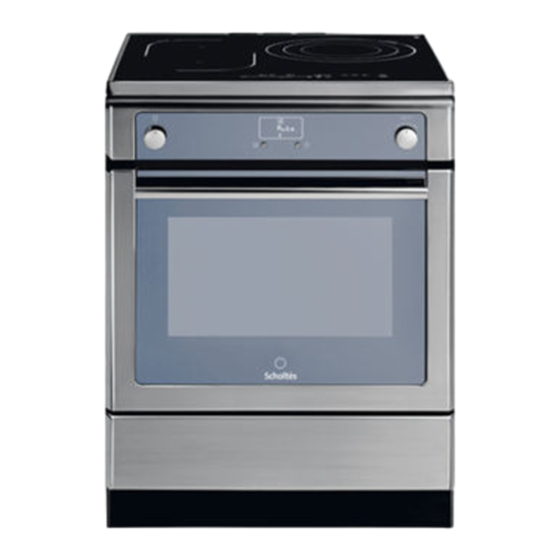
Description de l’appareil Descrizione dell’apparecchio Vue d’ensemble Vista d’insieme 1. Table de cuisson céramique 1.Piano di cottura induzione 2. Tableau de bord 2.Pannello di controllo 3. Support GRILLE 3.Ripiano GRIGLIA 4. Support LECHEFRITE 4.Ripiano LECCARDA 5. Pied de réglage 5.Piedino di regolazione 6. -
Page 5: Afficheur
Descrizione dell’apparecchio DISPLAY 1. Icona PROGRAMMA BASSA TEMPERATURA 2. Icone PROGRAMMI AUTOMATICI 3. Indicatore del Preriscaldamento 4. Indicatore PORTA BLOCCATA 5. Icona STOP 6. Icona DURATA 7. Icona FINE COTTURA 8. Icona CONTAMINUTI 9. Icona OROLOGIO 10.Digit numerici TEMPERATURA e TEMPI Description of the appliance DISPLAY 1. - Page 6 Descrizione dell’apparecchio Pannello di controllo Il pannello di controllo che qui viene descritto è rappresentato a fini esemplificativi: può non essere una esatta riproduzione del modello acquistato. 1ZONA „SLIDER”- per accendere/ spengere la piastra o regolare la Potenza (vedi Avvio e utilizzo). 2 Indicazione ZONA DI COTTURA indica la zona di cottura corrispondente.
-
Page 7: Control Panel
Description of the appliance Description de l’appareil Control panel Tableau de bord The control panel described in this manual is only a representative Le tableau de bord qui est example: it may not exactly match the panelon your appliance. décrit n.a qu.une valeur d.exemple : il peut ne pas correspondre au modèle acheté... -
Page 8: Beschrijving Van Het Apparaat
Beschrijving van het apparaat Bedieningspaneel Het bedieningspaneel dat hier wordt beschreven en afgebeeld geldt alleen als voorbeeld: het is mogelijk dat het niet exact overeenkomt met het door u aangeschafte model. 1 ZONE „SCHUIFREGELAAR”- om de kookplaat aan- of uit te zetten of de Stroomsterkte te regelen (Zie Starten en gebruik) 2 Aanwijzing KOOKZONE, geeft de overeenkomende... -
Page 9: Servicedienst
Le suddette tariffe potrebbero essere soggette a variazione • Het serienummer (S/N) da parte dell’operatore telefonico; per maggiori informazioni Deze informatie bevindt zich op het typeplaatje op het consultare il sito www.scholtes.com. apparaat. Assistance Warning: The appliance is fitted with an automatic diagnostic system which detects any malfunctions. -
Page 10: Posizionamento E Livellamento
Installazione ! È importante conservare questo libretto per poterlo Le gambe* si montano a consultare in ogni momento. In caso di vendita, di incastro sotto la base della cessione o di trasloco, assicurarsi che resti insieme cucina. all’apparecchio. ! Leggere attentamente le istruzioni: ci sono importanti informazioni sull’installazione, sull’uso e sulla sicurezza. - Page 11 ! Il cavo deve essere controllato periodicamente e 400V 2N~ sostituito solo da tecnici autorizzati. H05RR-F 4x4 CEI-UNEL 35363 H05VV-F 4x4 CEI-UNEL 35746 L2 L1 ! L’azienda declina ogni responsabilità qualora queste norme non vengano rispettate. TABELLA CARATTERISTICHE Dimensioni 32x43,5x40 cm 400V 3N~ Forno HxLxP H05RR-F 5x2.5 CEI-UNEL 35363...
-
Page 12: Avvio E Utilizzo
Avvio e utilizzo Impostare l’orologio 4. Durante la cottura è sempre possibile: - modificare il programma di cottura agendo sulla ! Si può impostare sia quando il forno è spento che manopola PROGRAMMI; quando è acceso, ma non si è programmata la fine di - modificare la temperatura agendo sulla manopola una cottura. -
Page 13: Programmi Di Cottura Automatici
Programmi di cottura manuali Programmi di cottura automatici ! Tutti i programmi hanno una temperatura di cottura preimpostata. Essa può essere regolata manualmente, ! La temperatura e la durata di cottura sono impostandola a piacere tra 40°C e 250°C. Nel prestabilite tramite il sistema C.O.P.®... -
Page 14: Consigli Pratici Di Cottura
Infornare a forno freddo. Nel caso in cui si desideri 2. ruotare la manopola IMPOSTAZIONE TEMPI verso il infornare a forno caldo, a seguito di una cottura che “+” e “-” per regolare il tempo desiderato; ha raggiunto alte temperature, il display visualizzerà 3. - Page 15 ! Quando si inserisce la griglia assicurarsi che il fermo sia PIZZA nella parte posteriore della cavità (vedi immagine). • Utilizzare una teglia in alluminio leggero, appoggiandola sulla griglia in dotazione. Con la leccarda si allungano i tempi di cottura e difficilmente si ottiene una pizza croccante.
- Page 16 Tabella cottura in forno PIETANZE ESEMPI FUNZIONE TEMPERATURA SUPPORTI pan di spagna, savoiradi, biscotti arrotolati, Biscotti (senza lievito) 200 °C tortiera su leccarda Brownie, Torte al formaggio bianco 200 °C tortiera su leccarda crostate allo zucchero, torte di pane briosciato alla Crostate in pasta lievitata 180 °C tortiera su leccarda...
- Page 17 Utilizzo del piano cottura La colla applicata sulle guarnizioni lascia alcune Accensione delle zone di cottura tracce di grasso sul vetro. Prima di utilizzare l’apparecchio, si raccomanda di eliminarle con un Per mettere in funzione una zona di cottura selezionare prodotto specifico per la manutenzione non abrasivo.
-
Page 18: Blocco Dei Comandi
Programmazione della durata di una cottura 1. Premere il tasto di programamzione . finchè la spia La pressione prolungata dei tasti consente contaminuti non si accende l’avanzamento veloce dei minuti del timer. ! È possibile programmare contemporaneamente tutte 2. Impostare la durata desiderata tramite i tasti le zone di cottura per una durata compresa tra 1 e 99 3. -
Page 19: Descrizione Tecnica
!Accessori. Modalità EXTENSO TECHNOLOGY Per il corretto funzionamento della zona cottura La zona EXTENSO TECHNOLOGY permette di regolare EXTENSO TECHNOLOGY, si consiglia l’utilizzo di lo stesso livello di potenza su due piastre “collegate” pentole con fondo ellittico o allungato e dimensione tra loro. -
Page 20: Consigli Pratici Per L'uso Dell'apparecchio
Consigli pratici per l’uso dell’apparecchio appena la temperatura è scesa a un livello accettabile. ! Adoperare recipienti di cottura il cui materiale Interruttore di sicurezza L’apparecchio è dotato di un interruttore di sicurezza che di fabbricazione sia compatibile con il principio spegne le zone di cottura automaticamente quando viene dell’induzione (materiale ferromagnetico). -
Page 21: Consigli Pratici Per La Cottura
Consigli pratici per la cottura Frittura Cottura a Pressione Pentola a Pressione Grigliata Ebollizione Crêpe Cottura a fuoco vivo e doratura (Arrosti, Bistecche, Scaloppine, Filetti di pesce, Uova al tegamino) Addensamento rapido (Sughi liquidi) Acqua bollente (Pasta, Riso, Verdure) Latte Addensamento lento (Sughi consistenti) Cottura a bagnomaria Cottura Pentola a pressione dopo il sibilo... -
Page 22: Precauzioni E Consigli
Precauzioni e consigli ! L’apparecchio è stato progettato e costruito in • Non staccare la spina dalla presa della corrente conformità alle norme internazionali di sicurezza. tirando il cavo, bensì afferrando la spina. Queste avvertenze sono fornite per ragioni di sicurezza •... -
Page 23: Smaltimento
• Avvertenza per i portatori di pacemaker o altri • Si raccomanda di effettuare sempre le cotture al GIRARROSTO e ROSTICCERIA a porta chiusa: sia dispositivi medici impiantabili attivi: Il piano cottura è conforme a tutte le normative per ottenere migliori risultati che per un sensibile vigenti in materia di interferenze elettromagnetiche. -
Page 24: Manutenzione E Cura
Manutenzione e cura Escludere la corrente elettrica 2. Svitare la lampadina e sostituirla con una analoga: potenza 15 W, attacco E 14. Prima di ogni operazione isolare l’apparecchio dalla rete Rimontare il coperchio, prestando attenzione a di alimentazione elettrica. posizionare correttamente la guarnizione (vedi fi gura). ! Non utilizzare la lampada forno per e come illuminazione di ambienti. - Page 25 Pulizia automatica PIROLISI Dispositivi di sicurezza • l’icona sul display illuminata indica che la Il programma PIROLISI porta la temperatura interna porta del forno si è bloccata automaticamente non del forno a raggiungere i 500°C e attiva il processo di appena la temperatura ha raggiunto valori elevati;...
-
Page 26: Positioning And Levelling
Installation ! Please keep this instruction booklet in a safe place Levelling for future reference.. Make sure the booklet remains If it is necessary to level the with the appliance if it is sold, given away or moved. appliance, screw the adjustable feet into the positions provided on each ! Please read this manual carefully: it contains... - Page 27 • The socket can withstand the maximum power of the appliance, which is indicated by the data plate. • The voltage falls between the values indicated on the data plate. • The socket is compatible with the plug of the appliance.
-
Page 28: Start-Up And Use
Start-up and use Setting the clock The temperature may be changed by turning the THERMOSTAT knob ! The clock may be set when the oven is switched 3. When the preheating indicator switches off off or when it is switched on, provided that the end and a buzzer sounds the preheating process is time of a cooking cycle has not been programmed complete: you may now place the food in the oven. - Page 29 Automatic cooking modes Manual cooking modes ! All cooking modes have a default cooking temperature which ! The temperature temperature and cooking duration are pre-set temperature temperature temperature pre-set pre-set pre-set pre-set may be adjusted manually to a value between 40°C and 250°C as values, guaranteeing a perfect result every time - automatically.
-
Page 30: Practical Cooking Advice
immediately following a high-temperature cooking programme, the 3. Press the button again to confirm; text “Hot” will appear on the display until the temperature of the 4. When the set time has elapsed, the text END appears on the oven has fallen to 40°. At this point it will be possible to place the DISPLAY, the oven will stop cooking and a buzzer sounds. -
Page 31: Oven Cooking Advice Table
! When inserting the shelf make sure the backstop is at the rear of the cavity (see image). Oven cooking advice table DISHES EXAMPLES FUNCTION TEMPERATURE SUPPORT Savoury sponge cake savoury sponge cake with olives, tuna, etc. Baked cakes or Multilevel 160 °C cake tin on dripping pan made with yoghurt... - Page 32 Oven cooking advice table DISHES EXAMPLES FUNCTION TEMPERATURE SUPPORT sponge cake, sponge fingers, swirled biscuits, Biscuit cakes (without yeast) 200 °C cake tin on dripping pan brownies, etc. White cheese tart 200 °C cake tin on dripping pan Tarts made using leavened dough sugar pie, fruit brioche loaf, etc.
-
Page 33: Booster Function
Start-up and use The glue applied on the gaskets leaves traces of grease power level, or towards the left to decrease the on the glass. Before using the appliance, we recommend power level. you remove these with a special non-abrasive cleaning The min/med/max buttons can also be pressed product. -
Page 34: Control Panel Lock
3. Press the programming button. The indicator light Control panel lock corresponding to the selected zone will start flashing. - - - - - + + + + + When the hob is switched on, it is possible to lock the 4. -
Page 35: Practical Advice On Using The Appliance
Practical advice on using the appliance Safety switch The appliance has a safety switch which automatically ! Use cookware made from materials which are compatible switches the cooking zones off after they have been in with the induction principle (ferromagnetic material). We operation for a certain amount of time at a particular power especially recommend pans made from: cast iron, coated level. -
Page 36: Technical Description
! Accessories To exit this mode, follow the procedure described above. For optimal EXTENSO TECHNOLOGY performance, The display will show the text DE and OF and the hob will we recommend the use of pans with an elliptical or be switched off. When it is next switched on, the hob will elongated base and a major diameter of at least 250 function normally. - Page 37 Practical cooking advice Frying Pressure cooking Pressure cooker Grilling Boiling Crêpes Cooking on a high flame and browning (roasts, steaks, escalopes, fish fillets, fried eggs) Fast thickening (liquid juices) Boiling water (pasta, rice, vegetables) Milk Slow thickening (dense juices) Bain-marie cooking Pressure cooking after whistle Low-flame cooking (stews) Reheating dishes...
-
Page 38: Precautions And Tips
Precautions and tips ! This appliance has been designed and • Always make sure the knobs are in the o position manufactured in compliance with international when the appliance is not in use. safety standards. The following warnings are • When unplugging the appliance, always pull the provided for safety reasons and must be read plug from the mains socket;... -
Page 39: Respecting And Conserving The Environment
Respecting and conserving the • Do not let children play with the appliance. environment • If the cooker is installed on a pedestal, take all necessary precautions to ensure that the appliance does not slide off this pedestal. • You can help to reduce the peak load of the electricity supply network companies by using the •... -
Page 40: Care And Maintenance
Care and maintenance Switching the appliance off 1. Remove the glass cover using a screwdriver. 2. Unscrew the light bulb and replace it with a Disconnect your appliance from the electricity supply similar one: Wattage 15 W, cap E 14. before carrying out any work on it. - Page 41 Automatic cleaning using the Safety devices PYROLYTIC cycle • The icon on the display, when lit, indicates During the PYROLYTIC cycle, the internal that the oven door was automatically locked as temperature of the oven reaches 500°C. The soon as the temperature reached a high value. pyrolytic cycle is activated and burns away food and grime residues.
-
Page 42: Positionnement Et Nivellement
Installation ! Conserver ce mode d’emploi pour pouvoir le Nivellement Pour mettre l’appareil bien à consulter à tout moment. En cas de vente, de cession plat, visser les pieds de réglage ou de déménagement, veiller à ce qu’il suive l’appareil. fournis aux emplacements prévus aux coins à... - Page 43 !Après installation de l’appareil, le câble électrique et la prise de courant doivent être facilement accessibles !Le câble ne doit être ni plié ni excessivement écrasé. !Le câble doit être contrôlé périodiquement et ne peut être remplacé que par un technicien agréé. ! Nous déclinons toute responsabilité...
-
Page 44: Mise En Marche Et Utilisation
Mise en marche et utilisation Mise à l’heure de l’horloge 3. L’extinction de l’indicateur de préchauffage le déclenchement du signal sonore indiquent la fin du ! Son réglage est possible que le four soit éteint préchauffage: il est temps d’enfourner les plats. ou allumé... -
Page 45: Programmes De Cuisson Manuels
Programmes de cuisson manuels Programmes de cuisson automatiques ! Tous les programmes ont une température de cuisson ! La température et la durée de cuisson sont présélectionnée. Il est possible de la régler manuellement, présélectionnées et ne peuvent pas être modifiées à l’aide entre 40°C et 250°C au choix. -
Page 46: Conseils De Cuisson
4. à expiration de la durée sélectionnée, l’AFFICHEUR affiche Recette du PAIN : END, le four stoppe la cuisson et un signal sonore retentit. 1 Plaque de 1000g Maxi. gradin du bas • Exemple: il est 9h00 et la durée programmée est de 1h15. Le programme s’arrête automatiquement à... - Page 47 ! Lors de l’introduction de la grille, s’assurer que la butée d’arrêt est bien dans la partie arrière de l’enceinte (voir photo) Tableau de cuisson au four PLATS EXEMPLES FONCTION TEMPÉRATURE SUPPORTS Gâteaux ou Gâteaux salés Gâteaux aux olives, au thon, etc. 160 °C moule sur lèchefrite multiniveaux...
- Page 48 Tableau de cuisson au four PLATS EXEMPLES FONCTION TEMPÉRATURE SUPPORTS Biscuits (sans levure) génoise, biscuits à la cuiller, biscuits roulés, Brownies, 200 °C moule sur lèchefrite Tartes au fromage blanc 200 °C moule sur lèchefrite Tartes à pâte levée tartes au sucre, tartes aux fruits à pâte brioche 180 °C moule sur lèchefrite moule sur lèchefrite (haricots...
-
Page 49: Allumage Des Foyers
Mise en marche et utilisation La colle utilisée pour les joints laisse des traces de Allumage des foyers graisse sur le verre. Nous conseillons de les éliminer Pour mettre en marche un foyer, sélectionner la touche du avant d’utiliser l’appareil à l’aide d’un produit d’entretien foyer souhaité... -
Page 50: Verrouillage Des Commandes
2. Régler le niveau de puissance du foyer. 3. Appuyer sur la touche pour valider. Le compte à rebours du minuteur démarre aussitôt. Une fois 3. Appuyer sur la touche de programmation . Le voyant le temps écoulé, un signal sonore retentit (pendant 1 minute). correspondant au foyer sélectionné... -
Page 51: Conseils D'utilisation De L'appareil
Conseils d’utilisation de l’appareil la table est à nouveau utilisable dès que la température est redescendue à un niveau acceptable. ! Utiliser des récipients dont le matériau est compatible avec l’induction (matériau ferromagnétique). Nous Interrupteur sécurité recommandons l’utilisation de casseroles en: fonte, L’appareil est équipé... -
Page 52: Description Technique Des Modèles
Mode EXTENSO TECHNOLOGY !Accessoires Pour un bon fonctionnement de la zone de cuisson La zone EXTENSO TECHNOLOGY permet de régler le EXTENSO TECHNOLOGY, nous conseillons d’utiliser même niveau de puissance sur deux plaques „ reliées „ entre elles. Elle est activable quand les deux plaques des cocottes à... -
Page 53: Conseils Utiles Pour La Cuisson
Conseils utiles pour la cuisson Friture Mise en pression Autocuisser Grillade Ebullition Crepes Saise et coloration (Rotis, Steack, Escalope, Filets de poisson, Oeufs au plat) Réduction rapide (Sauce liquides) Eau Frémissante (Pates, Riz, Légumes) Lait Réduction lente (Sauce épaisses) Cuisson au bain-marie Cuisson Autocuiseur après chuchotement Mijotage (Ragouts) Réchauffage des préparations... -
Page 54: Précautions Et Conseils
Précautions et conseils ! Cet appareil a été conçu et fabriqué conformément débrancher la fiche de la prise de courant. aux normes internationales de sécurité. Ces • N’effectuer aucune opération de nettoyage ou consignes de sécurité sont très importantes et d’entretien sans avoir auparavant débranché... -
Page 55: Economies Et Respect De L'environnement
• Avis à toute personne portant un pacemaker ou Economies et respect de l’environnement autre implant médical actif : La table est conforme à toutes les réglementations en matière d’interférences électromagnétiques. • Pour faire des économies d’électricité, utiliser autant Par conséquent, ce produit est parfaitement que possible le four pendant les heures creuses. -
Page 56: Nettoyage Et Entretien
Nettoyage et entretien 1. enlever le couvercle en verre à l’aide d’un tournevis. Mise hors tension 2. Dévisser l’ampoule et la remplacer par une autre de Avant toute opération de nettoyage ou d’entretien même type : puissance 15 W, culot E 14. couper l’alimentation électrique de l’appareil. -
Page 57: Nettoyage Automatique Par Pyrolyse
Nettoyage automatique par PYROLYSE • l’icône indique qu’il est possible d’annuler, à tout moment, le cycle de nettoyage par pression sur Pendant le programme PYROLYSE, la température à la touche l’intérieur du four atteint 500°C et lance le processus de pyrolyse, autrement dit, la carbonisation •... -
Page 58: Installatie
Installatie ! Bewaar dit instructieboekje zorgvuldig voor eventuele raadpleging in de toekomst. In het geval u het De poten* moeten aan het apparaat verkoopt, weggeeft of wanneer u verhuist, onderstuk van het fornuis moet het boekje bij het apparaat bewaard worden. worden vastgeklemd. - Page 59 staan aangegeven op het typeplaatje; • de contactdoos en de stekker van het apparaat overeenkomen. Als dat niet zo is, dient u ofwel de stekker ofwel de contactdoos te vervangen; gebruik geen verlengsnoeren of dubbelstekkers. ! Wanneer het apparaat geïnstalleerd is, moeten de elektrische kabel en de contactdoos gemakkelijk te bereiken zijn.
-
Page 60: Starten En Gebruik
Starten en gebruik De klok instellen 3. Als de aanwijzer van de voorverwarming uitgaat en u een geluidssignaal hoort, is de voorverwarming !U kunt de klok zowel instellen als de oven uit is als compleet: zet de etenswaren in de oven. wanneer hij aan is, maar alleen als u geen uitgestelde 4. -
Page 61: Automatische Kookprogramma's
Automatische kookprogramma’s Handmatige kookprogramma’s ! Alle programma’s hebben een vooringestelde ! De temperatuur en de duur van de bereiding zijn kooktemperatuur. Deze kan handmatig worden aangepast,en ingesteld en kunnen niet worden gewijzigd door het systeem naar wens worden ingesteld tussen de 40°C en de 250°C. C.O.P.®... - Page 62 oventemperatuur de 40° zal hebben bereikt. Nu kunt u het DISPLAY het woord END, beëindigt de oven de bereiding en brood in de oven zetten. klinkt een geluidssignaal. • B.v.: het is 9:00 uur en u programmeert een duur van 1 Recept voor BROOD: 1 bakplaat van 1000 g max, onderste ovenstand uur en 15 minuten.
-
Page 63: Kooktabel Oven
! Als u het rooster erin schuift dient u zich ervan te verzekeren dat de blokkering zich aan de achterzijde van de opening bevindt (zie afbeelding). Kooktabel oven GERECHTEN VOORBEELDEN FUNCTIE TEMPERATUUR HULPMIDDELEN Gebak- of Hartige plum-cakes plum-cake met olijven, tonijn, enz. 160 °C taartvorm op lekplaat multiniveau... - Page 64 Kooktabel oven GERECHTEN VOORBEELDEN FUNCTIE TEMPERATUUR HULPMIDDELEN taartvorm op Koekjes (zonder gist) cake, lange vingers, opgerolde koekjes, Brownies, 200 °C lekplaat taartvorm op Cheesecake 200 °C lekplaat taartvorm op Vruchtenaart van gistdeeg suikertaart, vlaaien 180 °C lekplaat taartvorm op Bereiding bodem voor vruchtentaarten taart met verse vruchten (aardbeien, frambozen, enz.) 180 °C lekplaat (bruine...
- Page 65 Starten en gebruik Inschakelen kookplaat De lijm die gebruikt is voor de afdichtingen laat wat vetvlekjes achter op het glas. Voordat u het apparaat Druk ongeveer 1 seconde op de knop voor het gebruikt raden wij u aan de vlekken te verwijderen inschakelen van de kookplaat.
-
Page 66: "Demo" Modus
De timer Programmering kookduur De kookplaat moet aan zijn. Als u lang op de toetsen drukt kunt u de Met de timer kunt u een duur tot aan 99 minuten instellen. minuten van de timer snel laten toenemen. ! Alle kookgedeeltes kunnen tegelijkertijd 1. - Page 67 • de volgende keer dat u de kookplaat inschakelt zal hij Oververhitting In het geval van oververhitting van de elektronische zich in de “demo” modus bevinden. onderdelen gaat de kookplaat automatisch uit en verschijnt Om deze modus te verlaten volgt u de boven beschreven procedure.
-
Page 68: Technische Beschrijving
EXTENSO TECHNOLOGY modus ! Accessoires ! Accessoires ! Accessoires Voor de juiste werking van de kookzoneEXTENSO M.b.v. de EXTENSO TECHNOLOGY zone kunt TECHNOLOGY raden wij u aan pannen te u dezelfde stroomsterkte instellen op twee gebruiken met een elliptische of verlengde bodem „aaneengesloten”... -
Page 69: Praktische Kooktips
Praktische kooktips Frituren Koken met een snelkookpan Snelkookpan Grillen Koken Crêpes Koken op hoog vuur en bruin bakken (Braadstukken, biefstukken, kalfslappen, visfilets, gebakken eieren) Snel indikken (vloeibare sauzen) Koken van water (pasta, rijst, groente) Melk Langzaam indikken (gebonden sauzen) Au bain-marie koken Koken met snelkookpan, na het sissen Koken op laag vuur Opwarmen van gerechten... -
Page 70: Voorzorgsmaatregelen En Advies
Voorzorgsmaatregelen en advies ! Dit apparaat is ontworpen en vervaardigd volgens de • Trek nooit de stekker aan het snoer uit het geldende internationale veiligheidsvoorschriften. stopcontact, maar pak altijd de stekker direct beet. Deze aanwijzingen zijn geschreven voor uw veiligheid •... -
Page 71: Energiebesparing En Milieubehoud
• Mededeling voor dragers van een pacemaker of een Energiebesparing en milieubehoud ander actief ingeplant medisch apparaat: De kookplaat voldoet aan alle geldende normen • Door de oven te gebruiken vanaf het late middaguur betreffende elektromagnetische storing. tot aan de vroege ochtend zorgt u ervoor dat de Dit product is aldus in volkomen overeenstemming elektriciteitscentrales minder worden belast tijdens met de voorschriften van de wet (richtlijn 89/336/... -
Page 72: Onderhoud En Verzorging
Onderhoud en verzorging De elektrische stroom afsluiten Zet het deksel weer op zijn plaats en let erop dat de afdichting goed is bevestigd (zie afbeelding). Sluit altijd eerst de elektrische stroom af voordat u tot enige handeling overgaat. ! Gebruik de ovenlamp nooit om een vertrek te Reinigen van het apparaat verlichten. - Page 73 Automatische reiniging PYROLYSE Veiligheidsmechanismen • het verlichte symbool op het display geeft aan Het programma PYROLYSE brengt de dat de ovendeur automatisch is geblokkeerd omdat oventemperatuur op 500°C om het pyrolyseproces de temperatuur zeer hoog is geworden; (ofwel het verbranden van voedselrestjes) te starten. Het vuil wordt letterlijk as.
- Page 76 05/2012- 195103599.00 XEROX FABRIANO...