Chapitres
Table des Matières
Dépannage

Manuels Connexes pour Schweizer eMag 50 HD


Sommaire des Matières pour Schweizer eMag 50 HD
- Page 1 Instructions for use for the electronic magnifier Notice d'utilisation de la loupe électronique eMag 50 HD Gebruiksaanwijzing voor de elektronische loep eMag 50 HD...
- Page 2 Contents . Sommaire . Inhoud Instructions for use english page 03 Manuel d’utilisation francais page 36 Gebruiksaanwijzing nederlandse bladzijde 68...
- Page 3 Congratulations on purchasing the eMag 50 HD. This handheld video magnifier enables you to magnify texts and objects from 2 to 14 times the original size. The eMag 50 HD features a 5" (12.7 cm) LCD widescreen (16:9). We hope you enjoy using this high-quality device.
-
Page 5: Table Des Matières
Magnifying live images Transferring images to a computer Magnifying captured and via USB cable saved images Transferring images to the eMag 50 HD Changing colour modes via USB cable Changing between the last colour mode Troubleshooting used and true full colour... -
Page 6: Please Read Before First Use
Under Battery status LED –> on page 13, you will find a description of the battery status LED indicators. See Quick start –> on page 10 for all the basic information you need to start using your eMag 50 HD. -
Page 7: Overview
With the reading stand opened, you can place the eMag 50 HD directly on a document and read printed text or images in magazines, catalogues, menus, photos or other printed matter. The eMag 50 HD can save and store up to 80 images, which can be copied to a computer via a simple USB connection. -
Page 8: Your Emag 50 Hd
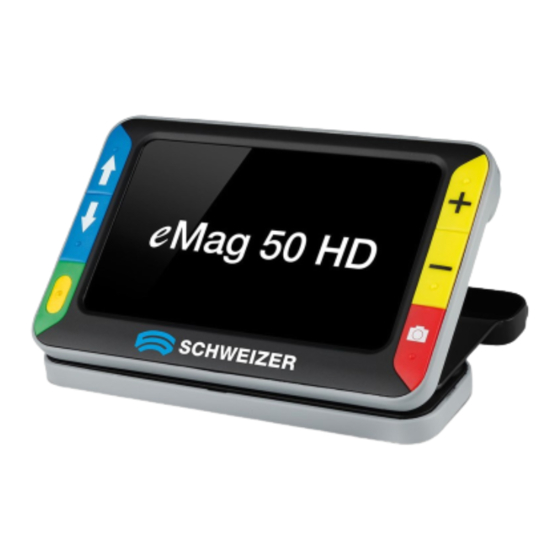
Your eMag 50 HD 1. Colour mode scroll up (blue) 2. Colour mode scroll down (blue) 3. Power on/off (green/yellow) 4. Increase magnification (yellow) 5. Decrease magnification (yellow) 6. Capture image (red) 7. LCD screen 8. USB port (micro USB) 9. - Page 9 11. Handle in closed position 12. LED lights 13. Camera (5 MP)
-
Page 10: Quick Start
3. Select one of the following options: • Turn and extend the handle to hold and use the eMag 50 HD like a magnifying glass. This is useful if you need to magnify and read labels or small print on tins, packaging, medication etc. - Page 11 As soon as you feel comfortable with the basic functions of the eMag 50 HD, try out the following advanced functions: • Turn the LED reading lights on and off to avoid glare and reflections when looking at photos or glossy magazines.
-
Page 12: Charging The Emag 50 Hd
USB port on a computer. 1. Plug one end of the power adapter into the eMag 50 HD and the other end into the wall outlet (1). 2. The battery status LED flashes green to show that the battery is charging (2). -
Page 13: Battery Status Led
Battery status LED Green – solid: Batteries are charged – power adapter connected. Batteries are charging – power adapter connected. Green – flashing: Low battery status. Red – flashing: Red – solid: Error; disconnect power adapter, wait a few seconds and then reconnect it. -
Page 14: Description Of Buttons
Description of buttons On/Off (green/yellow): Press once to switch on, press again to switch off. Magnification (yellow): Press and HOLD for continuous zoom magnification with live view. When viewing captured images, press and release to incrementally increase or decrease magnification. Colour mode (blue): Press to scroll through the default colour modes and 15 additional colour combinations. -
Page 15: Opening And Closing The Handle
Opening and closing the handle The handle can be opened in 2 positions, allowing you to hold the eMag 50 HD like a magnifying glass. -
Page 16: Opening The Reading Stand
Opening the reading stand The eMag 50 HD also has a reading stand, which – as soon as it is positioned on a document – allows you to read an item from a constant and convenient distance. 1. Slide the upper edge of the eMag 50 HD screen... -
Page 17: Functions
Functions Magnifying live images When viewing live images, you can use the continuous zoom function to magnify live images from 2x to 14x the original size. • Press and HOLD the yellow PLUS button to zoom in. • Press and HOLD the yellow MINUS button to zoom out. -
Page 18: Changing Colour Modes
If you need to move the eMag 50 HD to a different part of the document, it may be easier for you to switch to full colour mode, move to the new position in the document and then return to the selected colour mode to continue reading. -
Page 19: Adding/Removing Colour Modes
Adding/removing colour modes The eMag 50 HD has 5 default colour modes. You can also activate and choose from a variety of 15 other colour modes. As soon as a colour mode is available, you can easily scroll to it using the blue arrow buttons ( or ). -
Page 20: Restoring Default Colour Modes
Restoring default colour modes If you have added or removed optional colour modes, you can always reset the eMag 50 HD to its 5 default colour modes: Press and HOLD the green/yellow button and the blue UP arrow simultaneously for 15 seconds. -
Page 21: Optional Colour Modes
Optional colour modes • Black on yellow • Blue on black • Black on magenta • Green on black • Blue on yellow • Violet on black • Black on green • Red on black • Black on violet • White on blue •... -
Page 22: Capturing An Image
Capturing an image on the LCD screen can be useful for reading labels on objects or supermarket shelves. By holding the eMag 50 HD close to an object and capturing the image, you can then hold the eMag 50 HD closer to you to read the information. -
Page 23: Using Reading Line Or Reading Mask
Use these features to help you locate and maintain your place while viewing an image. When using the button sequence described below, the eMag 50 HD shows first the reading line, then the reading mask and then neither the reading line nor the reading mask. -
Page 24: Displaying The Reading Mask
Displaying the reading mask 1. Press and HOLD the green/yellow button (1) and then press both yellow buttons ( (2 and 3)) again to remove the reading line and display the reading mask on the screen as shown below: 2. Press and HOLD the green/yellow button (1) and then press the yellow PLUS button (2) or the yellow MINUS button... -
Page 25: Storage Mode
The image will be deleted when you exit Storage mode. Memory full: Indicates that the maximum number of images has been stored on the eMag 50 HD. You will need to select one or more images for deletion before you can save the current image. -
Page 26: Viewing Saved Images
Viewing saved images The eMag 50 HD can store up to 80 images. You can easily scroll through your saved images using the blue arrow buttons ( and ): 1. Press and HOLD the red button for approx. 6 seconds to access Overview mode. -
Page 27: Saving And Deleting An Image When Memory Is Full
The eMag 50 HD can store up to 80 images. If you try to save a further image, the Memory full icon appears on the screen. To save a further image, you first need to delete one or more saved images from the memory. -
Page 28: Transferring Images To A Computer Via Usb Cable
• the eMag 50 HD appears as an external device in Explorer (Windows) or Finder (Mac). 3. Open the "eMag 50 HD DCIM" folder and use the "drag and drop" method to move or copy one or more images to a folder or the desktop on your computer. The images are named and numbered in the order saved, for example IMG_0001.bmp, IMG_0002.bmp etc. -
Page 29: Transferring Images To The Emag 50 Hd Via Usb Cable
Transferring images to the eMag 50 HD via USB cable Any image transferred from the eMag 50 HD to your computer can be easily transferred back to the eMag 50 HD. Note: Only images saved by the eMag 50 HD can be copied back to the eMag 50 HD. -
Page 30: Troubleshooting
Note: The battery does not charge while the eMag 50 HD is connected to the USB port. The screen is blank. • If the eMag 50 HD is sitting on a flat surface surface (table or document), the screen is blank (black). Lift the device off the surface, or open the reading stand. - Page 31 The battery is not charging. • Use the supplied power adapter to charge the eMag 50 HD. The battery does not charge when the eMag 50 HD is connected to a USB port. • Make sure the barrel end of the power adapter is firmly plugged into the device's power port.
-
Page 32: Technical Data
• Maximum number of saved images: Up to 80 bitmap (BMP) images • Camera: 5 MP HD auto-focus camera module • Battery: Lithium-ion battery, approx. 3 hours continuous operation, approx. 3.5 hours charge time Note: Only use the supplied power adapter to charge the eMag 50 HD battery. Manufacturer: 11800 31 Court North, St. -
Page 33: Safety And Maintenance
Safety and maintenance • Do not attempt to repair the eMag 50 HD yourself or open the housing. This product contains no user serviceable parts. Any unauthorised attempt to service or replace internal components will render the warranty null and void. -
Page 34: Cleaning The Emag 50 Hd Lcd Screen
Cleaning the LCD screen • Power off and unplug the eMag 50 HD before cleaning the LCD screen. • Always use a clean microfibre cloth. • Very gently wipe the cloth across the screen. Do not exert pressure on the cloth or the LCD screen. -
Page 35: Service And Support
Service and support If you require technical support with your eMag 50 HD, please contact the dealer who sold you the visual aid. It is recommended you first refer to “Troubleshooting” (–> on page 30). Note: The eMag 50 HD contains no user serviceable components. Any unauthorised attempt to service or replace internal components will render the warranty null and void. - Page 36 Félicitations pour cet achat d'une eMag 50 HD. Cette loupe électronique à main va vous permettre de grossir de 2 à 14 fois des textes et objets par rapport à leur taille d'origine. La loupe eMag 50 HD est équipée d'un écran à...
- Page 37 Affichage de plusieurs combinaisons Caractéristiques techniques de couleurs Sécurité et maintenance Réinitialisation des combinaisons Nettoyage du boîtier de la eMag 50 HD de couleurs Nettoyage de l'écran LCD de la eMag 50 HD Combinaisons de couleurs Combinaisons de couleurs standard...
-
Page 38: À Lire D'abord
Une charge complète dure environ 3,5 heures. La procédure de charge de la batterie est décrite au chapitre Recharger la eMag 50 HD –> voir la page 44. Vous trouverez –> à la page 45 des explications sur les lampes des batteries au chapitre LED de charge des batteries. -
Page 39: Présentation Générale
Nous vous remercions d'avoir choisi la loupe eMag 50 HD ! La eMag 50 HD est une loupe électronique portative à main, permettant de grossir les objets de 2 à 14 fois. L'appareil photo autofocus intégré a une définition de 5 mégapixels et offre des images de très bonne qualité... -
Page 40: Votre Emag 50 Hd
Votre eMag 50 HD 1. Sélection des couleurs vers le haut (bleu) 2. Sélection des couleurs vers le haut (bleu) 3. Interrupteur marche-arrêt (vert-jaune) 4. Grossissement (jaune) 5. Réduction (jaune) 6. Enregistrement d'une image (rouge) 7. Écran LCD 8. Prise USB (micro-USB) 9. - Page 41 11. Poignée de maintien en position fermée 12. Lampes à LED 13. Appareil photo (5 MPx)
-
Page 42: Démarrage Rapide
–> Voir la page 47. • Ouvrez le support de lecture et posez la eMag 50 HD sur un document plat, par exemple un journal ou un magazine, une facture ou un reçu, une lettre, etc. –> Voir la page 48. - Page 43 • Utilisez la ligne de lecture ou le masque d'écran pour vous aider à rester au bon endroit lorsque vous lisez un texte. –> Voir les pages 55/56. • Vous pouvez mettre en mémoire des images pour les regarder, puis les effacer de votre eMag 50 HD. –> Voir les pages 58/59.
-
Page 44: Recharger La Emag 50 Hd
Recharger la eMag 50 HD Remarque: pour charger la eMag 50 HD, il faut utiliser le câble fourni. La recharge via la prise USB de l'ordinateur n'est pas possible. 1. Branchez une extrémité du câble de charge dans la eMag 50 HD et l'autre extrémité dans la prise de courant (1). -
Page 45: Led De Charge Des Batteries
LED de charge des batteries Vert – en continu: les batteries sont chargées – le chargeur est branché. les batteries sont en charge – le chargeur est branché. Vert – clignotant: Rouge – clignotant: batteries peu chargées. Rouge – continu: erreur ;... -
Page 46: Description Des Touches
Description des touches Marche-arrêt (vert-jaune): appuyer pour allumer, rappuyer pour éteindre. Grossissement (jaune): appuyer et MAINTENIR enfoncé pour grossir en continu la vue normale. Appuyer et relâcher pour grossir ou réduire pas à pas les images enregistrées. Sélection des couleurs (bleu): appuyez pour faire défiler les réglages de couleurs standard ainsi que 15 autres combinaisons de couleurs. -
Page 47: Ouverture Et Fermeture De La Poignée
Ouverture et fermeture de la poignée La poignée s'ouvre dans 2 positions pour vous permettre de tenir la eMag 50 HD comme une loupe classique. -
Page 48: Ouverture Du Support De Lecture
Ouverture du support de lecture La eMag 50 HD dispose aussi d'un support de lecture qui, à partir du moment où il est placé sur un document, vous permet de lire un article à une distance constante et confortable. 1. Avec un pouce, poussez le bord haut de l'écran de la eMag 50 HD dans un sens et en même... -
Page 49: Fonctions
Fonctions Grossissement de photos Pour regarder les photos, vous pouvez utiliser le zoom continu qui peut grossir de 2 à 14 fois. • Appuyez sur la touche PLUS jaune et MAINTENEZ-LA enfoncée pour grossir. • Appuyez sur la touche MOINS jaune et MAINTENEZ-LA enfoncée pour réduire. -
Page 50: Changer Les Combinaisons De Couleurs
(par exemple en tenant un document et en le lisant) et utiliser la combinaison de couleurs qui offre le contraste le plus adaptée à votre vue. Lorsque vous avez besoin de déplacer la eMag 50 HD vers une autre partie du document, il peut être plus simple de passer en mode tout-en-couleurs, puis d'aller à... -
Page 51: Affichage De Plusieurs Combinaisons De Couleurs
Affichage de plusieurs combinaisons de couleurs La eMag 50 HD a 5 combinaisons de couleurs standard. Mais vous pouvez aussi sélectionner et activer une combinaison de couleurs parmi les 15 disponibles. Dès qu'une combinaison est disponible, vous pouvez l'activer facilement au moyen des touches fléchées bleues ( ou ). -
Page 52: Réinitialisation Des Combinaisons De Couleurs
Réinitialisation des combinaisons de couleurs Si vous avez ajouté ou supprimé des combinaisons optionnelles, vous pouvez toujours revenir aux 5 combi- naisons standard de votre eMag 50 HD: Appuyez sur la touche vert-jaune et MAINTENEZ-LA enfoncée , et appuyez pendant 15 secondes sur la flèche bleue VERS LE HAUT . -
Page 53: Combinaisons De Couleurs Optionnelles
Combinaisons de couleurs optionnelles • Noir sur jaune • Bleu sur noir • Noir sur magenta • Vert sur noir • Bleu sur jaune • Violet sur noir • Noir sur vert • Rouge sur noir • Noir sur violet •... -
Page 54: Enregistrement D'une Image
Mise en mémoire et effacement d'une image –> voir la page 58. Extinction des lampes à LED Lorsque vous allumez votre eMag 50 HD, les lampes à LED s'allument aussi. Pour éviter les reflets lorsque vous regardez des surfaces réfléchissantes, vous pouvez éteindre les lampes à LED: 1. -
Page 55: Utilisation De La Ligne De Lecture Ou Du Masque De Texte
à vous concentrer sur l'image. Si vous utilisez les séquences de touches décrites plus bas, la loupe eMag 50 HD affiche d'abord la ligne de lecture, puis le masque de texte, puis ni l'une ni l'autre. -
Page 56: Affichage Du Masque De Texte
Affichage du masque de texte 1. Appuyez sur la touche vert-jaune (1) et MAINTENEZ-LA enfoncée, puis appuyez à nouveau sur les deux touches jaunes ( (2 et 3)) afin de supprimer la ligne de lecture et d'afficher le masque de texte à l'écran de la manière suivante: 2. -
Page 57: Mode Mise En Mémoire
. La photo s'effacera lorsque vous quitterez le mode mise en mémoire. Mémoire pleine: indique que la mémoire de la loupe eMag 50 HD contient le nombre maximum possible de photos. Avant de pouvoir mettre la photo actuelle en mémoire, vous... -
Page 58: Visualisation D'images Mémorisées
Visualisation d'images mémorisées La mémoire de la eMag 50 HD peut contenir jusqu'à 80 photos. Vous pouvez faire défiler les photos de manière très simple au moyen des touches fléchées bleues ( et ): 1. Appuyez sur la touche rouge et MAINTENEZ-LA enfoncée environ 6 secondes pour accéder au mode... -
Page 59: Mise En Mémoire Et Effacement D'une Image Lorsque La Mémoire Est Pleine
à la vue normale. Mise en mémoire et effacement d'une image lorsque la mémoire est pleine La mémoire de la eMag 50 HD peut contenir jusqu'à 80 photos. Au-delà de 80, si vous essayez de mettre en ... -
Page 60: Transfert D'images Vers Un Ordinateur Avec Un Câble Usb
LCD. • le symbole de batterie indique la charge actuelle de la batterie. Lorsque la loupe eMag 50 HD est raccordé à l'ordinateur via le câble USB, sa batterie ne se charge pas et aucune photo ne s'affiche à... -
Page 61: Transfert D'images Vers La Emag 50 Hd Avec Un Câble Usb
2. Cherchez les images sur votre ordinateur au moyen de l'explorateur Windows ou du Finder (Mac). 3. Sélectionnez l'image et faites-la glisser vers le classeur "eMag 50 HD DCIM". 4. Dès que vous avez transmis le ou les fichiers, assurez-vous de bien débrancher la eMag 50 HD de l'ordinateur. -
Page 62: Dépannage
Appuyez sur l’interrupteur marche-arrêt vert-jaune. Si la eMag 50 HD ne s'allume pas, il faut recharger ou remplacer la batterie. Remarque: lorsque la eMag 50 HD est connectée via la prise USB, la batterie ne se recharge pas. L’écran est vide. - Page 63 La batterie ne se recharge pas. • Utilisez le câble fourni pour recharger la eMag 50 HD. Lorsque la eMag 50 HD est connectée via la prise USB, la batterie ne se recharge pas. • Assurez-vous que la petite extrémité du chargeur est bien connectée dans la prise de l’appareil.
-
Page 64: Caractéristiques Techniques
• Appareil photo: module 5 MPx HD Autofocus • Batterie: batterie au lithium-ion, autonomie d'environ 3 heures, temps de charge 3,5 heures environ Remarque: pour recharger la batterie de la loupe eMag 50 HD, utilisez exclusivement le chargeur fourni. Fabricant:... -
Page 65: Sécurité Et Maintenance
Sécurité et maintenance • N'essayez pas de réparer vous-même la eMag 50 HD, ni d'en ouvrir le boîtier. Ce produit contient des pièces que l'utilisateur n'est pas autorisé à entretenir. Toute tentative non autorisée de maintenance ou de remplacement de composant interne annulera la garantie du produit. -
Page 66: Nettoyage De L'écran Lcd De La
Nettoyage de l'écran LCD de la eMag 50 HD • Avant de nettoyer l'écran, éteignez la eMag 50 HD et débranchez la fiche d'alimentation électrique. • Utilisez toujours un chiffon en microfibres propres. • Avec le chiffon, essuyez l'écran avec précaution. N'exercez pas de pression – ni sur le chiffon, ni sur l'écran LCD. -
Page 67: Service Et Assistance
Veuillez contacter votre fournisseur de matériel si vous avez besoin d’une assistance technique pour votre eMag 50 HD. Mais avant de le faire, lisez le chapitre «Dépannage» (–> page 62). Remarque: l'eMag 50 HD ne contient aucun composant pouvant être entretenu par l'utilisateur. Toute tentative non autorisée de maintenance ou de remplacement de composant interne annulera... - Page 68 D-91301 Forchheim www.schweizer-optik.de Van harte gefeliciteerd met de aanschaf van uw eMag 50 HD. Met deze elektronische handloep kunt u de originele maat van teksten en voorwerpen 2- tot 14-keer vergroten. De eMag 50 HD is voorzien van een LCD-scherm (met schermverhoudingen van 16:9) en heeft een beeldschermdiagonaal van 12,7 cm (5").
- Page 69 Overzicht Tonen van de leesregel Uw eMag 50 HD Snel aan de slag Tonen van het tekstvenster Opladen van uw eMag 50 HD Geheugenmodus LED-indicator 'Batterijstatus' Symbolen in de geheugenmodus Beschrijving van de toetsen Overzicht van opgeslagen foto's Openen en sluiten van de handgreep...
-
Page 70: Lees Dit A.u.b. Eerst
U moet de accu opladen voordat u uw eMag 50 HD voor het eerst kunt gaan gebruiken. Eenmaal volledig opladen vergt ongeveer 3,5 uur. Onder het kopje Opladen van uw eMag 50 HD –> zie blz. 76 leest u hoe u moet handelen om de accu op te laden. -
Page 71: Overzicht
Uw eMag 50 HD kan maximaal 80 opnamen opslaan en archiveren, waarna u ze via een USB-verbinding naar uw computer kunt overbrengen. Uw eMag 50 HD beschikt bovendien over een leesregel en een tekstvenster , die u zelf naar behoefte kunt activeren en gebruiken om een afbeelding of tekst op het LCD-scherm sneller te kunnen bestuderen. -
Page 72: Uw Emag 50 Hd
Uw eMag 50 HD 1. Kleurselectie omhoog (blauw) 2. Kleurselectie omlaag (blauw) 3. Aan/Uit-schakelaar (groen/geel) 4. Vergroten (geel) 5. Verkleinen (geel) 6. Fotograferen (rood) 7. LCD-scherm 8. USB-aansluiting (micro-USB) 9. Aansluiting voor batterijlader (5 V= / 2,4 A) 10. LED-indicator 'Batterijstatus'... - Page 73 11. Houdgreep in gesloten stand 12. LED-lamp 13. Camera (5 Mega-beeldpunten)
-
Page 74: Snel Aan De Slag
Snel aan de slag Hieronder treft u de handelingen aan, waarmee u uw eMag 50 HD snel kunt inrichten en voor het eerst kunt gaan gebruiken. 1. Vergewis u ervan dat de accu in het apparaat is opgeladen. –> Zie blz. 76/77. - Page 75 Zodra u vertrouwd bent met de basisfuncties van uw eMag 50 HD, zou u eens de onderstaande verdergaande functies kunnen proberen: • Schakel de LED-leeslamp aan en uit om glans en reflecties te voorkomen als u foto's of glanzende pagina's van tijdschriften wilt bekijken. –> Zie blz. 86.
-
Page 76: Opladen Van Uw Emag 50 Hd
Tip: Gebruik het meegeleverde laadsnoer om uw eMag 50 HD op te laden. U kunt de loep niet opladen via de USB-poort van een computer. 1. Steek een uiteinde van het laadsnoer in de eMag 50 HD en het andere uiteinde in de contactdoos (1). 2. De groen knipperende LED-indicator geeft aan dat de batterij wordt geladen (2). -
Page 77: Led-Indicator 'Batterijstatus
LED-indicator 'Batterijstatus' Groen – permanent oplichtend: de accu is opgeladen - de lader is aangesloten. de accu wordt opgeladen - de lader is aangesloten. Groen – knipperend: accu vrijwel ontladen. Rood – knipperend: Rood – permanent oplichtend: storing, neem de lader weg, wacht een paar seconden en sluit daarna de lader weer aan. -
Page 78: Beschrijving Van De Toetsen
Beschrijving van de toetsen Aan/uit (groen/geel): indrukken om in te schakelen, opnieuw indrukken om uit te schakelen. Vergroten (geel): indrukken en INGEDRUKT HOUDEN voor een traploze vergroting bij normale presentatie. Indrukken en loslaten om opgenomen afbeeldingen (foto's) stapsgewijs te kunnen vergroten of verkleinen. Kleurselectie (blauw): door in te drukken bladert u door de standaard kleurinstellingen en door de overige vijftien kleurencombinaties. -
Page 79: Openen En Sluiten Van De Handgreep
Openen en sluiten van de handgreep U kunt de handgreep in twee standen openen, zodat u uw eMag 50 HD als een vergrootglas kunt vasthouden. -
Page 80: Openen Van De Leesstandaard
Openen van de leesstandaard Uw eMag 50 HD beschikt ook over een leesstandaard, zodat u - mits de loep op een document is geplaatst - een artikel op een aangename manier en op gelijkblijvende afstand kunt lezen. 1. Schuif de bovenrand van het beeldscherm van uw... -
Page 81: Functies
Functies Vergroten van actuele afbeeldingen Bij het bekijken van actuele afbeelding kunt u die schermafbeelding 2- tot 14-keer traploos vergroten. • Druk op de gele PLUS-toets en HOUD DIE TOETS INGEDRUKT als u de afbeelding wilt vergroten. • Druk op de gele MINUS-toets en HOUD DIE TOETS INGEDRUKT als u de afbeelding wilt verkleinen. -
Page 82: Wisselen Van Kleurencombinatie
Mocht het voor nodig zijn uw eMag 50 HD te verplaatsen naar een ander deel van het docu- ment, dan kan het eenvoudiger zijn dat u voor een eenkleurig scherm kiest, naar de nieuwe plaats in het do- cument gaat en daar weer terugkeert naar de door u geselecteerde kleurencombinatie om verder te kunnen lezen. -
Page 83: Tonen Van Een Aantal Kleurencombinaties
Tonen van een aantal kleurencombinaties Uw eMag 50 HD kent vijf standaard kleurencombinaties. U kunt echter ook een keuze maken uit nog eens vijftien kleurencombinaties en een kleurencombinatie activeren. Zodra een kleurencombinatie beschikbaar is, kunt u die gemakkelijk met behulp van een blauwe pijltoets ( of ) selecteren. -
Page 84: Terugstellen Van De Kleurencombinaties
Terugstellen van kleurencombinaties Mocht u extra kleurencombinaties hebben toegevoegd of verwijderd, dat kun u uw eMag 50 HD altijd nog terugstellen naar de vijf standaard kleurencombinaties: Druk op de groen/gele toets , HOUD DIE TOETS ingedrukt en druk 15 seconden lang op de blauwe pijl 'OMHOOG' . -
Page 85: Optionele Kleurencombinaties
Optionele kleurencombinaties • zwart op geel • blauw op zwart • zwart op magenta • groen op zwart • blauw op geel • violet op zwart • zwart op groen • rood op zwart • zwart op violet • wit op blauw •... -
Page 86: Fotograferen
Het fotografen van een afbeelding op uw LCD-scherm kan handig zijn, bijvoorbeeld om etiketten op voorwerpen of op schappen in een supermarkt te lezen. Als u uw eMag 50 HD dichtbij een voorwerp houdt en de afbeelding fotografeert, dan kunt u vervolgens uw eMag 50 HD dicht bij uw gezicht houden om het etiket te lezen. -
Page 87: Het Gebruik Van De Leesregel Of Tekstvenster
Als u op de hieronder beschreven manier de toetsen indrukt zal uw eMag 50 HD eerst de leesregel laten zien, vervolgens het tekstvenster en tot slot geen van beide: geen leesregel en geen tekstvenster. -
Page 88: Tonen Van Het Tekstvenster
Tonen van het tekstvenster 1. Druk op de groen/gele toets (1), HOUD DIE TOETS INGEDRUKT en druk dan weer op een van de beide gele toetsen in ( (2 en 3)) om de leesregel weg te nemen en om als volgt het tekstvenster op het scherm te tonen: 2. -
Page 89: Geheugenmodus
. De foto wordt gewist zodra u de geheugenmodus verlaat. Geheugen vol: Wijst erop dat het maximale aantal foto's werd opgeslagen op uw eMag 50 HD. U moet eerst een of meer foto's markeren om te wissen , voordat u de actuele... -
Page 90: Overzicht Van Opgeslagen Foto's
Overzicht van opgeslagen foto's Uw eMag 50 HD kan maximaal 80 foto's opslaan. Met behulp van de blauwe pijltoetsen ( en ) kunt u heel gemakkelijk door het fotoboek bladeren: 1. Druk op de rode toets , en HOUD DIE TOETS ongeveer zes seconden lang INGEDRUKT om naar het overzicht te gaan. -
Page 91: Opslaan En Wissen Van Een Foto Als Het Geheugen Vol Is
De nieuwe foto wordt opgeslagen en alle gedeactiveerde, opgeslagen foto's worden gewist. Tip: Om ruimte op uw eMag 50 HD te maken, kunt u de foto's ook overbrengen naar een computer. Lees verder onder het kopje "Foto's via een USB-snoertje overbrengen naar een computer... -
Page 92: Foto's Via Een Usb-Snoertje Overbrengen Naar Een Computer
• uw eMag 50 HD verschijnt als extern geheugen in de Explorer (Windows) of in de Finder (Mac). 3. Open de map "eMag 50 HD DCIM" en verplaats - door aan te klikken en te verslepen - een of meer foto's naar een nieuwe map of naar het bureaublad van uw computer, of door de foto's te dupliceren. -
Page 93: Foto's Via Een Usb-Snoertje Overbrengen Naar Uw Emag 50 Hd
Foto's via een USB-snoertje overbrengen naar uw eMag 50 HD Elke foto, die u van uw eMag 50 HD naar uw computer hebt overgebracht, kun u ook even eenvoudig weer naar uw eMag 50 HD terugbrengen. Tip: U kunt uitsluitend foto's, die u ooit op uw eMag 50 HD hebt opgeslagen weer terugzetten naar uw eMag 50 HD. -
Page 94: Verhelpen Van Problemen
Het apparaat wil niet inschakelen. Druk op de groen/gele Aan/Uit-schakelaar. Laad de accu op of vervang de accu als uw eMag 50 HD niet wil inschakelen. Tip: de accu wordt niet opge- laden als het USB-snoertje in uw eMag 50 HD is gestoken. - Page 95 (fotograferen) om de LED-verlichting uit te schakelen. Na 30 minuten schakelt uw Dat wilt u ook: uw eMag 50 HD schakelt automatisch uit als u binnen een eMag 50 HD zich uit. tijdsbestek van 30 minuten geen toets hebt ingedrukt. Dat verlengt de ge-...
-
Page 96: Technische Gegevens
• Camera: 5 miljoen beeldpunten, hoge definitie, automatische scherpstelling • Accu: oplaadbare lithium/ion-accu, ca. 3 uur permanent gebruik, oplaadduur ca. 3,5 uur Tip: Gebruik uitsluitend de meegeleverde lader om de accu van uw eMag 50 HD op te laden. Fabrikant:... -
Page 97: Veiligheid En Onderhoud
Veiligheid en onderhoud • Probeer niet zelf uw eMag 50 HD te repareren of de behuizing te openen. Dit product bevat geen onderdelen waaraan u als gebruiker onderhoud hoeft te plegen. De garantie vervalt bij elke niet- geautoriseerde poging onderhoud te verrichten aan componenten in het inwendige of door die te vervangen. -
Page 98: Schoonmaken Van Het Lcd-Scherm Van Uw Emag 50 Hd
Schoonmaken van het LCD-scherm van uw eMag 50 HD • Schakel uw eMag 50 HD uit en neem de netsteker van de lader uit voordat u het scherm gaat schoon- maken. • Gebruik altijd een schoon microvezeldoekje. • Wis het beeldscherm voorzichtig met het doekje af. Oefen geen druk uit - niet op het doekje en niet op het LCD-scherm. -
Page 99: Service En Ondersteuning
Neem contact op met de aanbieder van uw hulpmiddelen wanneer u technische ondersteuning eMag 50 HD nodig hebt. Lees eerst het hoofdstuk "Problemen verhelpen" ( –> blz. 94). Tip: De eMag 50 HD bevat geen onderdelen waaraan de gebruiker onderhoud dient te plegen.