Table des Matières
Publicité
Les langues disponibles
Les langues disponibles
Liens rapides
Pet Mate Ltd. guarantees your product for a period of 3 years from the date of purchase,
subject to the registration of your purchase details on our website www.pet-mate.com within
14 days of purchase. (If you do not have access to a computer, please send details of your
purchase with copy of receipt along with your name and address.) In the event of a fault
developing contact Pet Mate customer services for a returns authorisation number. The
guarantee is limited to any defect arising due to faulty materials or manufacture. Any defective
item will be repaired or replaced free of charge at the manufacturer's discretion, provided that
the defect has not been caused by neglect, misuse or normal wear and tear. Your statutory
rights are not affected.
GARANTIE
D
Pet Mate Ltd. gewährt auf Ihr Produkt eine Garantie von 3 Jahren ab dem Kaufdatum, unter der Voraussetzung,
dass die Registrierung Ihres Produkts auf unserer Website www.pet-mate.com innerhalb von 14 Tagen des
Kaufdatums erfolgt ist. (Wenn Sie keinen entsprechenden Computerzugang haben, senden Sie uns bitte Ihre
Kaufangaben zusammen mit einer Kopie Ihres Einkaufsbelegs und Angabe Ihres Namens und Ihrer Adresse.)
Sollte an Ihrem Produkt eine Störung auftreten, so kontaktieren Sie bitte den Kundendienst von Pet Mate, damit
wir Ihnen eine Rücksendungs-Genehmigungsnummer übermitteln können. Die Garantie ist auf Mängel
beschränkt, die auf fehlerhaftes Material oder Produktionsfehler zurückzuführen sind. Fehlerhafte Artikel werden
nach Ermessen des Herstellers kostenlos repariert oder ersetzt, vorausgesetzt, dass der Defekt nicht durch ein
Missgeschick, Vernachlässigung, falsche Bedienung oder normale Abnutzung verursacht wurde. Ihre
gesetzlichen Rechte sind nicht betroffen.
GARANTIE
F
Pet Mate Ltd garantit votre produit pour une période de 3 ans à compter de la date d'achat, sous réserve
d'enregistrement des détails de votre achat sur notre site www.pet-mate.com dans les 14 jours suivant l'achat.
(Si vous n'avez pas accès à un ordinateur, veuillez envoyer les détails de votre achat avec une copie du reçu,
accompagnée de votre nom et de votre adresse.) En cas de panne/mauvais fonctionnement, contactez Pet Mate
pour obtenir un numéro d'autorisation de retour. Les articles défectueux seront remplacés ou réparés
gratuitement à la discrétion du fabricant, sous réserve que le mauvais fonctionnement ne soit pas le résultat d'un
usage inadapté ou abusif ou d'une usure normale. Ces conditions n'affectent pas vos droits statutaires.
GARANTÍA
E
Pet Mate Ltd. garantiza su producto durante un período de 3 años a partir de la fecha de compra, siempre y
cuando haya registrado los detalles de su compra en nuestro sitio web, www.pet-mate.com, durante los 14 días
posteriores a la fecha de compra. (Si no tuviera acceso a un ordenador, por favor, envíe los detalles de su
compra junto con una copia del recibo, su nombre y dirección.) En caso de producirse un fallo, póngase en
contacto con Servicio al Cliente de Pet Mate para obtener un número de autorización de devolución. La garantía
se limita a aquellos fallos que se produzcan como consecuencia de materiales o fabricación defectuosos. Todo
artículo defectuoso se reparará o reemplazará a la discreción del fabricante, siempre y cuando el defecto no
haya sido causado por negligencia, uso indebido o el uso y desgaste normales. Sus derechos estatutarios no
resultarán afectados.
GARANTIE
NL
Pet Mate Ltd. geeft drie jaar garantie op uw product, vanaf de koopdatum en afhankelijk van de registratie binnen
14 dagen na aankoop van uw koopgegevens op onze website www.pet-mate.com. (Als u geen toegang tot een
computer hebt, wilt u dan de gegevens over uw aanschaf samen met een kopie van uw koopbewijs inclusief uw
naam en adres opsturen.) Mocht zich een defect voordoen, neemt u dan contact op met de klantendienst van
Pet Mate en u ontvangt een autoriseringsnummer voor retour. Deze garantie betreft slechts defecten ten gevolge
van materiaal- of fabrieksfout. Elk defect onderdeel wordt gratis gerepareerd of vervangen, dit ter beoordeling
van de fabrikant, en op voorwaarde dat het defect niet ontstaan is door onzorgvuldigheid, onjuist gebruik of door
normale slijtage. Dit heeft geen effect op uw vastgelegde rechten.
CAT MATE Elite
®
INSTRUCTIONS
Betriebsanleitung · Mode d'emploi · Instrucciones · Instructies
Ref. 305
I.D. DISC CAT FLAP WITH TIMER CONTROL
D
I.D.-MARKE KATZENKLAPPE MIT ZEITSCHALTUHR-
FUNKTION
F
CHATIÈRE DISQUE D'IDENTIFICATION AVEC FONCTION
DE TEMPORISATION
E
GATERA CON DISCO DE I.D. CON CONTROL DE TIEMPO
NL
I.D. DISC KATTENDEUR MET TIJDKLOK FUNCTIONERING
www.pet-mate.com
+44 (0)1932 700 001
N America (936) 760 4333
© PET MATE Ltd · Lyon Road · Hersham · Surrey · KT12 3PU · England
N.America only: Ani Mate · 104A Longview Drive · Conroe · Texas 77301
30503/0619
1
1
2
3
9
10
11
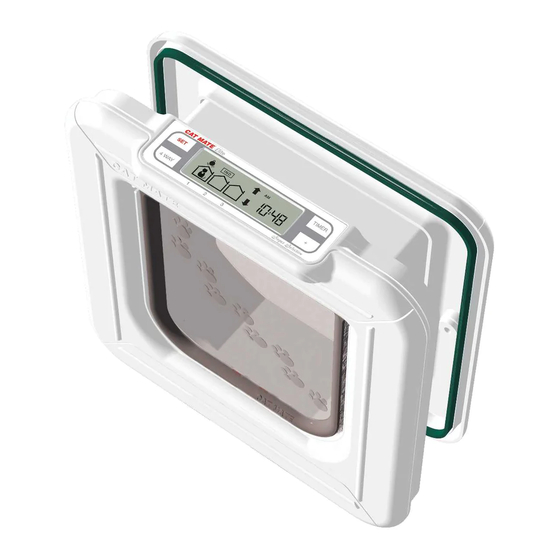
1. 'PROG' (PROGRAM) button
2. I.D. Disc search indicator
3. 'INDIVIDUAL' lock setting indicator
4. Low battery indicator
5. AM/PM indicators (12Hr clock mode)
6. 'TIMER' function indicator
7. 'TIMER' mode 'Start/Finish' indicators
8. 'TIMER' button
9. '4 WAY' button
10 - 12. CAT 1 - 3 location symbols
13.'4 WAY' lock indicators
14.Alphanumeric display (normally
states time)
15.'ADVANCE' button
3
4
5
6
7
8
12
13
14
15
2
4
Publicité
Table des Matières

Manuels Connexes pour CAT MATE Elite 305


Sommaire des Matières pour CAT MATE Elite 305
- Page 1 CAT MATE Elite ® 30503/0619 Pet Mate Ltd. guarantees your product for a period of 3 years from the date of purchase, INSTRUCTIONS subject to the registration of your purchase details on our website www.pet-mate.com within 14 days of purchase. (If you do not have access to a computer, please send details of your purchase with copy of receipt along with your name and address.) In the event of a fault...
- Page 2 IMPORTANT - READ BEFORE USE 0 - 12mm (0 - ”) 25mm (1”) 12 - 25mm ( - 1”) 38mm (1 ”) WICHTIG - BITTE VOR VERWENDUNG Seiten 13 - 21 ”) 25 - 38mm (1 - 1 ”) 50mm (2”) 1.
-
Page 3: Important Safety Instructions
1. Introduction the following measures: Thank you for choosing the Cat Mate Elite I.D. Disc Cat Flap with Timer Control. • Reorient or relocate the receiving antenna. CAREFULLY READ THESE INSTRUCTIONS AND PROGRAM THE CAT FLAP •... - Page 4 4.1.3 Determine thickness of door panel, (t). (Fig. 7). If you are installing your cat flap in a wall, you will need to purchase Cat Mate Elite Wall 4.1.4 Holding the interior frame and the exterior frame in position, mark the 2 screw Liners.
- Page 5 5. Fitting I.D. Disc(s) to your Cat(s) 8. To View How Long Since the Cat(s) Last Used the Cat Flap 8.1 To view how many hours and minutes since cats 1, 2 or 3 last used the cat flap, 5.1 If desired, record your cat’s details on the I.D. label by writing on the label in pen press the '+' button.
- Page 6 9.5 Setting Timer Control/Clock for ALL Cats To cancel timer control and revert back to the normal access option: If you wish to set your cat flap to ensure that ALL cats have a particular access option, 9.5.12 Press the 'TIMER' button for 5 seconds. over a selected timed period, e.g.
-
Page 7: Wichtige Sicherheitsanweisungen
1. Einführung • Check that the cat flap frame is not overtightened with the 2 fixing screws. Try Vielen Dank dafür, dass Sie sich für den Kauf die Cat Mate Elite I.D.-Marke Katzenklappe loosening screws slightly. mit Zeitschaltuhr Funktion entschieden haben. - Page 8 2. Einlegen der Batterien 4.1.6 Innenrahmen auf die Innenseite der Tür positionieren und Außenrahmen auf diesen schrauben, wobei die Schrauben für die Füllungsdicke (t) geeignet sein müssen, wie 2.1 Batteriedeckel abnehmen, indem dieser nach oben geschoben wird (siehe Abb. 2). Der in Abb.
- Page 9 Wenn Ihre Katzenklappe in eine Wand eingebaut werden soll, muss zusätzlich eine Klappe neuerlich verriegelt, und die Taste 'PROG' muss dann freigegeben werden. entsprechende Cat Mate Elite Wandauskleidung besorgt werden. Wenn die Wand über Im Fall von sehr scheuen Katzen kann im GEWÖHNUNGS-MODUS Futter zum Anlocken 50mm dick ist, muss dazu für jede um 50mm darübergehende Dicke jeweils eine weitere...
-
Page 10: Einstellen Der Schaltuhrsteuerung (Timer)/Uhr Für Alle Katzen
Eine Zutrittsoption wie folgt wählen: 9.5.3 Auf die Taste 'PROG' drücken, womit Ihre Einstellung gespeichert wird. 9.1 Die Taste '4 WAY' 5 Sekunden lang drücken, bis die Anzeige blinkt. 9.5.4 Im Display wird die Uhrzeit angezeigt, wobei das Minutensymbol blinkt. Wiederholt auf die Taste '+' drücken, bis die aktuelle Minuteneinstellung angezeigt wird (z. - Page 11 11. Umprogrammieren einer I.D-Marke • Überprüfen Sie, dass der 4-Wege-Verschluss für den Zutritt in der gewünschten Richtung programmiert ist (siehe Abschnitt 9). 11.1 Die Taste 'PROG' 5 Sekunden lang drücken; nun wird die nächste nicht benutzte Katzennummer blinken, und Linien laufen um die ersten ZWEI NULLSTELLEN. •...
-
Page 12: Important Consignes De Sécurité
CHATIERE AVANT DE L'INSTALLER. 4.1.1 Placez le cadre extérieur dans la position souhaitée sur le sol. Nous vous La chatière disque d'identification avec fonction de temporisation de Cat Mate Elite permet recommandons de placer le bas de l'ouverture à environ 150mm au-dessus du de contrôler l'entrée individuelle et la sortie d’un maximum de 9 chats. -
Page 13: Portes En Upvc/Métal De 0-50Mm D'épaisseur
4.1.6 Positionnez le cadre intérieur sur le côté intérieur de la porte et vissez le cadre muraux Cat Mate Elite. Vous aurez besoin d’1 revêtement mural pour chaque 50mm extérieur dessus en utilisant des vis adaptées à l'épaisseur du panneau, (t), comme d'épaisseur de la paroi au-delà... - Page 14 9.2 Appuyez plusieurs fois sur la touche « 4 WAY » pour faire défiler les options d'accès Pour les chats très hésitants, placez la chatière en « MODE D'ENTRAÎNEMENT » et utilisez de la nourriture pour encourager l’animal à entrer et sortir par la chatière. disponibles, jusqu'à...
- Page 15 9.5.3 Appuyez sur la touche « PROG » pour sauvegarder le réglage. 11.2 Appuyez sur la touche « + » pour sélectionner le numéro de chat approprié que vous souhaitez reprogrammer ou sélectionnez le prochain numéro de chat suivant 9.5.4 L'écran affichera l'heure avec le symbole des minutes qui clignotera. Appuyez disponible.
-
Page 16: La Chatière Ne S'est Pas Complètement Fermée
1. Introducción piles pendant 30 minutes avant de les remettre en place, le verrou devrait Gracias por elegir la gatera con disco de I.D con control de tiempo de Cat Mate Elite. fonctionner normalement ensuite. LEA ESTAS INSTRUCCIONES ATENTAMENTE Y PROGRAME LA GATERA ANTES DE 14.4 Difficultés pour régler les fonctions requises/l'heure... - Page 17 2. Instalación de las pilas 4.1.5 Extraiga los marcos y taladre agujeros de 6mm de diámetro en el panel para los tornillos. 2.1 Quite la cubierta de las pilas empujándola hacia arriba (véase la Fig. 2). La cubierta se soltará. 4.1.6 Coloque el marco interior en la parte interior de la puerta y atornille el marco exterior a éste utilizando tornillos apropiados para el grosor del panel, (t), como se muestra 2.2 Introduzca 4 pilas alcalinas AA (R6) como se muestra en la (Fig.
- Page 18 Para los gatos muy indecisos, mientras esté en el 'MODO ENTRENAMIENTO', utilice comida para animarlos a entrar y salir por la gatera. Si va a instalar la gatera en una pared, deberá adquirir guarnición para pared Cat Mate Elite. Necesitará 1 guarnición por cada 50mm de grosor de pared sobre 50mm.
-
Page 19: Ajuste De Las Opciones De Acceso Individual (2-9 Gatos)
9.2 Pulse repetidamente el botón '4 WAY' para desplazarse a través de las opciones de 9.5.3 Pulse el botón 'PROG' para guardar el ajuste. acceso disponibles (Fig. 7), hasta que llegue a la deseada. 9.5.4 La pantalla mostrará el tiempo con el símbolo de los minutos destellando. Pulse el botón '+' repetidamente hasta que aparezca el ajuste actual de minutos (es decir, 9.3 Pulse el botón 'PROG' para guardar el ajuste. - Page 20 11.2 Pulse el botón '+' para seleccionar el número de Gato apropiado que desee • Asegúrese de que no esté activado un cierre cronometrado (evidente si destella el ajuste de cerrojo '4 WAY'). Si fuera necesario, cancele el cierre cronometrado reprogramar, o seleccione el siguiente número de Gato disponible.
- Page 21 150mm boven de vloer te monteren Proficiat met de aankoop van de Cat Mate Elite I.D. Disc Kattendeur met Tijdklok (afb. 5a). Bij een hogere kattendeur is een trapje voor de kat misschien handig om Functionering.
- Page 22 4.4 Montage in een muur (zie sectie 13). Als u een kattendeur in een wand plaatst, dient u Cat Mate Elite Wall Liners aan te schaffen. U heeft één wall liner nodig voor elke 50mm wanddikte over 50mm. 7. Zien waar uw kat zich bevindt 4.4.1 Maak in de muur een rechthoekige opening van 205mm hoog bij 180mm breed.
- Page 23 alternatieve manier om het huis in of uit te gaan heeft, of als de ene kat de andere kat kort 9.5 Instellen van de Timer Control / Tijdsklok voor AL uw katten opgevolgd heeft bij het gebruiken van de kattendeur, of als de kat maar net zijn neus door Als u uw kattendeur zo wenst in te stellen dat AL uw katten een specifieke de kattendeur heeft gestoken, enz.
- Page 24 10. Vervangen van batterijen 14.2 De kattendeur reageert niet op de geprogrammeerde I.D. disc en gaat niet open Als lage batterijindicator ( 4 , afb. 1) gaat branden, moeten de alkaline batterijen vervangen • Als de kattendeur in een UPVC- / metalen deur is aangebracht, zorg er dan voor dat de juiste opening in de deur is gezaagd (zie sectie 4.2).