Publicité
Les langues disponibles
Les langues disponibles
Liens rapides
Unfold the front and back flaps of this manual to view the camera's parts.
All manuals and user guides at all-guides.com
Consumer Imaging
EASTMAN KODAK COMPANY
Rochester, NY 14650
© Eastman Kodak Company, 2000
Pt. No. 919 4242
Kodak
T700 Zoom
Camera
ENGLISH/ESPAÑOL/FRANÇAIS
Printed in U.S.A.
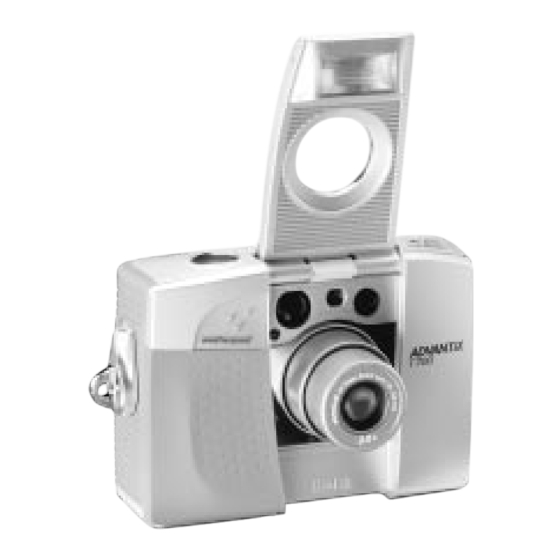
CAMERA IDENTIFICATION
1 Shutter button
3
2 Auto-focus sen
3 Lens cover/flas
4 Format-selecto
4
5 Viewfinder
6 Self-timer lamp
2
7 Lens
1
8 Meter-cell windo
9 Strap post
10 Film-door lever
5
10
9
6
7
8
Unfold the front and back flaps of this manual fo view the camera's parts.
Publicité

Manuels Connexes pour Kodak ADVANTIX T700 Zoom


Sommaire des Matières pour Kodak ADVANTIX T700 Zoom
- Page 1 9 Strap post 10 Film-door lever Consumer Imaging EASTMAN KODAK COMPANY Rochester, NY 14650 © Eastman Kodak Company, 2000 ENGLISH/ESPAÑOL/FRANÇAIS Unfold the front and back flaps of this manual to view the camera’s parts. Pt. No. 919 4242 Printed in U.S.A.
- Page 2 All manuals and user guides at all-guides.com LCD Panel Camera Identification This device complies with part 15 of the FCC Rules. Operation is subject to the following two conditions: (1) this device may not cause harmful 25 Date display 11 Flash/camera-ready lamp interference, and (2) this device must accept any interference received, 26 PM indicator 12 Viewfinder eyepiece...
- Page 3 Go to our Web site at http://www.kodak.com (for US) or http://www.kodak.ca (for Canada) or call: Kodak (USA only) from 9:00 a.m. to 7:00 p.m. (Eastern time) Monday through Friday at 1 (800) 242-2424. Kodak (Canada only) from 8:00 a.m. to 5:00 p.m. (Eastern time) Monday through Friday at 1 (800) 465-6325, ext.
- Page 4 All manuals and user guides at all-guides.com ADVANCED PHOTO SYSTEM Date and time/title imprinting FEATURES AVAILABLE • The date, time, and cassette ID number are printed on the back of your WITH THIS CAMERA prints, which makes it easy to organize pictures and order reprints.
- Page 5 (PQix) • Easy, drop-in loading is fast and virtually error-free, eliminating blank rolls and double • This camera records vital scene exposures. The camera uses KODAK data on the film’s magnetic ADVANTIX Film. The film cassette, unlike information strip and...
- Page 6 All manuals and user guides at all-guides.com CONTENTS SELECTING THE FLASH MODES ..19 Auto flash without red-eye reduction ......19 GETTING STARTED ......... 5 Auto flash with Setting the language ......5 red-eye reduction ......19 List of languages ........6 Fill flash ..........
- Page 7 All manuals and user guides at all-guides.com GETTING STARTED 2 Press the menu button (24) once. Load the battery (see LOADING THE MENU BATTERY on page 9), and then set the language and the date and time on the SELECT camera.
- Page 8 All manuals and user guides at all-guides.com 4. Press the right or left side of the zoom List of languages button (14) or select button (23) to Languages LCD display cycle to your selection. US English UK English German French Spanish Japanese Danish...
- Page 9 All manuals and user guides at all-guides.com 2. Press the select button (23). Date and time imprinting Traditional cameras print date and/or MENU time information directly onto the film. Your camera uses the film’s magnetic data-recording capability to record date SELECT and time information, which your photofinisher can imprint only on the...
- Page 10 All manuals and user guides at all-guides.com ATTACHING THE NECK STRAP 4. Press the enter/self-timer button (22) to store the selected number(s) and to 1. Insert the shorter looped end of the activate the next “blinking” number(s). adjustable strap through the hole of the strap post (9).
- Page 11 LOADING THE BATTERY You can use the knob on the clasp of This camera uses one 3-volt lithium the camera strap to activate the small KODAK KCR2 (or equivalent) Battery control buttons on the camera. that supplies power for all camera operations.
- Page 12 • the battery symbol (36) “blinks” on the • In the unlikely event that battery fluid LCD panel (13) or leaks onto your skin, contact Kodak • none of the indicators, except for a Health, Safety and Environment steady battery symbol, appear on the...
- Page 13 All manuals and user guides at all-guides.com LOADING THE FILM You can load film into the camera with the lens cover/flash opened or closed. OPEN 1. Rotate the film-door lever (10) to open the film door (18). • The film door opens only when the film chamber is empty or the film in the camera is completely rewound into the film cassette and the motor...
- Page 14 All manuals and user guides at all-guides.com USING THE LCD BACKLIGHT 2. Insert the film cassette completely into the film chamber. Make sure the This camera features an LCD backlight Film Status Indicator (FSI) on the film for easy viewing and use in low-light or cassette is at (#1 position) for a nighttime settings.
- Page 15 All manuals and user guides at all-guides.com TAKING PICTURES 2. Turn the format-selector dial (4) to select C, H, or P format. The You can take Classic (C), Group/HDTV (H)*, viewfinder and Panoramic (P) pictures on the same changes to film cassette.
- Page 16 All manuals and user guides at all-guides.com 4. Partially press down the shutter button (1) until the flash/camera-ready lamp (11) turns green. Fully press down the shutter button to take the picture. Typical print sizes (formats) Classic Group (HDTV) Panoramic 3.5 x 5 in.
- Page 17 All manuals and user guides at all-guides.com Using the focus lock 3. While still partially depressing the shutter button, move the camera until This camera automatically focuses on your subject is where you want whatever is within the Auto Focus (AF) it within the viewfinder eyepiece (12).
- Page 18 All manuals and user guides at all-guides.com • Hold your camera vertically to 2. Press the right side of the zoom button (14) to zoom closer to the capture tall, narrow subjects, such as a waterfall, skyscraper, or a subject in the telephoto mode or the left side to zoom away from the single person.
- Page 19 All manuals and user guides at all-guides.com TAKING FLASH PICTURES 4. When the flash/camera-ready lamp (11) glows green, fully press In dim light, such as indoors or outdoors down the shutter button to take the in heavy shade, or on dark overcast picture (see Flash/warning- days, you need flash.
- Page 20 All manuals and user guides at all-guides.com Flash-to-subject distance Flash/warning-lamp signals ISO Film Wide Tele Lamp Indicator Situation Speed (25 mm) (50 mm) Glows green • Camera ready for 2 to 11 ft 2 to 6 ft picture-taking (0.6 to 3.4 m) (0.6 to 1.8 m) Glows red •...
- Page 21 All manuals and user guides at all-guides.com SELECTING THE Auto flash without AUTO red-eye reduction FLASH MODES Use this feature to take pictures of Besides the auto-flash mode without red- subjects other than people. eye reduction (initial default setting of the camera), you can select auto-flash with Auto flash with AUTO...
- Page 22 All manuals and user guides at all-guides.com 4. Partially depress the shutter Flash off button (1). When the flash/camera- When you do not want to use the flash, ready lamp (11) glows green, fully especially indoors where flash is depress the shutter button to take prohibited or capture the ambiance of the picture.
- Page 23 Use a tripod (tripod socket [19]) or place the camera on another firm support, and use high- MENU speed KODAK ADVANTIX Film because SELECT the shutter speed at night will most likely be slow. ENTER EXP.
- Page 24 All manuals and user guides at all-guides.com 1. Completely lift up the lens cover/ 4. Infinity-focus mode or night-view flash (3) to uncover the lens (7) mode : and to turn on the camera. – Simply press the shutter button (1) to take the picture.
- Page 25 All manuals and user guides at all-guides.com USING THE 4. Look through the viewfinder eyepiece (12) to compose the picture SELF-TIMER and to allow room for yourself in it. Use the self-timer feature when you want 5. Press the shutter button (1). to include yourself in pictures.
- Page 26 All manuals and user guides at all-guides.com PRINT TITLE IMPRINTING 2. Press the select button (23). • “ TITLE PRINT” and “_ _” blinks on You can choose a print title from the the LCD panel. TITLE-SELECT LIST and choose a language (see Setting the language on 3.
- Page 27 All manuals and user guides at all-guides.com Title Title Title Title Number Number Christmas First day of School Birthday Tour Vacation New Year’s Honeymoon Easter Wedding Happy New Year Hanukkah Reunion Graduation Father’s Day Family Mother’s Day Party Memories Holiday Baptism Anniversary Halloween...
- Page 28 All manuals and user guides at all-guides.com PRINT-QUANTITY SELECTION 4. Press the enter/self-timer button (22) to store the information. Before you take a picture, you can • After you take the picture, the print choose the number of prints from 0 to 9 quantity defaults to 1.
- Page 29 All manuals and user guides at all-guides.com UNLOADING THE FILM 3. Remove the film cassette from the camera and reload with new KODAK ADVANTIX Film. Automatic rewind • The FSI on The camera automatically rewinds the fully- the film into the cassette after the exposed film last exposure.
- Page 30 All manuals and user guides at all-guides.com CARING FOR YOUR CAMERA 1. Gently press the mid-roll-change button (16) with the control-button • Protect the camera from dust, activator on the camera strap to start moisture, sudden impact, and the auto-film rewind. excessive heat.
- Page 31 All manuals and user guides at all-guides.com TROUBLESHOOTING What happened Probable cause Solution Camera will Battery weak, dead, missing, Replace or reload not operate or improperly loaded the battery Film does not Battery weak, dead, missing, Replace or reload advance or rewind or improperly loaded the battery LCD panel is blank...
- Page 32 4.6– f /8.7 Shutter: Programmed, 1/2–1/250 seconds Weatherproof: IEC 60529 Weatherproofing Class 2 Power source: Main power: one 3 V lithium KODAK KCR2 (or equivalent) Battery Dimensions: 91 X 64 X 35.5 mm Weight: 5.3 oz. (150 g) without film or battery...
- Page 33 All manuals and user guides at all-guides.com Kodak, Advantix, Ektanar, Sensalite, and the Advanced Photo System symbol and logotype are trademarks.
- Page 34 All manuals and user guides at all-guides.com Este dispositivo cumple con la parte 15 de las reglamentaciones de la FCC. El manejo está supeditado a las siguientes dos condiciones: (1) Este dispositivo puede no causar interferencia dañina, y (2) este dispositivo debe aceptar cualquier interferencia recibida, incluyendo interferencia la cual pudiese causar un funcionamiento indeseable.
- Page 35 Visite nuestro sitio en la red mundial electrónica (worldwide web) a la dirección http://www.kodak.com o llame a: Kodak (en los Estados Unidos solamente) al número 1 (800) 242-2424, de lunes a viernes de 9:00 a.m. a 7:00 p.m. (hora del este).
- Page 36 All manuals and user guides at all-guides.com Identificación de la cámara 1 Disparador 2 Sensores de enfoque automático 3 Cubierta del lente/flash 4 Disco selector del seleccionador de formatos 5 Visor 6 Lámpara de autodisparador 7 Lente 8 Ventana de medidor de célula fotoeléctrica 9 Presilla de la correa 10 Palanca de la puerta del...
- Page 37 All manuals and user guides at all-guides.com 11 Lámpara de flash/ cámara lista 12 Ocular del visor 13 Panel LCD 14 Botón de zoom 15 Botón del modo de flash 16 Botón de cambio a medio rollo (MRC) 17 Botón de modos 18 Puerta del compartimiento de la película 19 Montaje para trípode...
- Page 38 All manuals and user guides at all-guides.com Panel LCD 25 Exhibición de fecha 26 Indicador de p.m. 27 Exhibición de sensibilidad de ISO 28 Indicador de flash apagado 29 Icono de enfoque infinito 26 27 30 Icono de vista de noche 31 Icono de disparo continuo 32 Flecha de selector...
- Page 39 All manuals and user guides at all-guides.com CARACTERÍSTICAS DEL Impresión de fecha y hora/título ADVANCED PHOTO SYSTEM • La información de la fecha, hora y número de identificación del cartucho DISPONIBLES CON son impresos en la parte de atrás de ESTA CÁMARA sus fotografías, lo que hace fácil el organizar y mandar a hacer...
- Page 40 • La carga de rollo fácil es rápida y virtualmente sin error, eliminando rollos en blanco y doble exposición. La cámara usa película KODAK ADVANTIX. El cartucho de la película, no igual a los cartuchos tradicionales de 35 mm, comunica el estado de la película y se convierte en el cargador y...
- Page 41 All manuals and user guides at all-guides.com Indicador del estado de la película CONTENIDO (FSI) PROCEDIMIENTOS ......41 • El indicador realzado avanzará de una Como fijar el idioma ......41 Lista de idiomas ........ 42 posición a otra para identificar el Impresión de fecha y hora ....
- Page 42 All manuals and user guides at all-guides.com COMO TOMAR FOTOGRAFÍAS SELECCIÓN DEL NÚMERO CON FLASH ........54 DE IMPRESIONES ......64 Distancia del sujeto al flash ....55 EXHIBICIÓN DE LA SENSIBILIDAD Señales del flash/lámpara ISO DE LA PELÍCULA ...... 65 de advertencia ........
- Page 43 All manuals and user guides at all-guides.com PROCEDIMIENTOS 2. Oprima una vez el botón de menú (24). Después de cargar la batería (vea COMO CARGAR LA BATERÍA en la MENU página 46), fije en la cámara, el idioma, la fecha y la hora. SELECT Como fijar el idioma ENTER...
- Page 44 All manuals and user guides at all-guides.com Lista de idiomas 4. Oprima el lado derecho o izquierdo del botón de zoom (14) o el botón Idiomas Exhibición LCD de selección (23) para pasar a su selección. Inglés de US Inglés de UK Alemán Francés Español...
- Page 45 All manuals and user guides at all-guides.com Impresión de fecha y hora 1. Oprima repetidamente el botón de menú (24) para ver la lista y Las cámaras tradicionales imprimen la seleccionar el formato deseado. información de la fecha y/u hora directamente en la película.
- Page 46 All manuals and user guides at all-guides.com 3. Oprima el botón de zoom (14) o el 4. Oprima el botón de registrar/ botón de selección (23) para cambiar autodisparador (22) para guardar el/ el/los número(s). los número(s) seleccionado(s) y para activar el/los próximo(s) número(s) “parpadeante(s)”.
- Page 47 All manuals and user guides at all-guides.com COMO AJUSTAR LA CORREA ACTIVADOR DEL BOTÓN DE LA CÁMARA DE CONTROL 1. Pase el extremo corto de la correa Puede usar la perilla en la hebilla de la ajustable debajo de la abertura de la correa de la cámara para activar los presilla de la correa (9).
- Page 48 Indicador de batería débil Debe cambiar la batería cuando — Esta cámara utiliza una batería de litio de 3 voltios KODAK KCR2 (o su equivalente) que • el símbolo de la batería (36) proporciona la energía necesaria para todas “parpadea” en el panel LCD (13) o las funciones de la cámara.
- Page 49 Para activar la cámara, puede oprimir contacto con la información de Kodak cualquiera de los botones de control sobre Salud, Seguridad y el Medio excepto el disco selector del Ambiente llamando al 1-716-722-5151 seleccionador de formatos (4).
- Page 50 All manuals and user guides at all-guides.com COMO CARGAR LA PELÍCULA Puede cargar película en la cámara con OPEN la cubierta del lente/flash abierta o cerrada. 1. Gire la palanca de la puerta del compartimiento de la película (10) para abrir la puerta del compartimiento de la película (18).
- Page 51 All manuals and user guides at all-guides.com 2. Ponga el cartucho de la película • No fuerce el cartucho de la completamente en el compartimiento película en el compartimiento de de la película. Asegúrese de que el la película. Indicador del estado de película (FSI) 3.
- Page 52 All manuals and user guides at all-guides.com COMO USAR LA ILUMINACIÓN • La iluminación de fondo se apaga automáticamente después de DE FONDO DEL LCD 15 segundos, o cuando se toma una fotografía, o cuando se Esta cámara tiene la característica de rebobina la película.
- Page 53 All manuals and user guides at all-guides.com 1. Levante completamente la cubierta del lente/ flash (3) para destapar el lente (7) y encender la cámara. 2. Mueva el disco selector del seleccionador de formatos (4) al formato deseado (C, H, o P). El visor cambiará y mostrará...
- Page 54 All manuals and user guides at all-guides.com Como usar el cerrojo de enfoque 3. Mire a través del ocular del visor (12) colocando las marcas de enfoque Esta cámara se enfoca automáticamente automático (AF) en su sujeto. Para en cualquier objeto que aparezca dentro una fotografía nítida, manténgase a de las marcas del enfoque automático una distancia mínima de 2 pies...
- Page 55 All manuals and user guides at all-guides.com Consejos útiles para obtener 2. Oprima parcialmente y mantenga mejores fotografías oprimido el disparador (1) para asegurar la posición enfocada y • Acérquese lo suficiente al sujeto a espere hasta que la lámpara de flash/ fotografiar de modo que éste ocupe cámara lista (11) brille verde.
- Page 56 All manuals and user guides at all-guides.com COMO USAR EL LENTE 3. Mire a través del ocular del visor (12). DE ZOOM 4. Oprima el disparador (1) para tomar la fotografía. Esta cámara tiene un lente de zoom • El barril del lente automáticamente motorizado que le deja seleccionar el regresa a la posición gran angular enfoque de distancia ideal para tomar...
- Page 57 All manuals and user guides at all-guides.com Distancia del sujeto al flash 2. Mantenga al sujeto a fotografiar dentro del alcance indicado para la Sensibilidad Gran Telefoto- sensibilidad de la película en su ISO de angular gráfico cámara. No tome fotografías a más la película (25 mm) (50 mm)
- Page 58 All manuals and user guides at all-guides.com Señales del flash/lámpara COMO SELECCIONAR LOS de advertencia MODOS DE FLASH Indicador Situación Además del modo de flash automático luminoso sin reducción de ojos rojos (modo Brilla verde • La cámara está lista configurado inicialmente en la cámara), para tomar fotografías puede seleccionar flash automático con...
- Page 59 All manuals and user guides at all-guides.com Flash automático sin Flash de relleno con FILL AUTO reducción de ojos rojos reducción de ojos rojos Use esta característica para tomar Use esta característica cuando quiera fotografías que no incluyan a personas. reducir al mínimo ojos rojos en fotografías con flash de relleno tomadas Flash automático con...
- Page 60 All manuals and user guides at all-guides.com [40]), flash automático con reducción COMO SELECCIONAR LAS de ojos rojos (indicadores [40] & [35]), OPCIONES DE MODOS flash de relleno (indicador [41]), flash ESPECIALES de relleno con reducción de ojos rojos (indicadores [41] & [35]) o flash Oprima repetidamente el botón de apagado (indicador [28]) aparezcan modos (17) para ver las selecciones.
- Page 61 ISO KODAK ADVANTIX porque la mayor probabilidad es que la • En el modo de disparo continuo, abertura del diafragma, en estas todas las opciones del flash están...
- Page 62 All manuals and user guides at all-guides.com 4. Modo de enfoque infinito o vista de COMO USAR EL noche : AUTODISPARADOR – Simplemente oprima el disparador (1) para tomar la fotografía. Use esta característica cuando quiera incluirse en las fotografías. Modo de disparo continuo : 1.
- Page 63 All manuals and user guides at all-guides.com 4. Mire a través del ocular del visor (12) COMO IMPRIMIR EL TÍTULO para componer la fotografía y para DE LA IMPRESIÓN dejar un espacio libre en la fotografía donde pueda situarse. Antes de tomar la fotografía, usted puede escoger un título ya impreso de la 5.
- Page 64 All manuals and user guides at all-guides.com 1. Oprima el botón de menú (24) hasta 4. Oprima el botón de registrar/ que « TITLE PRINT » (IMPRESIÓN DE autodisparador (22) para fijar la TÍTULO) aparezca en el panel LCD (13). información.
- Page 65 All manuals and user guides at all-guides.com Número Título Número Título de título de título Navidad Feliz cumpleaños Cumpleaños Felicidades Vacaciones Feliz Navidad Luna de miel Festival Boda Primer día de colegio Día del Corpus Tour Graduación Año Nuevo Familia Pascua de Resurrección Fiesta Feliz Año Nuevo...
- Page 66 All manuals and user guides at all-guides.com IMPRESIONES) y « P 1 » en el panel Número Título LCD (13). de título Cabalgata de Reyes MENU Semana Santa AUTO SELECT PRINT Día de la ENTER EXP. LEFT Primera Comunión MODES Día de la Confirmación 2.
- Page 67 All manuals and user guides at all-guides.com EXHIBICIÓN DE LA COMO DESCARGAR SENSIBILIDAD ISO DE LA PELÍCULA LA PELÍCULA Rebobinado automático Puede ver en el panel LCD (13) la Esta cámara automáticamente rebobina sensibilidad de ISO de la película que la película en el cartucho una vez que se está...
- Page 68 3. Retire el cartucho de película de la se puede rebobinar y volver a cargar cámara y vuelva a cargarla con un hasta que la última fotografía en el rollo rollo nuevo de película KODAK haya sido tomada. La cámara rebobina ADVANTIX. la película automáticamente y configura el FSI a (posición #3) cuando se toma...
- Page 69 All manuals and user guides at all-guides.com 2. Vea los pasos 1 al 3 del Rebobinado PRECAUCIÓN: Use solventes o automático. soluciones diseñados para la limpieza de lentes de cámaras. No use • Puede volver a cargar el cartucho pañuelos con químicos diseñados para de película parcialmente expuesto la limpieza de gafas.
- Page 70 All manuals and user guides at all-guides.com PROBLEMAS Y SOLUCIONES Problema Causa probable Solución La cámara no La batería está débil, Reemplace o vuelva a funciona descargada, mal colocada, cargar la batería o falta colocarla La película no La batería está débil, Reemplace o vuelva a avanza o se descargada, mal colocada,...
- Page 71 All manuals and user guides at all-guides.com Problema Causa probable Solución La lámpara de El sujeto se encuentra entre Párese más lejos del flash/cámara 8 plgds. (20 cm) y 2 pies sujeto y vuelva a componer lista brilla rojo (0,6m) de la cámara la fotografía y el disparador se traba...
- Page 72 Programado, 1/2 – 1/250 segundos A prueba de intemperie: IEC 60529 a prueba de intemperie Clase 2 Fuente de energía: Primaria: una batería de litio de 3 voltios KODAK KCR2 (o su equivalente) Dimensiones: 91 x 64 x 35,5 mm Peso: 5.3 onzas (150 g) sin película ni batería...
- Page 73 36100. Dans la région de Toronto, composez le (416) 766-8233, poste 36100. Kodak (É.-U. seulement) du lundi au vendredi, de 9 h à 19 h (heure normale de l’Est) au numéro 1 800 242-2424. Assurez-vous d’avoir en main votre appareil-photo au moment de téléphoner.
- Page 74 All manuals and user guides at all-guides.com Description de l’appareil-photo Déclencheur Capteurs de mise au point automatique Couvre-objectif/flash Sélecteur du format de photo Viseur Témoin du retardateur Objectif Fenêtre du posemètre Tige de la courroie 10 Loquet du compartiment du film...
- Page 75 All manuals and user guides at all-guides.com 11 Témoin du flash/appareil- photo prêt 12 Oculaire du viseur 13 Panneau ACL 14 Bouton de zoom 15 Bouton des modes flash 16 Bouton de rembobinage à mi-rouleau 17 Bouton de modes spéciaux 18 Couvercle du compartiment du film 19 Écrou du trépied...
- Page 76 All manuals and user guides at all-guides.com Panneau ACL 25 Affichage de la date 26 Indicateur PM 27 Affichage de sensibilité ISO du film 28 Indicateur du flash désactivé 26 27 29 Icône de mise au point à l’infini 30 Icône de vue nocturne 31 Icône d’entraînement continu FILL...
- Page 77 All manuals and user guides at all-guides.com Impression de la date, de l’heure FONCTIONS APS OFFERTES et du titre AVEC CET APPAREIL-PHOTO • La date, l’heure et le numéro d’identification de la cassette sont • Un matériau de scellement spécial imprimés au verso de vos photos, ce préserve l’appareil de l’humidité...
- Page 78 éliminant les rouleaux vierges ou réexposés. L’appareil fonctionne réussies possible. avec des Films KODAK ADVANTIX. Contrairement aux cartouches de film classique 35 mm, la cassette de film indique l’état du film qu’elle renferme, en plus de jouer un rôle de contenant de transport et d’entreposage une fois...
- Page 79 All manuals and user guides at all-guides.com Indicateur de l’état du film TABLE DES MATIÈRES • Un voyant passe d’un symbole à l’autre DÉMARRAGE .......... 78 pour indiquer l’état du film à l’intérieur Choix de la langue ....... 78 de la cassette. Liste des langues .........
- Page 80 All manuals and user guides at all-guides.com SÉLECTION DES AUTRES MODES DÉMARRAGE DE FLASH ........... 94 Une fois que vous avez installé la pile Flash automatique sans réduction des (voir la rubrique INSTALLATION DE LA yeux rouges ........94 Flash automatique avec réduction des PILE à...
- Page 81 All manuals and user guides at all-guides.com 4. Appuyez sur la partie droite ou gauche 2. Appuyez une fois sur le bouton de du bouton de zoom (14) ou sur le menu (24). bouton de sélection (23) pour passer d’un choix à l’autre. MENU SELECT ENTER...
- Page 82 All manuals and user guides at all-guides.com Liste des langues Impression de la date et de l’heure Langues Affichage ACL Les appareils-photo classiques impriment la date et l’heure directement sur le film. Anglais (É.-U.) Votre appareil-photo emploie plutôt la Anglais (G.-B.) bande de données magnétiques pour enregistrer la date et l’heure, lesquelles Allemand...
- Page 83 All manuals and user guides at all-guides.com 1. Appuyez de façon répétée sur le 3. Appuyez sur le bouton de zoom (14) bouton de menu (24) pour vous ou sur le bouton de sélection (23) pour déplacer et choisir la fonction modifier le chiffre.
- Page 84 All manuals and user guides at all-guides.com FIXATION DE LA COURROIE 4. Appuyez sur le bouton de saisie/ retardateur (22) pour enregistrer votre DE COU sélection et activer les prochains chiffres (clignotants). 1. Enfilez la plus courte des boucles de la courroie adaptable sous la tige de la courroie (9).
- Page 85 ACTIVATEUR DU BOUTON INSTALLATION DE LA PILE DE COMMANDE Cet appareil-photo utilise 1 Pile au lithium KODAK KCR2 (ou l’équivalent) de 3 volts Utilisez le bouton du fermoir de la qui fournit l’alimentation nécessaire à courroie pour activer les petits boutons toutes les fonctions de l’appareil.
- Page 86 Centre d’information des Services • Jetez les piles conformément aux de santé, de l’environnement et de la réglementations locales et nationales. sécurité de Kodak au (716) 722-5151 • Ayez toujours des piles de rechange aux États-Unis. avec vous. • Dans l’éventualité peu probable où le •...
- Page 87 All manuals and user guides at all-guides.com CHARGEMENT DU FILM Fonctions automatiques d’économie d’énergie Vous pouvez charger le film dans Arrêt automatique l’appareil-photo, que le couvre-objectif/ flash soit ouvert ou fermé. Cet appareil-photo se met automatiquement en mode veille après 1.
- Page 88 All manuals and user guides at all-guides.com Assurez-vous que l’indicateur de l’état excessive pour insérer la cassette du film est positionné à (position 1) dans le compartiment du film. dans le cas d’une nouvelle cassette ou 3. Refermez le couvercle du à...
- Page 89 All manuals and user guides at all-guides.com UTILISATION DU PANNEAU • Le panneau lumineux s’éteint automatiquement après 15 secondes ACL LUMINEUX ou immédiatement après la prise d’une photo ou le rembobinage du Cet appareil-photo est doté d’un panneau film. Vous pouvez aussi l’éteindre ACL lumineux qui facilite le visionnement manuellement en appuyant de et le réglage des fonctions en lumière...
- Page 90 All manuals and user guides at all-guides.com POUR PRENDRE DES PHOTOS 2. Tournez le sélecteur du format de photo (4) pour choisir le format désiré Vous pouvez prendre des photos de (C, H ou P). Le formats classique (C), groupe/HDTV (H)* cadre du viseur et panoramique (P) sur la même cassette s’ajuste pour...
- Page 91 All manuals and user guides at all-guides.com 4. Appuyez partiellement sur le déclencheur (1) jusqu’à ce que le témoin du flash/appareil-photo prêt (11) passe au vert. Enfoncez ensuite complètement le déclencheur pour prendre la photo. Formats des photos Classique Groupe (HDTV) Panoramique 88,9 mm x 127 mm ou 88,9 mm x 152 mm ou...
- Page 92 All manuals and user guides at all-guides.com Mémorisation de la mise au point 2. Enfoncez partiellement le déclencheur (1) et maintenez-le en Cet appareil-photo effectue position pour mémoriser la mise au automatiquement la mise au point sur point; attendez que le témoin du flash/ tout ce qui se trouve à...
- Page 93 All manuals and user guides at all-guides.com • Placez-vous de biais par rapport aux Conseils pour prendre de surfaces brillantes, comme les fenêtres meilleures photos ou les miroirs, pour éviter le reflet du • Approchez-vous suffisamment de flash ou des taches brillantes dans votre sujet pour qu’il remplisse bien le vos photos.
- Page 94 All manuals and user guides at all-guides.com UTILISATION DE 3. Cadrez ensuite votre sujet dans l’oculaire du viseur (12). L’OBJECTIF ZOOM 4. Enfoncez complètement le Doté d’un objectif zoom motorisé, cet déclencheur (1) pour prendre la photo. appareil-photo vous permet de choisir la •...
- Page 95 All manuals and user guides at all-guides.com Distances entre le sujet et le flash 2. Assurez-vous que votre sujet se trouve à une distance qui soit appropriée pour Sensibilité Grand-angulaire Téléobjectif la sensibilité du film chargé dans votre ISO du film (25 mm) (50 mm) appareil.
- Page 96 All manuals and user guides at all-guides.com Témoins du flash Appuyez de façon répétée sur le bouton des modes flash (15) pour afficher les Indicateur Situation modes sur le panneau ACL (13) et faire Vert • L’appareil-photo est prêt à votre sélection.
- Page 97 All manuals and user guides at all-guides.com Flash d’appoint FILL 1. Soulevez complètement le couvre- objectif/flash (3) pour découvrir À l’intérieur ou à l’extérieur, la lumière l’objectif (7) et mettre l’appareil-photo vive projetée sur des sujets éclairés à sous tension. contre-jour peut créer des ombres 2.
- Page 98 All manuals and user guides at all-guides.com 4. Appuyez partiellement sur le SÉLECTION DES MODES déclencheur (1). Lorsque le témoin du SPÉCIAUX flash/appareil-photo prêt (11) passe au vert, enfoncez complètement le Appuyez de façon répétée sur le bouton déclencheur pour prendre la photo. de modes spéciaux (17) pour faire défiler les modes spéciaux.
- Page 99 (écrou du trépied [19]) ou placez options flash automatique avec ou l’appareil sur une surface stable, et sans réduction des yeux rouges sont utilisez un Film KODAK ADVANTIX de disponibles. sensibilité élevée parce que la vitesse d’obturation sera vraisemblablement plus •...
- Page 100 All manuals and user guides at all-guides.com UTILISATION DU 3. Cadrez bien votre sujet dans l’oculaire du viseur (12). RETARDATEUR 4. Mode de mise au point à l’infini ou de Utilisez ce mode si vous souhaitez vous vue nocturne : inclure dans la photo.
- Page 101 All manuals and user guides at all-guides.com 4. Regardez dans l’oculaire du viseur (12) IMPRESSION DU TITRE pour composer la photo. Prévoyez de Avant de prendre une photo, vous la place pour vous. pouvez choisir une langue (voir la 5. Appuyez sur le déclencheur (1). rubrique Choix de la langue à...
- Page 102 All manuals and user guides at all-guides.com 2. Appuyez sur le bouton de Numéro Titre sélection (23). du titre • « TITLE PRINT » (TITRE DE Noël L’ÉPREUVE) et « _ _ » clignotent sur le panneau ACL. Anniversaire 3. Appuyez sur la partie droite ou gauche Vacances du bouton de zoom (14) ou sur le Lune de miel...
- Page 103 All manuals and user guides at all-guides.com Numéro Titre Numéro Titre du titre du titre Joyeux anniversaire Jour de l’an Félicitations Fête du Travail Joyeux Noël Bar Mitzva Festival Bat Mitzva Rentrée Scolaire Toussaint Tourv Fête de Jeanne-d’Arc Nouvelle Année Pentecôte/Lundi de Pentecôte Pâques...
- Page 104 All manuals and user guides at all-guides.com CHOIX DU NOMBRE 3. Appuyez sur la partie droite ou gauche du bouton de zoom (14) ou D’ÉPREUVES sur le bouton de sélection (23) pour sélectionner le nombre Cette fonction vous permet de choisir, d’épreuves désiré.
- Page 105 (18). 3. Retirez la cassette de film de l’appareil- photo, puis rechargez ce dernier avec une nouvelle cassette de Film KODAK ADVANTIX. • L’indicateur de l’état du film d’une cassette de film entièrement exposé...
- Page 106 All manuals and user guides at all-guides.com Rembobinage à mi-rouleau 1. Appuyez légèrement sur le bouton de rembobinage à mi-rouleau (16) à l’aide Vous pouvez rembobiner votre film à mi- de l’activateur du bouton de rouleau et le recharger par la suite pour commande (sur la courroie) pour poursuivre la prise de photos.
- Page 107 All manuals and user guides at all-guides.com ENTRETIEN DE VOTRE • Retirez les piles lorsque vous entreposez l’appareil-photo pour une APPAREIL-PHOTO longue période. • Préservez votre appareil-photo de la ATTENTION : Pour prévenir tout poussière, de l’humidité, des chocs et dommage ou choc électrique, de la chaleur excessive.
- Page 108 All manuals and user guides at all-guides.com DÉPANNAGE Problème Cause probable Solution L’appareil-photo La pile est faible, épuisée, Remplacez ou réinstallez ne fonctionne pas. manquante ou mal installée. la pile. Le film n’avance pas La pile est faible, épuisée, Remplacez ou réinstallez ne se rembobine pas.
- Page 109 All manuals and user guides at all-guides.com Problème Cause probable Solution La porte du Une cassette de film est Appuyez sur le bouton de compartiment du chargée dans le rembobinage à mi-rouleau. film ne s’ouvre pas. compartiment du film. Voir la rubrique Rembobinage à...
- Page 110 Programmé, ½ à 1/250 seconde Étanchéité : Norme d’étanchéité IEC 60529, classe 2 Alimentation : Principale : 1 Pile au lithium KODAK KCR2 (ou l’équivalent ) de 3 volts Dimensions : 91 mm x 64 mm x 35,5 mm Poids :...
- Page 111 All manuals and user guides at all-guides.com Kodak, Advantix, Ektanar, Sensalite et les symbole et logo Advanced Photo System sont des marques de commerce.
- Page 112 All manuals and user guides at all-guides.com...
- Page 113 All manuals and user guides at all-guides.com...
- Page 114 All manuals and user guides at all-guides.com...