Publicité
Les langues disponibles
Les langues disponibles
Liens rapides
USA office: Fontana
AUS office: Truganina
GBR office: Ipswich
If you're having difficulty, our friendly
customer team is always here to help.
FRA office: Saint Vigor d'Ymonville
USA:cs.us@costway.com
AUS:cs.au@costway.com
GBR:cs.uk@costway.com
FRA:cs.f r @costway.com
Wall Mounted Closet System
Système de Penderie
HW66516
THIS INSTRUCTION BOOKLET CONTAINS IMPORTANT SAFETY INFORMATION. PLEASE READ AND KEEP FOR FUTURE REFERENCE.
Publicité

Manuels Connexes pour Costway HW66516


Sommaire des Matières pour Costway HW66516
- Page 1 GBR office: Ipswich FRA office: Saint Vigor d'Ymonville USA:cs.us@costway.com If you're having difficulty, our friendly AUS:cs.au@costway.com customer team is always here to help. GBR:cs.uk@costway.com THIS INSTRUCTION BOOKLET CONTAINS IMPORTANT SAFETY INFORMATION. PLEASE READ AND KEEP FOR FUTURE REFERENCE. FRA:cs.f r @costway.com...
- Page 2 Before You Start Please read all instructions carefully. Retain instructions for future reference. Separate and count all parts and hardware. Read through each step carefully and follow the proper order. We recommend that, where possible, all items are assembled near to the area in which they will be placed in use, to avoid moving the product unnecessarily once assembled.
- Page 3 LIST OF PARTS WARNING IMPORTANT: CHOKING HAZARD This product contains small parts. Check that you have all parts as listed. Depending on the configuration you choose, you may not use all components supplied. Anchors for stud and plaster walls are included. Anchors for TOOLS REQUIRED concrete or steel walls must be purchased separately.
- Page 4 BR350 CS558 Hang Track Cover Strip Bracket with with Locking 350mm Widget (of each) HT914 Screws Hang Track 914mm HT666 Anchors Hang Track 666mm Clothes Rod Hanger and Hanger Widget (of each) HR914 Hanging Rod - Ø25mmx914mm Outer Rod HR660 Hanging Rod - Outer Rod Ø25mmx660mm HR660...
- Page 5 Mount Extendable Hang Tracks TOP EDGE WALL L EFT STUD SIDE CLOSET OUTSIDE OF TRACK Locate all wall studs on Position first Hang Track closet wall and mark with so that the track is an X at the maximum touching the left side of the height you require your closet (if that is where you system to be positioned.
- Page 6 If there is no wall stud to fix a screw through the second hole from the left, please ensure you use a suitable wall anchor. (see Steps 1 and 2 below). Install screws into studs (or anchors) along Tracks. Starting at left side, fasten the FIRST TWO screws into studs (or anchors).
- Page 7 Hang Wall Strips TRACK COVER TRACK COVER Hang another Wall strip on the Track and use one of the Track Covers to space apart. Hang first two Wall strips Position BOTH outside Wall Drill a pilot hole and fasten screws in bottom hole of Wall strip. over the Hang Track.
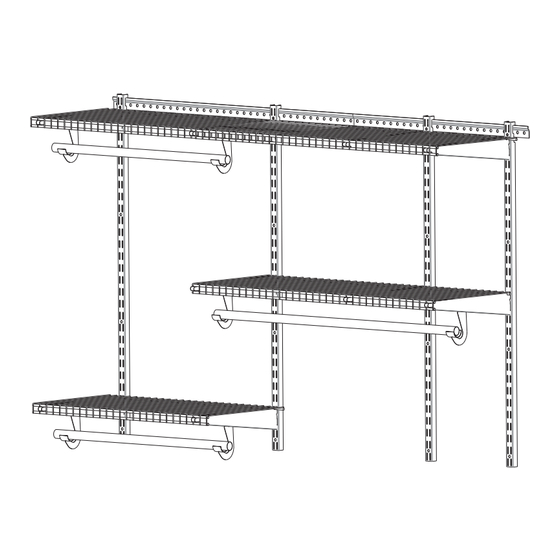
- Page 8 Install Wall Strip Extensions Install Brackets & Adjustable Shelves Insert Brackets into Uprights at desired locations. NOTE: Install Brackets and shelving at Slide one end of Wall strip connector into top two notches of short Wall strip. the top first and work down.
- Page 9 Install Adjustable Clothes Rods 'A' SHELF SEATS IN 'B' SHELF SEATS IN FRONT NOTCH BACK NOTCH Shelf labelled A sits in front notch of Bracket. Shelf labelled B sits in back notch. Be sure each shelf slides back as far as possible before locking shelves into Brackets.
- Page 10 AVERTISSEMENT RISQUE D'ÉTOUFFEMENT Ce produit contient de petites pièces. OUTILS REQUIS Niveau à bulle Marteau Fully Adjustable System ■ Shelves and Clothes Rods can be adjusted or reconfigured anywhere on this system to meet your storage needs. Perceuse électrique Foret de 6 mm Foret de 10 mm ■...
- Page 11 LISTE DES PIÈCES BR350 IMPORTANT: Support avec pièce de x10 (de Vérifiez que vous avez toutes les pièces comme indiqué. 350mm verrouillage chaque) Selon la configuration choisie, il est possible que vous n'utilisiez pas tous les composants fournis. HT914 Les ancrages pour les murs à ossature et en plâtre sont inclus. Les ancrages pour murs en béton ou en acier doivent être achetés Piste de suspension 914mm...
- Page 12 CS558 Bande de couverture de la piste de suspension Ancres Capuchon...
- Page 13 Monter des Pistes de Suspension Extensibles S'il n'y a pas de goujon mural pour fixer une vis à travers le deuxième trou à partir de la gauche, assurez-vous d'utiliser BORD SUPÉRIEUR un ancrage mural approprié. (voir les étapes 1 et 2 ci-dessous).
- Page 14 Accrocher les Bandes Murales Installez les vis dans les goujons (ou les ancrages) le long des pistes. COUVERTURE DE PISTE Marquez et percez un trou (pour un ancrage mural) dans le deuxième trou de la Accrochez les deux Placez les DEUX bandes piste desuspension à...
- Page 15 Installer les Extensions de Bande Murale Faites glisser une extrémité du connecteur de la bande murale dans les deux encoches supérieures de la bande murale courte. COUVERTURE DE PISTE Accrochez une autre bande murale sur la piste et utilisez l'une Faites glisser l'autre extrémité...
- Page 16 Installer les Supports & les Étagères Assurez-vous que Réglables les verrous du support sont déverrouillés (le clip de verrouillage en plastique doit être en position verticale - debout) et installez les étagères en vous assurant que le « nez » du support dépasse du bord avant de l'étagère.
- Page 17 Installer des Tringles à Vêtements Réglables AVERTISSEMENT! Si les étagères sont installées dans la mauvaise encoche, l'avant des étagères peut tomber du support. Si les étagères chevauchent 3 sections, utilisez deux sections A et une section B, en plaçant les sections A à l'extérieur et en séparant le pont avec la section B.
- Page 18 Return / Damage Claim Instructions DO NOT discard the box / original packaging. In case a return is required, the item must be returned in original box. Without this your return will not be accepted. Take a photo of the box markings. A photo of the markings (text) on the side of the box is required in case a part is needed for replacement.