Publicité
Les langues disponibles
Les langues disponibles
Liens rapides
Publicité
Chapitres

Sommaire des Matières pour Med-Fit 3
- Page 1 Med-Fit 3 Instruction Manual Betriebsanleitung Manuel d’instruction...
-
Page 2: Skin Preparation
Skin Preparation Before Application of Self-Adhesive Electrodes For best results please wash the area to be treated with a solution of warm salt water (mix one tablespoon of salt in warm water) and rub the area with the salt solution. The procedure will maximise the effect of the Tens when applied to areas of the body, where the skin may be particularly dry. -
Page 3: Table Des Matières
INDEX Chapter Contents Page 1. General Description ............. 2 2. Warnings & Precautions ..........2 3. Control Layout .............. 4 ..........5 5. Accessories ..............6 6. Graphic Symbols ............7 7. Parameter Controls ............7 8. Attachment of Electrodes Lead Wires ....... 10 9. -
Page 4: General Description
Chapter 1 : GENERAL DESCRIPTION The MED-FIT 3 is a battery operated pulse generator that sends electrical impulses to the body by means of electrodes attached to the skin. The device has two independently controllable channels. A pair of electrodes can be connected to each channel. - Page 5 Tens is unsuitable and should not be used in the following situations. • Persons suffering from conditions where the circulation is impaired. • Epilepsy, Heart Condition or any form of Malignancy. • Patients with poor skin sensation and non-compliant patients who are emotionally disturbed or have dementia.
-
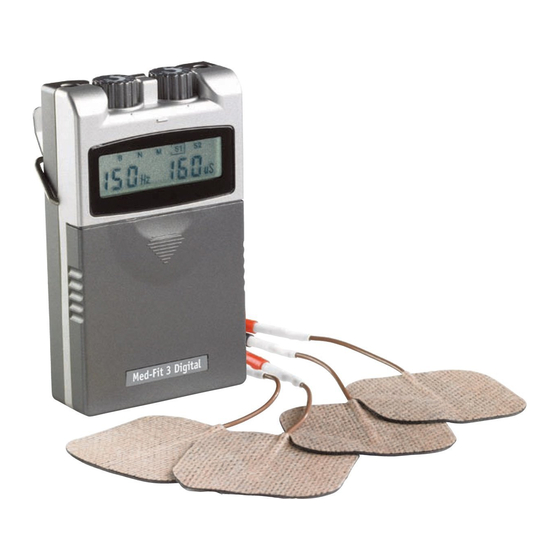
Page 6: Control Layout
Chapter 3 : CONTROL LAYOUT (1) CAP (2) LEAD CONNECTOR (3) INTENSITY CONTROL (OUTPUT ON/OFF SWITCH) (4) LCD (5) PULSE RATE CONTROL (6) PULSE WIDTH CONTROL (7) MODE CONTROL (8) BATTERY STRIP (9) BATTERY CASE (10) BELT CLIP LIQUID CRYSTAL DISPLAY... - Page 7 Chapter 4 : TECHNICAL SPECIFICATIONS MECHANISM TECHNICAL DESCRIPTION 01. Channel Dual, isolated between channels. 02. Pulse Amplitude Adjustable 0-80mA, Max output 80mA peak to peak (15.8mA rms) into 500ohm load each channel. 03. Output Voltage Adjustable 0-40V, Max output 40V peak to peak (7.9V rms) into 500ohm load each channel.
-
Page 8: Accessories
This will continue for 1 second and the cycle is then repeated Chapter 5 : ACCESSORIES Each set MED-FIT 3 are completed with standard accessories and standard label as given below I. Accessories REF. NO. -
Page 9: Graphic Symbols
Chapter 6 : GRAPHIC SYMBOLS Note Operating Instructions Degree of Electrical Protection BF Do not insert the plug into AC power supply socket. Pulse Rate Pulse Width Increase Parameter Decrease Parameter Direct Current (DC power source) Consult Instructions for use Manufacturer Serial Number Chapter 7 : PARAMETER CONTROLS... -
Page 10: Pulse Rate
PULSE RATE The Pulse Rate (frequency, pulses per second or Hertz) is thought to determine whether the spinal gating mechanism or the endorphin release mechanism is activated. As a rough guide the higher frequencies, those above 70Hz, will activate the spinal gating mechanism. The patient will perceive a "pins and needles"... - Page 11 INTENSITY Each patient responds differently to different levels of intensity, due to varying degrees of tissue resistance, innnervation, skin thickness, etc. Intensity instructions are therefore limited to the following set- tings: Perception - The intensity is increased so that the patient can feel the stimulation, but there is no muscular contraction.
-
Page 12: Preparation For Use
Chapter 8 : ATTACHMENT OF ELECTRODE LEAD WIRES The wires provided with the system insert into the jack sockets lo- cated on top of the device. Holding the insulated portion of the con- nector, push the plug into one of the jacks (see drawing); one or two sets of wires may be used. -
Page 13: Electrodes
2. Insert the lead wire into the pin connector on the pre-wired electrodes. 3. Remove the electrodes from the protective liner and apply the Removal 1. Peel the electrodes from the skin; do not pull on the lead wires because it may damage the electrodes. -
Page 14: Adjusting The Controls
In order to reduce the intensity or to switch the unit off turn the con- trol anti-clockwise. 3. Lead Connector Ensure that the unit is switched off. Connect the electrodes to the lead by inserting the plugs into the electrode connectors. Plug the... - Page 15 4. Mode Control Expose the controls by sliding front cover down from top of unit. This button controls 5 modes: B for burst, N for constant, and M for pulse rate modulation (-40%) stimulation, S1 for pulse width modulation(-40%), S2 for pulse width modulation(-70%). Select the required mode 5.
- Page 16 1. Make sure that both intensity controls are in the off position 2. Slide the battery compartment cover and remove. 3. Remove the battery from the compartment. 4. Insert the battery into the compartment. Note the polarity indicated on the battery and in the compartment.
-
Page 17: Battery Information
2. Please recycle the used battery in accordance with domestic regulation. Chapter 13 : SAFETY-TECHNICAL CONTROLS For safety reasons, check your MED-FIT 3 TENS each week based on the following checklist. 1. Check the device for external damage. - deformation of the housing. -
Page 18: Warranty
EN 60601-1-2:2001 and EN 60601-1:1990+A1:1993+A2:1995 +A13:1996 safety standards. Chapter 15 : WARRANTY All MED-FIT 3 carry a warranty of one year from the date of de- livery. The warranty applies to the stimulator only and covers both parts and labour relating thereto. - Page 19 Kapitel 1. TENS – Die Alternative gegen Schmerz ....18 2. Wie das TENS-Gerät arbeitet ......18 3. Bei welchen Indikationen hilft TENS? ....19 4. Wann sollte TENS nicht angewendet werden? ..19 5. Die Bedienelemente des TENS-Gerätes ....20 6. TENS im Einsatz – Schritt für Schritt ....21 7.
-
Page 20: Tens - Die Alternative Gegen Schmerz
1. TENS - Die Alternative gegen Schmerz Die Transkutane Elektrische Nervenstimulation – kurz TENS-Therapie genannt – ist eine anerkannte, klinisch geprüfte Methode zur Linde- rung von akuten und chronischen Schmerzen. Als äußerlich anwend- bare und medikamentenfreie Behandlungsform, sicher und einfach in der Handhabung, genießt sie das Vertrauen vieler Patienten. -
Page 21: Bei Welchen Indikationen Hilft Tens
3. Bei welchen Indikationen hilft TENS? - Wirbelsäulen-Syndrome wie Nacken-, Brust- oder Lendenwirbelbe- schwerden - Schulter-Arm-Syndrom - Diffuse Schmerzen an der Wirbelsäule Gelenkschmerzen - Gonarthrose - Koxarthrose - Schmerzen im Schultergelenk Kopfschmerzen und Migräne Neuropathie 4. Wann sollte TENS nicht angewendet werden? Nicht geeignet ist die TENS-Therapie für Patienten mit... -
Page 22: Die Bedienelemente Des Tens-Gerätes
5. Die Bedienelemente des TENS-Geräts Durch die übersichtliche Anordnung der Bedienelemente ist das TENS-Gerät leicht zu handhaben. Hier eine Übersicht: (1) Kabelbuchse (2) Intensitätsregler Timer (An-/Aus-Schalter) Auswahlschalter (3) Flüssigkristalldisplay(LCD) (4) Impulsregler (5) lmpulsweitenregler (6) Betriebsartenwahl (7) Batteriestrip (8) Batteriefach (9) Gürtelclip Display (1) Anzeige der Intensität... -
Page 23: Tens Im Einsatz - Schritt Für Schritt
6. TENS im Einsatz – Schritt für Schritt - Öffnen Sie das Gerät, in dem Sie die Schiebeabdeckung herunter schieben. - Legen Sie die Blockbatterie in das Batteriefach. - Vergewissern Sie sich, dass das Gerät ausgeschaltet ist (bei Regler auf „off“; keine Anzeige im Display). -
Page 24: Die Bedienung Im Detail
7. Anwendungsbeispiele für die TENS-Therapie Halswirbel-Syndrom • Brustwirbel-Syndrom • Lendenwirbel-Syndrom • Ischias-Syndrom • Gonarthrose • Koxarthrose • Sprunggelenksbeschwerden • Periarthritis • Epicondylitis • Migräne • 8. Die Bedienung im Detail 1. Schiebeabdeckung Sie deckt die Regler ab, mit denen Sie Impulsweite, Impulsrate und Modus einstellen können. - Page 25 Uhrzeigersinn bis zur gewünschten Einstellung. Einschalten Ausschalten Intensitätseinstellung 3. Kabelverbinder Die Verbindung zu den Elektroden wird durch zwei Kabel herge- stellt, die in die vorgesehenen Buchsen des TENS-Geräts gesteckt werden. Das Gerät muss dabei ausgeschaltet sein. Erst wenn Sie die Kabel mit dem TENS-Gerät verbunden haben, befestigen Sie an jedem Kabelende eine Elektrode.
- Page 26 4.Betriebsartenregler Wenn Sie die Schiebeabdeckung herunterziehen, sehen Sie die Regler des TENS-Geräts. Drücken Sie den Betriebsartenregler (M) so lange bis die gewünschte der fünf Betriebsarten im Display erscheint: B = pulsierende Stimulation N = konstante Stimulation M = Stimulation durch Impulsweiten-Modulation S1 = Intensität und Impulsratenstimulation S2 = Intensität und Pulsweitenstimulation 5.
- Page 27 Wenn Sie diesen Knopf drücken, wird die Impulsrate größer B. Abschwächung Drücken Sie diesen Knopf , so wird die Impulsrate ständig abgeschwächt. 6. Impulsweitenkontrolle Die Impulsweite ist stufenlos von 30 bis 260 µS einstellbar. Den ein- gestellten Wert erkennen Sie auf dem Display. Die Impulsweite gibt Auskunft über die Länge der einzelnen elektri- schen Impulse und damit über die empfundene Stärke der Stimulati- Wenn Sie (Knopf Pfeil nach oben) drücken, so wird die Impulsweite...
-
Page 28: Die Behandlung Im Detail
7. Therapiebehandlungszeit Behandlungszeit abrufen: Gerät einschalten Gleichzeitig MODE-Taste und linke Pfeiltaste drücken Im Display erscheint die Behandlungszeit, die der Benutzer in An spruch genommen hat Behandlungszeit zurücksetzen: Gerät einschalten Gleichzeitig MODE-Taste und rechte Pfeiltaste ( ) drücken Im Display ist die Behandlungszeit auf Null zurückgesetzt 8. -
Page 29: Drei Individuelle Stimulationsformen
10. Drei individuelle Stimulationsformen Die konventionelle Stimulation Mit konstanten Impulsen und Frequenzen bis 150 Hz; zu Behandlungs- beginn, besonders bei akuten Schmerzen -Die Burst-Methode Mit niedrigen Frequenzen; bei längerer Therapiedauer -Die Modulation Mit regelmäßig schwankenden Frequenzen, Pulsweiten und Intensi- tät; bei längerer Therapiedauer und chronischen Schmerzen Impulsdauer Die unterschiedlichen Impulsweiten sind in der Lage, verschiedene Gruppen von Nervenfasern zu stimulieren. -
Page 30: Der Umgang Mit Den Elektroden
Starke Muskelkontraktion durch eine hohe Impuls-Intensität ist nur erwünscht, wenn der Schmerz auf Grund eines verkrampften oder spastischen Muskels entsteht. Dann kann TENS als traditioneller Mus- kelstimulator eingesetzt werden. Benutzen Sie hierfür die schnelle Impulsfrequenz, eine weite Impulsdauer und stellen Sie den Inten- sitätsschalter auf sichtbare Kontraktion ein. -
Page 31: Die Positionierung Der Elektroden
Ihrem Arzt 12. Die Positionierung der Elektroden Die Positionierung der Elektroden ist ein wichtiger Erfolgsparameter für die TENS-Therapie. Jeder Patient reagiert hier unterschiedlich. Die nachfolgenden Vorschläge können daher nur Beispiele sein. Pro- bieren Sie die unterschiedlichen Positionierungsmethoden einfach aus, um das individuell beste Ergebnis zu erzielen. Nebeneinanderliegende Elektroden und links der schmerzenden Stelle angebracht (ein oder beide Elektroden-Paare) -
Page 32: Wartung, Lagerung Und Transport
13. Wartung, Lagerung und Transport Um das Gerät zu reinigen, benutzen Sie bitte nur feuer-ungefährliche Reinigungsmittel. Verschmutzungen und Flecken können mit handelsüblichem Haus- haltsreiniger entfernt werden. Tauchen Sie das Gerät nicht ins Wasser. Reinigungstücher immer gut auswringen. Zum Transport packen Sie das Gerät in die Styropor-Verpackung. Bei längerer Lagerung entfernen Sie bitte die Batterie und bewahren Sie das Gerät an einem trockenen und kühlen Ort auf. -
Page 33: Technische Angaben
15. Technische Angaben Die technischen Details des EV-803 Digital SD TENS sind folgendermaßen: Mechanismus Technische Beschreibung 01. Kanal zweifach, isoliert zwischen den Kanälen 02. Intensitätsregler stufenlos regelbar, 15.8mA rms (Max. Leistung) Strom in 500 Ohm pro Kanal; regelbar durch Intensitätskontrollknopf (80mA in 500 Ohm, max. Leistung) 03. -
Page 34: Sicherheitskontrolle
16. Sicherheitskontrolle Überprüfen Sie das TENS-Gerät wöchentlich auf Basis folgender Check-Liste Gerät Äußere Beschädigungen Defekte Ausgangsbuchsen Lesbarkeit der Beschriftung und der Etiketten Zubehör Beschädigungen der Kabel Beschädigungen der Elektroden Falls Sie Probleme mit dem Gerät haben, so setzen Sie sich bitte mit in Verbindung: 02154-9549-0. -
Page 35: Garantie
EN 60601-1-2:2001 und EN 60601-1:1990+A1:1993+A2:1995+A13:1996 Sicherheitsstandard überein. Hersteller: Everyway Medical Instruments Co., Ltd. 3F., No.5, Ln. 155, Sec. 3, Beishen Rd.,Shenkeng Dist., New Taipei City 22203,Taiwan. (R.O.C.) Vertretung in der EU: REHAB EUROPA SL SANT GERVASI DE CASSOLES, 96 3 o 4 a 08022 BARCELONA, SPAIN. - Page 36 INDEX Contenu du chapitre ......Page Description générale ......35 Avertissements et précautions .
-
Page 37: Chapitre 1 : Description Générale
Chapitre 1 : DESCRIPTION GÉNÉRALE Le MED-FIT 3 est un générateur d'impulsions fonctionnant avec des piles envoyant des impulsions électriques au corps par le biais d'électrodes collées sur la peau. L'appareil possède deux canaux contrôlables de façon indépendante. Une paire d'électrodes peut être reliée à chaque canal. - Page 38 Les appareils Tens ne conviennent pas et ne doivent pas être utilisés dans les situations suivantes. • Condition médicale causant une altération de la circulation sanguine. • Épilepsie, problèmes cardiaques et toute forme de malignité. • Les patients ayant des problèmes de peau et les patients non conformes perturbés émotionnellement ou souffrant de démence.
-
Page 39: Chapitre 3 : Disposition Des Commandes
Chapitre 3 : DISPOSITION DES COMMANDES (1) COUVERCLE (1) COUVERCLE (2) CONNECTEUR DE CÂBLE (3) COMMANDE D'INTENSITÉ (INTERRUPTEUR MARCHE/ARRÊT DE LA SORTIE) (4) LCD (5) COMMANDE DE FRÉQUENCE D'IMPULSION (6) COMMANDE DE LONGUEUR D'IMPULSION (7) COMMANDE DE MODE (8) BANDE PILE (9) BOÎTIER PILE... -
Page 40: Chapitre 4 : Spécifications Techniques
Chapitre 4 : SPÉCIFICATIONS TECHNIQUES Les spécifications techniques du MED-FIT 3 sont les suivantes M" u t i % e t $ r c % A A j e i t f f f c i f % e t $ r c %... -
Page 41: Chapitre 5 : Accessoires
Chapitre 5 : ACCESSOIRES Chaque MED-FIT 3 est proposé avec des accessoires et étiquettes standard, comme indiqué ci-dessous I. Accessoires NO. RÉF. DESCRIPTION QTÉ 1. SA 10 Électrodes adhésives 50 X 50 mm ....4 Fils conducteurs d'électrode . -
Page 42: Chapitre 7 : Commandes Des Paramètres
Courant continu (source d'alimentation CC) Consultez les instructions d'utilisation Fabricant Numéro de série Chapitre 7 : COMMANDES DES PARAMÈTRES DURÉE DES IMPULSIONS Une durée d'impulsion élevée générera des stimulations plus importantes pour tout réglage d'intensité. Comme indiqué en section Commandes, vous pouvez stimuler les fibres nerveuses en utilisant une combinaison de différents groupes d'intensités et de durées d'impulsion La durée d’impulsion la plus longue est nécessaire pour les fibres... -
Page 43: Intensité
Les fréquences plus basses, entre 2 et 16 Hz, activeront le mécanisme de diffusion d'endorphine. Le patient percevra une sensation de tapotement. Il est à noter que les réponses des patients individuels à l'appareil TENS peuvent varier et que le médecin doit être préparé à essayer différents réglages afin d'obtenir la réponse la plus efficace. -
Page 44: Chapitre 8 : Branchement Des Fils
Légère contraction - L'intensité est augmentée pour une contraction musculaire tout juste visible mais insuffisante pour déplacer une articulation. Lors de l'utilisation des fréquences d’impulsion basses, ceci se présentera sous la forme de tressaillements individuels. Les fréquences d'impulsion plus élevées augmenteront simplement la tension musculaire. -
Page 45: Chapitre 9 : Préparation Pour Utilisation
l'avant de l'appareil. Tout en maintenant la section isolée du connecteur, poussez la fiche dans une des prises (voir illustration) ; vous pouvez utiliser un ou deux jeux de câbles. Après connexion des câbles au stimulateur, branchez chaque câble à une électrode Faites attention lors de la fixation et du retrait des câbles Pousser/tirer le câble au lieu de tenir le connecteur isolé... -
Page 46: Chapitre 10 : Application D'électrodes Autoadhésives Réutilisables
1. N'appliquez pas sur les peaux abimées. 2. Les électrodes doivent être jetées lorsqu'elles n'adhèrent plus. 3. Les électrodes sont conçues pour une utilisation par un seul patient. 4. En cas d'irritation, cessez l'utilisation et consultez votre médecin. 5. Lisez les instructions pour l'utilisation des électrodes auto-adhésives... -
Page 47: Chapitre 11 : Ajuster Les Commandes
Pour réduire l'intensité de la sortie ou éteindre l'appareil, tournez la commande dans le sens antihoraire. 3. Connecteur de câble Vérifiez que l'appareil est éteint. Branchez les électrodes au câble en insérant les fiches dans les connecteurs de l'électrode. Branchez le câble sur l'appareil et appuyez sur les électrodes sur la peau... - Page 48 fiche connecteur de la sonde 4. Commande de mode Exposez les commandes en faisant coulisser le couvercle du dessus de l'appareil vers le bas. Ce bouton contrôle 5 modes : B pour décharge, N pour constant et M pour stimulation par modulation de la fréquence d'impulsion (-40 %), S1 pour modulation de la longueur d'impulsion (-40 %), S2 pour modulation de la longueur d'impulsion (- 70 %).
- Page 49 Lorsque vous appuyez sur ce bouton, la fréquence d'impulsion augmente progressivement Lorsque vous appuyez sur ce bouton, la fréquence d'impulsion diminue progressivement 6. Commande de longueur d'impulsion Cette commande ajuste la longueur de chaque impulsion électrique. En augmentant la longueur de l'impulsion, la force et la sensation des stimuli augmenteront.
-
Page 50: Informations Sur Les Piles
3. Ne jetez pas les piles usées au feu. Chapitre 13 : CONTRÔLES TECHNIQUES DE SÉCURITÉ Pour des raisons de sécurité, vérifiez votre MED-FIT 3 de façon hebdomadaire en vous basant sur les points suivants. 1. Vérifiez la présence de dégâts extérieurs sur l'appareil : - déformation du boîtier. -
Page 51: Conformité Aux Normes De Sécurité
EN 60601-1-2:2001 et EN 60601-1:1990+A1:1993+A2:1995 Chapitre 15 : GARANTIE Tous les modèles MED-FIT 3 disposent d'une garantie d'un an à compter de la date de livraison. La garantie s'applique au stimulateur uniquement et couvre les pièces et la main d'œuvre concernant l’appareil. - Page 52 Med-fit Ltd Unit 8, Martel Court, S. Park Business Park, Hamilton Road, Stockport, SK1 2AF Tel: 0161 429 7330 Web: www.med-fit.co.uk...