
Manuels Connexes pour NuVinci Nfinity 330


Sommaire des Matières pour NuVinci Nfinity 330
- Page 1 MANU-NFIN-00 TECHNICAL OWNER MANUAL NUVINCI OPTIMIZED CVP WITH NFINITY CABLE SHIFT SYSTEM 1-29 30-58 59-87 88-116 TECHNICAL OWNER MANUAL...
- Page 2 , Nfinity 380 and Nfinity 380SE 4. Nfinity service instructions Series Drivetrains 4.1 Replacing Shifter Cables 1.2 The NuVinci Optimized CVP 4.2 Resetting CVP to Full Overdrive 4.3 Servicing or Replacing Freewheel 4.4 Removing Brake Configurations 2. Nfinity operation & care 2.1 Shifting Nfinity Systems While Riding...
-
Page 3: The Nuvinci Optimized Cvp
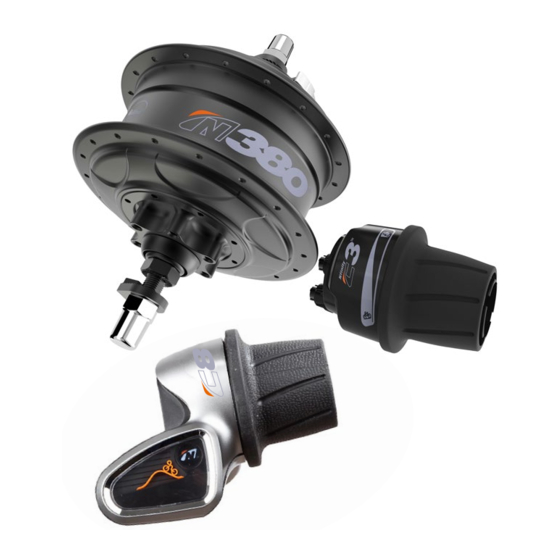
NUVINCI OPTIMIZED PRODUCTS 1. NuVinci Optimized products 1.1 Nfinity 330, Nfinity 380 and Nfinity 1.2 The NuVinci Optimized CVP 380SE Series Drivetrains The NuVinci Optimized technology is a The Nfinity series of mechanical shifting continuously variable planetary (CVP) drivetrains are the first continuously variable... - Page 4 - Using the Nfinity grip, rotate in the direction indicating more of a “flat” (B) 2.2 Shifting Nfinity Systems While Stopped • NuVinci Cycling CVPs cannot be shifted completely through the ratio range while stopped • 50-70% of the shift range is typically...
- Page 5 NFINITY OPERATION & CARE 2.3 Adjusting Cable Slack All controller related explanations show for the C8 controller apply to all other controllers. • Cable slack can be adjusted with the barrel adjusters (C) at the shifter. • Cable slack can be determined by pulling lightly on the cable housing (D) at the shifter and noticing any slack.
-
Page 6: Disconnecting The Rear Wheel
NFINITY OPERATION & CARE 2.4 Disconnecting the Rear Wheel 1. Shift to a position that allows easy access to the shift cable hardware. 2. Remove shift cable hardware following steps 3. Loosen and/or remove the axle nuts (A) and the no-turn washers (B) on both sides. - For rim or roller brake applications, disconnect the rear brake according to the manufacturer’s instructions. -
Page 7: Fitting The Rear Wheel
NFINITY OPERATION & CARE 2.5 Fitting the Rear Wheel 1. Place the rear wheel into the rear frame, making sure not to obstruct shift cables. 2. Slide one no-turn washer (A) each onto each axle end. The serrations of the no-turn washer must bear against the dropout of the frame. -
Page 8: Cleaning & Lubrication
Do not use aggressive cleaners Optimized CVP, Nfinity shift system, or Harmony shift system could endanger you, • The NuVinci Optimized CVP is provided and your warranty may become void. with permanent lubrication and the CVP • internals are maintenance-free for the life Please contact your qualified bike dealer of the product. - Page 9 NFINITY ASSEMBLY OF COMPONENTS 3. Nfinity assembly of components 3.1 Wheelbuilding • The anti-shift retainer (A) provides 135mm spacing, and should remain on the CVP 135 mm during lacing and wheelbuilding. - Maximum spoke diameter is #13/ 2.34mm - Minimum spoke diameter is #14/ 2.00mm •...
-
Page 10: Installing The Sprocket
NFINITY ASSEMBLY OF COMPONENTS 3.2 Installing the Sprocket • 1. Remove the anti-shift retainer (A) by pulling See section 5.1 (for chainline and beltline firmly away from the NuVinci CVP specifications) • The NuVinci Optimized CVPs are NuVinci Optimized CVPs are compatible with 16 to 28 tooth sprockets. - Page 11 1. Ensure you have the correct Nfinity Hub compatible Interface for your NuVinci Optimized CVP. • N330 CVPs have a yellow dot (A), and are compatible with Nfinity 330 Hub Interfaces designated with a light grey interior (B). • N360, N380 and N380SE CVPs have N360/N380/N380SE CVP...
- Page 12 NFINITY ASSEMBLY OF COMPONENTS 3.4 Installing the Nfinity Hub Interface 6. Thread the r.h. nut (F), serrations facing 1. Remove the anti-shift retainer, if installed outward, onto the axle and tighten to 10- (reference section 3.2) 15 Nm (7-11 ft-lbs). 2.
- Page 13 NFINITY ASSEMBLY OF COMPONENTS 3.5 Installing the Shifter 1. Install right brake lever according to the manufacturer’s instruction. 2. Slide the shifter (A) onto the handlebar. 3. Install the right hand grip (B) onto the handlebar according to the manufacturer’s instructions 4.
- Page 14 NFINITY ASSEMBLY OF COMPONENTS 3.6 Installing Shift Cable Housing 1. Route cable housing as shown from the shifter to the Nfinity Hub Interface. 2. Measure, cut and install the appropriate length cable housing (A) for the bicycle. • Full-length housing is recommended for both shift cables.
- Page 15 NFINITY ASSEMBLY OF COMPONENTS 3.7 Installing Shift Cables and Hardware Install cable end hardware only by pulling 4. Cut the excess cable at a maximum of cables at the end of the housing (A). Never 2.0mm from the end of the UD cable stop rotate the grip (B) with cables unattached, as (G).
- Page 16 NFINITY SERVICE INSTRUCTIONS 4. Nfinity service instructions 4.1 Replacing Shifter Cables Removing Shifter Cables 1. Remove cable hardware from both cables and remove shift cables from housing. 2. Remove the phillips screw (A) on the bottom of the Nfinity shifter and remove the bottom cover (B) by pulling lightly on the access tab.
- Page 17 Installing Shifter Cables 4. Install one shift cable, allowing the shifter housing (E) to guide the cable around the internals until it comes out the other side. Guide the cable through the closest barrel adjuster (F). 5. Pull the cable through the barrel adjuster until the cable anchor seats fully into the grip pulley (G).
- Page 18 (reference section 3.2). 2. If the Nfinity Hub Interface is incorrectly 7. Install the NuVinci Optimized CVP into a installed, full ratio range of the CVP may vice or fixture as shown, clamping on the be unavailable, and full overdrive will left hand axle flats.
- Page 19 NFINITY SERVICE INSTRUCTIONS 8. While driving the CVP clockwise with the Sprocket (A), rotate the Nfinity Hub Interface (B) counter-clockwise toward the full overdrive "H" position until a firm stop is felt. Repeat this rotation 2-3 times by driving the CVP clockwise and rotating the Nfinity Hub Interface back and forth, ending at a firm stop toward (but likely not at) the full overdrive "H"...
-
Page 20: Servicing Or Replacing Freewheel
NFINITY SERVICE INSTRUCTIONS 4.3 Servicing or Replacing Freewheel Set the NuVinci Optimized CVP in full overdrive with the front shifter or Nfinity Hub Interface prior to removal. 1. Remove the rear wheel per section 2.4. 7. Install the sprocket and Nfinity Hub Interface per section 3.2, section 3.3, and... -
Page 21: Removing Brake Configurations
NFINITY SERVICE INSTRUCTIONS 4.4 Removing Brake Configurations Reference exploded view in section 5.3 for numbering and descriptions. Remove the rear wheel per section 2.4. Removing Roller Brake Hardware 1. Remove left hand axle nut (1), left hand no-turn washer (2), and left hand nut (3). 2. -
Page 22: Installing Brake Configurations
NFINITY SERVICE INSTRUCTIONS 4.5 Installing Brake Configurations Reference exploded view in section 5.3 for numbering and descriptions. Installing Roller Brake Hardware Installing Disc Brake Hardware 1. Install the roller brake adapter (7) and 1. Install the disc brake adapter (9) and brake apply a high strength thread locking shield (8) and apply a high strength thread compound (equivalent to Loctite®... -
Page 23: Cvp Specifications
49.0 ± 0.5mm Chainline 49.0 ± 0.5mm Beltline (Gates) 45.5 ± 0.5 mm Beltline (Gates) 45.5 ± 0.5 mm Nfinity 330 systems are compatible with Beltline (Conti-Tech) 46.2 ± 0.5 mm Beltline (Conti-Tech) 46.2 ± 0.5 mm mid-motor eBike Sprocket sizes... -
Page 24: Approved Gearing
NFINITY TECHNICAL DATA 5.2 Approved Gearing N330 CVP Approved Gearing (Nfinity 330 & Harmony 330 Group Sets) N380 CVP Approved Gearing (Nfinity 380, Nfinity 380SE, Harmony 380, Harmony 380/380SE and Harmony HISync Group Sets) 58 & higher 58 & higher 27 &... -
Page 25: Exploded View
NFINITY TECHNICAL DATA 5.3 Exploded View (Optional – to be Left (non-drive) side Right (drive) side used with 2.3 mm thick sprockets) Rim brake configuration 15 13 Roller brake configuration Disc brake configuration Axle nut No-turn washer Left hand nut Cupped washer Rim brake cover Brake lock ring... -
Page 26: Technical Data
Technology components sold herewith are to be used only in the rear wheel of a bicycle for usual and customary rear hub purposes and in accordance with the accompanying instructions. You agree not to use the NuVinci ® All dimensions... - Page 27 INTELLECTUAL PROPERTY NOTICE 6. Intellectual property notice The NuVinci Optimized, N330, N360, N380, C3, C8, C8s, H3, H8, Nfinity 330, Nfinity 380, Nfinity 380SE, Harmony 330, Harmony 380, Harmony 380SE, Harmony H|Sync, Nfinity HI, HHI3, HHI8, HHISync control units Intellectual Property Notice...
- Page 28 WARRANTY 7. Warranty The NuVinci Optimized, N330, N360, N380, C3, C8, C8s, H3, H8, Nfinity 330, Nfinity 380, Nfinity 380SE, Harmony 330, Harmony 380, Harmony 380SE, Harmony H|Sync, Nfinity HI, HHI3, HHI8, HHISync warranty statement for bicycles • What does this warranty cover?
- Page 29 WARRANTY Limitations of warranty North American Office NuVinci CYCLING THIS LIMITED WARRANTY IS THE SOLE AND EXCLUSIVE European Support and Service WARRANTY MADE BY FALLBROOK WITH RESPECT Fallbrook Technologies Inc. TO THE PRODUCT, AND IS GIVEN IN LIEU OF ANY...
- Page 30 MANU-NFIN-00 TECHNISCHES BENUTZERHANDBUCH NUVINCI OPTIMIZED GETRIEBENABE MIT NFINITY BOWDENZUG SCHALTSYSTEM 1-29 30-58 59-87 88-116 TECHNISCHES BENUTZERHANDBUCH...
- Page 31 Inhaltsverzeichnis 3.7 Schaltzüge montieren 1. NuVinci Optimized Produkte 1.1 Nfinity 330, Nfinity 380 und Nfinity 380SE 4. Nfinity – Wartungsanweisungen Produktgruppen 4.1 Schaltzüge austauschen 1.2 Stufenlos verstellbares Planetengetriebe – 4.2 Nabe auf größte Übersetzung einstellen Continuously Variable Planetary (CVP) 4.3 Freilauf warten oder austauschen 4.4 Bremsen-Konfigurationen entfernen...
-
Page 32: Nuvinci Optimized Produkte
NUVINCI OPTIMIZED PRODUKTE 1. NuVinci Optimized Produkte 1.1 Nfinity 330, Nfinity 380 und Nfinity 1.2 Stufenlos verstellbares 380SE Produktgruppen Planetengetriebe – Continuously Variable Planetary (CVP) Die mechanischen Getriebe der Nfinity Die NuVinci Optimized Technologie Produktgruppen bieten das erste System für besteht aus einem stufenlos verstellbaren Fahrräder, das dem Fahrer ermöglicht, die... - Page 33 Den Drehgriff des Nfinity Controllers in die Richtung drehen, die eine "Ebene" anzeigt (B). 2.2 Im Stilstand "schalten" • NuVinci Optimized Naben lassen sich im Stillstand nicht über die gesamte Übersetzungsbandbreite schalten. • Gewöhnlich können 50-70% der Übersetzungsbandbreite im Stillstand geschaltet werden.
- Page 34 NFINITY – INBETRIEBNAHME & WARTUNG 2.3 Schaltzug-Spiel einstellen Bei allen auf das "Schalten" bezogenen Erklärungen wird der C8 Controller gezeigt. Sie gelten aber genauso für den C3 und den C8s Controller. • Spiel am Schaltzug kann mit den am Drehgriffgehäuse befindlichen Stellschrauben (C) eingestellt werden.
-
Page 35: Hinterrad Ausbauen
NFINITY – INBETRIEBNAHME & WARTUNG 2.4 Hinterrad ausbauen 1. Schalten Sie in eine Position, die leichten Zugang zu den Seilzugenden am Nfinity Naben-Interface ermöglicht. 2. Entfernen Sie die mit Zugstopp-Schnapper bzw. Zugstopp versehenen Seilzugenden vom Nfinity Naben-nterface gemäß den Schritten 3. - Page 36 NFINITY – INBETRIEBNAHME & WARTUNG 2.5 Hinterrad einbauen 4. Montieren Sie die mit Zugstopp bzw. 1. Setzen Sie das Hinterrad in die Zugstopp-Schnapper versehenen Seilzu- Ausfallenden am Hinterbau des Rahmens genden wieder im Nfinity Naben-Interface ein und heben Sie die Kette (bzw. den gemäß...
-
Page 37: Reingung & Schmierung
Dampfstrahler ein, um Fehlfunktionen • infolge eingedrungenen Wassers zu Nur ein qualifizierter Fahrradhändler vermeiden. sollte etwaige notwendige Arbeiten an der NuVinci Optimized Nabe bzw. an • Im Winterzeitraum sollten Sie Fahrrad anderen Bauteilen des Schaltsystems in kürzeren Abständen reinigen, damit durchführen. - Page 38 NFINITY – MONTAGE VON BAUTEILEN 3. Nfinity - Montage von Bauteilen 3.1 Laufradbau • Die Anti-Shift-Befestigung (A) bietet 135 ermöglicht einer 135 mm Einbaubreite auch 135 mm wenn kein Ritzel etc. montiert sind und sollte während des Einspeichens und Laufradbaus an der Nabe bleiben.
-
Page 39: Ritzel Montieren
Fahrers führen. 2. Montieren Sie ein Standard 9-Spline 3/32 Zoll (2,3 mm) Ritzel (B) mit der Nfinity 330 Systeme sind kompatibel flachen Seite zur Nabe, gefolgt von dem für Mittelmotor-eBike-Systeme bis zu mitgelieferten Spacer (C, falls erforderlich) einer Leistung von 250W. - Page 40 Nfinity Naben-Interface für Ihre NuVinci Optimized Nabe haben. • N330 Naben sind mit einem gelben Punkt (A) markiert und sind ausschließlich mit einem Nfinity 330 Naben-Interface kompatibel, das durch einen hellgrauen Ring (B)im Innenteil gekennzeichnet. • N360, N380 und N380SE Naben haben...
- Page 41 NFINITY – MONTAGE VON BAUTEILEN 3.4 Nfinity Naben-Interface montieren 1. Entfernen sie die Anti-Shift-Sicherung, wenn 5. Wenn der Einbauwinkel ausgerichtet sie noch montiert ist (vgl. Abschnitt 3.2). ist, achten Sie darauf, dass das Nfinity Naben-Interface auf vollen Overdrive 2. Achten Sie darauf, dass die Markierung gestellt ist, und setzen Sie dann das Nfinity auf der gekerbten Mutter (A) mit der Naben-Interface und die gekerbte Mutter...
- Page 42 NFINITY – MONTAGE VON BAUTEILEN 3.5 Contoller montieren 1. Montieren Sie den rechten Bremshebel am Lenker entsprechend der Herstelleranweisungen. 2. Schieben Sie den Controller (A) auf den Lenker. 3. Montieren Sie den rechten Lenkergriff (B) entsprechend der Herstelleranweisungen. 4. Richten Sie den Controller so aus, dass die Anzeige (C) für den Fahrer sichtbar ist und die Funktion der Schaltzüge nicht behindert wird.
- Page 43 NFINITY – MONTAGE VON BAUTEILEN 3.6 Außenhüllen für die Schaltzüge montieren 4. Bringen Sie Endkappen (B) an beiden 1. Führen Sie die Außenhüllen vom Controller Enden der Außenhüllen an, sobald diese bis zum Nfinity Naben-Interface. die richtigen Längen haben. 2. Ermitteln Sie erforderliche Länge (A) für die Außenhüllen.
- Page 44 NFINITY – MONTAGE VON BAUTEILEN 3.7 Schaltzüge montieren & einstellen Achten Sie beim Montieren und Einstellen der 4. Schneiden Sie den überschüssigen Underdrive- Schaltzüge darauf, dass Sie die Schaltzüge Schaltzug hinter dem fixierten Zugstopp (F) nur an den herausstehende Enden (A) aus ab und achten Sie dabei darauf, dass nicht der Zughülle ziehen.
- Page 45 NFINITY – WARTUNG 4. Nfinity – Wartung 4.1 Schaltzüge austauschen Schaltzüge entfernen 1. Entfernen Sie den Zugstopp bzw. den Zugstopp-Schnapper von den Schaltzügen und ziehen Sie die Schaltzüge aus den Außenhüllen heraus. 2. Entfernen Sie die Kreuzschlitzschraube (A) auf der Unterseite des Controllers und heben Sie die Abdeckung (B) durch leichtes Ziehen an der Lasche vom Gehäuse ab.
- Page 46 NFINITY – WARTUNG Schaltzüge verlegen 4. Fädeln Sie einen Schaltzug so ein, dass er im Gehäuse einmal um die Griffrolle (E) herumgeführt wird und auf der gegenüberliegenden Seite austritt. Führen Sie das ungekürzte Ende des Schaltzugs über die nächstliegende Stellschraube aus dem Gehäuse heraus.(F).
- Page 47 NFINITY – WARTUNG 4.2 Nabe auf größte Übersetzung einstellen 1. NuVinci Optimized Naben werden mit 6. Stellen Sie das Nfinity Naben-Interace auf installierter Anti-Shift-Befestigung (vgl. die volle Untersetzung "L" ein (beachten Abschnitt 3.2) ausgeliefert und befinden Sie, dass dies entgegengesetzt zur sich in der Werkseinstellung in der größten...
- Page 48 NFINITY – WARTUNG 7. Befestigen Sie die NuVinci Optimized Überprüfen Sie, ob die beiden Nabe wie gezeigt in einem Schraubstock Markierung jetzt auf einer Linie oder einer Halterung, indem Sie es an liegen. Sollte dies nicht der Fall sein, den Abflachungen der linken Achse wiederholen Sie Schritt 5.
- Page 49 NFINITY – WARTUNG 4.3 Freilauf warten oder austauschen Stellen Sie das NuVinci Optimized 6. Montieren Sie die gewarteten oder neuen Getriebe vor dem Ausbau in größte Bauteile gemäß der Explosionszeichnung Übersetzung über den Controller in Abschnitt 5.3 oder über das Nfinity-Naben-Interface.
-
Page 50: Bremsen-Konfiguration Entfernen
NFINITY – WARTUNG 4.4 Bremsen-Konfiguration entfernen Entfernen der Scheibenbremsen-Teile Siehe Explosionszeichnung in Abschnitt 5.3 für die Zuordnung 1. Entfernen Sie die Achsmutter (1), die linke und Beschreibung der in den Nasenscheibe (2), die linke Mutter (3) und nachfolgenden Schritten genannten Teile. die Tellerscheibe (4). -
Page 51: Bremsen-Konfigurationen Montieren
NFINITY – WARTUNG 4.5 Bremsen-Konfigurationen montieren Montieren der Scheibenbremsen-Teile Siehe Explosionszeichnung in Abschnitt 5.3 für Nummerierung 1. Montieren sie den Bremsscheiben-Adapter und Beschreibung der in den (9) und die Bremsen-Abdeckung (8) ein nachfolgenden Schritten genannten Teile. hochfestes Gewindesicherungsmittel für hochfeste Schraubverbindungen (z.B. - Page 52 NFINITY – TECHNISCHE DATEN 5. Nfinity - Technische Daten 5.1 Getriebe-Spezifikationen Nfinity 330 Nfinity 380/ Nfinity 380SE Nabe (Getriebe) N380/N380SE Nabe (Getriebe) N330 Farbe Silber oder schwarz Farbe Silber oder schwarz Gewicht Nabe 2.450 g Gewicht Nabe 2.450 g Übersetzung der Geschwindigkeit Stufenlos variabel innerhalb der Bandbreite der Gänge...
- Page 53 NFINITY – TECHNISCHE DATEN 5.2 Zugelassene Getriebeübersetzung (Übersetzungsverhältnis Kettenrad/Ritzel) N330 CVP Zugelassene Getriebeübersetzung (Nfinity 330 & Harmony 330 Produktgruppen) N380 CVP Zugelassene Getriebeübersetzung(Nfinity 380, N380SE, Harmony 380/380SE and Harmony HISync Pro- 58 & höher 58 & höher 27 & niedriger 27 &...
- Page 54 NFINITY – TECHNISCHE DATEN 5.3 Explosionszeichnung Linke Seite Rechte Seite (Optional - wird (Nicht-Antreibsseite) (Nicht-Antreibsseite) mit 2,3 mm breiten Ritzeln verwendet) Ausstattung mit Felgenbremse 15 13 Ausstattung mit Rollenbremse Ausstattung mit Scheibenbremse Achsmutter Nasenscheibe Linke Mutter Tellerscheibe Staubschutzdeckel Felgenbremse Bremsen-Sicherungsring Klemmrollen-Adapter Bremsen-Abdeckung Scheibenbremsen-Adapter...
-
Page 55: Abmessungen Getriebenabe & Controller
Technology components sold herewith are to be used only in the rear wheel of a bicycle for usual and customary rear hub purposes and in accordance with the accompanying instructions. You agree not to use the NuVinci ® All dimensions... - Page 56 6. Hinweis auf geistiges Eigentum Gültig für NuVinci Optimized Produkte und Produktgruppen (N330, N360, N380, C3, C8, C8s, H3, H8, Nfinity 330, Nfinity 380, Nfinity 380SE, Harmony 330, Harmony 380, Harmony 380SE, Harmony H|Sync, Nfinity HI, HHI3, HHI8, Harmony H|Snyc HHI)
-
Page 57: Garantie
Die Garantieerklärung gilt für folgende Produkte und Produktgruppen im Einsatz an Fahrrädern: NuVinci Optimized, N330, N360, N380, C3, C8, C8s, H3, H8, Nfinity 330, Nfinity 380, Nfinity 380SE, Harmony 330, Harmony 380, Harmony 380SE, Harmony H|Sync, HHI8, HHI3, Harmony H|Sync HHI. - Page 58 GARANTIE Wie erhält man Garantieleistungen? North American Office NuVinci CYCLING DIESE EINGESCHRÄNKTE GARANTIE IST DIE EINZIGE European Support and Service UND AUSSCHLIESSLICHE GARANTIE, DIE FALLBROOK Fallbrook Technologies Inc. IN BEZUG AUF DAS PRODUKT ABGIBT, UND WIRD Cedar Park, Texas 78613 USA Popovstraat 12 ANSTELLE ANDERER GARANTIEN ABGEGEBEN.
- Page 59 MANU-NFIN-00 TECHNISCHE GEBRUIKERSHANDLEIDING NUVINCI OPTIMIZED CVP MET NFINITY-KABELSCHAKELSYSTEEM 1-29 30-58 59-87 88-116 TECHNISCHE GEBRUIKERSHANDLEIDING...
- Page 60 Inhoudsopgave 1. NuVinci Cycling-producten 3.7 Installatie van de binnenkabels en bevestiging 1.1 Nfinity 330-, Nfinity 380 en Nfinity 4. Nfinity onderhoudsinstructies 380SE-versnellingsnaven 4.1 Vervanging van de schakelkabels 1.2 De NuVinci Optimized CVP 4.2 Terugzetten van de CVP in Full Overdrive 4.3 Onderhoud of vervanging van het freewheel...
-
Page 61: Nuvinci Cycling-Producten
NUVINCI CYCLING-PRODUCTEN 1. NuVinci Cycling-producten 1.1 Nfinity 330-, Nfinity 380 en Nfinity 1.2 De NuVinci Optimized CVP 380SE-versnellingsnaven De NuVinci Optimized-technologie is De Nfinity-serie met mechanische een continu variabele planetaire (CVP)- schakelversnellingsnaven is het eerste continu versnellingsnaaf die een oneindig aantal... - Page 62 Gebruik de Nfinity-greep, draai in de richting die “plat” aangeeft (B). 2.2 Nfinity-systemen schakelen als u gestopt bent • NuVinci Cycling CVP'S kunnen niet volledig door het versnellingsbereik geschakeld worden als u stopt. • 50-70% van het schakelbereik is meestal toegankelijk, terwijl de rest toegankelijk is door een heel klein beetje te draaien.
- Page 63 NFINITY BEDIENING & ONDERHOUD 2.3 Kabelspeling instellen Alle beschrijvingen op het gebied van de C8- controller zijn van toepassing op alle andere controllers. • De kabelspeling kan worden aangepast met kabelspanner (C) op de schakelaar. • De kabelspeling kan worden ingesteld door licht aan de buitenkabels te trekken (D) op de schakelaar, waarna speling ontstaat.
- Page 64 NFINITY BEDIENING & ONDERHOUD 2.4 Demontage van het achterwiel 1. Schakel naar een positie waarin u gemakkelijk toegang hebt tot de schakelkabelbevestiging. 2. Verwijder de binnenkabelbevestiging in de volgende stappen 3. Draai de asmoeren los en verwijder ze (A) en de onderlegringen (B) aan beide zijden. Bij velg- en rollerremapplicaties maakt u de achterrem los volgens de instructies van de fabrikant.
-
Page 65: Montage Van Het Achterwiel
NFINITY BEDIENING & ONDERHOUD 2.5 Montage van het achterwiel 1. Plaats het achterwiel in het frame en let er daarbij op dat de binnenkabels niet klem komen te zitten. 2. Schuif op de beide uiteinden van de as (A) een onderlegring. De gekartelde rand in de onderlegring moet tegen de uitvaleinden van het frame worden geplaatst. -
Page 66: Reinigen & Smering
Dit kan tot storingen leiden • doordat er water doordringt. Noodzakelijke werkzaamheden aan de NuVinci Optimized CVP, het • In de winter kunt u uw fiets beter iets Nfinity schakelsysteem of het Harmony- vaker schoonmaken zodat strooizout geen schakelsysteemsysteem mogen schade kan aanbrengen. -
Page 67: Montage Van Het Wiel
NFINITY BEDIENING & ONDERHOUD 3. Nfinity assemblage van de componenten 3.1 Montage van het wiel • De transportborging (A) zorgt voor 135 mm ruimte en moet op de CVP blijven tijdens het 135 mm spaken en de montage van het wiel. De maximale spaakdiameter is #13/ 2.34 mm De minimale spaakdiameter is #14/ 2.00 mm •... -
Page 68: Installatie Van Het Tandwiel
NFINITY ASSEMBLAGE VAN DE COMPONENTEN 3.2 Installatie van het tandwiel • 1. Verwijder de transportborging (A) door Zie paragraaf 5.1 (voor specificaties deze stevig van de NuVinci CVP te trekken. betreffende kettinglijn en riemlijn). • De NuVinci Optimized CVP‘s zijn ... - Page 69 Hub Interface & oriëntatie Compatibility & Orientation 1. Zorg ervoor dat u de juiste Nfinity- compatibel naafinterface hebt voor uw NuVinci Optimized CVP. • N330 CVP's hebben een gele stip (A), en zijn compatibel met de Nfinity 330-naafinterfaces aangeduid met een lichtgrijze binnenkant (B).
- Page 70 NFINITY ASSEMBLAGE VAN DE COMPONENTEN 3.4 Installeren van de Nfinity- naafinterface 1. Verwijder de transportborging indien deze 6. Voorzie de rechter asmoer van geïnstalleerd is (zie paragraaf 3.2). schroefdraad (F), de gekartelde randen naar buiten gericht, op de as en draai vast 2.
- Page 71 NFINITY ASSEMBLAGE VAN DE COMPONENTEN 3.5 Installatie van de draaischakelaar 1. Monteer de rechter remhendel volgens de voorschriften van de fabrikant. 2. Schuif de draaischakelaar (A) op het stuur. 3. Monteer het rechterhandvat (B) op het stuur volgens de voorschriften van de fabrikant. 4.
- Page 72 NFINITY ASSEMBLAGE VAN DE COMPONENTEN 3.6 Installatie van de buitenkabels 1. Voer de buitenkabels zoals weergegeven van de draaischakelaar naar de Nfinity- naafinterface. 2. Meet, knip en monteer de juiste lengte van de buitenkabels (A) voor de fiets. • Gebruik van volledige buitenkabels voor beide binnenkabels is aanbevolen.
- Page 73 NFINITY ASSEMBLAGE VAN DE COMPONENTEN 3.7 Installatie van de binnenkabels en bevestiging Installeer kabel en bevestiging alleen door 4. Snijd het kabeloverschot af op maximaal aan het einde van de buitenkabels aan kabels 2.0 mm van het einde van de UD- trekken (A) Draai de greep nooit (B) als de kabelstop (G).
- Page 74 NFINITY ONDERHOUDSINSTRUCTIES 4. Nfinity onderhoudsinstructies 4.1 Vervanging van de schakelkabels Verwijdering van de schakelkabels 1. Verwijder de kabelbevestiging van beide kabels en verwijder de binnenkabels uit de buitenkabels. 2. Verwijder de kruiskopschroef (A) aan de onderzijde van de Nfinity-draaischakelaar en verwijder de onderste afdekplaat (B) door voorzichtig aan het lipje te trekken.
- Page 75 NFINITY ONDERHOUDSINSTRUCTIES Schakelkabels installeren 4. Installeer een schakelkabel, terwijl de buitenkabel (E) de kabel rond het interne mechanisme leidt totdat hij er aan de andere kant weer uit komt. Leid de kabel door de dichtstbijzijnde kabelspanner (F). 5. Trek de kabel door de kabelspanner tot het kabelanker volledig in de kabelgreep valt (G).
- Page 76 3. Als de naaf al geïnstalleerd is op een fiets, schakel de CVP dan zo ver mogelijk 7. Installeer de NuVinci Optimized CVP in is naar de overdrive "H" en verwijder een bankschroef, zoals weergegeven, het achterwiel volgens de instructies in waarbij de naaf geklemd wordt op de paragraaf 2.4.
- Page 77 NFINITY ONDERHOUDSINSTRUCTIES 8. Draai de CVP met de klok mee door deze aan het tandwiel te draaien (A), terwijl de Nfinity naafinterface (B) tegen de klok in draait tot de full overdrive "H" positie totdat een duidelijke stop gevoeld wordt. Herhaal dit proces 2 tot 3 keer door de CVP met de klok mee te draaien en tegelijkertijd de Nfinity naafinterface heen...
-
Page 78: Onderhoud Of Vervanging Van Het Freewheel
NFINITY ONDERHOUDSINSTRUCTIES 4.3 Onderhoud of vervanging van het freewheel Zet de NuVinci Optimized CVP in full overdrive met de voorste draaischakelaar of de Nfinity- naafinterface voor de verwijdering van het freewheel. 1. Verwijder het achterwiel zoals beschreven 6. Installeer de onderhouden / nieuwe in paragraaf 2.4. -
Page 79: Verwijderen Van De Remconfiguraties
NFINITY ONDERHOUDSINSTRUCTIES 4.4 Verwijderen van de remconfiguraties Zie explosietekening in paragraaf 5.3 voor nummers en beschrijvingen. Verwijder het achterwiel zoals beschreven in paragraaf 2.4. Verwijderen van de roller-brake-bevestiging Verwijderen van de schrijfrembevestiging 1. Verwijder de linkerasmoer (1), de linker-no- 1. -
Page 80: Installeren Van Remconfiguraties
NFINITY ONDERHOUDSINSTRUCTIES 4.5 Installeren van remconfiguraties Zie explosietekening in paragraaf 5.3 voor nummers en beschrijvingen. Installeren van de schrijfrembevestiging Installeren van roller-brake-bevestiging 1. Installeer de roller-brake-adapter (7) en 1. Installeer de schrijfremadapter (9) gebruik een sterk schroefborgingsmiddel en remcover (8) en gebruik een sterk (vergelijkbaar met Loctite®... - Page 81 49.0 ± 0.5 mm Kettinglijn 49.0 ± 0.5 mm Riemlijn (Conti-Tech) 45.5 ± 0.5 mm Riemlijn (Conti-Tech) 45.5 ± 0.5 mm Nfinity 330 systemen Riemlijn (Conti-Tech) 46.2 ± 0.5 mm Riemlijn (Conti-Tech) 46.2 ± 0.5 mm zijn compatibel Tandwielen 16-22 tands (ketting)
-
Page 82: Goedgekeurde Overbrengingsverhoudingen
HARMONY TECHNISCHE GEGEVENS 5.2 Goedgekeurde overbrengingsverhoudingen N330 CVP goedgekeurde overbrengingsverhoudingen (Nfinity 330 & Harmony 330 productgroepen) /380SE N380 CVP Goedgekeurde overbrengingsverhoudingen (Nfinity 380, N380SE, Harmony 380 , and Harmony HISync product- 58 & hoger 58 & hoger 27 & lager 27 &... - Page 83 HARMONY TECHNISCHE GEGEVENS 5.3 Explosietekening (Optioneel- te gebruiken Linker- (niet-aangedreven) kant Rechter- (aangedreven) kant bij tandwielen met een dikte van 2,3 mm) Velgremonfiguratie 15 13 Roller-brake-configuratie Schijfremconfiguratie Asmoer No-turn-onderlegring Linkerasmoer Schuin toelopende vulring Velgremcover Klemring voor rem Roller-brake-adapter Remcover Schijfremcover Rechtermoer Naafinterface Tandwielklemring...
-
Page 84: Technical Data
Technology components sold herewith are to be used only in the rear wheel of a bicycle for usual and customary rear hub purposes and in accordance with the accompanying instructions. You agree not to use the NuVinci ® All dimensions... -
Page 85: Kennisgeving Betreffende Intellectueel Eigendom
KENNISGEVING BETREFFENDE INTELLECTUEEL EIGENDOM 6. Kennisgeving betreffende intellectueel eigendom De NuVinci Optimized, N330, N360, N380, C3, C8, C8s, H3, H8, Nfinity 330, Nfinity 380, Nfinity 380SE, Harmony 330, Harmony 380, Harmony 380SE, Harmony H|Sync, Nfinity HI, HHI3, HHI8, HHISync controle-eenheden... -
Page 86: Garantie
GARANTIE 7. Garantie De NuVinci Optimized, N330, N360, N380, C3, C8, C8s, H3, H8, Nfinity 330, Nfinity 380, Nfinity 380SE, Harmony 330, Harmony 380, Harmony 380SE, Harmony H|Sync, Nfinity HI, HHI3, HHI8, HHISync garantieverklaring voor fietsen • Wat valt er onder deze garantie? - Page 87 WARRANTY Beperkingen van de garantie North American Office NuVinci CYCLING DEZE BEPERKTE GARANTIE IS DE ENIGE EN EXCLUSIEVE European Support and Service GARANTIE DIE FALLBROOK GEEFT MET BETREKKING Fallbrook Technologies Inc. TOT HET PRODUCT EN WORDT VERSTREKT TER Cedar Park, Texas 78613 USA Popovstraat 12 VERVANGING VAN ELKE ANDERE GARANTIE.
- Page 88 MANU-NFIN-00 MANUEL TECHNIQUE D'UTILISATION ENGRENAGE PLANÉTAIRE À VARIATION CONTINUE (CVP) NUVINCI OPTIMIZED AVEC SYSTÈME DE CHANGEMENT DE VITESSES PAR CÂBLE NFINITY 1-29 30-58 59-87 88-116 MANUEL TECHNIQUE D’UTILISATION...
- Page 89 1. Produits NuVinci Cycling 4. Nfinity - Instructions d’entretien 1.1 Transmissions des gammes 4.1 Remplacement des câbles du dérailleur Nfinity 330, Nfinity 380 et Nfinity 380SE 4.2 Rétablissement du CVP en position de 1.2 Le CVP NuVinci Optimized surmultiplication maximale 4.3 Entretien ou remplacement de la roue libre...
-
Page 90: Produits Nuvinci Cycling
PRODUITS NUVINCI CYCLING 1. Produits NuVinci Cycling 1.1 Transmissions des gammes 1.2 Le CVP NuVinci Optimized Nfinity 330, Nfinity 380 et Nfinity 380SE La technologie NuVinci Optimized est une La gamme de transmissions à changement transmission à engrenage planétaire à... -
Page 91: Nfinity - Utilisation & Entretien
« terrain plat » (B). 2.2 Changement des vitesses sur les systèmes Nfinity à l'arrêt • Les CVP NuVinci ne peuvent parcourir toute la plage de rapports lorsqu'ils sont à l'arrêt. • 50 à 70% de la plage de rapports est en général accessible, le reste peut être activé... -
Page 92: Ajustement Du Mou Du Câble
NFINITY UTILISATION & ENTRETIEN 2.3 Ajustement du mou du câble Toutes les explications concernant le régulateur C8 s'appliquent également aux autres régulateurs. • Le mou du câble peut être correctement réglé à l'aide des barillets d'ajustement (C) sur le dérailleur. •... -
Page 93: Démontage De La Roue Arrièreel
NFINITY UTILISATION & ENTRETIEN 2.4 Démontage de la roue arrièreel 1. Placez le dérailleur dans une position qui fournit un accès aisé au matériel du câble du dérailleur. 2. Retirez le matériel du câble du dérailleur en suivant les étapes 3. -
Page 94: Montage De La Roue Arrière
NFINITY UTILISATION & ENTRETIEN 2.5 Montage de la roue arrière 1. Placez la roue arrière dans la partie postérieure du cadre, en veillant à ne pas entraver les câbles du dérailleur. 2. Enfilez une rondelle fixe (A) sur chaque extrémité de l'axe. La dentelure de la rondelle fixe doit reposer sur la pattedu cadre. -
Page 95: Nettoyage & Lubrification
• Réaliser des travaux non autorisés sur le • N'employez pas de détergents agressifs. CVP NuVinci Optimized, le système de changement de vitesses Nfinity ou le • Le CVP NuVinci Optimized bénéficie d'une système de changement de vitesses... -
Page 96: Nfinity - Assemblage Des Composants
NFINITY - ASSEMBLAGE DES COMPOSANTS 3. Nfinity - Assemblage des composants 3.1 Rayonnage de la roue • La cale de blocage (A) fournit un espace de 135 mm et doit rester sur le CVP durant 135 mm le rayonnage de la roue. Le diamètre maximal du rayon s'élève à... -
Page 97: Installation Du Pignon
NFINITY - ASSEMBLAGE DES COMPOSANTS 3.2 Installation du pignon • 1. Enlevez la cale de blocage (A) en le Voir section 5.1 (pour les spécifications tirant fermement hors du CVP NuVinci relatives aux chaînes et courroies). Optimized. • Les CVP NuVinci Optimized sont compatibles avec les ... - Page 98 CVP NuVinci Optimized. • Les CVP N330 présentent un point jaune (A) et sont compatibles avec les interfaces de moyeu Nfinity 330 dont l'intérieur arbo- re une teinte gris clair (B). • Les CVP N360, N380 et N380SE présentent une commande de changement...
-
Page 99: Installation De L'interface De Moyeu
NFINITY - ASSEMBLAGE DES COMPOSANTS 3.4 Installation de l'interface de moyeu Nfinity 1. Enlevez la cale de blocage le cas échéant 5. Lorsque l'angle d'installation est aligné, (voir section 3.2). vérifiez que l'interface de moyeu Nfinity est en position « H » de surmultiplication 2. -
Page 100: Installation Du Dérailleur
NFINITY - ASSEMBLAGE DES COMPOSANTS 3.5 Installation du dérailleur 1. Placez le levier de frein droit conformément aux indications du fabricant. 2. Glissez le régulateur (A) sur le guidon. 3. Installez la poignée droite (B) sur le guidon conformément aux indications du fabricant. 4. -
Page 101: Installation De La Gaine Du Câble Du Dérailleur
NFINITY - ASSEMBLAGE DES COMPOSANTS 3.6 Installation de la gaine du câble du dérailleur 1. Dirigez la gaine du câble comme illustré ci-contre, depuis le dérailleur jusqu'à l'interface de moyeu Nfinity. 2. Mesurez, coupez et installez la longueur de gaine appropriée (A) pour le vélo. •... -
Page 102: Installation Des Câbles Et Du Matériel Du Dérailleur
NFINITY - ASSEMBLAGE DES COMPOSANTS 3.7 Installation des câbles et du matériel du dérailleur Placez le matériel à l'extrémité du câble 4. Coupez la longueur de câble superflue en tirant les câbles au bout de la gaine (A) à 2,0 mm maximum de l'extrémité de la uniquement. -
Page 103: Nfinity - Instructions D'entretien
NFINITY - INSTRUCTIONS DE SERVICE 4. Nfinity - Instructions d’entretien 4.1 Remplacement des câbles du dérailleur Démontage des câbles du dérailleur 1. Enlevez le matériel des deux câbles du dérailleur et sortez-les de leur gaine. 2. Retirez la vis cruciforme (A) en dessous du dérailleur Nfinity et le couvercle inférieur (B) en tirant légèrement sur la languette d'accès. - Page 104 NFINITY - INSTRUCTIONS DE SERVICE Montage des câbles du dérailleur 4. Installez un câble de dérailleur en utilisant la gaine (E) pour le guider à l'intérieur jusqu'à ce qu'il sorte de l'autre côté. Faites passer le câble par le barillet d'ajustement le plus proche (F).
-
Page 105: Rétablissement Du Cvp En Position De Surmultiplication Maximale
4.2 Rétablissement du CVP en position de surmultiplication maximale 6. Réglez l'interface de moyeu Nfinity en 1. Les CVP NuVinci Optimized sont livrés position de sous-multiplication maximale en position de surmultiplication maximale « L » (notez qu'il s'agit du contraire et dotés d'un disque de retenue anti-... - Page 106 NFINITY - INSTRUCTIONS DE SERVICE 8. Tout en actionnant le CVP dans le sens horaire à l'aide du pignon (A), faites tourner l'interface de moyeu Nfinity (B) dans le sens inverse vers la position de surmultiplication maximale « H » jusqu'à ce qu'elle marque un arrêt ferme.
-
Page 107: Entretien Ou Remplacement De La Roue Libre
NFINITY - INSTRUCTIONS DE SERVICE 4.3 Entretien ou remplacement de la roue libre ressort. Placez le CVP NuVinci Optimized 5. Enlevez la bague de serrage intérieure en position de surmultiplication (17), le roulement à aiguilles (18) et la maximale à l'aide du dérailleur protection côté... -
Page 108: Démontage Des Freins
NFINITY - INSTRUCTIONS DE SERVICE 4.4 Démontage des freins Consultez la vue éclatée dans la section 5.3 pour la numérotation et les descriptions. Enlevez la roue arrière tel que décrit dans la section 2.4. Démontage du matériel d'un frein à rouleau Démontage du matériel d'un frein à... -
Page 109: Montage Des Freins
NFINITY - INSTRUCTIONS DE SERVICE 4.5 Montage des freins Consultez la vue éclatée dans la pour la numérotation et les descriptions. Montage du matériel d'un frein à disque Montage du matériel d'un frein à rouleau 1. Installez l'adaptateur du frein à rouleau (7) 1. -
Page 110: Nfinity- Données Techniques
Dérailleur C3, C8s et N360 (tous les MY) Changement de vitesses Poignée rotative variable, ¾ tour Changement de vitesses Poignée rotative variable, ¾ tour Les systèmes Nfinity 330 Interface de moyeu Nfinity 330 Interface de moyeu Nfinity 380 sont compatibles avec les Autres IM compatibles –... -
Page 111: Engrenages Autorisés
NFINITY - DONNÉES TECHNIQUES 5.2 Engrenages autorisés N330 CVP pignons autorisés (Nfinity 330 & Harmony 330 groupe de produits) N380 CVP pignons autorisés (Nfinity 380, Nfinity 380SE, Harmony 380/380SE, and Harmony HISync groupe de produits) 58 & superiéur 58 & superiéur 27 &... -
Page 112: Vue Éclatée
NFINITY - DONNÉES TECHNIQUES 5.3 Vue éclatée Côté gauche Côté droite (facultatif – á utiliser (Côté opposé á (Côté entraînement) avec des pignons deto l'entraînement) 2.3 mm d'epaisseur) Frein sur jante 15 13 Frein à rouleau Frein à disque Écrou d'axe Rondelle fixe Écrou gauche Rondelle bombée... -
Page 113: Dimensions Du Cvp Et Du Dérailleur Nfinity
Technology components sold herewith are to be used only in the rear wheel of a bicycle for usual and customary rear hub purposes and in accordance with the accompanying instructions. You agree not to use the NuVinci ® All dimensions... -
Page 114: Droits De Propriété Intellectuelle
AVIS DE PROPRIÉTÉ INTELLECTUELLE 6. Droits de propriété intellectuelle Les unités de commande NuVinci Optimized, N330, N360, N380, N380SE, C3, C8, C8s, H3, H8, Nfinity 330, Nfinity 380, Harmony 330, Harmony 380, Harmony 380SE, Harmony H|Sync, Nfinity HI, HHI3, HHI8, HHISync Droits de propriété... -
Page 115: Garantie
GARANTIE 7. Garantie Déclaration de garantie pour les vélos NuVinci Optimized, N330, N360, N380, N380SE, C3, C8, C8s, H3, H8, Nfinity 330, Nfinity 380, Harmony 330, Harmony 380, Harmony 380SE, Harmony H|Sync, Nfinity HI, HHI3, HHI8, HHISync Que couvre cette garantie ? •... - Page 116 GARANTIE Limitations de la garantie North American Office NuVinci CYCLING CETTE GARANTIE LIMITÉE EST LA SEULE ET European Support and Service UNIQUE GARANTIE ACCORDÉE PAR FALLBROOK Fallbrook Technologies Inc. CONCERNANT CE PRODUIT ET REMPLACE TOUTE Cedar Park, Texas 78613 USA Popovstraat 12 AUTRE GARANTIE.