
Manuels Connexes pour Mescomp Technologies harma klinic AC 211

Sommaire des Matières pour Mescomp Technologies harma klinic AC 211
- Page 1 MES C OMP TECHNOLOGIES mescomp technologies Automatyczny ciśnieniomierz typu naramiennego Blood pressure monitor upper arm type. Teneiometre automatique brassard AC 211 0197...
- Page 3 SPIS TREŚCI POLSKI 05..Właściwości: 06..UWAGA, przeczytaj zanim włączysz urządzenie! 08..III. Specyfikacja techniczna: 09..Informacje dotyczące ciśnienia Czym jest ciśnienie krwi? Dlaczego warto mierzyć ciśnienie krwi? Jak należy mierzyć ciśnienie krwi w domu? Standardy ciśnienia krwi. Wahania ciśnienia krwi. Co to jest arytmia? 12..
- Page 4 SPIS TREŚCI 17..Uwagi dotyczące pomiarów: 17..XII. Ustawienia daty i godziny. 18..XIII. Ustawienie własnych parametrów ciśnienia krwi. 19..XIV. Pomiar ciśnienia krwi. I. Funkcja wykrywania zaburzeń pracy serca- arytmii. 21..Specjalna funkcja- ustalanie średniej z 3 ostatnich pomiarów. 21..
- Page 5 SPIS TREŚCI ENGLISH 2 4 ..XIX. What is blood pressure? New W.H.O blood pressure classifications Variations in blood pressure 2 6 ..Important information before use of the unit 2 7 .
-
Page 6: Table Des Matières
SPIS TREŚCI FRENCH 43..XXXV. Définition de la pression artérielle 43..XXXVI. L'intérêt d'un autocontrôle de la pression artérielle à domicile 44..XXXVII. L'intérêt d'un autocontrôle de la pression artérielle à domicile 45..XXXVIII. Informations importantes avant d'utiliser le tensiomètre 46.. - Page 7 • Długa żywotność baterii. • Małe zużycie energii. • Etui na urządzenie. • Instrukcja w 3 językach, w tym w języku polskim. UWAGA : Producent MESCOMP TECHNOLOGIES. zastrzega sobie możliwość wprowadzenia zmian w osprzęcie i oprogramowaniu wynikające z postępu technicznego.
- Page 8 II. UWAGA, przeczytaj zanim włączysz urządzenie! • Przeczytaj uważnie instrukcję obsługi przed pierwszym użyciem. • Ciśnieniomierz jest przeznaczony dla użytku domowego i instytucyjnego, nie stanowi zastępstwa wizyt u lekarza. Aby uzyskać szczegółowe informacje na temat własnego ciśnienia, należy skontaktować się z lekarzem. •...
- Page 9 R O Z W I Ą Z Y WA N I E P R O S T Y C H P R O B L E M Ó W - urządzenia nie należy samodzielnie naprawiać. W przypadku problemów z urządzeniem, usterką proszę zgłosić w serwisie Mescomp Technologies lub w serwisie autoryzowanym (lista serwisów dostępna na stronie internetowej Mescomp Technologies).
- Page 10 III. Specyfikacja techniczna Model nr : AC 211 Rodzaj pomiaru : Oscylometryczny Zakres : Ciśnienie 0 ~ 300 mmHg Puls 40 ~ 199 uderzeń/min. Dokładność : Ciśnienie +/-3mmHg Puls +/- 5% Pamięć : 3 pamięci, w każdej można zapisać do 30 pomiarów z datą i godziną Wyświetlacz : wyświetlanie ciśnienia skurczowego i rozkurczowego,...
- Page 11 IV. Informacje dotyczące ciśnienia. Czym jest ciśnienie krwi? Ciśnienie krwi jest to ciśnienie oddziaływujące na ściany tętnic. Ciśnienie skurczowe to ciśnienie mierzone, gdy serce się kurczy i wypycha z siebie krew. Ciśnienie rozkurczowe jest to ciśnienie mierzone, kiedy serce rozkurcza się i krew z niego powoli wypływa.
- Page 12 IV. Informacje dotyczące ciśnienia. Jak należy mierzyć ciśnienie krwi w domu? Pojedyncze badanie ciśnienie krwi, nie zobrazuje stanu twojego zdrowia, należy badać ciśnienie regularnie zaraz po przebudzeniu. Nie należy badać ciśnienia krwi bezpośrednio po wysiłku fizycznym. Zmierzone wartości będą zapisane w pamięci urządzenia, lub można zapisać jej w tabeli załączonej na końcu instrukcji obsługi.
- Page 13 IV. Informacje dotyczące ciśnienia. Wahania ciśnienia krwi. Indywidualne ciśnienie krwi ciągle się zmienia. Podczas wysiłku fizycznego wartość pomiaru może wzrosnąć , natomiast podczas odpoczynku może się zmniejszyć. Ciśnienie krwi zależy w dużej mierze od stanu umysłu, temperatury, zmęczenia, stresu itp. Ciśnienie krwi zmienia się...
- Page 14 V. Opis urządzenia 1. Wyświetlacz 2. Wtyczka powietrzna 3. Mankiet naramienny 4. Wlot powietrza 5. Przycisk START/STOP 6. Przycisk MEMORY (PAMIĘĆ) 7. Przycisk MODE (TRYB) 8. Przycisk UP (GÓRA) 9. Przycisk DOWN (DÓŁ) 10. Baterie...
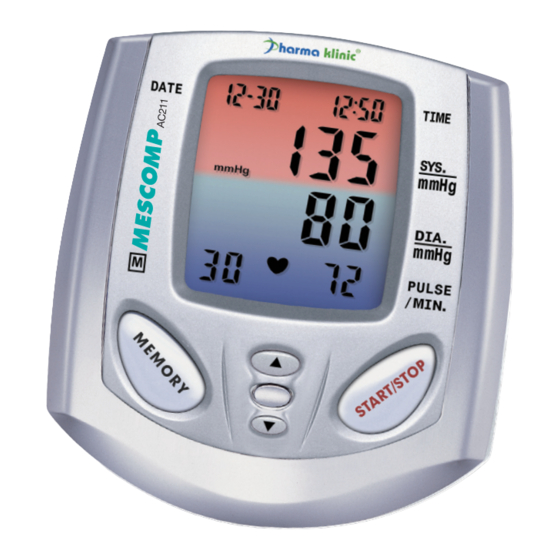
- Page 15 VI. Opis przycisków Przycisk START/STOP Przycisk uniwersalny, rozpoczęcie pomiaru, wyłączenie pomiaru. Przycisk MEMORY (PAMIĘĆ) Służy do przeglądania pamięci. Przycisk MODE (TRYB) Przycisk wielofunkcyjny, służy do ustawiania daty oraz godziny, wyboru pamięci. Przyciski GÓRA/DÓŁ Służą do przeglądania pamięci, zapisywanych pomiarów. VII. Opis wyświetlacza. MIESIĄC DZIEŃ...
- Page 16 VII. Opis wyświetlacza. Podczas pomiaru ciśnienia krwi miga, oznacza ilość wyczuwalnych uderzeń serca na minutę. Ostrzeżenie o słabych bateriach ( patrz UWAGI DOTYCZĄCE BATERII) Ostrzeżenie, oznacza, że urządzenie nie mogło prawidłowo określić ciśnienia krwi, należy powtórzyć pomiar. ERROR Oznaczenie wykrycia arytmii. Pojawienie się symbolu podczas pomiaru może być...
- Page 17 IX. Uwagi dotyczące baterii • Kiedy baterie będą bliskie wyczerpania, na wyświetlaczu pojawi się ikona oznacza, że należy wymienić baterie na nowe, wyłącznie alkaiczne. • Jeżeli urządzenie nie będzie używane przez dłuższy czas należy wyjąc z niego baterie. • Zużytych baterii nie należy wrzucać do ognia. •...
- Page 18 X. Zakładanie mankietu Przełóż mankiet prze metalową sprzączkę, tak aby gładka powierzchnia znajdowała się po wewnętrznej powierzchni mankietu Włóż lewą rękę do mankietu. Dolna krawędź mankietu powinna znajdować się około 1,5 cm od łokcia. Rurka mankietu powinna leżeć nad tętnicą po wewnętrznej stronie ramienia, nie powinna być...
- Page 19 XI. Uwagi dotyczące pomiarów • Ciśnieniomierz po wykonaniu pomiarów wyłącza się po 1 minucie po naciśnięciu ostatniego przycisku • Nie należy mierzyć ciśnienia krwi bezpośrednio po dużym wysiłku, ważne jest, aby przed pomiarem zrelaksować się. • Nie przeprowadzać pomiaru w stanie napięcia oraz stresu. •...
- Page 20 XIII. Ustawienie własnych parametrów ciśnienia krwi. Ciśnieniomierz posiada dodatkową funkcję ustawienia własnych parametrów ciśnienia krwi. Państwa lekarz pokaże jaki jest prawidłowy zakres ciśnienia krwi oraz poda odpowiednie wartości. Dzięki tej funkcji nie będziesz musiał pamiętać jaka powinna być prawidłowa wartość twojego ciśnienia, zrobi to za kolorowy wyświetlacz, który w zależności od wyniku badania zaświeci się...
- Page 21 XIV. Pomiar ciśnienia krwi. UWAGA: Urządzenie posiada 3 pamięci numerów, w każdej można zapisać do 30 pomiarów wraz z data oraz godziną. Przed pomiarem należy wybrać żądaną grupę pamięci, aby wybrać: 1. Naciśnij przycisk START/STOP, a następnie przycisk MODE, aby wybrać żądaną pamięć naciśnij przycisk "▲" lub "▼" . 2.
- Page 22 XIV. Pomiar ciśnienia krwi. 5. Urządzenie wyłączy się automatycznie po 1 minucie od przyciśnięciu ostatniego przycisku. UWAGA: Gdy nie ustawisz parametrów ciśnienia krwi (dotyczy pamięci nr 2i 3) po zakończeniu pomiaru wyświetlacz nie podświetli się na kolorowo. Warunkiem działania podświetlania wyświetlacza po pomiarze jest ustawienie parametrów w pamięci urządzenia.
- Page 23 XV. Specjalna funkcja- ustalanie średniej z 3 ostatnich pomiarów. Po każdym pomiarze wynik zostaje zapisywany we wcześniej wybranej pamięci urządzenia. Gdy naciśniesz raz przycisk MEMORY na wyświetlaczu zostanie pokazana średnia z 3 ostatnich pomiarów, na wyświetlaczu pojawi się symbol (A), aby przypomnieć, że jest to średnia z 3 ostatnich pomiarów.
- Page 24 XVII. Przeglądanie pamięci Aby przeglądać pomiary zapisane w pamięci: 1. Naciśnij przycisk MEMORY, a następnie przycisk MODE, za pomocą przycisków "▲" lub "▼" . wybierz pamięć, w której chcesz sprawdzić pomiary. 2. Następnie naciśnij przycisk MEMORY, następnie za pomocą przycisku "▼" możesz przeglądać wszystkie pomiary.
- Page 25 XVIII. Rozwiązywanie prostych problemów. Nie można włączyć aparatu Sprawdź, czy baterie są naładowane i prawidłowo zainstalowane. Powietrze nie jest pompowane do mankietu Sprawdź czy mankiet nie jest uszkodzony. Sprawdź, czy przewód łączący mankiet z aparatem jest właściwie połączony. Niewiarygodne wartości pomiaru Mankiet został...
- Page 26 ENGLISH XIX. What is blood pressure? Blood pressure is the pressure or the force of blood flowing against the walls of the arteries. Blood pressure is constantly changing during the course of the cardiac cycle. Systolic blood pressure is the highest pressure in the cycle. Diastolic blood pressure is the lowest pressure in the cycle.
- Page 27 XIX. What is blood pressure? New W.H.O blood pressure classifications Standards for assessing high or low blood pressure without regard to age have been established by the World Health Organization (WHO) as shown in the chart. Variations in blood pressure Individual blood pressures vary greatly on a daily and seasonal basis.
- Page 28 XX. Important information before use of the unit • Wrap the cuff snugly around your arm, The cuff must be at the same level as your heart. • Do not move the unit during measurement, or accurate measurement can not be achieved. •...
- Page 29 XXI. Color check feature- lighting screen. The COLOR CHECK technology enables end users to read and understand easily the results display on the screen, thanks to the COLOR Lighting of the Screen. Your Blood pressure is higher than standards set in the BPM, the screen turns in RED.
- Page 30 XXII. Device descriptions 1. LCD DISPLAY 2. AIR PLUG 3. ARM CUFF 4. AIR JACK 5. START/STOP BUTTON 6. RECALL MEMORY BUTTON 7. MODE BUTTON 8. UP BUTTON 9. DOWN BUTTON 10. "AA"(1.5V) x 4 ALKALINE BATTERIES...
- Page 31 XXIII. Description of display symbols MONTH DATE HOUR MINUTE SYMBOL SYSTOLIC BLOOD RATE PRESSURE mmHg UNIT BATTERY WEAK DIASTOLIC SYMBOL RATE ERROR MEASURING ERROR DISPLAY PULSE NUMBER RATE OF MEMORY PULSE SYMBOL...
- Page 32 XXIV. Changing batteries Remove the battery cover at the rear side of the unit and insert ALKALINE batteries into the battery compartment as shown, Make sure the polarities + and - are observed. Important notice : XXV. Attaching arm cuff Press your brachial artery by two fingers approximately 1 inch above the Elbow...
- Page 33 XXV. Attaching arm cuff Pull the cuff so that the top and bottom edges are tightened around your arm. When the cuff is positioned properly, press the Velcro firmly against the pile side of the cuff. Sit on a chair and place your arm on the table so that the cuff is at the same level as your heart.
- Page 34 XXVI. Description of display marks Display mark Condition/Cause Corrective action Flashes on the LCD Measurements in screen when pulse progress. Do not is detected during move or talk. pulse mark measurement. Appears when the Replace all four battery voltage is batteries with new excessively low or ones.
- Page 35 XXVII. How to measure 1. Inserting 4 pieces "AA" Alkaline batteries in position: a. Open battery cover b. Refer to the picture in positioning batteries c. All segments will appear on the mmHg display in 3 seconds. d. Display 1 month 1 date, 12 hour ERROR 0 minute.
- Page 36 XXVII. How to measure For the SYS, it means that when taking your blood pressure, if your SYS is above 130 mmHg, upper part of the screen will turn RED; if your SYS is below 130mmHg, then the upper part of the screen will turn BLUE; For the DIA, it means that when taking your blood pressure, if your DIA is above 90 mmHg, lower part of the screen will turn RED;...
- Page 37 XXVII. How to measure e. Press the "MODE" key to confirm and complete the setting of your Blood pressure monitor. The screen now displays the time and date and the current user number. IMPORTANT ! FIRST SETTING OF THE SYS and DIA FOR USER 2 and 3 of your Blood pressure monitor.
- Page 38 XXVII. How to measure e. Press the "MODE" key to confirm setting and go to the setting of the DIASTOLIC. f. The DIASTOLIC figure is now the flashing on the lower part of the screen (85); Press the selection key ''▲'' or '' ▼'' on the side of the unit to adjust up or down this figure (Please note that the adjustment is done by +/-5 mmHg each time you press the ''▲'' or ''▼'' key).
- Page 39 XXVII. How to measure c. Press the "START" key to switch on the unit; Select the User 1, 2 or 3 as described in above paragraph 4 above. d. Then, Press again "START/STOP" key to START the measurement. All the segment of the screen will appear and then the air pressure will automatically pump up to 160 mmHg.
- Page 40 XXVIII. Irregular heart beat feature. We call ‘Arrhythmia’ the irregularity of cardiac rhythm; it means that your heart beat is irregular, either to fast or to slow. The appearance of symbol, signifies that a certain pulse irregularity was detected during measurement. Talking, moving, shaking or irregular pulses can result the appearance of this symbol.
- Page 41 XXIX. Memory – special feature. Average of the last 3 measures. After each measurement, the SYS, DIA and heart pulse rate will be automatically stored in memory together with the time and date. Each Memory can keep records up to the latest 30 measures.
- Page 42 XXX. Maintenance. • Use a piece of cloth with water or mild cleansing agent to clean the case and then use a piece of dry cloth to wipe it dry. Use a piece of dry cloth to wipe the cuff when it is dirty.
- Page 43 XXXIII. Warning • The cuff size is suitable for 23 ~ 33 cm / 9 ~ 13 inches adult only. • The device is not supposed to be used when your arm has any wound or injury. • In case the cuff kept pumping up non-stop, open the cuff at once.
- Page 44 XXXIV. Specifications Method of measurement Oscillometric Model Number AC 211 Range of measurement Pressure 0 ~ 300 mmHg Pulse 40 ~ 199 beats/minute Accuracy Pressure +/- 3 mmHg Pulse +/- 5% Max Inflation Deluxe Automatic Exhaust Automatic exhaust valve Display Systolic, Diastolic, Pulse rate Sets of memory 3 databases of 30 memory...
-
Page 45: French
FRENCH XXXV. Définition de la pression artérielle La pression artérielle est la mesure de la force du sang circulant contre les parois des artères. La pression artérielle change constamment durant le cours du cycle cardiaque. La pression la plus haute durant le cycle est appelée la pression systolique, la pression la plus basse est la pression diastolique. -
Page 46: Xxxvii. L'intérêt D'un Autocontrôle De La Pression Artérielle À Domicile
XXXVII. L'intérêt d'un autocontrôle de la pression artérielle à domicile Les standards pour la détermination d'une pression artérielle WYSOKIE PODWY SZONE haute ou basse sans tenir compte de l'âge, ont été établis NORMALNE par l'Organisation Mondiale de la Santé (World Health Skurczowe ci nienie t tnicze Organization WHO), tel qu'il est montré... -
Page 47: Xxxviii. Informations Importantes Avant D'utiliser Le Tensiomètre
XXXVIII. Informations importantes avant d'utiliser le tensiomètre • Les mesures de pression artérielle doivent être interprétées par un médecin ou un personnel de santé qui connaît vos antécédents médicaux. En utilisant l'appareil régulièrement et en enregistrant les résultats pour que votre médecin puisse les interpréter, celui-ci sera informé... -
Page 48: Xxxix. Fonction 'Ecran Lumineux' 'Color Check
XXXIX. Fonction ‘Ecran Lumineux’ ‘Color Check’ Cette nouvelle technologie ‘COLOR CHECK’ (vérification par la couleur), permet à son utilisateur d’interpréter les résultats facilement et rapidement par un affichage lumineux couleur des résultats. Votre tension est supérieure à la valeur paramétrée, l’écran s’allume en ROUGE. -
Page 49: Xl. Description Du Matériel
XL. Description du matériel 1. Afficheur à cristaux liquides 2. Prise de connecteur du brassard 3. Brassard 4. Prise de connecteur pour le brassard 5. Touche "Marche/Arrêt" (START/STOP) 6. Mémoire (MEMORY) 7. Touche de régiage "MODE" 8. Défilement HAUT 9. Défilement BAS 10. -
Page 50: Xli. Description Des Symboles À L'écran
XLI. Description des symboles à l'écran MOIS DATE HEURE MINUTE SYMBOLE DE BATTEMENT IRRÉGULIER DU COEUR SYSTOLE UNITE DE PERSSION mmHg ARTERIELLE AFFICHAGE DE DIASTOLE LA PILE USÉE ERROR AFFICHEUR ERREUR NOMBRE DES PULSATION DONNÉS EN MEMOIRES SYMBOLE POULS... -
Page 51: Xlii. Installation Des Piles
XLII. Installation des piles Enlevez le couvercle du compartiment à piles situé à l'arrière du tensiomètre et insérez les piles. Faites attention à positionner les piles en respectant la polarité + et - comme indiqué. XLIII. Fixation du brassard pour la mesure Le bras doit être nu. - Page 52 XLIII. Fixation du brassard pour la mesure 3. Ajuster le brassard à environ 1.5 cm Bord de la partie au dessus du coude ; le brassard inférieure 1/2" (1.5 cm) recouvre l'artère dans le creux de votre bras. Tube de brassard Languette du brassard 4.
-
Page 53: Xliv. Explication Des Symboles Affichés Sur L'écran
XLIV. Explication des symboles affichés sur l'écran Marques affichées Condition / Cause Action corrective Mesure en cours. Ne Ce symbole apparaît pas bouger ou parler. en condition de mesure et clignote quand le pouls est détecté. Apparaît quand la Remplacez les 4 piles tension des piles est par de nouvelles piles. -
Page 54: Xlv. Instructions Pour L'utilisation
XLV. Instructions pour l'utilisation A. Insertion des piles a. Ouvrez le couvercle des piles. b. Reportez vous au dessin pour le positionnement des piles (voir point mmHg No 5) c. Tous les segments LCD ERROR apparaissent sur l'affichage en 3 secondes. -
Page 55: Xlvi
XLV. Instructions pour l'utilisation C. Paramétrage des données Systoliques et Diastoliques de votre tensiomètre - fonction ‘écran lumineux’ Votre tensiomètre est paramétré par DEFAUT avec les valeurs suivantes : TENSION SYSTOLIQUE : 130 mmHg TENSION DIASTOLIQUE : 90 mmHg Il est recommandé de demander conseil à son médecin ou pharmacien pour déterminer en fonction de son âge et de sa condition générale, le paramétrage adapté... - Page 56 XLV. Instructions pour l'utilisation REMARQUE IMPORTANTE POUR LE PARAMETRAGE DES UTILISATEURS 2 et 3 : Pour les utilisateurs 2 et 3, aucun paramètre par DEFAUT (données SYSTOLIQUES et DIASTOLIQUES) n’a été paramétré. L’éclairage de l’écran ne s’effectuera qu’après votre paramétrage. Pour paramétrer les données Systoliques et Diastoliques la première fois des utilisateurs 2 et 3 : a.
- Page 57 XLV. Instructions pour l'utilisation D. Mode Multi-Utilisateurs Votre tensiomètre peut enregistrer les informations de 3 utilisateurs dans des mémoires différentes. Cela permet de bien différencier les mesures. Vous pouvez également utiliser cette fonction pour différencier les mesures effectuées le matin, le midi ou le soir. Par défaut lorsque vous mettez l’appareil en route, l’...
- Page 58 XLV. Instructions pour l'utilisation Le symbole de mesure de pression artérielle va clignoter sur l'affichage puis la pression de l'air va automatiquement augmenter. Si la pression artérielle à tendance à être au niveau haut, la pression de l'air ERROR ERROR augmentera automatiquement au niveau requis par la mesure.
- Page 59 XLVI. Fonctions MOYENNE des 3 dernières mesures et MEMOIRES Après chaque mesure de pression artérielle, la valeur Systolique, la valeur Diastolique et la valeur du pouls ainsi que l'heure & la date du jour spécifique seront enregistrés en MEMOIRES automatiquement. La mémoire garde les 30 dernières mesures pour chaque utilisateur (1, 2 ou 3).
-
Page 60: Mesures Et Memoires
XLVI. Fonctions MOYENNE des 3 dernières mesures et MEMOIRES sous forme d'enregistrement tournant de 30 jeux de données. Appuyez sur "START/STOP" pour revenir à l’ affichage normal à tout moment. Fonctions MOYENNE des 3 dernières mesures et MEMOIRES C. Effacement des données en mémoires a. -
Page 61: Xlvii. Sécurité
XLVII. Sécurité Rangez toujours l'appareil dans son coffret de transport après usage.Ne placez pas l'appareil directement sous les rayons du soleil, dans des endroits ayant une température ambiante élevée, un taux d'humidité élevé ou comportant de la poussière.Ne le stockez pas dans un endroit soumis à... -
Page 62: Spécifications
L. Spécifications Modèle N AC 211 Méthode de mesure Oscillométrique Plage de mesure Pression 0 ~ 300 mmHg Pouls 40 ~ 199 pulast/min Précision Pression +/- 3 mmHg Pouls +/-5% Pression imprécise Système de pompe à regonflage automatique Gonflage Gonflage automatique (pompe à air) Diminution de la Vanne de controle automatique pression... - Page 63 Dziennik pomiarów/Blood pressure diary Data/Date Godzina/Time Wynik pomiaru/Result Puls/Pulse...
- Page 64 Dziennik pomiarów/Blood pressure diary Data/Date Godzina/Time Wynik pomiaru/Result Puls/Pulse...
- Page 65 Dziennik pomiarów/Blood pressure diary Data/Date Godzina/Time Wynik pomiaru/Result Puls/Pulse...
- Page 66 Dziennik pomiarów/Blood pressure diary Data/Date Godzina/Time Wynik pomiaru/Result Puls/Pulse...
- Page 67 Dziennik pomiarów/Blood pressure diary Data/Date Godzina/Time Wynik pomiaru/Result Puls/Pulse...
- Page 68 UWAGA: Przeczytaj zanim włączysz urządzenie! Przeczytaj uważnie instrukcję obsługi przed pierwszym użyciem Klasyfikacja BF: -Urzadzenie zasilane wewnętrznie -Klasyfikacja typu BF -IPX0 -Nie stosować w obecności palnej mieszanki znieczulajacejz powietrzem lub z tlenem lub z tlenkiem azotu. -Stała praca przy krótkim ładowaniu Aby uniknąć...
- Page 69 Symbol CE oznacza, że niniejszy produkt został poddany odpowiedniej 0197 procedurze oceny zgodności i spełnia z a s a d n i c z e w y m a g a n i a w z a k r e s i e bezpieczeństwa, ochrony zdrowia, środowiska i konsumenta.
- Page 70 Wyprodukowano przez: Health and Life Co. Ltd. 9F, No. 186, Jian Yi Road, Chung Ho City 235, Taipei, Taiwan Dystrybutor: Mescomp Technologies Al. Jerozolimskie 47 00-697 Warszawa Tel. 48 022 636 83 71/ 636 2000 Fax. 48 022 636 83 69...
- Page 71 3. Wady sprzętu, ujawnione w okresie gwarancji będą usuwane bezpłatnie w terminie 14 dni roboczych od daty dostarczenia wadliwego sprzętu do Działu Serwisu MESCOMP TECHNOLOGIES lub innej upoważnionej przez MESCOMP TECHNOLOGIES placówki serwisowej zwanej dalej Zakładem Serwisowym (wg aktualnej listy).
- Page 72 c) uszkodzenia wywołane: - działaniem siły wyższej (kradzież, zalanie itp.) d) materiały eksploatacyjne, takie jak baterie i spowodowane przez nie uszkodzenia. 5. Gwarancją nie jest objęty sprzęt, na którym stwierdzono usunięcie lub uszkodzenie plomb lub numerów fabrycznych. 6. Reklamacje sprzętu są przyjmowane w Zakładzie Serwisowym po okazaniu ważnej karty gwarancyjnej i dowodu zakupu.
- Page 73 Kupon A karty gwarancyjnej Kupon B karty gwarancyjnej Kupon C karty gwarancyjnej Ac 211 Ac 211 Ac 211 Data naprawy Data naprawy Data naprawy .................... Rodzaj naprawy Rodzaj naprawy Rodzaj naprawy ..................................................
- Page 74 Stick Here Stick Here Stick Here Data produkcji Data produkcji Data produkcji (wydania),pieczęć (wydania), pieczęć (wydania), pieczęć Data sprzedaży Data sprzedaży Data sprzedaży (instalacji),pieczęć (instalacji), pieczęć (instalacji), pieczęć...
- Page 76 CIŚNIENIOMIERZE AUTOMATYCZNE Zaprojektowane tak, aby uzyskać precyzyjne pomiary, w szybki i przyjazny dla użytkownika sposób. Dzięki funkcji ustawienia własnych parametrów ciśnienia krwi oraz nowoczesnej technologii Color Check, nie musisz już pamiętać jaka jest prawidłowa wartość Twojego ciśnienia. W czytelny sposób wskaże to Twój kolorowy wyświetlacz.