Table des Matières
Publicité
Les langues disponibles
Les langues disponibles
Liens rapides
PROFESSIONELLER CD / MP3-SPIELER
PROFESSIONAL CD / MP3 PLAYER
LECTEUR CD / MP3 PROFESSIONNEL
LETTORE CD / MP3 PROFESSIONALE
CD-196USB
Bestellnummer 21.2890
BEDIENUNGSANLEITUNG • INSTRUCTION MANUAL • MODE D'EMPLOI
ISTRUZIONI PER L'USO • MANUAL DE INSTRUCCIONES • INSTRUKCJA OBSŁUGI
VEILIGHEIDSVOORSCHRIFTEN • SIKKERHEDSOPLYSNINGER • SÄKERHETSFÖRESKRIFTER • TURVALLISUUDESTA
Publicité
Chapitres
Table des Matières

Manuels Connexes pour Monacor International img Stage Line CD-196USB


Sommaire des Matières pour Monacor International img Stage Line CD-196USB
- Page 1 PROFESSIONELLER CD / MP3-SPIELER PROFESSIONAL CD / MP3 PLAYER LECTEUR CD / MP3 PROFESSIONNEL LETTORE CD / MP3 PROFESSIONALE CD-196USB Bestellnummer 21.2890 BEDIENUNGSANLEITUNG • INSTRUCTION MANUAL • MODE D’EMPLOI ISTRUZIONI PER L’USO • MANUAL DE INSTRUCCIONES • INSTRUKCJA OBSŁUGI VEILIGHEIDSVOORSCHRIFTEN • SIKKERHEDSOPLYSNINGER • SÄKERHETSFÖRESKRIFTER • TURVALLISUUDESTA...
- Page 2 Bevor Sie einschalten … Before switching on … Wir wünschen Ihnen viel Spaß mit Ihrem neuen Gerät We wish you much pleasure with your new “img Stage von „img Stage Line“. Bitte lesen Sie diese Bedienungs- Line” unit. Please read these operating instructions care- anleitung vor dem Betrieb gründlich durch.
- Page 3 5 6 7 8 9 10 Œ 13 14 15 17 18 19 20 21 Ž J K L M N P Q R ...
-
Page 4: Table Des Matières
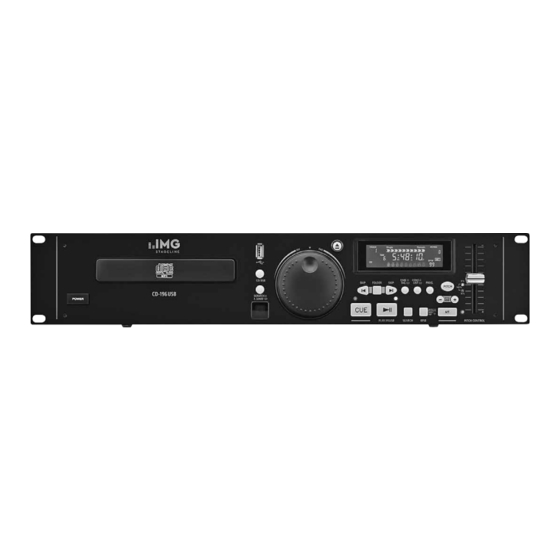
Auf der ausklappbaren Seite 3 finden Sie beide LEDs aus: 1 Übersicht der Bedien elemen te alle beschriebenen Bedienelemente und An - Geschwindigkeitsregler (11) deaktiviert und Anschlüsse schlüsse. LED 8 % leuchtet: Geschwindigkeitsregler aktiviert, 1.1 Frontseite (Abb. 1) Einstellbereich ±8 % Inhalt Tasten mit Doppelfunktionen sind durch die LED 16 % leuchtet:... -
Page 5: Display
leuchtet konstant) und Pause (LED über der 1.2 Fernbedienung (Abb. 2) 1. wenn sichtbare Schäden am Gerät oder am Taste blinkt) Netzkabel vorhanden sind, 23 Taste OPEN / CLOSE wie Taste 2. wenn nach einem Sturz oder Ähnlichem der 20 Taste SEARCH, um das Drehrad (16) auf die 24 Zifferntasten für die Direktwahl Verdacht auf einen Defekt besteht, Funktion „schneller Vor- / Rücklauf“... -
Page 6: Bedienung
an die entsprechende Buchse des Misch - 4) Sind bei MP3-Betrieb die Titel in verschiede- 3) Sind mehrere Playlists vorhanden, zum pultes anschließen. Der Spieler muss auf nen Ordnern einsortiert, zum Anwählen Anwählen einer anderen Playlist folgen- eines anderen Ordners folgendermaßen die Faderstartart des Mischpultes eingestellt dermaßen vorgehen: wer den... -
Page 7: Betriebsart Wählen
(z. B. bei ruhigen Musiktiteln), lässt sich der erlischt). Im Wiedergabemodus schaltet sich die 5.9 Geschwindigkeit mit oder ohne Wert auch manuell feststellen: Funktion 8 Sekunden nach der letzten Betäti- Tonhöhenverschiebung verändern gung des Rades automatisch aus. a) Die Taste BPM (21) im Takt der Musik Die Geschwindigkeit lässt sich mit dem Schiebe- einige Male antippen (mindestens 4 ×). -
Page 8: Leier-Effekt
5.11.2 Leier-Effekt 3) Mit der Taste oder (18) die Speicher- plätze („P- 01“ … „P- 99“) nacheinander Falls die Funktion Master-Tempo (konstante anwählen. Der Name des jeweils gespeicher- Tonhöhe) aktiviert ist [Anzeige „MT“ (R) im Dis- ten Titels wird in der Textzeile (N) angezeigt. play und LED neben der Taste MT (22) leuchtet], diese mit der Taste MT ausschalten. -
Page 9: Firmware Aktualisieren
9 Technische Daten Frequenzbereich: ..20 – 20 000 Hz Klirrfaktor: ... < 0,1 % Kanaltrennung: ..> 75 dB Abb. -
Page 10: Operating Elements And Connections
All operating elements and connections de - LED 16 % lights up: 1 Operating Elements scribed can be found on the fold-out page 3. speed control activated, and Connections adjusting range ±16 % both LEDs light up: Contents 1.1 Front panel (fig. 1) speed control activated, adjusting range ±100 % Buttons with dual functions are marked by the... -
Page 11: Display
1.1.1 Display (fig. 3) 28 PITCH repaired in an expert way. Likewise, no liability 29 PLAY/ PAUSE will be accepted for operating errors or for data A when “TRACK” is shown: 30 CUE loss caused by a defect and for any conse- number of the title 31 PROG. -
Page 12: Operation
b) Select the folder with the button . If playing time indication (O) and the indica- 5 Operation one of the buttons is kept pressed, the tion “TRACK” (A). Switch on the unit with the POWER switch (12). folders can quickly be selected with the jog 4) Start the replay of the first title or select The display shortly shows “boot”... -
Page 13: Selecting The Operating Mode
5.4 Selecting the operating mode 2) Precisely select the spot by turning the jog 2) Adjust the speed with the sliding control. The wheel (16) clockwise and counter-clockwise. display will show the percentage deviation To switch over between single title replay [indi- For an acoustic check the adjusted spot will from the standard speed on the top right (l). -
Page 14: Storing And Replaying A Title Sequence
5.12.1 Storing and replaying a title sequence switched over to the indication of the next 6 Remote Control free storage location “P- …”. 1) If a title is replayed, first set the unit to pause The infrared remote control provided is supplied with the button (19). -
Page 15: Battery Replacement
6.1 Battery replacement 9 Specifications If the range of the remote control decreases, the Frequency range: ..20 – 20 000 Hz battery must be replaced. THD: ....< 0.1 % 1) Press the locking of the battery support to the Channel separation: . -
Page 16: Eléments Et Branchements
Ouvrez le présent livret page 3, dépliable, de 10 Affichage pour le réglage sélectionné avec la 1 Eléments et branchements manière à visualiser les éléments et branche- touche PITCH (9) : ments. les deux LEDs éteintes : 1.1 Face avant (schéma 1) réglage de vitesse (11) désactivé... -
Page 17: Affichage
19 Touche PLAY / PAUSE pour commuter 1.2 Télécommande (schéma 2) En aucun cas, vous ne devez poser dʼobjet entre lecture (la LED au-dessus de la touche contenant du liquide, p. ex. un verre, sur lʼap- 23 Touche OPEN / CLOSE, comme touche brille en continu) et pause (la LED au-dessus pareil. -
Page 18: Utilisation
2) Le lecteur peut être démarré ou mis sur DER, lʼaffichage indique “FO-SEL”, le message 3) Sʼil existe plusieurs listes de lecture, procé- “FOLDER” (A) et le nombre de dossiers (M). Si pause via une table de mixage avec fonction dez comme suit pour sélectionner une maintenant une des touches SKIP (18) est enfon- démarrage électrique. -
Page 19: Sélection Du Mode De Fonctionnement
teur de beats ne peut pas déterminer de Pour désactiver la fonction, appuyez une 5.9 Modification de la vitesse valeur correcte (par exemple pour des titres nouvelle fois sur la touche SEARCH (affichage avec ou sans déplacement calmes de musique), la valeur peut être “SEARCH”... -
Page 20: Effet Bourdonnement
5.11.2 Effet bourdonnement lʼindication “PG” brille en continu, appuyez CUE PLAY = gestion via une impulsion deux fois sur la touche PROG. En ouvrant le fader, la lecture commence, via Si la fonction Master Tempo (hauteur tonale une brève impulsion de commande de la constante) est activée [affichage “MT”... -
Page 21: Remplacement De La Batterie
– les touches SCAN permettent une 8 Entretien de lʼappareil avance et retour rapides : tant que la touche Protégez lʼappareil de la poussière, des vibra- SCAN correspondante est maintenue enfon- tions, de lʼhumidité et de la chaleur (plage de cée, le titre défile vers lʼavant ou lʼarrière. -
Page 22: Elementi Di Comando E Collegamenti
A pagina 3, se aperta completamente, LED 8 % è acceso: 1 Elementi di comando vedrete tutti gli elementi di comando e colle- regolatore della velocità attivato, e collegamenti gamento descritti. campo di regolazione ±8 % LED 16 % è acceso: regolatore della velocità... -
Page 23: Avvertenze Di Sicurezza
21 Tasto BPM per il modo manuale di conteggio 1.2 Telecomando (fig. 2) 1. lʼapparecchio o il cavo rete presentano dei del beatcounter e per ritornare al modo auto- danni visibili; 23 Tasto OPEN / CLOSE come tasto matico ( Capitolo 5.3) 2. -
Page 24: Riprodurre Brani Musicali
REMOTE (37) con la relativa presa del mixer 4) Se con funzionamento MP3, i titoli sono inse- Lʼindicazione (A) cambia da “TRACK” a usando un cavo con connettori jack 3,5 mm. riti in varie cartelle, per scegliere una car- “FOLDER” e indica ora il numero della Sul lettore deve essere impostato lʼavvia- tella differente, procedere come segue: playlist attuale. - Page 25 per segnalare il modo di conteggio 5.7 Posizionarsi con esattezza su 5.9 Modificare la velocità con o senza manuale. un punto determinato spostamento dellʼaltezza del suono b) Per ritornare nel modo automatico di con- È possibile posizionarsi su un punto con lʼesat- Con il cursore (11) è...
-
Page 26: Compilare Una Sequenza Individuale Di Titoli
5.11.2 Effetto di trascinamento 5.12.2 Controllare la sequenza CUE PLAY = Comando tramite un impulso (dragging effect) Aprendo il fader, per via di un breve impulso 1) Se è in corso la riproduzione di un titolo, atti- Se è stata attivata la funzione Master-Tempo di comando del mixer si avvia la riproduzione vare dapprima la pausa con il tasto (19). -
Page 27: Sostituzione Della Batteria
6.1 Sostituzione della batteria 8 Manutenzione Se la portata del telecomando si riduce, occorre Proteggere lʼapparecchio dalla polvere, da vibra- sostituire la batteria. zioni, umidità e calore (temperatura dʼesercizio ammessa 0 – 40 °C). Per la pulizia usare solo un 1) Spostare il blocco del portabatteria a sinistra panno morbida, asciutto;... -
Page 28: Elementos De Funcionamiento Y Conexiones
Todos los elementos de funcionamiento y las 10 Indicación para el ajuste seleccionado con el 1 Elementos de Funcionamiento conexiones que se describen pueden encon- botón PITCH (9): y Conexiones trarse en la página 3 desplegable. Ambos LEDs apagados: Control de velocidad (11) desactivado 1.1 Panel frontal (fig. -
Page 29: Visualizador
19 Botón PLAY / PAUSE para cambiar entre 1.2 Control remoto (fig. 2) No utilice el aparato y desconecte inmediata- reproducción (LED sobre el botón iluminado mente la toma del enchufe si: 23 Botón OPEN / CLOSE igual que constantemente) y pausa (LED sobre el 1. -
Page 30: Funcionamiento
2) El lector se puede iniciar y poner en pausa ción actual con el botón FOLDER, en el visualizador lista de reproducción bajo la indicación se mostrará “FO-SEL”, la indicación “FOLDER” (A) mediante un mezclador con función de inicio “Total” (M). y el número de carpetas (M). -
Page 31: Selección Del Modo De Funcionamiento
Si se muestra “Total Remain” (F, G), se 3) Si se mantiene pulsado el botón CUE, se sobre el botón CUE se ilumina constante- indica el tiempo remanente del CD completo reproduce brevemente el inicio de la pista. mente. Para parar la reproducción repetida (no es posible en modo MP3). -
Page 32: Efectos
desplazarán los beats respecto a los beats 7) Para volver al modo de reproducción están- TACT = control mediante un pulsador de la pieza musical actual. dar, ponga el aparato en pausa con el botón Cuando el pulsador se utiliza por primera vez y mantenga pulsado el botón PROG. -
Page 33: Cambio De La Batería
pistas, carpetas, listas de reproducción o par- 8 Mantenimiento del Aparato ticiones. La selección se hace entrando el Proteja el lector del polvo, de las vibraciones, de número correspondiente. Con números de la humedad y del calor (temperatura ambiente varios dígitos, pulse los botones numéricos admisible: 0 –... -
Page 34: Elementy Operacyjne I Złącza
Proszę otworzyć instrukcję na stronie 3. dioda 8 % świeci: 1 Elementy operacyjne i złącza Pokazano tam rozkład elementów operacyj- regulator prędkości aktywny, nych i złączy. zakres regulacji ±8 % 1.1 Panel przedni (rys. 1) dioda 16 % świeci: Przyciski o podwójnej funkcji oznaczone są sym- regulator prędkości aktywny, bolem dla “wciśnij przycisk na krótko”... -
Page 35: Wyświetlacz
19 Przycisk PLAY / PAUSE do przełączania 1.2 Pilot zdalnego sterowania (rys. 2) wysoką temperaturą (dopuszczalny zakres pomiędzy trybem odtwarzania (zapala się wynosi 0 – 40 °C). 23 Przycisk OPEN / CLOSE taki jak przycisk dioda ponad przyciskiem) i pauzy (dioda Na urządzeniu nie należy stawiać... -
Page 36: Obsługa
kabla ze złączami RCA, do wejścia liniowego zatwierdzona przyciskiem FOLDER, wyświetlacz CONT. / LIST i wybrać inny format lub opcję “Folder”, pokaże “FO-SEL”, wskazanie “FOLDER” (A) oraz za pomocą przycisków oraz na mikserze lub wzmacniaczu (możliwe liczbę folderów (M). Teraz, po wciśnięciu jednego z oznaczenia: LINE IN, AUX IN, CD). -
Page 37: Wybór Trybu Pracy
polu BPM (P). Jeżeli nie ma możliwości auto- cja zostaje automatycznie wyłączona po 8 se - wane jest za pomocą dwóch diod (10) obok matycznego określenia liczby bitów na kundach od ostatniego użycia pokrętła jog. przycisku: minutę (np. dla cichych utworów), można zro- Uwagi: W trybie pauzy, po przewinięciu bieżący punkt obie diody zgaszone: bić... -
Page 38: Efekt Stutter
5.11.3 Efekt stutter 5.12.3 Edytowanie i kasowanie 6 Zdalne sterowanie sekwencji utworów Do wytwarzania efektów dźwiękowych można Pilot zdalnego sterowania wyposażony jest w 1) Ustawić odtwarzacz w tryb pauzy przyci- również wykorzystać punkt Cue, zapamiętany baterię zasilającą. Przed przystąpieniem do skiem (19). -
Page 39: Aktualizowanie Oprogramowania
3) Wsunąć ponownie uchwyt na baterię do 9 Specyfikacja pilota. Pasmo przenoszenia: . . 20 – 20 000 Hz THD: ....< 0,1 % Zużyte baterie wyrzucać do specjalnie oznaczonych pojemników, nie do zwy- Separacja kanałów: . -
Page 40: Veiligheidsvoorschriften
Lees aandachtig de onderstaande veiligheids- voorschriften, alvorens het apparaat in gebruik te nemen. Voor meer informatie over de bedie- ning van het apparaat raadpleegt u de andersta- lige handleidingen. Veiligheidsvoorschriften Het apparaat is in overeenstemming met alle 1. wanneer het apparaat of het netsnoer zicht- Onderhoud van het apparaat vereiste EU-Richtlijnen en is daarom geken- baar beschadigd is,... -
Page 41: Säkerhetsföreskrifter
Ge akt på säkerhetsinformationen innan enhe- ten tas i bruk. Skulle ytterliggare information behövas kan den återfinnas i Manualen för andra språk. Säkerhetsföreskrifter En skadad elsladd skall endast bytas på verk- Skötsel av enheten Enheten uppfyller samtliga Eu-direktiv och har stad. - Page 42 ® MONACOR INTERNATIONAL GmbH & Co. KG • Zum Falsch 36 • 28307 Bremen • Germany © Copyright by MONACOR INTERNATIONAL. All rights reserved. A-1270.99.01.09.2011...