Table des Matières
Publicité
Liens rapides
User manual
Gebrauchsanweisung
Gebruikshandleiding
Mode d'emploi
Warning! Adult assembly required. This product should, at all times, be used by the child under direct supervision of an
adult. OUTDOOR USE ONLY. Only for domestic use.
Achtung! Erwachsene Montage erforderlich. Dieses Produkt darf von Kindern nur unter Aufsicht von Erwachsenen
benutzt werden. NUR FÜR AUßENGEBRAUCH. Nur für den Hausgebrauch.
Waarschuwing! Montage door volwassene vereist. Dit product dient te allen tijde onder direct toezicht van volwassenen
te worden gebruikt door het kind. UITSLUITEND VOOR BUITENGEBRUIK. Uitsluitend voor thuisgebruik.
Attention! Assemblé par un adulte. Ce produit doit, à tout moment, être utilisé sous la suveillance d'un adulte.
POUR UTILISATION EN EXTÉRIEUR UNIQUEMENT. Uniquement destiné à un usage domestique.
retain for future reference
MWO-56100-V03
Publicité
Table des Matières

Manuels Connexes pour Exit Sprinqle

Sommaire des Matières pour Exit Sprinqle
- Page 1 User manual Gebrauchsanweisung Gebruikshandleiding Mode d’emploi Warning! Adult assembly required. This product should, at all times, be used by the child under direct supervision of an adult. OUTDOOR USE ONLY. Only for domestic use. Achtung! Erwachsene Montage erforderlich. Dieses Produkt darf von Kindern nur unter Aufsicht von Erwachsenen benutzt werden.
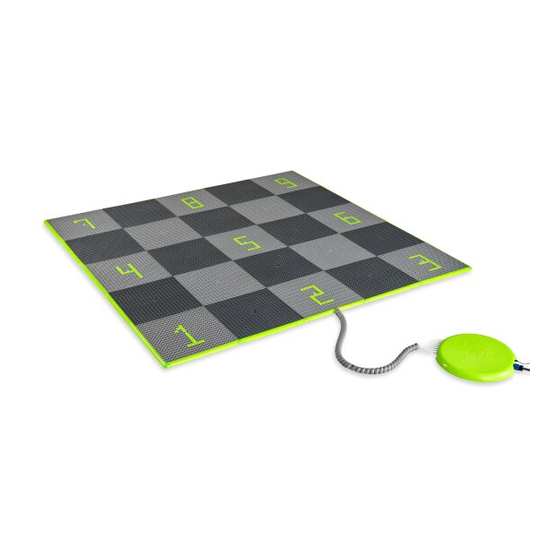
- Page 2 : Exit Sprinqle 3x3 square / Hopscotch Age range : 3-8 years Max. Weight/load : 100 kg / 220 lbs Technische Daten Produktbezeichnung : Exit Sprinqle 3x3 Rechteck / Hopse Spiel Altersgruppe : 3-8 jahr Max. Gewicht/Belastung : 100 kg / 220 lbs Technische gegevens Productnaam...
- Page 3 Instructions p4 English p48 Deutsch p52 Nederlands p56 Français p60 MRO-23102 -V04 MWO-56100-V03...
- Page 4 Light gray Dark gray 186X MRO-23102 -V04 MWO-56100-V03...
- Page 5 3 x 3 SQUARE MRO-23102 -V04 MWO-56100-V03...
- Page 6 ST2901 Flat bottom under “Click” MRO-23102 -V04 MWO-56100-V03...
- Page 7 ST2902 Flat bottom under “Click” MRO-23102 -V04 MWO-56100-V03...
- Page 8 ST2901 ST2902 ST2901 MRO-23102 -V04 MWO-56100-V03...
- Page 9 Flat bottom under MRO-23102 -V04 MWO-56100-V03...
- Page 10 Flat bottom under MRO-23102 -V04 MWO-56100-V03...
- Page 11 Flat bottom under MRO-23102 -V04 MWO-56100-V03...
- Page 12 Flat bottom under MRO-23102 -V04 MWO-56100-V03...
- Page 13 MRO-23102 -V04 MWO-56100-V03...
- Page 14 1 Tube 1 Tile 9 8 7 2 Tube 2 Tile 3 Tube 3 Tile ... . MRO-23102 -V04 MWO-56100-V03...
- Page 15 Bend the tube around 2 supports . Guide the tubes through the inlets between the two tiles. MRO-23102 -V04 MWO-56100-V03...
- Page 16 Tube to nozzle 3 6 9 8 5 2 7 4 1 MRO-23102 -V04 MWO-56100-V03...
- Page 17 MRO-23102 -V04 MWO-56100-V03...
- Page 18 MRO-23102 -V04 MWO-56100-V03...
- Page 19 MRO-23102 -V04 MWO-56100-V03...
- Page 20 MRO-23102 -V04 MWO-56100-V03...
- Page 21 MRO-23102 -V04 MWO-56100-V03...
- Page 22 All numbers are 10 Click Blocks high All numbers are 5 Click Blocks wide MRO-23102 -V04 MWO-56100-V03...
- Page 23 1.Connect the electric power supply to the control box.You can notice a green blur light under the cover of the control box. 2.To start “tap” once on the control box. The program will start. When you “tap” again an other program will start. There are totally 7 standard programs.
- Page 24 MRO-23102 -V04 MWO-56100-V03...
- Page 25 Games to play: 1.Catch: stay in the middle (5) and try to catch the beam around you. 2.Forward: follow the numbers 1,2,3 etc till 9 and start at 1 again. 3.Bounce: same as “forward” but from 9 backwards till 1. 4.Three: 3 beams together horizontal.
- Page 26 3 x 3 HOPSCOTCH MRO-23102 -V04 MWO-56100-V03...
- Page 27 2x ST2905 1x ST2906 “Click” Flat bottom under MRO-23102 -V04 MWO-56100-V03...
- Page 28 ST2906 Flat bottom under MRO-23102 -V04 MWO-56100-V03...
- Page 29 MRO-23102 -V04 MWO-56100-V03...
- Page 30 Flat bottom under ST2905 ST2905 MRO-23102 -V04 MWO-56100-V03...
- Page 31 Flat bottom under MRO-23102 -V04 MWO-56100-V03...
- Page 32 Flat bottom under MRO-23102 -V04 MWO-56100-V03...
- Page 33 Flat bottom under MRO-23102 -V04 MWO-56100-V03...
- Page 34 MRO-23102 -V04 MWO-56100-V03...
- Page 35 Tube 1 (no extension tube) connected to Tile 1 MRO-23102 -V04 MWO-56100-V03...
- Page 36 Bend the tube around 2 supports . Guide the tubes through the inlets between the two tiles. MRO-23102 -V04 MWO-56100-V03...
- Page 37 Tube to nozzle 1 3 6 9 4 7 8 5 2 MRO-23102 -V04 MWO-56100-V03...
- Page 38 MRO-23102 -V04 MWO-56100-V03...
- Page 39 MRO-23102 -V04 MWO-56100-V03...
- Page 40 MRO-23102 -V04 MWO-56100-V03...
- Page 41 MRO-23102 -V04 MWO-56100-V03...
- Page 42 All numbers are 10 Click Blocks high All numbers are 5 Click Blocks wide MRO-23102 -V04 MWO-56100-V03...
- Page 43 1.Connect the electric power supply to the control box.You can notice a green blur light under the cover of the control box. 2.To start “tap” once on the control box. The program will start. When you “tap” again an other program will start. There are totally 7 standard programs.
- Page 44 MRO-23102 -V04 MWO-56100-V03...
- Page 45 Disassembling 1.PUSH on blue ring 2.PULL tube MRO-23102 -V04 MWO-56100-V03...
- Page 46 When remove part 6 & 7 first and then remove the tile. MRO-23102 -V04 MWO-56100-V03...
- Page 47 PUSH le� �le down PULL right �le up MRO-23102 -V04 MWO-56100-V03...
- Page 48 Only products which live up to the highest EXIT Toys standard are marked with and recognized by the EXIT-brand. “We want to thank you for your custom and your confidence in this product. We’re sure your kids will have as much fun as we did during development.
-
Page 49: Guidelines For Safe Use
2.0 Guidelines for safe use Using your EXIT Sprinqle as instructed in this manual will eliminate virtually all hazards. However, please bear in mind that children have a natural urge to play and that this may lead to unforeseen dangerous situations for which the manufacturer cannot be held responsible. - Page 50 3.0 Warnings for safe use, maintenance and assembly: Please read carefully and keep all enclosed information for future reference. 1. ASSEMBLY AND SAFETY INFORMATION The product must be assembled by an adult. They must be erected exactly in accordance with the assembly instructions. Enlisting the aid of a helper will make assembly easier.
-
Page 51: Special Warnings
Dutch Toys Group B.V. reserves the right to not offer the guarantee if: • the original purchase receipt is missing; • the EXIT Sprinqle product is used for purposes other than what it was developed for; • the assembly method differs from the prescribed assembly method;... - Page 52 Außerdem kontrollieren wir selbst ständig unsere Produktionsabläufe und lassen diese als weitere Kontrolle regelmäßig durch unabhängige Stellen überprüfen. Nur Produkte, die den höchsten EXIT Toys Standards gerecht werden, werden mit dem EXIT Toys label gekennzeichnet. Wir danken Ihnen für Ihr Vertrauen in dieses Produkt. Und wir sind sicher, dass Ihre Kinder genau viel Spaß...
- Page 53 2. Richtlinien für einen sicheren Gebrauch Wenn das EXIT Sprinqle Produkt entsprechend dieser Anleitung verwendet wird, sind praktisch alle Gefahren ausgeschlossen. Bedenken Sie allerdings, dass Kinder einen natürlichen Spieldrang haben und dass dies zu unvorhergesehenen gefährlichen Situationen führen kann, für die der Hersteller nmicht haftbar gemacht werden kann.
- Page 54 3. ANLEITUNG ZUR MONTAGE, WARTUNG UND GEBRAUCH Bitte lesen Sie diese Anleitung vor der Montage und der ersten Benutzung sorgfältig durch. Bitte bewahren Sie diese Anleitung zur Information,bzw. für Wartungsarbeiten und Ersatzteilbeschaffung auf. 1. MONTAGE Dieses Spielgerät muß durch einem Erwachsene aufgebaut werden. Befolgen Sie dabei genau die Bauanleitung.
-
Page 55: Garantie
Häusern, überhängenden Ästen, Wäscheleinen oder elektrischen Leitungen. • Bewahren Sie die Montage- und Bauanleitung zur weiteren Benutzung. 4. Garantie Dutch Toys Group B.V. gibt für das EXIT Sprinqle Produkt bei richtiger Verwendung eine Garantie von: - Übrigen Teile : 2 Jahr Garantie. - Page 56 We voeren ook voortdurend controles uit tijdens de productie en we laten regelmatig nieuwe onafhankelijke tests uitvoeren als extra controle. Enkel de producten die voldoen aan de strengste normen van EXIT Toys krijgen het EXIT Toys merk. Wij stellen het zeer op prijs dat u bij ons klant bent en danken u voor het vertrouwen in dit product.
-
Page 57: Richtlijnen Voor Veilig Gebruik
2. Richtlijnen voor veilig gebruik Als u de instructies voor het EXIT Sprinqle produkt correct opvolgt, kunt u nagenoeg alle risico’s vermijden. Houd er wel rekening mee dat kinderen van nature graag spelen en dat dit tot onvoorziene gevaarlijke situaties kan leiden waarvoor de fabrikant niet verantwoordelijk is. - Page 58 3. Instructie voor assemblage, onderhoud en gebruik Lees dit zorgvuldig en bewaar alle bijgevoegde informatie zorgvuldig voor toekomstig gebruik. 1. Montage Het product moet door een volwassene worden gemonteerd. Het product moet exact zo worden gemonteerd zoals beschreven staat in de handleiding. Het inschakelen van hulp van iemand zal de montage vereenvoudigen.
-
Page 59: Bijzondere Waarschuwingen
Bewaar de gebruiks- en installatiehandleiding om deze in de toekomst nog eens te kunnen raadplegen. 4. Garantie Dutch Toys Group B.V. verstrekt op haar EXIT Sprinqle produkten bij juist gebruik een garantie van: - Overige onderdelen : 2 jaar garantie Dutch Toys Group B.V. - Page 60 1. Introduction Vous venez de faire l’acquisition du produit EXIT Sprinqle; nous vous en félicitons! S’amuser, être actif et jouer dehors..Nous faitons tout notre possible pour développer des produits sûr pour les enfants. Étant donné que nos produits sont classés comme étant des jouets, nous nous conformons aux réglementations de sécurité...
-
Page 61: Consignes De Sécurité
2. Consignes de sécurité Une utilisation conforme à ce qui est indiqué dans ce manuel éliminera quasiment tous les dangers. Cependant, gardez à l’esprit que les enfants éprouvent naturellement une forte envie de jouer et cela peut conduire à des situations imprévisibles et dangereuses dont le fabricant ne peut être tenus pour responsables. -
Page 62: L'assemblage, L'entretien Et L'utilisation
3. L’ASSEMBLAGE, L’ENTRETIEN ET L’UTILISATION Lirez attentivement les instructions suivantes et les conserver à des fins de référence future. 1. ASSEMBLAGE ET SÉCURITÉ L’assemblage des produits doit être uniquement effectué par un adulte. Le montage doit être fait en suivant rigoureusement les étapes des instructions fournies. L’aide d’une seconde personne peut grandement faciliter l’assemblage. -
Page 63: Avertissements Spéciaux
Dutch Toys Group B.V. se réserve le droit de n’accorder aucune garantie en cas de : absence d’une preuve d’achat d’origine ; • application à d’autres fins que celles pour lesquelles le produit EXIT Sprinqle a été conçue; • montage autre que le mode d’installation prescrit;... - Page 64 Dutch Toys Group P.O. Box 369, 7000 AJ, Doetinchem Edisonstraat 83, 7006 RB, Doetinchem The Netherlands info@exittoys.com www.exittoys.com EXIT is a registered trade mark of Dutch Toys Group...