Hamax Caress Manuel De L'utilisateur
Masquer les pouces
Voir aussi pour Caress:
- Mode d'emploi (42 pages) ,
- Mode d'emploi (21 pages) ,
- Manuel d'instructions (25 pages)

Manuels Connexes pour Hamax Caress


Sommaire des Matières pour Hamax Caress
- Page 1 Hamax ID: 10244 Rev 010 14052013 User manual Caress Hamax AS Visiting address: Vålerveien 159 N-1599 Moss Norway Tel.: +47 69 23 38 38 email: customerservice@hamax.no www.hamax.com...
- Page 2 User Manual Caress...
-
Page 3: Important
Important! Important! Ważne! Wichtig! IMPORTANTE! Viktig! Importantă! Důležité! важно! Vigtigt! VIKTIGT! ¡Importante! Dôležité! TÄRKEÄÄ! Важно! FONTOS! Önemli! IMPORTANTE! Важливо! BELANGRIJK! BIKE FRAME TUBE NOT OK! Ø = 28 - 40mm NOT OK! - Page 4 User Manual Congratulations on purchasing the Hamax bicycle child seat. You now have a comfortable and safe child seat that can be adjusted to fit your child as she/he grows. Please read the instructions carefully before assembling or using the child seat.
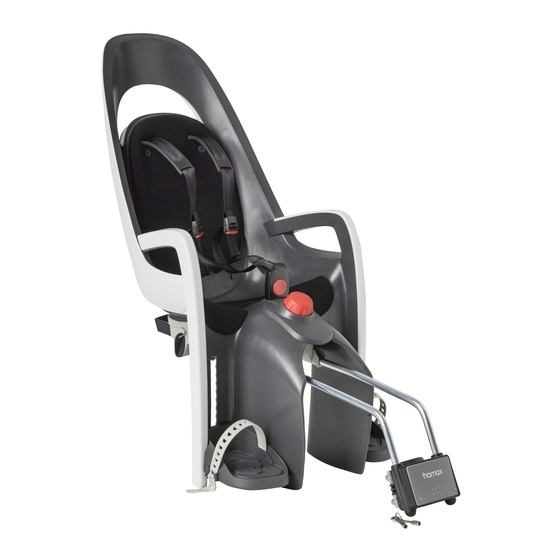
- Page 5 CARESS 1. Main seat 2. Restraint system 3. Sliding backrest 4. Belt lock 5. Foot rests 6. Carrier bow 7. Fastening bracket complete a) Bracket b) Metal strips c) Fastening screws d) Safety indicator e) Locking pin f) Key 8. Eccentric shaft 9.
- Page 7 1. Siège principal 1. Sæde 2. Système de harnais 2. Fastspændingssystem 3. Dossier coulissant 3. Forskydeligt ryglæn 4. Fermeture de ceinture 4. Bæltelås 5. Supports de pieds 5. Fodstøtter 6. Arc porteur 6. Bærebue 7. Étrier de fixation complet 7. Komplet monteringsbeslag a) Étrier a) Beslag b) Sangles métalliques b) Metalbånd c) Vis de fixation c) Fastgørelsesskruer d) Indicateur de sécurité d) Sikkerhedslås e) Goupille de verrouillage e) Låsebolt f) Clé f) Nøgle 8. Tige excentrique 8. Ekscenteraksel 9. Bouton d’inclinaison 9. Justeringsskrue 10. P rotection de pied 10. F odbeskyttelse 11. B ande pour exposition en magasin 11. B utiksudstillingsstrop...
- Page 9 1. Seggiolino principale 1. Scaun principal 2. Cinture di sicurezza 2. Sistem de fixare 3. Schienale scorrevole 3. Spătar glisant 4. Fibbia 4. Dispozitiv de blocare centură 5. Poggiapiedi 5. Suport pentru picioare 6. Staffa di sostegno 6. Bară de sprijin 7.
- Page 10 Основна седалка Осигурителна система Плъзгаща облегалка Ключалка на колана Стъпенки за краката Носеща дъга Закрепваща скоба комплект a) Скоба b) Метални ленти c) Закрепващи винтове d) Индикатор за безопасност e) Фиксиращ щифт f) Ключ Ексцентричен вал Копче за фиксиране 10. Предпазител за краката 11.
- Page 11 - Avertissement : N’attachez pas de baga- et qu’il ne puisse glisser hors du siège. ges ou d’équipements supplémentaires au Hamax recommande que le dossier soit siège pour enfants, puisque cela pourrait légèrement incliné vers l’arrière. faire augmenter le poids au-delà des 22 - Vérifiez que tous les composants de la bi-...
- Page 12 - Pour nettoyer le siège, n’utilisez que de l’eau savonneuse tiède. et à vous, de belles randonnées en vélo avec votre siège Hamax pour - Si le siège pour enfants a souffert un ac- cident ou des dommages, contactez votre enfants ! fournisseur pour qu’il vérifie si le siège...
- Page 13 - Warnung: Benutzen Sie den Monterings- og bruksanvisning Gratulerer med kjøpet av barnesetet fra Hamax anbefaler at ryggstøtten bør Hamax til sykkelen din. Du har nå helle litt bakover. et komfortabelt og sikkert barnesete • Kontroller at alle deler på sykkelen...
- Page 14 Hamax! garantien ugyldig og produsentens ansvar vil utløpe. • Advarsel: Vær oppmerksom på at det Vennlig hilsen oss på Hamax. Návod k použití Blahopřejeme ke koupi dětské (7). Viz obrázek F. Šrouby musejí být cyklosedačky Hamax. Pořídili jste si utaženy dostatečně...
- Page 15 UPOZORNĚNÍ dětskou cyklosedačkou Hamax! - Upozornění: Nepřipojujte další zavazadla nebo zařízení do dětské Srdečně vás zdravíme my v Hamax. Brugervejledning Tillykke med købet af Hamax’ barnestol. - Barnestolen skal monteres ved hjælp Du har købt en sikker og behagelig stol, af beslaget (7) på...
- Page 16 Manual del usuario Enhorabuena. Ha adquirido un asiento Si tiene dudas sobre si el asiento va a infantil Hamax para bicicleta. Se trata encajar bien, le aconsejamos que se de un cómodo y seguro asiento infantil dirija a la casa conde compró la que se puede ajustar a medida que su bicicleta.
- Page 17 Hamax. - Recuerde que el asiento infantil puede calentarse mucho si le da el sol Saludos de Hamax. directamente. Compruebe que no esté caliente antes de colocar al niño en el asiento. Käyttöohjeet lisävarusteita lastenistuimeen.
-
Page 18: Hu Felhasználói Útmutató
Hamax suosittelee, että selkätuen tulee VAROITUKSET nojata hieman taaksepäin. - Varoitus: Älä kiinnitä ylimääräisiä - Tarkista että kaikki polkupyörän osat laukkuja tai toimivat oikein, kun polkupyöränistuin... - Page 19 ülés ne lejtsen előrefelé, különben a ajánljuk, hogy a külön csomagot a gyermek kicsúszik az ülésből. kerékpár elejéhez rögzítse. A Hamax azt ajánlja, hogy a háttámla - Vigyázat: Ne változtassa meg a legyen kissé hátrafelé megdöntve. gyermekülést. - Emiatt a garancia - Ellenőrizze a kerékpár minden...
- Page 20 Hamax consiglia di fare in modo che lo AVVERTENZE schienalesia leggermente reclinato. - Controllare tutte le parti della bicicletta...
- Page 21 - Bescherm uw kind steeds van de weer- Hamax raad aan dat de rugleuning lichtjes somstandigheden met gepaste, regenbe- naar achter zou hellen. stendige kledij.
- Page 22 Przechowuj tę instrukcję w przesuwa się do przodu, co może bezpiecznym miejscu, ponieważ spowodować wysunięcie się dziecka. może być ona w przyszłości Hamax zaleca, aby oparcie było lekko przydatna w razie nabycia przechylone do tyłu. dodatkowego wyposażenia fotelika. - Po zamontowaniu fotelika należy sprawdzić...
-
Page 23: Pt Instruções De Utilização
Instruções de utilização Parabéns por ter adquirido a cadeira equipadas com amortecedores. infantil de bicicleta Hamax. Dispõe - Pode ser montada em bicicletas com agora de uma cadeira confortável e ou sem porta-bagagens. segura que acompanha o crescimento Caso tenha dúvidas quanto à... - Page 24 - A criança deve estar protegida contra deslizar. a chuva com vestuário impermeável A Hamax recomenda que a cadeira se adequado. incline ligeiramente para trás. - Lembre-se de colocar o capacete na - Verifique que todas as peças da criança antes de iniciar o passeio.
- Page 25 22 kg. Recomandăm ca Hamax recomandă ca spătarul să fie bagajul suplimentar să fie ataşat de puţin înclinat în faţă. partea frontală a bicicletei - Verificaţi funcţionarea corectă...
-
Page 26: Ru Руководство Пользователя
Руководство пользователя Поздравляем Вас с приобретением максимально допустимую нагрузку детского велосипедного кресла Hamax. кресла. Теперь у Вас есть удобное и - Не возите слишком маленьких детей, безопасное детское кресло, которое чтобы обеспечить их безопасность в может расти вместе с Вашими детьми. -
Page 27: Техническое Обслуживание
Bruksanvisning Grattis till ditt köp av en cykelbarnsits fungerar som de ska när barnsitsen är från Hamax. Nu har du en bekväm och monterad. säker barnsits som kan justeras så att den passar ditt barn i takt med att han ANVÄNDNING... - Page 28 Hamax! - Varning: Lämna aldrig cykeln parkerad med ett barn i barnsitsen utan uppsikt. Vänliga hälsningar från oss på Hamax. - Varning: Använd inte barnsitsen om någon av delarna är trasig. Uzivatelska prirucka Blahoželáme vám k zakúpeniu detského Spoločnosť...
- Page 29 Ръководство за потребителя Благодарим ви, че закупихте тръбата на рамата със скоба (7). детската седалка за велосипед Hamax. Вижте изображение F. Винтовете Вече имате удобна и безопасна трябва да са затегнати достатъчно седалка, която може да се настройва...
- Page 30 Поздоровляємо Вас із придбанням багажник можна зняти). дитячого велосипедного крісла - Не можна встановлювати на Hamax. Тепер у Вас є зручне й велосипеди з амортизаторами. безпечне дитяче крісло, що може - Можна встановлювати на велосипеди рости разом з Вашими дітьми.
-
Page 31: Технічне Обслуговування
Найкращі побажання від компанії - Дитина повинна бути захищена від Hamax. дощу спеціальним водозахисним костюмом. Kullanım Kılavuzu Hamax bisiklet çocuk koltuğunu satın Daha sonraki zamanlarda çocuk aldığınız için teşekkür ederiz. koltuğu için ekstra ekipman satın alabileceğiniz için, bu kılavuzu Çocuğunuz büyüdükçe ayarlanabilme özelliğiyle onu konforlu ve güvenli bir... - Page 32 Çocuk koltuğu, çocuğun yan kısmının ve ayaklarının korunmasını Hamax çocuk koltuğu ile size ve sağlar. Ancak yine de, kapalı çamurluk / çocuğunuza keyifli yolculuklar zincir kapağı satın alarak takmanız diliyoruz.
- Page 33 User Manual Caress...
- Page 34 Remove the transportation lock CARESS Press the front of the mounting bracket (7) to release the bracket from the transportation pins (13). Remove the transportation pins. The transportation pins (13) are recyclable. Appuyez sur la partie frontale de Presione en la parte delantera del l’étrier de montage (7) pour libérer...
- Page 35 PRESS Nacisnąć przednią część uchwytu Zatlačte prednú časť montážnej mocującego (7) i zwolnić uchwyt z konzoly (7) a konzola sa odpojí od blokady transportowej (13). Usunąć prepravných zámkov (13). Odmontujte blokadę transportową. Blokadę prepravné zámky. Prepravné zámky transportową (13) oddajemy do (13) sú...
- Page 36 Remove shop display strap & protective foamblock CARESS Remove the shop display strap (11) by pulling up the edge over the top of the strap, as shown in pic. 1. Remove protection foam block (12) (pic. 3) from the back. Both the shop display strap and protection foam block are recyclable.
- Page 37 Pic. 2 Pic. 3 Zdjąć uchwyt sklepowy (11) Vyberte uchopovací pásik (11) pociągając za krawędź w górnej części potiahnutím okraju nad vrch pásika ako paska, jak przedstawiono na rys. 1. je to uvedené na obr. 1. Vyberte Zdjąć piankę ochronną (12) znajdującą ochranný...
- Page 38 Remove locking pin & seperate extra footguard CARESS Turn the seat (1) upside down. Turn the eccentric shaft (8) clockwise before you pull the eccentric shaft completely out. The footguards (10) will be used later. zoom Retournez le siège (1). Tournez la Käännä...
- Page 39 Vire a cadeira ao contrário (1). Обърнете седалката (1) обратно. Rode o pino de bloqueio (8) no sentido Завъртете фиксиращия щифт (8) по dos ponteiros do relógio antes de o часовниковата стрелка, преди да puxar completamente para fora. извадите фиксиращия щифт напълно. As proteções de pé...
- Page 40 Mount the carrier bar to the seat CARESS Insert the carrier bow (6) through the holes as shown below. Insérez l’arc porteur (6) dans les Voer de draagboog (6) door de trous comme illustré ci-dessous. gaten zoals hieronder weergegeven. Stecken Sie den Trägerbogen (6) Przesunąć...
- Page 42 Insert locking pin CARESS Insert the eccentric shaft (8) through the holes under the seat base, keeping it in unlocked position to allow final adjustment later on. Insérez la goupille de verrouillage Pase el pasador de cierre (8) por (8) dans les trous sous la base du siège,...
- Page 43 D1) Locked D2) Unlocked zoom Wkładamy bolec blokujący (8) w Vlozte blokovaci kolik (8) cez otwory pod siedzeniem i pozostawiamy otvory pod zakladnou sedadla, pricom w pozycji otwartej, aby mieć później ho udrziavajte v nezablokovanej polohe, możliwość właściwego ustawienie aby ste neskorsie umoznili zaverecne fotelika.
- Page 44 Fastening bracket CARESS Place the fastening bracket (7a) over the frame tube of the bike. Attach the bracket with the metal strips/ fastening screws (7b+c). Do not tighten fully, so that the height can be adjusted at a later stage.
- Page 45 Aseta kiinnityspidike (7a) pyörän Puneţi suportul de fixare (7a) pe runkoputken päälle. Ruuvaa pidike ţeava cadrului bicicletei. Montaţi suportul paikalleen metalliliuskoilla ja cu benzile metalice/şuruburile de fixare kiinnitysruuveilla (7b+c). Älä kiristä (7b + c). Nu strângeţi complet astfel kokonaan niin, että voit säätää încât înălţimea să...
- Page 46 Mount the bicycle child seat onto the bracket CARESS Guide the carrier bow ends (6) down into the bracket (7a) until you hear a click = locked position. Adjust the bracket (7a) to the correct height until there are approx.
- Page 47 Inserire le estremità della staffa di Zavedte konce tyci nosica (6) dole sostegno (6) nell’attacco (7a) spingendo medzi konzolu (7a) az kym nepocujete fino a quando non si sente un ”clic” = klik = zamknuta poloha. Prisposobte posizione bloccata. Regolare l’altezza konzolu (7a) spravnej vyske, az kym dell’attacco (7a) posizionandolo in modo nie je priblizne 10-12 cm medzi zadnym...
- Page 48 Make sure the carrier bow is correctly attached to the bracket by checking that the green safety indicators (7d) are visible. zoom Étrier Hamax de fixation: Hamax-kiinnityspidike: Assurez-vous que l’arc porteur est Varmista, että kiinnityskaari on correctement attaché à l’étrier en kiinnitetty oikein pidikkeeseen vérifiant que les indicateurs verts de...
- Page 49 Fastened Not fastened Suportul de fixare Hamax: Hamax Sabitleme kelepçesi: asiguraţi-vă că arcul de transport este Taşıyıcı yayın kelepçe üzerine, yeşil fixat corect la suport, verificând dacă uyarı indikatörleri (7d) görünecek indicatoarele verzi de siguranţă (7d) şekilde takıldığından emin olun.
- Page 50 Lockable bracket: By pressing down the locking pin (7e), the carrier bow is locked to the bracket. To unlock: Insert key (7f) and turn clockwise. For safekeeping, Hamax recommends that you remove the keys before the bicycle trip. Étrier verrouillable:...
-
Page 51: Locking Pin
För in nyckeln (7f) och vrid den Wkładamy kluczyk (7f) i obracamy go medsols. För säkerhets skull zgodnie z ruchem wskazówek zegara. rekommenderar Hamax att du tar bort Dla bezpieczeństwa, Hamax zaleca nycklarna innan du ger dig ut och wyciągnięcie kluczyka przed każdą... -
Page 52: Adjusting The Seat
Adjusting the seat CARESS Make sure the eccentric shaft (8) is in the unlocked position before adjusting the seat to the correct lengthways position = max. 10 cm between the centre mark (14) on the seat and the rear hub. - Page 53 Locked Sprawdzamy czy bolec blokujący Skontrolujte, ci je blokovaci kolik (8) znajduje się w pozycji otwartej, po (8) v odblokovanej polohe pred czym ustawiamy siedzisko fotelika tak, prisposobenim sedadla na spravnu aby zaznaczony wskaźnikiem środek polohu po dlzke = max. 10 cm medzi środek ciężkości nie wykraczał...
-
Page 54: Foot Rest Adjustment
Foot rest adjustment CARESS How to release the foot rest (5): Release the footrest handle on the back by flipping it upwards. Move the foot rest (5) to the preferred height and fasten the foot rest by pressing the foot rest handle down. - Page 55 Jak odblokować podpórkę na nogi Ako uvoľniť opierku nohy (5): (5): Odblokować dźwignię podpórki Uvoľnite držadlo opierky na nohy na umieszczoną z tyłu przesuwając ją w zadnej strane, aby ste ju prepli nahor. górę. Przesunąć podpórkę (5) na Posuňte opierku na nohy (5) do želanej wybraną...
- Page 56 Foot strap adjustment CARESS How to fasten/release the foot strap (a): To fasten the foot strap put the strap into the track and pull down to preferred length. The strap will automatically lock. It’s only possible to tighten the strap when it is in the track. To loosen the foot strap, just pull it out of the track.
- Page 57 Jak odblokować pasek Så här frigör du fotremmen (a): zabezpieczający (a): W celu zapięcia Du fäster fotremmen genom att föra in paska należy wprowadzić go w prowadnik den genom skåran och dra neråt till i pociągnąć, aby uzyskać pożądaną önskad längd. Remmen låses długość.
- Page 58 Extra footguard CARESS To mount the extra foot guard (10): Press the foot guard into the fitting grooves until it clicks. zoom Pour monter la protection de pieds Lisäpinnasuojan kiinnitys Paina supplémentaire (10) : Poussez la pinnasuojaa asennusuriin, kunnes protection de pied dans les rainures kuuluu naksahdus.
- Page 59 CLICK! Opposite view Pentru a monta protecţia Ekstra ayak korumasını (10) suplimentară pentru picioare (10): monte etmek için: Ayak korumasını Apăsaţi protecţia pentru picioare în montaj kanallarına doğru yerine canelurile de fixare până când se aude oturana kadar bastırın. un declic. Щоб...
- Page 60 Restraint system CARESS The restraint system (2) can be attached and detached by pressing in or out the belt lock (4) shown in pic. 1. It is important to press at the middle of the belt lock button (pic. 2 & 3) when detaching the restraint system.
- Page 61 Pic. 1 Where to push: Pic. 2 Pic. 3 System (2) ten można przyczepiać Obmedzovací systém (2) sa dá i odczepiać naciskając na sprzączkę (4) pripojiť a odpojiť stlačením spony (4) widoczną na rys. 1. Sprzączkę należy zobrazenej na obr. 1. Pre uvoľnenie je naciskać...
- Page 62 Chest buckle adjustment CARESS The restraint system length can be adjusted by adjusting buckle a and b. To adjust buckles (a+b) hold the buckle as shown in pic. 1. By pressing the red button, the belt loosens by pulling the buckle upwards.
- Page 63 Pic. 1 Pic. 2 Pic. 3 Turvakiinnitysjärjestelmän pituutta De lengte van het harnassysteem voi säätää säätämällä solkia a ja b. kan worden ingesteld via de beugels a Säädä solkia (a+b) pitämällä soljesta en b.Om de beugels (a+b) in te stellen kuten kuvassa 1.
- Page 64 Lungimea sistemului de fixare Çocuk emniyet kemeri sistemi poate fi ajustată cu ajutorul cataramei uzunluğu a ve b tokalarıyla ayarlanabilir. de reglare a şi b. Pentru a regla Tokaları (a+b) ayarlamak için tokayı cataramele (a+b) ţineţi catarama aşa resim 1’de gösterildiği gibi tutun. cum este prezentat în figura 1.
- Page 66 SLIDING BACKREST CARESS The sliding backrest (3) height can be adjusted, so the backrest and restraint system is in the correct height to the child’s shoulders. Move backrest to preferred height, and fasten by pressing the lever down (pic. 1).
- Page 67 Pic. 1 Istnieje możliwość regulacji Výška posuvnej opierky chrbta (3) wysokości oparcia przesuwanego (3) w sa dá nastaviť tak, aby boli opierka celu dopasowania do pleców dziecka. chrbta a obmedzovací systém v Przesunąć oparcie na preferowaną správnej výške na ramenách dieťaťa. wysokość...
- Page 68 Reclinable function CARESS To recline the seat twist the reclining knob (9) to the position required. Pour incliner le siège en arrière, Aby ustawić fotelik w pozycji tournez la molette de réglage (9) leżącej należy przekręcić pokrętło jusqu’à atteindre la position désirée.
- Page 70 How to remove the seat CARESS The seat (1) is easy to PRESS remove from the bicycle when not in use. Press the cover of the bracket and pull the seat bar free from the bracket (7). In case you have a lockable bracket, check if the bracket is locked first.
- Page 71 Stolen (1) er nem at tage af Istuin (1) on helppo tarvittaessa cyklen, når den ikke er i brug. Tryk på irrottaa pyörästä. Paina pidikkeen dækslet til beslaget og skub suojusta ja vedä istuintanko irti stolestangen fri af beslaget (7). pidikkeestä...
- Page 72 È facile rimuovere il seggiolino (1) Du tar enkelt av sitsen (1) från dalla bicicletta quando non è in uso. cykeln när den inte ska användas. Premere il pulsante dell’attacco ed Tryck på fästet och dra loss sitsbygeln estrarre la staffa di supporto från fästet (7).
- Page 74 Before embarking on a bicycle trip CARESS • Adjust the restraint system (2) • Adjust the foot rests (5) and fasten foot straps • Check the safety indicators (7d) of the bracket • Always wear helmets; both child and adult NB! Never leave your child alone in the bicycle child seat.
- Page 75 • Juster sikkerhedsselen (2) • Säädä turvavyö (2) • Juster fodstøtterne og stram • Säädä jalkatuet ja kiinnitä jalkahihnat fodremmene (8) • Kontroller sikkerhedslåsene (7d) på • Tarkista pidikkeen turvamerkinnät beslaget. (7d). • Bær altid hjelm, både barn og voksen. •...
- Page 76 • Regolare la cintura di sicurezza (2) • Reglaţi centura de siguranţă (2) • Regolare i poggiapiedi e fissare le • Reglaţi suportul pentru picioare şi cinghiette per i piedi (8) strângeţi benzile pentru picioare (8) • Controllare gli indicatori di sicurezza •...
- Page 77 • Настройте предпазния колан (2) • Настройте стъпенките и затегнете коланите на краката (8) • Проверете индикаторите за безопасност (7d) на конзолата • Винаги носете шлемове, и възрастният и детето. Важно! Никога не оставяйте детето само на детската седалка. Моля имайте предвид, че вадещата...
- Page 78 Extra fastening bracket CARESS With an extra bracket (7) you can easily move one seat between two bicycles. Hamax fastening bracket (7) is available in two version; standard and lockable Art. nr.: 604001 STANDARD BRACKET Art. nr.: 604002 LOCKABLE BRACKET Si vous disposez d’un étrier...
- Page 79 един на друг велосипед. adicional (7). O componente de fixação Закрепващата конзола Hamax (7) се Hamax (7) está disponível em duas предлага в две версии: стандартна и versões: standard e com bloqueio заключваща се Art. nr.: 604001 SUPORTE STANDARD Арт.
-
Page 80: Problem Solving
Problem solving CARESS If you should encounter any of the problems sketched below, there are four different carrier rack types available to solve your problem. Contact your cycle dealer. Problem 1: Problem 2: Problem 3:... - Page 81 Solution 1: Extra bar for small frames 603083 Caress Solution 2: Extra bar to lower seat 603086 Caress Solution 3: Extra bar to reduce incline 603084 Caress...
- Page 82 Problem solving CARESS Problem 4: Si vous éprouvez l’un des Existen cuatro tipos diferentes de problèmes illustrés ci-dessus, il y a soportes para solucionar cualquiera de quatre types différents de rack porteur los problemas representados disponibles pouvant solutionner votre gráficamente arriba.
- Page 83 Solution 4: Extra bar to increase incline 603085 Caress W rozwiązaniu problemów Ak by ste sa mali stretnut s przedstawionych na powyższych nejakym problemom, nacrtnutym nizsie, rysunkach pomogą cztery różne rodzaje su tu k dispozicii styri rozne typy pałąków. nosicov, ktore su k dispozicii na riesenie vasho problemu.