Table des Matières
Publicité
Les langues disponibles
Les langues disponibles
Liens rapides
Publicité
Table des Matières

Manuels Connexes pour CASO DESIGN WineComfort 126


Sommaire des Matières pour CASO DESIGN WineComfort 126
- Page 1 Original- Bedienungsanleitung WineComfort 126 (665) WineComfort 180 (670)
- Page 2 Braukmann GmbH Raiffeisenstraße 9 D-59757 Arnsberg Service-Hotline International: Tel.: +49 (0) 29 32 / 80 55 4 – 99 Fax: +49 (0) 29 32 / 80 55 4 – 77 eMail: kundenservice@caso-germany.de Sie finden die aktuellste Version der Bedienungsanleitung auch auf unserer Homepage: www.caso-germany.de Bildabweichungen zur Originalware sind technisch bedingt möglich.
-
Page 3: Table Des Matières
1 Bedienungsanleitung ....................10 1.1 Allgemeines ......................10 1.2 Informationen zu dieser Anleitung ................ 10 1.3 Warnhinweise ......................10 1.4 Haftungsbeschränkung ..................11 1.5 Urheberschutz ......................11 2 Sicherheit ......................... 12 2.1 Bestimmungsgemäße Verwendung ............... 12 2.2 Allgemeine Sicherheitshinweise ................12 2.3 ... - Page 4 8 Garantie ........................23 9 Technische Daten ....................23 10 Operating Manual ....................25 10.1 General ........................25 10.2 Information on this manual ..................25 10.3 Warning notices ...................... 25 10.4 Limitation of liability ....................26 10.5 Copyright protection ....................26 11 ...
- Page 5 17 Disposal of the Old Device ..................36 18 Guarantee ......................... 36 19 Technical Data ......................37 20 Mode d´emploi ......................39 20.1 Généralités ....................... 39 20.2 Informations relatives à ce manuel ................ 39 20.3 Avertissements de danger..................39 20.4 Limite de responsabilités ..................40 20.5 ...
- Page 6 25 Réparation des pannes ................... 49 25.1 Consignes de sécurité .................... 49 25.2 Origine et remède des incidents ................49 26 Elimination des appareils usés ................50 27 Garantie ........................51 28 Caractéristiques techniques .................. 51 29 Istruzioni d´uso ......................53 29.1 ...
- Page 7 34.2 La pulizia ........................63 34.2.1 Muovere l’apparecchio ..................63 35 Eliminazione malfunzionamenti ................63 35.1 Indicazioni di sicurezza ..................64 35.2 Cause malfunzionamenti e risoluzione ..............64 36 Smaltimento dell’apparecchio obsoleto ..............65 37 Garanzia ........................66 38 Dati tecnici ....................... 66 39 ...
- Page 8 43.2 Placa de especificaciones ..................76 44 Limpieza y conservación ..................77 44.1 Instrucciones de seguridad ..................77 44.2 Limpieza ........................77 44.3 Transporte del aparato ................... 78 45 Resolución de fallas ....................78 45.1 Instrucciones de seguridad ..................78 45.2 ...
- Page 9 53.1 Bedieningspaneel en display ................. 92 53.2 Typeplaatje ....................... 92 54 Reiniging en onderhoud ..................92 54.1 Veiligheidsvoorschriften ..................93 54.2 Reiniging ........................93 54.3 Bewegen van het apparaat ..................94 55 Storingen verhelpen ....................94 55.1 Veiligheidsvoorschriften ..................94 55.2 ...
-
Page 10: Bedienungsanleitung
1 Bedienungsanleitung 1.1 Allgemeines Lesen Sie die hier enthaltenen Informationen, damit Sie mit Ihrem Gerät schnell vertraut werden und seine Funktionen in vollem Umfang nutzen können. Ihr WineComfort dient Ihnen viele Jahre lang, wenn Sie ihn sachgerecht behandeln und pflegen. Wir wünschen Ihnen viel Freude beim Gebrauch. 1.2 Informationen zu dieser Anleitung Diese Bedienungsanleitung ist Bestandteil des WineComfort (nachfolgend als Gerät bezeichnet) und gibt Ihnen wichtige Hinweise für die Inbetriebnahme, die Sicherheit, den... -
Page 11: Haftungsbeschränkung
Ein Warnhinweis dieser Gefahrenstufe kennzeichnet eine mögliche gefährliche Situation. Falls die gefährliche Situation nicht vermieden wird, kann dies zu leichten oder gemäßigten Verletzungen führen. ► Die Anweisungen in diesem Warnhinweis befolgen, um Verletzungen von Personen zu vermeiden. Ein Hinweis kennzeichnet zusätzliche Informationen, die den Umgang mit der Maschine erleichtern. -
Page 12: Sicherheit
2 Sicherheit In diesem Kapitel erhalten Sie wichtige Sicherheitshinweise im Umgang mit dem Gerät. Dieses Gerät entspricht den vorgeschriebenen Sicherheitsbestimmungen. Ein unsachgemäßer Gebrauch kann jedoch zu Personen und Sachschäden führen. 2.1 Bestimmungsgemäße Verwendung Dieses Gerät ist nur für den Gebrauch in geschlossenen Räumen zum ... -
Page 13: Gefahrenquellen
► Eine Reparatur des Gerätes während der Garantiezeit darf nur von einem vom Hersteller autorisierten Kundendienst vorgenommen werden, sonst besteht bei nachfolgenden Schäden kein Garantieanspruch mehr. ► Defekte Bauteile dürfen nur gegen Original-Ersatzteile ausgetauscht werden. Nur bei diesen Teilen ist gewährleistet, dass sie die Sicherheitsanforderungen erfüllen werden. 2.3 Gefahrenquellen 2.3.1 Brandgefahr / Gefahr durch brennbare Materialien / Explosionsgefahr... -
Page 14: Inbetriebnahme
► Bei Beschädigung der Anschlussleitung muss eine spezielle Anschlussleitung durch eine vom Hersteller autorisierte Fachkraft installiert werden. ► Betreiben Sie dieses Gerät nicht, wenn sein Stromkabel oder -stecker beschädigt ist, wenn es nicht ordnungsgemäß arbeitet oder wenn es beschädigt oder fallengelassen wurde. -
Page 15: Auspacken
3.3 Auspacken Zum Auspacken des Gerätes gehen Sie wie folgt vor: Entnehmen Sie das Gerät aus dem Karton und entfernen Sie das innere und äußere Verpackungsmaterial. Das Gerät sollte nur aufrecht transportiert werden. Reinigen Sie den Innenraum mit handwarmen Wasser und einem weichen Lappen. ... -
Page 16: Standfüsse
Stellen Sie das Gerät nicht in einer heißen Umgebung oder in der Nähe von brennbarem Material auf. Das Gerät benötigt zum korrekten Betrieb eine ausreichende Luftströmung. Lassen Sie 15 cm Freiraum um das Gerät herum. Decken Sie keine Öffnungen am Gerät ab und blockieren Sie sie nicht. ... -
Page 17: Holzlagerböden
3.5.4 Holzlagerböden Jeder Holzlagerboden kann herausgenommen werden um größere Flaschen zu lagern. Normaler Boden unterer Boden 3.5.5 Herausnehmen der Holzlagerböden Um einen Holzlagerboden herauszunehmen, nehmen Sie zuerst die Flaschen heraus. Dann heben Sie den Boden leicht an und ziehen ihn dann heraus. (Eventuell vorher Schrauben lösen). -
Page 18: Aufbau Und Funktion
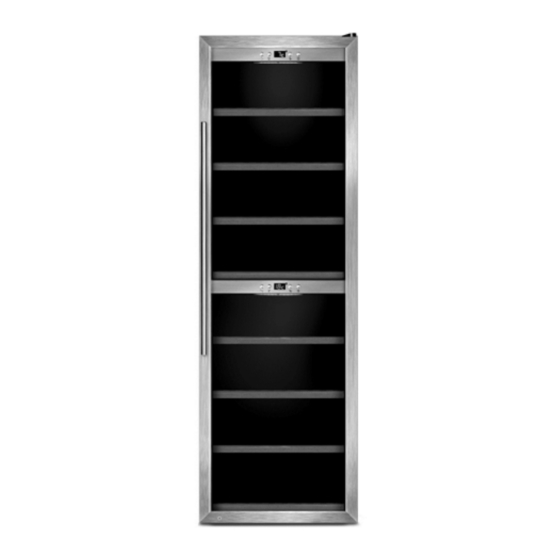
4 Aufbau und Funktion In diesem Kapitel erhalten Sie wichtige Hinweise zum Aufbau und Funktion des Gerätes. 4.1 Gesamtübersicht (1) Obere Scharnierabdeckung (2) Türdichtung (3) Türrahmen (abschließbar) (4) Türgriff (5) Unteres Scharnier mit Stellfuß (6) Fuß (7) Auslaß für warme Luft (8) Lufteinzug (9) unteres Bedienfeld (10) Auslaß... -
Page 19: Bedienelemente Und Anzeige
5.1 Bedienelemente und Anzeige ► Die Tasten ermöglichen eine Einstellung zwischen 5 – 20 °C für beide Zonen. ► Werden sowohl die obere, als auch die untere Zone genutzt, muss die Temperatur der oberen Zone niedriger oder gleich der Temperatur der unteren Zone sein. ►... -
Page 20: Reinigung Und Pflege
6 Reinigung und Pflege In diesem Kapitel erhalten Sie wichtige Hinweise zur Reinigung und Pflege des Gerätes. Beachten Sie die Hinweise um Beschädigungen durch falsche Reinigung des Gerätes zu vermeiden und den störungsfreien Betrieb sicherzustellen. 6.1 Sicherheitshinweise Beachten Sie die folgenden Sicherheitshinweise, bevor Sie mit der Reinigung des Gerätes beginnen: ►... -
Page 21: Bewegen Ihres Gerätes
Manuelles Abtauen: Bitte lassen Sie das Gerät mindestens alle 6 Monate abtauen. Wenn Sie die Tür des Gerätes häufig öffnen, müssen Sie den Abtauvorgang häufiger durchführen. Schalten Sie das Gerät aus aber ziehen Sie nicht den Netzstecker. Lassen Sie dann das Gerät manuell abtauen. Achten Sie auf die Auffangschale (K) und entfernen Sie während dem Abtauen das entstandene Wasser. -
Page 22: Entsorgung Des Altgerätes
Die Tür schließt nicht richtig. - Das Gerät steht nicht eben. - Die Türen wurden verkehrt herum oder nicht richtig angebracht. - Die Dichtung ist abgenutzt. - Die Böden sind verrutscht. LED zeigt nichts an. - Die Hauptschalttafel funktioniert nicht. - Der Stecker ist defekt. -
Page 23: Garantie
Gerät austauschen. Offene Mängel sind innerhalb von 14 Tagen nach Lieferung anzuzeigen. Weitere Ansprüche sind ausgeschlossen. Zur Geltendmachung eines Garantieanspruches setzen Sie sich bitte vor einer Rücksendung des Gerätes (immer mit Kaufbeleg!) mit uns in Verbindung. 9 Technische Daten Name WineComfort 126 WineComfort 180 Modell SW-126 SW-180 Artikelnr. - Page 24 Original Operating Manual WineComfort 126 (665) WineComfort 180 (670)
-
Page 25: Operating Manual
10 Operating Manual 10.1 General Please read the information contained herein so that you can become familiar with your device quickly and take advantage of the full scope of its functions. Your wine refrigerator will serve you for many years if you handle it and care for it properly. We wish you a lot of pleasure in using it! 10.2 Information on this manual These Operating Instructions are a component of the WineComfort (referred to hereafter as... -
Page 26: Limitation Of Liability
10.4 Limitation of liability All the technical information, data and notices with regard to the installation, operation and care are completely up-to-date at the time of printing and are compiled to the best of our knowledge and belief, taking our past experience and findings into consideration. No claims can be derived from the information provided, the illustrations or descriptions in this manual. -
Page 27: General Safety Information
11.2 General Safety information PLEASE NOTE Please observe the following general safety notices with regard to the safe handling of the device. ► Examine the device for any visible external damages prior to using it. Never put a damaged device into operation. ►... -
Page 28: Dangers Due To Electrical Power
DANGER ► Do not use electrical devices inside the device. ► Do not use mechanical devices or other means to accelerate the defrosting process. ► Never use the device to store or dry flammable materials. ► Never clean appliance parts with flammable fluids. The fumes can create a fire hazard or explosion. -
Page 29: Delivery Scope And Transport Inspection
12.2 Delivery scope and transport inspection As a rule, the WineComfort is delivered with the following components: Wine refrigerator WineComfort 7 wooden shelves (665) 8 wooden shelves (670) Operating Instructions with handle and screws Please note ► Examine the shipment for its completeness and for any visible damages. ►... -
Page 30: Setup
12.5 Setup 12.5.1 Setup location requirements: In order to ensure the safe and trouble-free operation of the device, the setup location must fulfil the following prerequisites: Place your appliance on a floor that is strong enough to support the appliance when it is fully loaded. -
Page 31: Wine Shelves
12.5.4 Wine shelves Each shelve can be removed to store larger bottles. Usual shelf Lower shelf 12.5.5 To remove a shelf Remove all bottles from the shelves. Lift the shelf upwards and the gently pull it out, (eventually untighten the screws). Please note ►... -
Page 32: Complete Overview
13.1 Complete overview (1) Up Hinge Cover (2) Door Sealing (3) Door Frame (lockable) (4) Door Handle (5) Down Hinge (adjustable foot) (6) Foot (7) Hot Air Outlet (8) Air inlet (9) Control Panel (Down) (10) Cold Air Outlet (11) Rack 7 pcs (665) 8 pcs (670) (12) Control Panel ( Up) (13) Housing... -
Page 33: Rating Plate
If you press the power button of : Upper zone -> the device is switched on Down zone -> the down zone is switched on/off When the LED lights the device is working. With pushing both for 5 seconds, the temperature display mode will be exchange between °C and °F. -
Page 34: Cleaning
15.2 Cleaning Interior space Wash the inside with a damp cloth soaked in lukewarm water and a bit of mild detergent. Tip for neutralisation of odors: Wash the inside with a damp cloth soaked in lukewarm water and baking soda solution. The solution should be about 2 tablespoons of baking soda to a quarter of water. -
Page 35: Safety Notices
16.1 Safety notices Attention ► Only qualified electricians, who have been trained by the manufacturer, may carry out any repairs on electrical equipment. ► Improperly performed repairs can cause considerable dangers for the user and damages to the device. 16.2 Fault indications and rectification of faults The following table assists in localizing and rectifying minor faults. -
Page 36: Disposal Of The Old Device
Dew on the surface of The surface of wine cabinet especially the glass door appear some frost if item in a damp room. This is due to cabinet: the moisture in the air coming into contact with the cabinet. Please wipe it away with dry cloth. Liquid sound 1 、The sound of compressor when starts or stops working... -
Page 37: Technical Data
14 days of delivery. All further claims are excluded. To enforce a guarantee claim, please contact us prior to returning the device (always provide us with proof of purchase). 19 Technical Data Name WineComfort 126 Model No. SW-126 Item No.:... - Page 38 Mode d'emploi original WineComfort 126 (665) WineComfort 180 (670)
-
Page 39: Mode D´emploi
20 Mode d´emploi 20.1 Généralités Veuillez lire les indications de ce manuel afin de vous familiariser rapidement avec l'appareil et afin de pouvoir utiliser l'ensemble de ses fonctions. Votre appareil vous sera fidèle de nombreuses années si vous l'utilisez et l'entretenez conformément. -
Page 40: Limite De Responsabilités
Remarque Cette indication est accompagnée d'informations complémentaires pour faciliter l'utilisation de l'appareil. 20.4 Limite de responsabilités Tous les renseignements techniques, données et instructions d'installation, de fonctionnement et d'entretien contenus dans ce manuel sont parfaitement actuels au moment de la publication et tiennent compte de notre expérience réalisée jusqu'ici et de nos connaissances actuelles en toute bonne foi. -
Page 41: Consignes De Sécurités Générales
Attention ► Respecter les procédures décrites dans ce mode d'emploi. Tout recours en garantie est supprimé en cas de dommages causés par une utilisation non conforme. L'utilisateur est entièrement responsable des risques encourus. 21.2 Consignes de sécurités générales Remarque Pour une utilisation en toute sécurité de l'appareil veuillez observer les consignes générales de sécurités suivantes : ►... -
Page 42: Dangers Du Courant Électrique
Danger ► Ne pas stocker des substances explosives telles que les bombes aérosols avec des gaz propulseurs inflammables dans cet appareil. ► Le propulseur à l'intérieur de l'appareil est combustible. ► N’endommagez pas le circuit de refroidissement. ► N’utilisez pas d’appareils électriques à l’intérieur de l’appareil. ►... -
Page 43: Mise En Service
22 Mise en service Ce chapitre est consacré à des indications importantes concernant la mise en service de l'appareil. Observez les indications pour éviter les dangers et les détériorations. 22.1 Consignes de sécurité Attention Lors de la mise en service de l'appareil peuvent se produire des dommages pour les biens et les personnes ! Pour éviter les dangers veuillez observer les consignes de sécurité... -
Page 44: Mise En Place
Le retour des emballages dans le circuit des matières épargne les matières premières et restreint le volume des déchets. Eliminez les emballages inutiles dans les points de collecte destinés au système de recyclage avec le logo «Point vert». Remarque ► Veuillez si possible conserver l'emballage original pendant la durée de la garantie de l'appareil afin de pouvoir emballer correctement l'appareil en cas de recours en garantie. -
Page 45: L'installation De La Poignée
22.5.3 L’installation de la poignée La cave à vins est avec 1 poignée en acier inoxydable. Pour l’installer, visez-la simplement sur la porte avec les vis fournies. 22.5.4 Rayonnages en bois Chacun des rayonnages en bois peut être enlevé pour stocker de plus grosses bouteilles. -
Page 46: Structure Et Fonctionnement
Assurez-vous que le câble électrique est en parfait état et qu'il n'est pas disposé sous un four ou des surfaces chaudes ou des bords coupants. Installez le câble électrique de façon à ne pas trébucher dessus. L’appareil n'est pas conçu pour fonctionner avec un convertisseur courant continu/courant alternatif. -
Page 47: Eléments De Commande Et D'affichage
23.3 Eléments de commande et d'affichage Remarque ► Les touches permettent un réglage entre 5 et 20°C au niveau des deux claies supérieures. ► Si on utilise aussi bien la zone supérieure que la zone inférieure, la température de la zone supérieure doit être inférieure ou égale à... -
Page 48: Consignes De Sécurité
24.1 Consignes de sécurité Prudence Avant de commencer le nettoyage de l'appareil veuillez observer les consignes de sécurité suivantes : ► Avant utilisation, nettoyez la surface intérieure avec de l’eau tiède et un chiffon doux. ► Avant le nettoyage arrêter l'appareil et retirer le connecteur de la prise murale. ►... -
Page 49: Déplacement De Votre Appareil
24.2.1 Déplacement de votre appareil Si vous voulez mettre l’appareil à un autre endroit : Arrêtez l’appareil et débranchez la prise murale. Sortez le contenu. Par mesure de sécurité, scotchez tous les éléments en vrac à l'intérieur. Scotchez la porte. Assurez-vous que l’armoire cave à... -
Page 50: Elimination Des Appareils Usés
La LED ne s’allume pas. Le tableau de contrôle principal ne fonctionne pas.Problème des plaquettes à circuits imprimés.Il y a un problème avec la prise. Erreur d’affichage LED - Lo Mauvaise qualité d’affichage.La valeur ponctuelle de la température est éteinte. Les fonds ne fonctionnent pas. -
Page 51: Garantie
être signalés dans un délai de 14 jours après livraison. Tout autre recours est sans objet. Pour tout recours en garantie nous vous prions d'entrer en contact avec nos services avant de nous retourner l'appareil (toujours avec le bon d'achat!). 28 Caractéristiques techniques Désignation WineComfort 126 WineComfort 180 Modèle SW-126 SW-180 N°... - Page 52 Istruzioni d’uso originali WineComfort 126 (665) WineComfort 180 (670)
-
Page 53: Istruzioni D´uso
29 Istruzioni d´uso 29.1 In generale Legga le informazioni qui contenute, affinché acquisti rapidamente familiarità con il suo apparecchio e affinché possa utilizzare appieno le sue funzioni. Il Suo l´apparecchio Le renderà un buon servizio per molti anni, se lo tratterà e lo curerà in modo adeguato. -
Page 54: Limitazione Della Responsabilità
Attenzione Un’indicazione d'avvertimento di questo livello di pericolo contrassegna una situazione di pericolo potenziale. Se tale situazione pericolosa non viene evitata, le conseguenze potranno essere lesioni leggere o di media entità. ► Osservare le indicazioni in queste avvertenze, per evitare il lesioni di persone. Indicazione Un indicazione contrassegna inoltre delle informazioni, che facilitano l’utilizzo della macchina. -
Page 55: Sicurezza
30 Sicurezza In questo capitolo riceverà importanti indicazioni sulla sicurezza nell’utilizzo dell’apparecchio. Questo apparecchio corrisponde alle disposizioni di sicurezza prescritte. Un utilizzo inadeguato può però provocare danni a persone e cose. 30.1 Utilizzo conforme alle disposizioni Questo apparecchio è previsto solo per l’utilizzo al chiuso per raffreddare di vino e bevande. -
Page 56: Fonti Di Pericolo
Indicazione ► Componenti difettosi dovranno essere sostituiti soltanto da pezzi di ricambio originali. Solo con questi pezzi vi è la garanzia, che i requisiti di sicurezza siano soddisfatti. 30.3 Fonti di pericolo 30.3.1 Pericolo d’incendio/ Pericolo a causa di materiali combustibili / pericolo d’esplosione Pericolo In caso di utilizzo inadeguato dell’apparecchio, sussiste pericolo d’esplosione... -
Page 57: Messa In Funzione
Pericolo ► In caso di danni dei cavi di connessione, sarà necessario far installare un cavo di connessione speciale da un tecnico autorizzato dal produttore. ► Non azioni l'apparecchio, quando il suo cavo elettrico o la sua spina sono danneggiati, se non lavora in modo adeguato o se è... -
Page 58: Disimballaggio
31.3 Disimballaggio Per il disimballaggio dell’apparecchio, proceda come segue: Estragga l’apparecchio dal cartone e tolga il materiale d'imballaggio. Assicurarsi che l’apparecchio sia in posizione dritta durante il trasporto. Pulire l’interno con acqua tiepida e un panno morbido. ... -
Page 59: Piedini
Non copra alcuna apertura sull'apparecchio e non le blocchi. Non elimini i piedini dell’apparecchio. La presa dovrà essere facilmente accessibile, in modo tale che il cavo elettrico possa essere facilmente estratto, in casi d'emergenza. Il montaggio di questo apparecchio in luoghi di posizionamento non stazionari (per esempio navi) dovrà... -
Page 60: Estrarre Il Ripiano Di Legno
31.5.5 Estrarre il ripiano di legno Per estrarre un ripiano di legno, togliere dapprima le bottiglie. Poi sollevare delicatamente il ripiano ed estrarlo, (eventualmente svitare dapprima le viti). Indicazione ► Assicurarsi, accuratamente, che i ripiani di legno si trovino correttamente sui binari, prima di appoggiarvi le bottiglie. -
Page 61: Panoramica Complessiva
32.1 Panoramica complessiva (1) Cernera disopra (2) Guarnizone (3) Telaio della porta (bloccabile) (4) Maniglia (5) Cernera disotto, Piedino regolabile (6) Piedino (7) Sfogo d´aria caldo (8) Imbeversi aria (9) Regulatore di Temperatura disotto (10) Sfogo d´aria freddo (11) Ripiani di appoggio in legno 7 pezzo (665) 8 pezzo (670) (12) Regulatore di... -
Page 62: Targhetta Di Omologazione
Premendo il tasto Power si attivano : Pannello di comando superiore: commutare l'apparecchio ON/OFF. Pannello di comando inferiore: la zona inferiore. L'apparecchio funziona quando il LED è acceso. Premendo contemporaneamente entrambi i tasti per 5 sec. si può cambiare tra l’indicazione della temperatura in °C e °F. La temperatura può... -
Page 63: La Pulizia
34.2 La pulizia Interno Pulire il vano interno con acqua tiepida e un detergente delicato, nonché con un panno morbido. Consiglio per neutralizzare gli odori: Pulire il vano interno con acqua tiepida e un poco di lievito in polvere (2 cucchiaini dentro un ¼ litro di acqua), nonché con un panno morbido. -
Page 64: Indicazioni Di Sicurezza
35.1 Indicazioni di sicurezza Attenzione ► Riparazioni su apparecchi elettrici dovranno essere eseguiti soltanto da personale specializzato, addestrato dal produttore. ► Con riparazioni inadeguate possono verificarsi gravi pericoli per l’utilizzatore e danni sull’apparecchio. 35.2 Cause malfunzionamenti e risoluzione La seguente tabella aiuta a localizzare e a risolvere malfunzionamenti più lievi. Malfunzionamento Possibile causa frigorifero... -
Page 65: Smaltimento Dell'apparecchio Obsoleto
Brina sulla superficie Soprattutto quando l’apparecchio si trova in un refrigeratore per vino ambiente umido, si forma brina sulla parte anteriore in vetro. Risulta dall’umidità dell’aria, che entra in contatto con il refrigeratore per vino. Rimuovere la brina con un panno morbido. -
Page 66: Garanzia
14 giorni dalla fornitura. Altre pretese sono escluse. Per far valere una pretesa di garanzia, La preghiamo di mettersi in contatto con noi, prima di reinviarci l’apparecchio (sempre con scontrino d’acquisto!). 38 Dati tecnici Nome WineComfort 126 Modello SW-126 Nr. articolo Potenza... - Page 67 Manual del usuario WineComfort 126 (665) WineComfort 180 (670)
-
Page 68: Manual Del Usuario
39 Manual del usuario 39.1 Generalidades Lea atentamente la información contenida en este manual para familiarizarse rápidamente con el aparato y poder utilizar sus funciones en toda su capacidad. Su WineComfort le servirá durante muchos años si lo trata y conserva adecuadamente. Le deseamos una gran satisfacción durante el uso. -
Page 69: Limitación De Responsabilidad
39.4 Limitación de responsabilidad La información técnica contenida, datos e indicaciones contenidos en el presente manual para la instalación, operación y conservación se corresponden con los últimos avances técnicos en el momento de la impresión y se publican teniendo en cuenta nuestra experiencia y conocimientos hasta ese momento. -
Page 70: Instrucciones Generales De Seguridad
Advertencia ► Los procedimientos descritos en el manual de instrucciones deben obedecerse. Queda excluida cualquier reclamación de garantía debido a daños derivados del uso no conforme a lo previsto. La responsabilidad recae exclusivamente en el usuario. 40.2 Instrucciones generales de seguridad Nota Para una manipulación segura del aparato, observe las siguientes instrucciones generales de seguridad:... -
Page 71: Peligro De Electrocución
Peligro ► El propelente dentro de la unidad es combustible. ► No dañe el circuito de refrigeración. ► No utilice equipos eléctricos en el interior del aparato. ► No utilice dispositivos mecánicos u otros medios para acelerar el proceso de descongelación. -
Page 72: Instrucciones De Seguridad
41.1 Instrucciones de seguridad Advertencia Al poner en marcha el aparato pueden producirse lesiones a personas o daños materiales Tener en cuenta las precauciones indicadas, a fin de evitar peligros: ► Los materiales de embalaje no deben utilizarse como juguetes. Peligro de asfixia. ►... -
Page 73: Colocación
Nota ► Si fuera posible, conserve el embalaje original durante el período de garantía para poder embalar el aparato adecuadamente en caso de que requiera hacer uso de la garantía. 41.5 Colocación 41.5.1 Requisitos que debe reunir el lugar de montaje Para garantizar el funcionamiento seguro y correcto del aparato, el lugar de colocación debe cumplir los siguientes requisitos: ... -
Page 74: Estantes De Madera
Para ello, aparte la goma de la parte trasera de la puerta de manera que queden a la vista los agujeros para las agarraderas. Puede montarlas con la ayuda de los tornillos que también se entregan. Seguidamente vuelva a colocar la goma de la puerta en su posición correcta. -
Page 75: Estructura Y Funciones
La toma de alimentación debe estar provista de un fusible protector de 16A. La conexión del aparato a la red eléctrica debe realizarse mediante un cable alargador arrollado, de 3 metros de longitud como máximo y una sección recta de 1,5 mm². El uso de regletas de conexiones o ladrones con varias tomas está... -
Page 76: Mandos E Indicadores
43.1 Mandos e indicadores Nota ► Los botones permiten regular la temperatura entre 5 – 20°C en las dos zonas. ► En caso de utilizar las dos zonas, superior e inferior, la temperatura de la zona superior debe ser igual o menor que la temperatura de la zona inferior. ►... -
Page 77: Limpieza Y Conservación
44 Limpieza y conservación Este capítulo incluye algunos consejos importantes acerca de la limpieza y la conservación del aparato. Tenga presentes las instrucciones y daños por limpieza incorrecta del aparato y asegúrese de que el aparato funciona sin errores. 44.1 Instrucciones de seguridad Precaución Tenga presentes las siguientes instrucciones de seguridad antes de comenzar a limpiar el aparato:... -
Page 78: Transporte Del Aparato
Descongelado manual: Deje el aparato descongelar cada 6 meses. Si abre con frecuencia la puerta del aparato, deberá realizar el proceso de descongelado con mayor frecuencia. Apague el aparato pero no desconecte el cable de alimentación. A continuación, deje que el aparato se descongele manualmente. -
Page 79: Eliminación Del Aparato Usado
El aparato es demasiado - El aparato no está nivelado. - Compruebe el ventilador. ruidoso. - Piezas sueltas. - El aparato toca a la pared. La puerta no cierra - El aparato no está nivelado. correctamente. - Las puertas están colocadas al revés o no están bien. - La junta de la puerta está... -
Page 80: Garantía
Queda excluida cualquier otra reclamación de garantía. Para hacer valer una declaración de garantía, antes de devolver el aparato (siempre con presentación del recibo de compra), póngase en contacto con nosotros. 48 Datos técnicos Denominación WineComfort 126 Modelo SW-126 Nº de art. 40 38437 00665 0 Conexión... - Page 81 Denominación WineComfort 180 Modelo SW-180 Nº de art. 40 38437 00670 4 Conexión 230 V / 50 Hz Potencia 135W Gasto de energía KW por 24 horas 0,82 (12 ) Capacidad 180 botellas Dimensiones exteriores (An/H/P) 600 x 1860 x 730 mm Peso neto 86,35 kg...
- Page 82 Originele Gebruiksaanwijzing WineComfort 126 (665) WineComfort 180 (670)
-
Page 83: Gebruiksaanwijzing
49 Gebruiksaanwijzing 49.1 Algemeen Lees de hier vermelde informatie, zodat u snel vertrouwd raakt met uw apparaat en al zijn functies in volle omvang kunt gebruiken. U heeft jaren lang plezier van uw WineComfort als u hem vakkundig behandelt en onderhoudt. -
Page 84: Aansprakelijkheid
VOORZICHTIG Een waarschuwing van dit gevarenniveau duidt op een mogelijk gevaarlijke situatie. Indien de gevaarlijke situatie niet vermeden wordt, kan dit tot lichte of matige verwondingen leiden. ► De aanwijzingen van deze waarschuwingsinstructie opvolgen om verwondingen bij personen te voorkomen. Een tip duidt op extra informatie, die de omgang met het apparaat lichter maakt. -
Page 85: Gebruik Volgens De Voorschriften
50.1 Gebruik volgens de voorschriften Dit apparaat is alleen voor het gebruik in een gesloten ruimte ter koelen van wijn en andere dranken bestemd. Een ander of er van afwijkend gebruik geldt als niet volgens de voorschriften. WAARSCHUWING Gevaar door gebruik niet volgens de voorschriften! Bij onreglementair gebruik van het apparaat en/of gebruik op een andere wijze kunnen gevaren ontstaan. -
Page 86: Bronnen Van Gevaar
50.2.1 Bronnen van gevaar 50.2.2 Brandgevaar / Gevaar door ontvlambare materialen / Explosiegevaar GEVAAR Bij ondeskundig gebruik van het apparaat bestaat brand- of explosiegevaar door ontsteking van de inhoud. Neemt u de volgende veiligheidsvoorschriften in acht om brandgevaar te voorkomen: Brandgevaar / Gevaar door ontvlambare materialen ►... -
Page 87: Ingebruikname
GEVAAR ► Opent u in geen enkel geval de behuizing van het apparaat. Zodra van spanning voorziene aansluitingen aangeraakt worden en de elektrische en mechanische structuur veranderd worden, dan bestaat het gevaar van een elektrische schok. Bovendien kunnen hierdoor storingen in het functioneren optreden. 51 Ingebruikname In dit hoofdstuk krijgt u belangrijke informatie omtrent de ingebruikname van het apparaat. -
Page 88: Verwijderen Van De Verpakking
De koelkast moet rechtop getransporteerd worden. Reinig de binnenkant met handwarm water en een zachte doek. Sluit het apparaat pas na min. 12 uur wachttijd op het stroomnet aan en schakel het apparaat in. Leg pas daarna de wijnflessen of andere dranken in de WineComfort. ►... -
Page 89: Stelpoten
Het apparaat heeft voor een correcte werking voldoende luchtstroming nodig. Laat u 15 cm vrije ruimte rondom de apparaat. Dek geen openingen van het apparaat af en blokkeer de openingen niet. Verwijder de pootjes van het apparaat niet. ... -
Page 90: Houten Bewaarplateaus
51.5.4 Houten bewaarplateaus Ieder houten bewaarplateau kan eruit genomen worden om grotere flessen te bewaren. Normaal plateau Onderste plateau 51.5.5 Houten bewaarplateaus eruit nemen Om een houten bewaarplateau eruit te nemen, haalt u eerst de flessen eruit. Dan tilt u het plateau lichtjes op en trekt het er dan uit. -
Page 91: Opbouw En Functie
52 Opbouw en functie In dit hoofdstuk krijgt u belangrijke aanwijzingen m.b.t. de opbouw en het functioneren van het apparaat. 52.1 Algemeen overzicht (1) Bovenste scharnierbedekking (2) Deurdichting (3) Deurkozijn (afsluitbaar) (4) Handvat (5) Onderste scharnier, verstellbare poten (6) poten (7) Uitgang voor warme lucht (8) Ingang verse lucht (9)Onderste bedieningspaneel... -
Page 92: Bedieningspaneel En Display
53.1 Bedieningspaneel en display ► Met de knoppen kunt u beide zones tussen 5° - 20° instellen. ► Wordt zowel de bovenste als de onderste zone gebruikt, moet de temperatuur van de bovenste zone lager dan of gelijk aan de temperatuur van de onderste zone zijn. ►... -
Page 93: Veiligheidsvoorschriften
54.1 Veiligheidsvoorschriften VOORZICHTIG Schenkt u eerst aandacht aan de volgende veiligheidsvoorschriften voordat u met de reiniging van het apparaat begint: ► Schakelt u de oven vóór het reinigen uit en trek de stekker uit het stopcontact. Maak de binnenkant leeg. ►... -
Page 94: Bewegen Van Het Apparaat
54.3 Bewegen van het apparaat Wanneer u het apparaat op een andere plaats wilt neerzetten: Schakel het apparaat uit en trek de stekker uit het stopcontact. Maak de binnenkant leeg. Plak voor de zekerheid alle losse elementen aan de binnenkant vast.Plak de deur vast. De koelkast dient rechtop getransporteerd te worden. -
Page 95: Afvoer Van Het Oude Apparaat
Compressor start niet - De compressor start niet als de ruimtetemperatuur lager is dan de gewenste temperatuur. Compressor re-start - De compressor werkt niet meer zodra de ingestelde temperatuur is bereikt. Condens op de oppervlakte - Met name als het apparaat in een vochtige omgeving van de wijnkoelkast staat, ontstaat er condens op het glas aan de voorkant. -
Page 96: Technische Gegevens
Verdere claims zijn uitgesloten. Stelt u zich voor het indienen van een garantieclaim en het terugsturen van uw apparaat via onderstaand adres (altijd met bewijs van koop!) met ons in verbinding. 58 Technische gegevens Apparaat WineComfort 126 Model SW-126 Artikelnr. Vermogens...