Chapitres
Table des Matières

Manuels Connexes pour Hilti PR 20


Sommaire des Matières pour Hilti PR 20
- Page 1 PR 20 Operating instructions Mode d'emploi Istruzioni d'uso Manual de instruções Manual de instrucciones Printed: 07.07.2013 | Doc-Nr: PUB / 5070166 / 000 / 00...
- Page 2 Printed: 07.07.2013 | Doc-Nr: PUB / 5070166 / 000 / 00...
- Page 3 180˚ Printed: 07.07.2013 | Doc-Nr: PUB / 5070166 / 000 / 00...
-
Page 4: Table Des Matières
7. Operation ..... .8 tions are with the tool when it is 8. Hilti calibration service ... .9 given to other persons. -
Page 5: General Information
1.2 Pictograms 2. Description Warning signs General warning 2.1 PR 20 rotating laser The PR 20 is a rotating laser with one rotating laser beam. Laser class 2 2.2 Features (Do not stare into the _ The tool allows a single person to level beam.) -
Page 6: Description Of Functions
_ The tool can be set up on a tripod with a Items supplied 5/8" thread or stood directly on some 1 PR 20 rotating laser other steady surface. 1 PRA 20 laser detector _ The tool is easy to operate, robustly built 1 PRA 75 laser detector holder and comparatively light in weight. -
Page 7: Technical Data
4. Technical data for the PR 20 4. Technical data for the PR 20 Operating temperature -20 to +50°C [-4° to +122°F] Range (diameter) 2 to 400m [6 to 1300’] with PRA 20 laser detector Storage temperature -30 to +60°C dry [-22°... -
Page 8: Safety Precautions
Although the tool complies with the strict hazards when used incorrectly by requirements of the relevant guidelines, untrained personnel or when used not Hilti cannot entirely rule out the following as directed. possibilities: – To avoid the risk of injury, use only origi- –... -
Page 9: Laser Classification
5.5 General safety precautions – Check the tool before use. If the tool is found to be damaged, have it repaired at a Hilti service center. – The accuracy of the tool must be checked after it has been dropped or subjected to other mechanical stressing. -
Page 10: Getting Started
6. Getting started 6. Getting started Shock warning LED All LED’s blink. The tool has been bumped or brought out of level temporarily. The shock warning LED lights red. -NOTE- The shock warning LED lights red The tool may be powered only by the PRA after deactivation of the shock 801 battery pack or by batteries warning. -
Page 11: Operation
7. Operation 7. Operation 7.3 Working in manual mode 1. Set up the tool in a suitable way for the application to be carried out, e.g. on a tripod. 2. The horizontal plane is no longer moni- 7.1 Switching the tool on and using the tored when manual mode is selected for laser detector the X- and Y-directions. -
Page 12: Hilti Calibration Service
In the event of a deviation in excess of day it is tested, with the specifications this, please return the tool to a Hilti Service given in the operating instructions. Center for inspection. -
Page 13: Care And Maintenance
9.2 Storage – Remove the tool from its case if it has become wet. Clean and dry the tool, its Most of the materials from which Hilti tools carrying case and accessories (at max. or appliances are manufactured can be temperature of 40°C / 108°... -
Page 14: Manufacturer's Warranty - Tools
Dispose of batteries in 11. Manufacturer's warranty – tools accordance with national regulations. Hilti warrants that the tool supplied is free Please help to protect our of defects in material and workmanship. environment. This warranty is valid so long as the tool is... -
Page 15: Fcc Statement
- WARNING - Made in Germany This equipment has been tested and has Hilti= registered trademark of the Hilti Corporation, Schaan, Liechtenstein been found to comply with the limits for a class B digital device, pursuant to part 15 LASER RADIATION - DO NOT... - Page 16 Ne pas prêter ou céder l'appareil à un 6. Mise en service........19 autre utilisateur sans lui fournir le mode 7. Utilisation ..........20 d'emploi. 8. Service de calibration Hilti ......21 9. Nettoyage et entretien......22 10. Recyclage ..........22 Principaux éléments 11. Garantie constructeur des appareils..23 12.
-
Page 17: Consignes Générales
Pour des conseils d'utilisation et autres infor- mations utiles. 2. Description 1.2 Pictogrammes 2.1 Laser rotatif PR 20 Symboles d'avertissement Le PR 20 est un laser rotatif muni d'un fais- Avertissement danger ceau laser rotatif. général 2.2 Caractéristiques – L'appareil permet à une personne de mettre Rayon laser rapidement à... -
Page 18: Description Du Fonctionnement
– L'appareil peut être posé sur un trépied Contenu de la boîte de livraison ″ ou directement sur un avec filetage 5/8 1 laser rotatif PR 20 support stable. 1 récepteur laser PRA 20 – Il est simple à utiliser, solide et relativement 1 support de récepteur laser PRA 75... -
Page 19: Caractéristiques Techniques
4. Caractéristiques techniques PR 20 4. Caractéristiques techniques Autonomie des piles à 20 °C [+68 °F] PR 20 Piles alcalines au manganèse : > 80 h NiMH : > 60 h Portée (rayon) de 2 à 400 m [6 à 1300 pieds] avec récepteur PRA 20... -
Page 20: Consignes De Sécurité
5. Consignes de sécurité 5. Consignes de sécurité – Ne faire réparer l'appareil que par le S.A.V. Hilti. En cas de montage incorrect de l'ap- pareil, il peut se produire un rayonnement 5.1 Consignes de sécurité générales laser d'intensité supérieure à celui des En plus des consignes de sécurité... -
Page 21: Classification Du Laser
5.5 Consignes de sécurité générales – Avant toute utilisation, l'appareil doit être contrôlé. Si l'appareil est défectueux, le faire réparer par le Service Clientèle Hilti. – Après une chute ou tout autre incident mécanique, il est nécessaire de vérifier la précision de l'appareil. -
Page 22: Mise En Service
6. Mise en service 6. Mise en service DEL Avertissement de choc Tous les témoins lumineux clignotent L'appareil a été secoué ou il n'est momentanément plus de niveau. Le témoin d'avertissement de choc est illumi- -REMARQUE- né en rouge L'appareil doit uniquement être utilisé avec Lorsque l'avertissement de choc est des piles conformes aux normes IEC ou un désactivé, la DEL s'illumine en rouge. -
Page 23: Utilisation
7. Utilisation 7. Utilisation 7.3 Mode manuel 1. En fonction de l'application, monter l'appa- reil par ex. sur un trépied. 2. Si le mode manuel est sélectionné pour l'axe X et l'axe Y, l'horizontalité n'est plus 7.1 Mise en marche de l'appareil et travail contrôlée. -
Page 24: Désactivation De La Fonction D'inclinaison
A – B devrait être inférieure à 2 mm / 0,15 pouces (à 20 m / 65 pieds). Le service de calibration Hilti se tient à votre En cas d'écarts importants : Apporter disposition en tout temps ; nous vous recom- l'appareil au Service Clientèle Hilti. -
Page 25: Nettoyage Et Entretien
Consulter le Service Clientèle Hilti ou votre conseiller commercial. 9.3 Transport Pour transporter ou renvoyer votre matériel, utiliser soit le carton de livraison Hilti, soit tout autre emballage de même qualité. -REMARQUE- Toujours enlever les piles avant de renvoyer votre appareil. -
Page 26: Garantie Constructeur Des Appareils
à une incapacité à utiliser l'appareil dans quelque but que ce soit. Hilti exclut en particulier les garanties implicites concernant l'utilisation et l'aptitude dans un but bien précis. -
Page 27: Déclaration Fcc
-ATTENTION- Made in Germany Cet appareil a subi des tests qui ont montré Hilti= registered trademark of the Hilti Corporation, Schaan, Liechtenstein qu'il est conforme aux limites définies pour un instrument numérique de la classe B, LASER RADIATION - DO NOT... - Page 28 5. Indicazioni di sicurezza .......29 6. Messa in funzione .......31 Se affidato a terzi, l'attrezzo deve 7. Utilizzo ..........32 essere sempre provvisto del manuale 8. Servizio di calibrazione Hilti ....33 d'istruzioni. 9. Cura e manutenzione ......34 10. Smaltimento........34 Componenti dell'attrezzo 11.
-
Page 29: Indicazioni Di Carattere Generale
1.2 Simboli e segnali 2. Descrizione Segnali d'avvertimento 2.1 Laser rotante PR 20 Attenzione: Il PR 20 è un laser con un raggio rotante. pericolo generico 2.2 Caratteristiche Raggio laser – Questo attrezzo permette ad una persona non guardare... -
Page 30: Descrizione Del Funzionamento
2. Descrizione / 3. Utensili ed accessori 2.3 Descrizione del funzionamento Dotazione 1 laser rotante PR 20 2.3.1 Piano orizzontale 1 ricettore raggio laser PRA 20 (livellamento automatico) 1 supporto per ricettore raggio laser Il livellamento avviene automaticamente PRA 75... -
Page 31: Dati Tecnici
4. Dati tecnici PR 20 4. Dati tecnici PR 20 Durata d'esercizio a 20 °C [+68 °F] Batterie alcaline: > 80 ore NiMH: > 60 ore Campo d'azione (diametro) 2–400 m [6–1300 ft.] con ricettore PRA 20 Temperatura d'esercizio da –20 °C a +50 °C [da –4 °F a +122 °F]... -
Page 32: Indicazioni Di Sicurezza
Sebbene l'attrezzo sia realizzato in confor- dell'attrezzo non sono consentite. mità ai severi requisiti delle direttive vigenti – Attenersi alle indicazioni relative all'utiliz- in materia, Hilti non può escludere la possi- zo, alla cura ed alla manutenzione bilità che l'attrezzo dell'attrezzo contenute nel manuale –... -
Page 33: Classificazione Del Laser
Centro Riparazioni Hilti. – Dopo una caduta o in seguito a sollecita- zioni di natura meccanica, controllare la precisione di funzionamento dell'attrezzo. -
Page 34: Messa In Funzione
6. Messa in funzione 6. Messa in funzione LED Avviso di urto Tutti i LED lampeggiano L'attrezzo è stato urtato o ha perso temporaneamente il livellamento. Il LED Avviso di urto si accende (rosso). -AVVISO- Dopo la disattivazione dell'avviso di L'attrezzo deve essere utilizzato solo con il urto, il LED dell'avviso di urto si accen- pacco batterie PRA 801 o batterie conformi... -
Page 35: Utilizzo
7. Utilizzo / Funzionamento 7. Utilizzo 7.3 Funzionamento manuale 1. Montare l'attrezzo nella maniera più adatta all'applicazione, ad es. su un trep- piede. 2. Se per le direzioni X e Y è stata scelta la 7.1 Accensione dell'attrezzo e uso del modalità... -
Page 36: Servizio Di Calibrazione Hilti
7. Utilizzo / 8. Servizio di calibrazione Hilti 7.4 Disattivazione della funzione piano In caso di scostamento rispetto ai dati for- inclinato niti dal produttore, gli attrezzi di misurazio- ne usati vengono nuovamente registrati. La funzione piano inclinato può essere... -
Page 37: Cura E Manutenzione
(da –30 °C a +60 °C/da – 22 °F a +140 °F). 9.2 Magazzinaggio Gli attrezzi Hilti sono in gran parte costituiti – Togliere gli attrezzi dai loro imballi se da materiali riciclabili. Condizione essenzia- bagnati. Attrezzi, contenitore per il tra- le per il riciclaggio è... -
Page 38: Garanzia Del Costruttore Per Gli Attrezzi
Questi sono i soli ed unici obblighi in mate- compatibile. ria di garanzia che Hilti è tenuta a rispetta- re; quanto sopra annulla e sostituisce tutte le dichiarazioni precedenti e/o contempora- nee alla presente, nonché altri accordi scritti e/o verbali relativi alla garanzia. -
Page 39: Dichiarazione Fcc
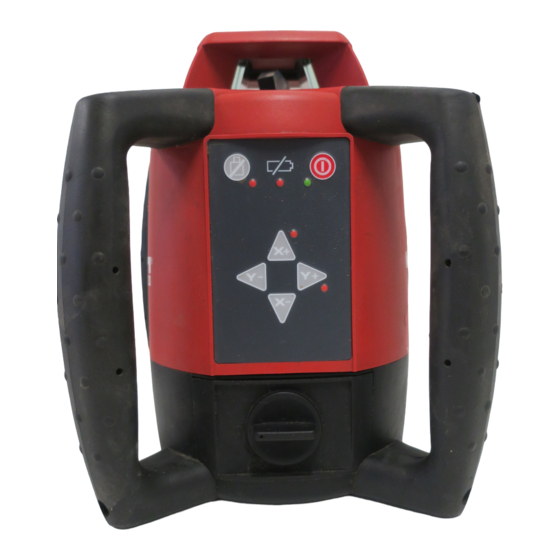
-PRUDENZA- Made in Germany Il presente attrezzo è stato testato ed è Hilti= registered trademark of the Hilti Corporation, Schaan, Liechtenstein risultato conforme ai valori limite stabiliti nel capitolo 15 delle direttive FCC per gli LASER RADIATION - DO NOT... - Page 40 13. Declaração de conformidade CE ..48 Cabeça rotativa Painel de controlo Punho Compartimento de bateria Placa base com rosca de 5/8″ Painel de controlo PR 20 Botão ON/OFF (liga/desliga) Botão de aviso de choque ON/OFF (ligado/desligado) Teclas para regular a inclinação/ direcção X/Y LED de nivelamento automático...
-
Page 41: Informação Geral
útil. 2. Descrição 1.2 Pictogramas 2.1 Laser rotativo PR 20 Sinais de aviso A PR 20 é um laser rotativo com um raio Perigo geral laser giratório. 2.2 Características Laser classe 2 – O laser rotativo PR 20, permite nivelar Não olhe fixamente... -
Page 42: Descrição Das Funções
1 Receptor laser PRA 20 fixa. 1 Porta-receptor laser PRA 75 – De fácil operação, construção robusta, 1 Manual de Instruções PR 20 peso razoável. 1 Manual de Instruções PRA 20 2.3 Descrição das funções 3 Pilhas (tipo D) 2 Pilhas (tipo AA) 2.3.1 Plano horizontal... -
Page 43: Características Técnicas
4. Características técnicas PR 20 4. Características técnicas PR 20 Longevidade da pilha a 20 °C [+68 °F] Alcanina: > 80 h NiMH: > 60 h Amplitude de medição (diâmetro) 2 até 400 m [6 até 1300 pés] com receptor PRA 20 Temperatura de funcionamento –20 °C até... -
Page 44: Normas De Segurança
No entanto, a Hilti não pode excluir instruções pode ocasionar ferimentos totalmente as seguintes possibilidades: pessoais. – Interferência com outros equipamentos –... -
Page 45: Classificação Laser
Se constatar danos, a ferramenta deverá ser reparada num Centro de Assistência Técnica Hilti. – Se a ferramenta sofreu uma queda ou foi submetida a qualquer outra força mecâ- nica, deverá verificar a sua precisão. -
Page 46: Antes De Iniciar A Utilização
6. Antes de iniciar a utilização 6. Antes de iniciar a utilização LED Aviso de choque Todos os LED's estão a piscar. A ferramenta sofreu um embate, ou está fora do nível momentaneamente. O LED do aviso de choque acende na cor -NOTA- vermelha. -
Page 47: Utilização
7. Utilização 7. Utilização 7.3 Trabalhar no modo manual 1. Coloque a ferramenta de acordo com a aplicação desejada, por ex. num tripé. 2. Se for escolhido o modo manual para as direcções X e Y, a posição horizontal 7.1 Ligar a ferramenta e trabalhar com deixa de ser controlada. -
Page 48: Serviço De Calibração Hilti
3. Girar a ferramenta no próprio eixo, por periodicamente através do serviço de cali- 180° (usar o mesmo eixo). bração Hilti, de forma a garantir a sua pre- 4. Marcar o segundo ponto na parede com cisão segundo as normas e de acordo com a ajuda do receptor. -
Page 49: Conservação E Manutenção
(máx. 40 °C/140 °F). esses materiais sejam devidamente separa- Coloque novamente o equipamento dentro dos. A Hilti já iniciou em vários países a da mala, apenas se esta estiver completa- recolha da sua ferramenta usada para fins mente seca. -
Page 50: Garantia Do Fabricante Sobre Ferramentas
Hilti, imediatamente após detecção do defeito. Estas são todas e as únicas obrigações da Hilti no que se refere à garantia, as quais anulam todas as declarações, acordos orais ou escritos anteriores ou contem- porâneos referentes à garantia. -
Page 51: Declaração Fcc
PR 20 -CUIDADO- Made in Germany Este equipamento foi testado e declarado Hilti= registered trademark of the Hilti Corporation, Schaan, Liechtenstein dentro dos limites da Classe II dos equipa- mentos digitais e conforme o estipulado no LASER RADIATION - DO NOT... - Page 52 No entregue nunca la herramienta a 6. Puesta en servicio.......55 otras personas sin adjuntar el manual 7. Manejo ..........56 de instrucciones. 8. Servicio de calibrado de Hilti ....57 9. Cuidado y mantenimiento ....58 10. Reciclaje..........58 Componentes de la herramienta 11. Garantía del fabricante de las herramientas ......59...
-
Page 53: Indicaciones Generales
2. Descripción Símbolos de advertencia Advertencia de peligro 2.1 Láser rotatorio PR 20 en general El PR 20 es un aparato que emite un rayo láser rotatorio. Radiación láser 2.2 Características No mirar al haz – Gracias a esta herramienta una sola per- sona puede nivelar cualquier superficie con rapidez y gran precisión (ha de utili-... -
Page 54: Descripción Del Funcionamiento
1 Receptor de láser PRA 20 – De fácil manejo, diseño robusto, peso 1 Soporte del receptor de láser PRA 75 moderado. 1 Manual de instrucciones PR 20 2.3 Descripción del funcionamiento 1 Manual de instrucciones PRA 20 3 Pilas (tipo D) 2.3.1 Superficie nivelada... -
Page 55: Datos Técnicos
4. Datos técnicos PR 20 4. Datos técnicos PR 20 Tiempo de servicio a 20 °C [+68 °F] manganeso-alcalinas: > 80 h NiMH: > 60 h Alcance (diámetro) 2 a 400 m [6 to 1300 ft.] con receptor PRA 20 Temperatura de servicio –20 °C a +50 °C... -
Page 56: Indicaciones De Seguridad
5. Indicaciones de seguridad – Las reparaciones sólo las podrán llevar a cabo personal de servicio técnico de Hilti. Si el atornillado de la herramienta 5.1 Observaciones básicas de seguridad no se realiza de la forma especificada, Además de las indicaciones técnicas de pueden generarse rayos láser que supe-... -
Page 57: Clasificación De Láser
En caso de que la herramienta estuviera dañada, llévela a un establecimiento del servicio técnico de Hilti. – Es preciso comprobar la precisión de la herramienta en caso de que ésta se caiga Printed: 07.07.2013 | Doc-Nr: PUB / 5070166 / 000 / 00... -
Page 58: Puesta En Servicio
6. Puesta en servicio 6. Puesta en servicio LED de advertencia de choque Parpadean todos los LED. La herramienta ha chocado o ha perdi- do momentáneamente el elemento de nivel. -INDICACIÓN- El LED de advertencia de choque está Sólo se debe poner en funcionamiento la encendido en rojo. -
Page 59: Manejo
7. Manejo 7. Manejo 7.3 Trabajar manualmente 1. Según el uso que se le vaya a dar, puede montarse la herramienta, p. ej., sobre un trípode. 2. Si se selecciona el modo manual para la 7.1 Conexión de la herramienta y trabajar dirección X e Y, deja de estar controlada con el receptor la posición horizontal. -
Page 60: Servicio De Calibrado De Hilti
7. Manejo / 8. Servicio de calibrado de Hilti 7.4 Desconexión de la función de Si se determinaran desviaciones respecto a nivelación los datos del fabricante, se volverían a ajustar los aparatos de medición usados. La función de nivelación puede desactivar- Una vez realizado el ajuste y la comproba- se pulsando una combinación de teclas. -
Page 61: Cuidado Y Mantenimiento
Sacar las pilas si se va almacenar la herra- mienta durante mucho tiempo. 9.3 Transporte Para el transporte o envío del equipo utili- zar cartón de embalajes de Hilti o un emba- laje equivalente. -INDICACIÓN- Enviar siempre la herramienta sin pilas. -
Page 62: Garantía Del Fabricante De Las Herramientas
Hilti, y de que el sistema técnico sea salvaguarda- do, es decir, que se utilicen en la herra- mienta exclusivamente consumibles, acce- sorios y piezas de recambio originales de Hilti. -
Page 63: Indicación Ffc
-PRECAUCIÓN- Made in Germany Esta herramienta ha cumplido en las prue- Hilti= registered trademark of the Hilti Corporation, Schaan, Liechtenstein bas realizadas los valores límites que se estipulan en el apartado 15 de la normativa LASER RADIATION - DO NOT... - Page 64 Printed: 07.07.2013 | Doc-Nr: PUB / 5070166 / 000 / 00...
- Page 65 Printed: 07.07.2013 | Doc-Nr: PUB / 5070166 / 000 / 00...
- Page 66 Printed: 07.07.2013 | Doc-Nr: PUB / 5070166 / 000 / 00...
- Page 67 Printed: 07.07.2013 | Doc-Nr: PUB / 5070166 / 000 / 00...
- Page 68 Hilti Corporation LI-9494 Schaan Tel.: +423 / 234 2111 Fax: +423 / 234 2965 www.hilti.com Hilti = reg. trademark of Hilti Corp., Schaan W 2751 0606 10-Pos. 1 (EU) 1 Printed in Liechtenstein © 2006 282840/E Right of technical and programme changes reserved S.E.&O.