Table des Matières
Publicité
Les langues disponibles
Les langues disponibles
Liens rapides
Publicité
Chapitres
Table des Matières

Manuels Connexes pour Resus Risycor NV

Sommaire des Matières pour Resus Risycor NV
- Page 1 ® Risycor CBU Corrosiemonitor Corrosion monitor Moniteur de corrosion Korrosionsmonitor Zerofix Kapventielarmatuur Lockshield valve device Armature de vanne à capuchon Kappenventilarmatur CBU-ZF_UM_V1_00 HANDLEIDING MANUAL MANUEL BETRIEBSANLEITUNG...
-
Page 2: Table Des Matières
■ INHOUDSOPGAVE LIJST MET AFKORTINGEN SYMBOLEN ALGEMENE BESCHRIJVING RISYCOR CORROSIE IN THERMISCHE INSTALLATIES MET WATER INHOUD VERPAKKING TOEPASSINGEN INSTALLATIE ACTIVERING BEDIENING / GEBRUIK UITLEZING VERVANGING BUITENDIENSTSTELLING OPMERKINGEN TECHNISCHE GEGEVENS 13.1 UITGANGEN, SIGNALEN, ALARM 13.2 EIGENSCHAPPEN 13.3 ANDERE 13.4 DIMENSIES ACCESSOIRES 14.1 USB-KABEL 14.2... -
Page 3: Lijst Met Afkortingen
■ 1 LIJST MET AFKORTINGEN HVAC Heating, Ventilation, Airconditioning and Cooling (verwarming, ventilatie, airconditioning en koeling) Universal Serial Bus (universele seriële bus) Light Emitting Diode (lichtuitstralende diode) Verein Deutscher Ingenieure (Duitse ingenieursvereniging) Personal Computer Volts Alternating Current (Volt wisselspanning) Volts Direct Current (Volt gelijkspanning) (m)A (Milli)ampères Millimeter Conformité... -
Page 4: Algemene Beschrijving
Voor meer informatie over Risycor, ga naar www.resus.eu. 3.2 CORROSIE IN THERMISCHE INSTALLATIES MET WATER Zie ook www.resus.eu voor een meer gedetailleerde uitleg... -
Page 5: Inhoud Verpakking
■ 4 INHOUD VERPAKKING • Corrosiemonitor (logger-sonde combinatie) met beschermdop + bijsluiter • Kapventielarmatuur • Aftapkraan • Netadapter • Kabelbinder met label voor vergrendeling kapventielarmatuur • Kabelbinder voor trekontlasting kabel van netadapter • Handleiding • Montagegids... -
Page 6: Toepassingen
De meetresultaten in chemisch behandelde installaties moeten dus met voorbehoud worden geïnterpreteerd. Voor meer gedetailleerde informatie over de toepassing van de corrosiemonitor verwijzen wij naar www.resus.eu. -
Page 7: Installatie
■ 6 INSTALLATIE Zie ook het document ‘Toepassingsrichtlijn’ waar de filosofie rond het gebruik van de Risycor in detail wordt toegelicht (www.resus.eu). VOORBEREIDING • Normaal gebruik in retour naar warmtegenerator De kapventielarmatuur met corrosiemonitor wordt ingebouwd in de retourleiding van de verwarmingsinstallatie. De doorstroomrichting speelt geen rol. - Page 8 Alternatieve inzet in expansieleiding Op grote installaties is een corrosiemonitor aanbevolen in de expansieleiding zélf. AANVOER RETOUR EXPANSIEVAT BIJVULLEIDING RISYCOR CBU + ZEROFIX BLINDPLUG • Kies een plaats met voldoende ruimte rondom. • Vermijd plaatsing van de corrosiemonitor in extreem zonlicht en oriënteer de corrosiemonitor in een positie waarbij de connectoren beschermd zijn tegen spatwater.
- Page 9 • Het expansievat kan rechtstreeks ingeschroefd worden in het kapventielarmatuur of via een stuk leiding. • Zorg ervoor dat er een stopcontact in de buurt is.
-
Page 10: Montage
MONTAGE Monteer de kapventielarmatuur in de retourleiding. Uiteraard moet het betreffende leidingdeel daartoe drukloos zijn. 2. Schroef de aftapkraan in het kapventielarmatuur. 3. Draai de hendel van het kapventielarmatuur loodrecht t.o.v. de leiding. 4. Verwijder de beschermdop van de sonde. - Page 11 5. De corrosiemonitor kan vervolgens d.m.v. bajonet montage in de armatuur geplaatst worden. Let er op dat u de sondetip niet beschadigt bij het inbrengen. OPGELET! Let op de 3 stappen. 6. Zorg ervoor dat de aftapkraan gesloten is. Draai de hendel 90° in uurwijzerzin tot in zijn normale werkingspositie (=volle doorlaat).
- Page 12 8. Borg deze positie d.m.v. de bijgeleverde kabelbinder. Schrijf op het label van deze kabelbinder de datum van ingebruikname. Borging met bijvoorbeeld een bout en moer of hangslot (in de daarvoor voorziene gaten) is ook mogelijk. 9. Vul de installatie (of het betreffende deel) opnieuw met water. Zet het geheel op de juiste druk.
- Page 13 De corrosiemonitor functioneert evenwel nog steeds niet. 4. Instellen grenswaarde voor de jaarlijkse corrosiesnelheid. De grenswaarde is vooringesteld op 24 μm per jaar. Via de Resus PC Dashboard-software kan deze waarde worden aangepast (zie hoofdstuk 9, uitlezing).
-
Page 14: Bediening / Gebruik
■ 8 BEDIENING / GEBRUIK CORROSIE LED MONITOR LED OK LED POTENTIAALVRIJ CONTACT MINI-USB CONNECTOR SONDETIP www.resus.eu info@resus.eu 1. LEDs: POTENTIAALVRIJ PROBLEEM ACTIE OPLOSSING CONTACT Alles goed Gesloten Oorzaak opsporen en Te hoge corrosiesnelheid Open verhelpen Contacteer installateur, Risycor is defect... - Page 15 alarmtoestand nog steeds actief kan zijn. 3. De ‘MINI-USB’-uitgang heeft twee functies: • De logger verbinden met het net d.m.v. de meegeleverde USB- netadapter; • De meetdata via een aparte datakabel USB/mini-USB (zie hoofdstuk 14, accessoires) downloaden (zie hoofdstuk 9, uitlezing). 4.
-
Page 16: Uitlezing
LED op de Risycom weer aangeeft dat de verbinding mag worden losgekoppeld. Het SD geheugenkaartje bevat nu alle data, die in de PC via de Resus PC Dashboard software verder kunnen geanalyseerd worden. 5. Vergeet niet de netadapter weer aan de logger aan te sluiten. -
Page 17: Vervanging
■ 10 VERVANGING Bij defect of wanneer de sondetip opgebruikt is, moet de corrosiemonitor worden vervangen. De corrosiemonitor kan eenvoudig worden gedemonteerd zonder de volledige installatie drukloos te maken. Verwijder de netadapter. 2. Verwijder de kabelbinder. 3. Draai de hendel van het kapventielarmatuur loodrecht t.o.v. de leiding, zodat het expansievat van de installatie wordt afgesloten. - Page 18 expansievat volledig te ledigen. 5. De corrosiemonitor kan verwijderd worden uit het kapventielarmatuur. 6. Er kan een nieuwe corrosiemonitor worden gemonteerd zoals beschreven staat vanaf stap 3 bij montage in hoofdstuk 6, Installatie. De vervanging van de corrosiemonitor moet met voldoende voorzichtigheid worden uitgevoerd door een gekwalificeerd persoon.
-
Page 19: Buitendienststelling
Bij het einde van de levenscyclus kan de corrosiemonitor uit dienst worden genomen. Zie hoofdstuk 10, Vervanging voor de uitbouw. Wat te doen met de oude corrosiemonitor? Gelieve terug te sturen naar Resus (zie achteraan voor de adresgegevens). Gooi deze niet weg. De uitbouw van de corrosiemonitor moet met voldoende voorzichtigheid worden uitgevoerd door een gekwalificeerd persoon. -
Page 20: Technische Gegevens
■ 13 TECHNISCHE GEGEVENS 13.1 UITGANGEN, SIGNALEN, ALARM Visueel • Diverse LEDs voor weergave van de bedrijfs- en alarmstatus USB: • Uitlezing van het geheugen Potentiaalvrij contact voor: • Gebouwbeheersysteem, afstandsbewaking, andere signaalgever (SMS module, geluidshoorn, lichtflits, …), stilleggen ketel, ... De alarmvoorwaarden zijn: •... -
Page 21: Andere
• Potentiaalvrij contact: - nominaal 48 VDC, 100 mA of 48 VAC RMS 80 mA - max. 350 mA @ <10 ms - IP52 13.3 ANDERE • Automomie geheugen: 10+ jaar • Dataopslag: elke 7 uur 13.4 DIMENSIES (NOMINAAL) • Logger-sonde combinatie: 72 mm * 52,5 mm * 53 mm •... -
Page 22: Accessoires
■ 14 ACCESSOIRES 14.1 USB-KABEL Voor de uitlezing van de logger wordt een standaard datakabel USB/ mini-USB gebruikt (in de reguliere handel verkrijgbaar). 14.2 RISYCOM De Risycom is een draagbaar toestel om de verzamelde data eenvoudig te kopiëren op een SD kaartje (.CSV files). 14.3 RISYALERT De Risyalert is een module die aan het potentiaalvrij contact van een Risycor tussengeschakeld kan worden bij afwezigheid van een... -
Page 23: Conformiteitsverklaring
■ 15 CONFORMITEITSVERKLARING DECLARATION OF CONFORMITY Resus Industries NV Kleine Monnikenwerve 9, 8000 Brugge, Belgium. Risycor CBU declares, that the product conforms to the following Product Specifications and Regulations: EMC: EN 55032:2012 Emission EN 5516-2-3:2010 + A1:2010 Enclosure Power Port Radiated Emission EN 55024:2010 Immunity;... -
Page 24: Normen En Richtlijnen
■ 16 NORMEN EN RICHTLIJNEN De volgende normen en richtlijnen zijn van toepassing op het thema corrosie in verwarmings- en/of koelinstallaties (niet beperkende lijst). Europa: EN 14868: Bescherming van metalen tegen corrosie - Richtlijn voor de beoordeling van corrosiewaarschijnlijkheid in gesloten watercirculatiesystemen. -
Page 25: Contact
Resus-corrosiemonitoren zorgen zo voor een veel langere levensduur van uw verwarmings- en koelinstallatie, een hoger comfort, minder ongewenste kosten en een belangrijke besparing van energie en grondstoffen. - Page 26 ■ TABLE OF CONTENTS LIST OF ABBREVIATIONS SYMBOLS GENERAL DESCRIPTION RISYCOR CORROSION IN WATER-BASED THERMAL INSTALLATIONS CONTENT OF THE PACKAGING APPLICATIONS INSTALLATION ACTIVATION OPERATION / USE READOUT REPLACEMENT DECOMMISSIONING REMARKS TECHNICAL DATA 13.1 OUTPUTS, SIGNALS, ALARMS 13.2 PROPERTIES 13.3 MISCELLANEOUS 13.4 DIMENSIONS ACCESSOIRES...
-
Page 27: List Of Abbreviations
■ 1 LIST OF ABBREVIATIONS HVAC Heating, Ventilation, Air conditioning and Cooling Universal Serial Bus Light Emitting Diode Association of German Engineers (Verein Deutscher Ingenieure) Personal Computer Volts Alternating Current Volts Direct Current (m)A (Milli)ampères Millimetre European Conformity (Conformité Européenne) (in agreement with European legislation) Electro-magnetic Compatibility RoHS Restriction of Hazardous... -
Page 28: General Description
For more information about Risycor, please go to www.risycor.eu. 3.2 CORROSION IN WATER-BASED THERMAL INSTALLATIONS See also ww.resus.eu for a more detailed explanation. about corrosion in hydronic systems. -
Page 29: Content Of The Packaging
■ 4 CONTENT OF THE PACKAGING • Corrosion monitor (logger-probe combination) with protective cap + instructions for use • Lockshield valve device • Drain valve • Mains adaptor • Tie wrap with label for fixing the lockshield valve device • Tie wrap for the strain relief of the mains adaptor •... -
Page 30: Applications
The measurement results in chemically treated installations should therefore be interpreted with caution. For more detailed information about the application of the corrosion monitor, please refer to www.resus.eu. -
Page 31: Installation
■ 6 INSTALLATION See also the ‘Application Guideline’ document, where the philosophy of the use of the Risycor is explained in detail (www.resus.eu). PREPARATION • Normal use in the return line to the heat generator The lockshield valve device with corrosion monitor is fitted into the return line of the heating installation. - Page 32 • Alternative deployment as a corrosion monitor without a connected expansion vessel For example, instead of a Risycor X on pipe diameters < DN25 RETURN Return RISYCOR CBU + ZEROFIX BLIND PLUG Alternative deployment in expansion line In large installations, a corrosion monitor is recommended in the expansion line itself.
- Page 33 protected against splashing water. • The expansion vessel may be screwed directly into the lockshield valve device or via a length of pipe. • Ensure that there is an electrical outlet nearby.
- Page 34 INSTALLATION Mount the lockshield valve device in the return line. The relevant part of the line must be de-pressurised for this purpose, of course. 2. Screw the drain valve into the lockshield valve device. 3. Turn the lever of the lockshield valve device perpendicular relative to the pipeline.
- Page 35 5. The corrosion monitor may then be placed in the fixture by means of bayonet mounting. Be careful not to damage the probe tip when inserting. CAUTION! Pay attention to the 3 steps. 6. Ensure that the drain valve is closed. Turn the lever 90°...
- Page 36 8. Secure this position using the supplied tie wrap. Write the date of installation on the label of this tie wrap. Securing with, for example, a nut and bolt or padlock is also possible (using the appropriate holes). 9. Refill the installation (or the corresponding part) with water. Then set everything to the correct pressure.
- Page 37 The corrosion monitor will still not function, however. 4. Set the limit for the annual corrosion rate. The threshold value is pre-set to 24 μm per year. This value can be changed via the Resus Dashboard software (see Chapter 9, Read-out).
-
Page 38: Operation / Use
■ 8 OPERATION / USE CORROSION LED MONITOR LED OK LED VOLT-FREE CONTACT MINI-USB CONNECTOR PROBE TIP www.resus.eu info@resus.eu 1. LEDs: VOLT-FREE PROBLEM ACTION SOLUTION CONTACT Everything ok Closed Corrosion speed too high Iden� fy cause and solve Open Contact installer, check... - Page 39 condition may still be active. 3. The ‘MINI-USB’ outlet has two functions: • To connect the logger to the mains by means of the supplied USB mains adaptor; • To download the measurement data via a separate USB/mini-USB data cable (see Chapter 14, Accessories) (see Chapter 9, Read- out).
-
Page 40: Readout
Risycom indicates that the connection can be disconnected. The SD memory card now contains all the data, which can be further analysed in the PC using the Resus PC Dashboard software. 5. Do not forget to reconnect the mains adaptor to the logger. -
Page 41: Replacement
■ 10 REPLACEMENT If a fault occurs, or when the sensor tip has been used up, the probe must be replaced. The corrosion monitor can be easily dismantled without having to de- pressurise the complete installation. Remove the mains adaptor. 2. - Page 42 4. Connect a hose to the hose connector, and open the drain valve to completely empty the expansion vessel. 5. The corrosion monitor can then be removed from the lockshield valve device. 6. A new corrosion monitor can now be mounted as described from step 3 for installation in Chapter 6, Installation.
-
Page 43: Decommissioning
See Chapter 10, Replacement for the dismantling instructions. What should be done with the old corrosion monitor? Please return to Resus (see reverse for address). Do not throw it away. The replacement of the corrosion monitor must be carried out with the necessary caution by a qualified person. -
Page 44: Technical Data
■ 13 TECHNICAL DATA 13.1 OUTPUTS, SIGNALS, ALARMS Visual • Various LEDs for displaying the operational and alarm status USB: • Memory readout Volt-free contact for: • Building management system, remote surveillance, other signal transmitter (SMS module, claxon, flash of light ...), shutting down of the boiler, ... -
Page 45: Dimensions
• Power consumption: 2.5 W • Volt-free contact: - nominal 48 VDC, 100 mA or 48 VAC RMS 80 mA - max. 350 mA @ <10 ms • IP52 13.3 OTHERS • Autonomy of the memory: 10+ years • Data storage: every 7 hours 13.4 DIMENSIONS (NOMINAL) •... -
Page 46: Accessories
■ 14 ACCESSORIES 14.1 USB CABLE A separate USB/mini-USB data cable is used for reading out the logger (available on the normal market). 14.2 RISYCOM The Risycom is a portable device for the convenient copying of collected data on SD card (.CSV files). 14.3 RISYALERT The Risyalert is a module that can be connected to the volt-free contact of a Risycor in the absence of a building management system. -
Page 47: Declaration Of Conformity
■ 15 DECLARATION OF CONFORMITY DECLARATION OF CONFORMITY Resus Industries NV Kleine Monnikenwerve 9, 8000 Brugge, Belgium. Risycor CBU declares, that the product conforms to the following Product Specifications and Regulations: EMC: EN 55032:2012 Emission EN 5516-2-3:2010 + A1:2010 Enclosure Power Port Radiated Emission EN 55024:2010 Immunity;... -
Page 48: Standards And Directives
■ 16 STANDARDS AND DIRECTIVES The following standards and directives are applicable to the subject of corrosion in heating and/or cooling installations (non exhaustive list). Europe: EN 14868: Bescherming van metalen tegen corrosie - Richtlijn voor de beoordeling van corrosiewaarschijnlijkheid in gesloten watercirculatiesystemen. -
Page 49: Contact
Resus corrosion monitors thereby ensure a much longer service life of your heating and cooling system, improved living comfort, fewer unwanted costs and significant savings on energy and raw materials. - Page 50 ■ TABLE DES MATIÈRES LISTE D’ABRÉVIATIONS SYMBOLES DESCRIPTION GÉNÉRALE RISYCOR CORROSION DES INSTALLATIONS THERMIQUES À EAU CONTENU DE L’EMBALLAGE APPLICATIONS INSTALLATION ACTIVATION COMMANDE/UTILISATION AFFICHAGE REMPLACEMENT MISE HORS SERVICE REMARQUES CARACTÉRISTIQUES TECHNIQUES 13.1 SORTIES, SIGNAUX, ALARMES 13.2 PROPRIÉTÉS 13.3 AUTRES 13.4 DIMENSIONS ACCESSOIRES 14.1...
-
Page 51: Liste D'abréviations
■ 1 LISTE D’ABRÉVIATIONS HVAC Heating, Ventilation, Airconditioning and Cooling (chauffage, ventilation, climatisation et refroidissement) Universal Serial Bus (bus sériel universel) Diode électroluminescente Verein Deutscher Ingenieure (Association des ingénieurs allemands) Personal Computer (ordinateur personnel) Volts en courant alternatif Volts en courant continu (m)A (Milli)ampères Millimètre Conformité... -
Page 52: Description Générale
Pour davantage d’informations concernant Risycor, consultez www. resus.eu. 3.2 CORROSION DES INSTALLATIONS THERMIQUES À EAU Consultez également www.resus.eu pour une explication plus détaillée sur la corrosion dans des installations hydroniques. -
Page 53: Contenu De L'emballage
■ 4 CONTENU DE L’EMBALLAGE • Moniteur de corrosion (combinaison enregistreur-sonde) avec capuchon + instructions d’utilisation • Armature de vanne à capuchon • Vanne de vidange • Adaptateur d’alimentation secteur • Attache autobloquante avec étiquette pour verrouillage de l’armature de vanne à capuchon •... -
Page 54: Applications
■ 5 APPLICATIONS Le Risycor est un moniteur de corrosion conçu pour les installations thermiques à eau. Il est ressorti de diverses études portant sur les processus de corrosion affectant les installations de chauffage ainsi que de plusieurs recommandations (voir le chapitre 16 « Normes et recommandations ») que la corrosion est un phénomène relativement complexe influencé... -
Page 55: Installation
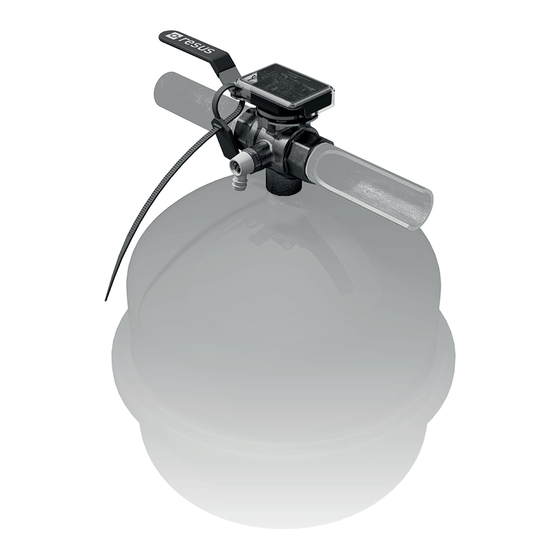
Pour davantage d’informations détaillées sur l’application du moniteur de corrosion, consultez www.risycor.eu. ■ 6 INSTALLATION Voir également le document « Directive d’application » qui détaille la philosophie relative à l’utilisation du Risycor (www.resus.eu). PRÉPARATION • Utilisation normale dans un retour vers le générateur de chaleur L’armature de vanne à... - Page 56 • Installation alternative comme moniteur de corrosion sans vase d’expansion raccordé Par exemple au lieu du Risycor X sur des sections < DN25 RETOUR Retour RISYCOR CBU + ZEROFIX BOUCHON Installation alternative dans le tuyau d’expansion Dans les grandes installations, un moniteur de corrosion est recommandé...
- Page 57 protéger les connecteurs des projections d’eau. • Le vase d’expansion peut directement être vissé dans l’armature de vanne à capuchon ou via un tuyau. • Veillez à disposer d’une prise électrique à proximité.
-
Page 58: Montage
MONTAGE Montez l’armature de vanne à capuchon dans le retour. Bien entendu, la partie du tuyau concernée ne peut être sous pression. 2. Vissez la vanne de vidange dans l’armature de vanne à capuchon. 3. Tournez la manette de l’armature de vanne à capuchon perpendiculairement au tuyau. - Page 59 5. Le moniteur de la corrosion peut ensuite être placé à l’aide de la baïonnette de montage dans l’armature. Veillez à ne pas endommager l’extrémité de la sonde lors de la pose. ATTENTION ! Notez les 3 étapes. 6. Veillez à ce que la vanne de vidange soit fermée. Tournez la manette à...
- Page 60 8. Sécurisez cette position à l’aide de l’attache autobloquante fournie. Notez la date de la mise en service sur l’étiquette de cette attache autobloquante. Il est également possible de sécuriser à l’aide d’un boulon et d’un écrou ou d’un verrou (dans le trou prévu à cet effet), par exemple.
- Page 61 ■ 7 ACTIVATION ATTENTION ! L’activation du moniteur de corrosion doit se faire : • dans une nouvelle installation : avant le premier remplissage/ rinçage avec de l’eau ; • dans une installation existante : au montage. Connectez l’adaptateur d’alimentation secteur à la prise électrique la plus proche et branchez l’enregistreur de données au secteur.
- Page 62 4. Réglez la valeur limite de la vitesse de corrosion annuelle. La valeur limite est préréglée à 24 μm par an. Elle peut être adaptée par le biais du logiciel Resus PC Dashboard (voir chapitre 9 « Affichage »).
-
Page 63: Commande/Utilisation
■ 8 COMMANDE/UTILISATION DEL CORROSION DEL MONITEUR DEL OK CONTACT LIBRE DE POTENTIEL CONNECTEUR MINI-USB EXTRÉMITÉ DE LA SONDE www.resus.eu info@resus.eu 1. DEL : CONTACT LIBRE PROBLÈME ACTION SOLUTION DE POTENTIEL Tout va bien Fermé Vitesse de corrosion trop Iden� fi ez la cause et Ouvert élevée... - Page 64 l’état de l’alarme puisse encore être actif. 3. La sortie MINI-USB présente deux fonctions : • Raccorder l’enregistreur de données au réseau à l’aide de l’adaptateur d’alimentation secteur USB ; • Télécharger les données de mesure (voir chapitre 9 « Affichage ») par le biais d’un câble USB/mini-USB séparé...
-
Page 65: Affichage
4. Les données de mesure peuvent être lues, de même que les données permettant l’analyse des alarmes. En cas de connexion avec un PC : suivez les instructions du manuel du Resus PC Dashboard. En cas de connexion avec le Risycom : appuyez sur le bouton « Télécharger »... -
Page 66: Remplacement
■ 10 REMPLACEMENT En cas de défaillance ou d’usure de l’extrémité de la sonde, il convient de procéder au remplacement du moniteur de corrosion. Le moniteur de la corrosion peut être facilement démonté sans mettre l’installation complètement hors pression. Retirez l’adaptateur d’alimentation secteur. 2. - Page 67 4. Raccordez un tuyau à la décharge de la vanne de vidange et videz complètement le vase d’expansion. 5. Le moniteur de corrosion peut être retiré de l’armature de vanne à capuchon. 6. Un nouveau moniteur de corrosion peut être monté conformément à...
-
Page 68: Mise Hors Service
Voir chapitre 10 « Remplacement » pour le démontage. Que faire du moniteur de corrosion usagé ? Veuillez le renvoyer à Resus (voir les coordonnées ci-après). Ne le jetez pas à la poubelle ! Le démontage du moniteur de corrosion doit être exécuté avec la prudence requise par un technicien qualifié. -
Page 69: Caractéristiques Techniques
■ 13 CARACTÉRISTIQUES TECHNIQUES 13.1 SORTIES, SIGNAUX, ALARMES Visuel • Différentes DELs pour montrer l’état de fonctionnement et d’alarme Port USB : • Lecture de la mémoire Contact libre de potentiel pour : • Système de gestion d’un bâtiment, surveillance à distance, autre émetteur de signaux (module SMS, corne sonore, flash de lumière, etc.), arrêt de la chaudière, etc. -
Page 70: Autres
Electriques : • Adaptateur d’alimentation secteur : CEE 7/16, 230 VCA, 50 Hz 5 VDC mini-USB • Puissance absorbée: : 2,5 W • Contact libre de potentiel : - nominale 48 VDC, 100 mA ou 48 VAC RMS 80 mA - max. -
Page 71: Accessoires
■ 14 ACCESSOIRES 14.1 CÂBLE USB Pour l’affichage de l’enregistreur de données, il convient d’utiliser un câble USB/mini-USB standard (disponible dans le commerce). 14.2 RISYCOM Le Risycom est un appareil portable pour copier facilement les données enregistrées sur une carte SD (fichiers .CSV). 14.3 RISYALERT Le Risyalert est un module qui peut être branché... -
Page 72: Déclaration De Conformité
■ 15 DÉCLARATION DE CONFORMITÉ DECLARATION OF CONFORMITY Resus Industries NV Kleine Monnikenwerve 9, 8000 Brugge, Belgium. Risycor CBU declares, that the product conforms to the following Product Specifications and Regulations: EMC: EN 55032:2012 Emission EN 5516-2-3:2010 + A1:2010 Enclosure Power Port Radiated Emission EN 55024:2010 Immunity;... -
Page 73: Normes Et Recommandations
■ 16 NORMES ET RECOMMANDATIONS Les normes et recommandations suivantes s’appliquent au thème de la corrosion dans les installations de chauffage et/ou de refroidissement (liste non exhaustive). Europe : EN 14868 : Bescherming van metalen tegen corrosie - Richtlijn voor de beoordeling van corrosiewaarschijnlijkheid in gesloten watercirculatiesystemen. -
Page 74: Contact
à temps les dommages occasionnés par la corrosion, le tartre et les résidus. Ce moniteur de corrosion Resus veille à un rallongement considérable de la durée de vie de votre installation de chauffage et de refroidissement, un confort accru, une diminution des frais indésirables et des économies... - Page 76 ■ INHALTSVERZEICHNIS ABKÜRZUNGSLISTE SYMBOLE ALLGEMEINE BESCHREIBUNG RISYCOR KORROSION IN WARMWASSER- HEIZUNGSANLAGEN VERPACKUNGSINHALT ANWENDUNGEN EINBAU AKTIVIERUNG BEDIENUNG/BENUTZUNG AUSLESEN AUSTAUSCH AUSSERBETRIEBNAHME WEITERE HINWEISE TECHNISCHE DATEN 13.1 AUSGÄNGE, SIGNALE, ALARM 13.2 EIGENSCHAFTEN 13.3 SONSTIGES 13.4 ABMESSUNGEN Zubehör 14.1 USB-KABEL 14.2 RISYCOM 14.3 RISYALERT KONFORMITÄTSERKLÄRUNG NORMEN UND RICHTLINIEN KONTAKT...
-
Page 77: Abkürzungsliste
■ 1. ABKÜRZUNGSLISTE HVAC Heating, Ventilation, Airconditioning and Cooling (Heizung, Lüftung, Klimatisierung und Kühlung) Universal Serial Bus (universeller serieller Bus) Light Emitting Diode (Leuchtdiode) Verein Deutscher Ingenieure Personal Computer Volts Alternating Current (Volt Wechselstrom) Volts Direct Current (Volt Gleichstrom) (m)A (Milli)Ampere Millimeter Conformité... -
Page 78: Allgemeine Beschreibung
Die Funktion des Kappenventils mit Ablassventil ermöglich die Entleerung des Ausdehnungsgefäßes zur Kontrolle und ggf. Korrektur des Vordrucks. Unter www.resus.eu finden Sie weitere Informationen zu Risycor. 3.2 KORROSION IN WARMWASSER-HEIZUNGSANLAGEN Unter www.resus.eu finden Sie ausführliche Erläuterungen zur Korrosion in hydronischen Systemen. -
Page 79: Verpackungsinhalt
■ 4. VERPACKUNGSINHALT • Korrosionsmonitor (Datenlogger-Sonden-Kombination) mit Schutzkappe + Gebrauchsanweisung • Kappenventilarmatur • Ablassventil • Netzadapter • Kabelbinder mit Etikett zur Verriegelung der Kappenventilarmatur • Kabelbinder zur Zugentlastung des Netzadapterkabels • Betriebsanleitung • Montageanleitung... -
Page 80: Anwendungen
Inhibitoren zugesetzt. Sie verändern das Verhalten der Anlagenwerkstoffe und des Systemwassers, so dass keine gleichmäßige Reaktion mehr vorliegt. Die Messergebnisse in mit Chemikalien behandelten Anlagen müssen daher mit Vorbehalt interpretiert werden. Ausführlichere Informationen zur Verwendung des Korrosionsmonitors finden Sie auf www.resus.eu. -
Page 81: Einbau
■ 6. EINBAU Siehe auch das Dokument „Anwendungsrichtlinie“, in dem die Idee, die hinter der Benutzung von Risycor steht, ausführlich erläutert wird (www.resus.eu). VORBEREITUNG • Normale Verwendung im Rücklauf zum Wärmeerzeuger Die Kappenventilarmatur mit Korrosionsmonitor wird in der Rücklaufleitung der Heizungsanlage eingebaut. Die Strömungsrichtung ist irrelevant. - Page 82 • Alternativer Einsatz als Korrosionsmonitor ohne angeschlossenes Ausdehnungsgefäß Beispielsweise anstelle von Risycor X bei Leitungsdurchmessern < DN25 RÜCKLAUF Rücklauf RISYCOR CBU + ZEROFIX BLINDSTOPFEN Alternativer Einsatz in der Ausdehnungsleitung Bei großen Anlagen empfiehlt sich der Einsatz eines Korrosionsmonitors in der Ausdehnungsleitung selbst. VORLAUF RÜCKLAUF AUSDEHNUNGSGEFÄSS...
- Page 83 starker Sonneneinstrahlung und richten Sie ihn so aus, dass die Anschlüsse spritzwassergeschützt sind. • Das Ausdehnungsgefäß kann direkt an der Kappenventilarmatur angeschraubt oder mit einem Leitungsstück angeschlossen werden. • Achten Sie darauf, dass eine Steckdose in der Nähe ist.
- Page 84 MONTAGE Montieren Sie die Kappenventilarmatur in der Rücklaufleitung. Natürlich muss der betreffende Leitungsabschnitt dazu drucklos sein. 2. Schrauben Sie das Ablassventil an die Kappenventilarmatur. 3. Stellen Sie den Betätigungsgriff der Kappenventilarmatur senkrecht zur Leitung. 4. Entfernen Sie die Schutzhülse von der Sonde.
- Page 85 5. Dann kann der Korrosionsmonitor mit dem Bajonettverschluss an der Armatur befestigt werden. Achten Sie darauf, dass Sie die Sondenspitze beim Einsetzen nicht beschädigen. Achtung! Beachten Sie die 3 Schritte. 6. Achten Sie darauf, dass das Ablassventil geschlossen ist. Drehen Sie den Betätigungsgriff im Uhrzeigersinn um 90° in seine normale Betriebsposition (= voller Durchlass).
- Page 86 8. Sichern Sie diese Position mit dem beiliegenden Kabelbinder. Schreiben Sie das Datum der Inbetriebnahme auf das Etikett am Kabelbinder. Zur Sicherung können Sie auch eine Schraube mit Mutter oder ein Bügelschloss (in den dafür vorgesehenen Löchern) verwenden. 9. Füllen Sie die Anlage (oder den Anlagenabschnitt) wieder mit Wasser.
- Page 87 ■ 7. AKTIVIERUNG Achtung! Die Aktivierung des Korrosionsmonitors muss wie folgt stattfinden: • Bei einer neuen Anlage: Vor der Erstfüllung bzw. dem Durchspülen mit Wasser • Bei einer bestehenden Anlage: Bei der Montage Stecken Sie den Netzadapter in die nächstgelegene Steckdose und schließen Sie den Datenlogger ans Netz an.
- Page 88 Wärmeerzeuger wieder funktioniert. Der Korrosionsmonitor arbeitet jedoch immer noch nicht. 4. Grenzwert für die jährliche Korrosionsrate einstellen. Der Grenzwert ist auf 24 μm pro Jahr voreingestellt. Dieser Wert kann über die Resus PC Dashboard-Software geändert werden (siehe Kapitel 9 – Auslesen).
-
Page 89: Bedienung/Benutzung
■ 8. BEDIENUNG/BENUTZUNG LED KORROSION LED MONITOR OK LED POTENTIALFREIER KONTAKT MINI-USB-ANSCHLUSS SONDESPITZE www.resus.eu info@resus.eu 1. LEDs: POTENTIALFREI- PROBLEM AKTION LÖSUNG ER KONTAKT Alles gut Geschlossen Korrosionsgeschwind- Ursache iden� fi zieren Geöff net igkeit zu hoch und korrigieren Installateur kontak- Risycor ist defekt �... - Page 90 Alarm mehr, auch wenn der Alarmzustand nach wie vor aktiv ist. 3. Der „Mini-USB-Anschluss“ hat zwei Funktionen: • Netzanschluss des Datenloggers mit dem mitgelieferten USB- Netzadapter • Download der Messdaten (siehe Kapitel 9 – Auslesen) über ein separates USB-/Mini-USB-Datenkabel (siehe Kapitel 14 – Zubehör). 4.
-
Page 91: Auslesen
Kapitel 7.1 – Aktivierung). Folgen Sie dem Downloadlink für das Resus PC Dashboard unter www.resus.eu. 2. Laden Sie das Resus PC Dashboard herunter und installieren Sie es. 3. Entfernen Sie das Netzadapterkabel vom Monitor und verbinden Sie den Mini-USB-Anschluss über ein separates USB-/Mini-USB- Datenkabel mit einem PC (siehe Kapitel 14 –... -
Page 92: Austausch
■ 10. AUSTAUSCH Bei einem Defekt oder wenn die Sondenspitze aufgebraucht ist, muss der Korrosionsmonitor ausgetauscht werden. Der Korrosionsmonitor kann einfach ausgebaut werden, ohne dass die gesamte Anlage drucklos sein muss. Entfernen Sie das Netzadapterkabel. 2. Entfernen Sie den Kabelbinder. 3. - Page 93 4. Schließen Sie einen Schlauch an den Schlauchstutzen an und öffnen Sie das Ablassventil, um das Ausdehnungsgefäß vollständig zu entleeren. 5. Nun kann der Korrosionsmonitor aus der Kappenventilarmatur entfernt werden. 6. Ein neuer Korrosionsmonitor kann wie ab Schritt 3 unter Montage in Kapitel 6 –...
-
Page 94: Ausserbetriebnahme
Am Ende der Lebensdauer kann der Korrosionsmonitor außer Betrieb genommen werden. Zum Ausbau siehe Kapitel 10 – Austausch. Was tun mit dem alten Korrosionsmonitor? Bitte senden Sie diesen an Resus zurück (Adresse siehe letzte Seite). Werfen Sie ihn nicht weg. Der Ausbau des Korrosionsmonitors muss mit der nötigen Sorgfalt von einem Fachmann vorgenommen werden. -
Page 95: Technische Daten
■ 13. TECHNISCHE DATEN 13.1 AUSGÄNGE, SIGNALE, ALARM Visuell: • Diverse LEDs zur Anzeige von Betriebs- und Alarmzustände USB: • Auslesen des Speichers Potenzialfreier Kontakt für: • Gebäudemanagementsystem, Fernüberwachung, andere Signalgeber (SMS-Modul, Horn, Lichtblitz,...), Abschaltung Kessel,... Alarm bei: • Zu hohe Korrosionsrate (einstellbar) •... -
Page 96: Abmessungen
• Energieverbrauch: 2,5 W • Potenzialfreier Kontakt: - nominal 48 VDC, 100 mA oder 48 VAC RMS 80 mA - max. 350 mA @ <10 ms - IP 52 13.3 ANDERE • Speicherreichweite: 10+ Jahre • Datenspeicherung: alle 7 Stunden 13.4 ABMESSUNGEN (NOMINAL) • Logger-Sonde Kombination: 72 mm * 52,5 mm * 53 mm •... -
Page 97: Zubehör
■ 14. ZUBEHÖR 14.1 USB-KABEL Zum Auslesen des Datenloggers wird ein Standard-USB-/Mini-USB- Datenkabel verwendet (im regulären Handel erhältlich). 14.2 RISYCOM Risycom ist ein tragbares Gerät um gespeicherte Daten einfach auf SD Karte zu kopieren (.CSV-Dateien). 14.3 RISYALERT Risyalert ist ein Modul, das am potenzialfreien Kontakt von Risycor zwischengeschaltet werden kann, wenn kein Gebäudemanagementsystem existiert. -
Page 98: Konformitätserklärung
■ 15. KONFORMITÄTSERKLÄRUNG DECLARATION OF CONFORMITY Resus Industries NV Kleine Monnikenwerve 9, 8000 Brugge, Belgium. Risycor CBU declares, that the product conforms to the following Product Specifications and Regulations: EMC: EN 55032:2012 Emission EN 5516-2-3:2010 + A1:2010 Enclosure Power Port Radiated Emission EN 55024:2010 Immunity;... -
Page 99: Normen Und Richtlinien
■ 16. NORMEN UND RICHTLINIEN Folgende Normen und Richtlinien gelten im Bereich Korrosion in Heizungs- und/oder Kühlanlagen (Liste nicht vollständig). Europa: EN 14868: Bescherming van metalen tegen corrosie - Richtlijn voor de beoordeling van corrosiewaarschijnlijkheid in gesloten watercirculatiesystemen. Veröffentlichungsdatum: Oktober 2005 EN 12828+A1: Verwarmingssystemen in gebouwen - Ontwerp voor watervoerende verwarmingssystemen Veröffentlichungsdatum: Mai 2014... -
Page 100: Kontakt
Schutz Ihrer Heizungs- und Kühlanlagen beitragen und Sie rechtzeitig vor den besonders schädlichen Auswirkungen von Korrosion, Kesselstein und Rückständen warnen. Die Korrosionsmonitore von Resus ermöglichen so eine wesentlich längere Standzeit Ihrer Heizungs- und Kühlanlagen, mehr Komfort, weniger unerwünschte Kosten und erhebliche Energie- und Materialeinsparungen. - Page 102 Vul hier de datum van ingebruikname in: Naam van installateur: Tel. van installateur: Enter the date of first use here: Name of the installer: Tel. no. of the installer:...
- Page 103 Telefonnummer des Installateurs: Resus en Risycor zijn geregistreerde handelsmerken. Risycor is gepatenteerd. Resus and Risycor are registered trademarks. Risycor is patented. Resus et Risycor sont des marques commerciales déposées. Risycor est breveté. Resus und Risycor sind eingetragene Warenzeichen. Risycor ist patentgeschützt.
- Page 104 If a problem occurs, please contact Resus. En cas de problème, contactez Resus. Wenn ein Problem auftreten sollte, wenden Sie sich bitte an Resus. Resus Distri nv Bredabaan 839 B-2170 Merksem (Antwerp) T +32 3 640 33 91 F +32 3 640 33 93 Belgium info@resus.eu...