Table des Matières
Publicité
Liens rapides
FU1224
KOMO
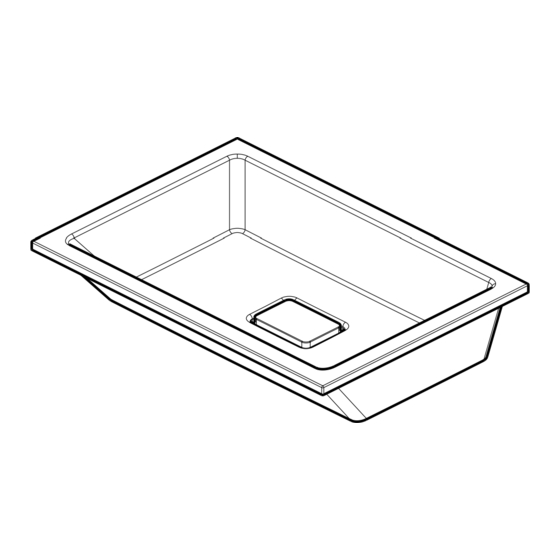
Lavabo en Castylat
MD
Castylat
Lavatory
®
www.KaliaStyle.com
Instructions d'installation - Garantie
Installation Instructions - Warranty
Numéro de série / Serial number
Conserver ce guide après l'installation car il contient des informations utiles pour le service et la garantie.
Keep these instructions after you have finished the installation, it contains useful information regarding service and warranty.
04/13
102114
Publicité
Table des Matières

Manuels Connexes pour Kalia Castylat KOMO FU1224


Sommaire des Matières pour Kalia Castylat KOMO FU1224
- Page 1 FU1224 KOMO Lavabo en Castylat Castylat Lavatory ® www.KaliaStyle.com Instructions d’installation - Garantie Installation Instructions - Warranty Numéro de série / Serial number Conserver ce guide après l’installation car il contient des informations utiles pour le service et la garantie. Keep these instructions after you have finished the installation, it contains useful information regarding service and warranty.
- Page 2 Merci d’avoir choisi Kalia! Thank you for choosing Kalia! Merci d’avoir choisi un produit Kalia et de faire confiance à Thank you for choosing a Kalia product and for placing your notre entreprise. trust in our company. Kalia a une philosophie d’affaires basée sur des valeurs Kalia has a business philosophy based on solid core values fondamentales dont l’innovation et l’excellence ainsi qu’un...
-
Page 3: Renseignements Importants
- Avant d’appliquer du calfeutrant, nettoyer les surfaces à caulking. l’aide d’un linge doux et humide. Kalia reserves the right to make any changes to the design Kalia se réserve le droit d’apporter toute modification au of the product, without notice. Use the installation instruction design du produit et ceci sans préavis. -
Page 4: Service Parts List
KOMO FU1224 Schéma des pièces de rechange Service Parts Diagram Instruction Part list_Vasque Liste des pièces de rechange Service Parts List FU1224_KOMO * Numéro de pièce / Description Qté / Qty Part Number Lavabo / Lavatory 102901 Cache-drain / Drain cover 102106 Gabarit de découpe / Cutting template Outils et matériaux nécessaires... -
Page 5: Etape 1 - Déterminer L'emplacement Du Lavabo
Drill the drain opening by using the right tool as per the type of countertop. Kalia recommends to drill the lavatory faucet holes as per faucet’s installation guide before the finale installation of the vessel if it’s a countertop lavatory faucet this will facilitate... -
Page 6: Etape 2 - Installation Du Drain
Installer le drain selon le guide d’installation du fournisseur. Step 2 - Drain Installation All type of drain can be installed, however Kalia suggests the grid type of drain. Follow the drain installation guide of the supplier to install the drain. -
Page 7: Etape 4 - Installation De Type Encastrée Fig
Aligner le drain avec l’ouverture faite à l’étape 1. Déposer le lavabo sur le comptoir (fig. 4.2). Compléter le raccordement du drain à la plomberie d’évacuation (selon les instructions fournies avec le drain). * Kalia suggère d’utiliser le produit KwikSeal de la ® compagnie DAP pour de meilleur résultat . -
Page 8: Entretien Et Nettoyage
Kalia. Les dommages par un traitement Kalia product. Damages resulting from inappropriate inapproprié ne sont pas couverts par la garantie Kalia. - Page 9 Notes...
-
Page 10: Garantie Limitée
Dans tous les cas, Kalia inc., ne peut être tenue responsable de tout montant excédant le prix d’achat du produit qui a été déboursé... -
Page 11: Warranty & Service
(1) year from the initial date of purchase by the owner/ end-user, contractor or builder from an authorized dealer. If the product is sold by Kalia Inc. as a display item, a one (1) year warranty applies. - Page 12 Kalia inc. 1355, 2e Rue Sainte-Marie (Québec) Canada G6E 1G9 t. 1-418-387-9090 1 877 GO KALIA (1-877-465-2542) f. 1-418-387-9089 www.KaliaStyle.com 102114 Imprimé en Chine / Printed in China...