Publicité
Les langues disponibles
Les langues disponibles
Publicité
Table des Matières

Manuels Connexes pour SOUNDMASTER UR-2010


Sommaire des Matières pour SOUNDMASTER UR-2010
- Page 1 UR - 2010 Bedienungsanleitung Instruction manual Mode d´emploi...
- Page 2 Das Öffnen i s t N U R F a c h p e r s o n a l g e s t a t t e t ! Sicherheits-/Umwelt-/Aufstell-/Montagehinweise • Gerät niemals mit Flüssigkeiten in Verbindung bringen oder in Feuchträumen (z.B. Bad) betreiben.
-
Page 3: Bedienung
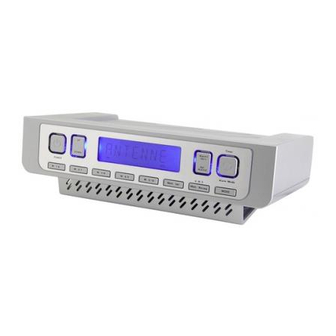
Bedienung 1. Montageplatte bzw. Standfuss 11. Batteriefach Gangreserve 2. Funktionstaste 12. Senderspeichertaste 3. Zeiteinstellung / Sendersuche vorwärts 13. Festsenderspeicher 5/10 4. Alarm 1 / Lautstärke + 14. Festsenderspeicher 4/9 5. Timer / Alarm / Modus / Einstellungen 15. Betriebstaste 6. UKW-FM Wurfantenne 16. - Page 4 Unterbaumontage des Gerätes 1. Suchen Sie eine geeignete und sichere (weit entfernt von Spühle & Herd) Anbaustelle. 2. Drücken Sie die 2 Befestigungsarretierungen auf der Rückseite des Gerätes nach unten und schieben die Montageplatte (1) nach hinten um diese vom Gerät zu nehmen. 3.
- Page 5 Einstellen der Terminerinnerungsfunktion Mit dieser Funktion können Sie bis zu 5 Termine (z.B. Geburtstage) speichern und das Gerät erinnert Sie dann am jeweiligen Tag morgens um Uhr 8.00. Taste (2) MODE 3x drücken (SDA1 & Datum blinkt abwechselnd) Mit Tasten (3) UP & (8) DOWN Erinnerunstermin einstellen. (siehe Einstellung Datum) Mit Taste (5) TIMER kann die Jahreszahl deaktiviert werden und Sie werden dann jedes Jahr am gleichen Tag erinnert.
- Page 6 Weckfunktion Alarm 1 / Alarm 2 Es können 2 unterschiedliche Weckzeiten programmiert werden Weckfunktion Symbol in der Anzeige Mit Radio Mit Signalton Ausgestellt kein Symbol Taste (4) AL1 oder (7) AL2 drücken und in der Anzeige erscheint die zuletzt eingestellte Weckzeit und das Symbol für den Alarmtyp für Alarm 1 oder Alarm 2.
- Page 7 AMS Funktion (autom. Speicherung) Mit dieser Funktion werden Sender mit RDS Signal automatisch gesucht und auf die Speicherplätze verteilt. Gerät mit Taste (15) POWER einschalten Taste (9) MEM-REVIEW AMS drücken und ca. 2 Sekunden halten. Das Gerät startet den Suchlauf und speichert Sender ab. Der Suchlauf kann durch Drücken der Tasten (4) oder (7) gestoppt werden.
-
Page 8: Indications Concernant La Sécurité /La Protection De L'environnement /Le Positionnement /Le Montage
SEUL le personnel c o m p é t e n t est a u t o r i s é à ouvrir le boîtier ! Indications concernant la sécurité /la protection de l’environnement /le positionnement /le montage • Evitez tout contact de cet appareil avec des liquides et ne l’utilisez jamais dans des pièces humides (telles qu’une salle de bain par ex.). -
Page 9: Utilisation
Utilisation Dessous de l’appareil 1. Plaque de montage ou pied 11. Compart. piles réserve de marche 2. Touche de fonction 12. Touche d’enregistr. des stations 3. Réglage heure /Recherche stations avant 13. Enregist. stations fixes 5/10 4. Alarme 1 / Volume + 14. - Page 10 Montage sous-plan de l’appareil 9. Cherchez tout d’abord un endroit adapté à ce type de montage, qui soit sûr (éloigné de l’évier et de la cuisinière). 10. Enfoncez les 2 dispositifs d’arrêt situés sur le dos de l’appareil vers le bas et faîtes glisser la plaque de montage (1) vers l’arrière afin de la retirer de l’appareil.
- Page 11 Vous tenez la touche enfoncée : La date défile par tranche de 10 jours Attention, lorsque vous réglez l’heure et la date, si vous n’appuyez sur aucune touche pendant un espace d’env. 10 secondes, l’appareil revient en mode horaire normal. Réglage de la fonction de rappel de dates A l’aide de cette fonction, vous avez la possibilité...
- Page 12 Programmer minuteur de cuisine Vous avez la possibilité de programmer différents temps à l’aide des touches (17) MEM 1/6 jusqu’à (13) MEM 5/10 (jusqu’à 5 temps de minuteur différents) Appuyez sur la touche (5) TIMER. 10. Réglez le temps voulu à l’aide des touches (3) UP / (8) DOWN. 11.
- Page 13 Marche de la radio Régler la station Appuyer sur la touche (15) POWER. Recherche manuelle : Enfoncez brièvement les touches (3)UP ou (8) DOWN Recherche automatique : Appuyez sur les touches (3)UP ou (8) DOWN et tenez-les enfoncées pendant env. 2 sec. Réglez le volume à...
- Page 14 Fonction de blocage des touches Vous avez la possibilité de bloquer les touches de sorte que les enfants par exemple ne puissent pas modifier les réglages déjà effectués. Appuyez sur la touche (12) MEM.SET jusqu’à ce qu’une clé apparaisse sur l’écran d’affichage.
- Page 15 WARNING: SHOCK HAZARD – DO NOT OPEN!!! Key List 1. Mounting bracket 11. Battery Hatch 2. MODE 12. MEMORY / KEY LOCK 3. UP 13. MEM 5 /10 4. Alarm 1 / VOL + 14. MEM 4/9 5. TIMER/ALARM MODE/SDA MODE 15.
- Page 16 How to used • As the unit is powered up, the date and clock are defaulted to Monday, 1 2007, 0:00 or 12:00AM. • The two alarms are defaulted to 0:00 or 12:00AM, daily type but disabled. • The radio is switched off. •...
- Page 17 steady. • Press <MODE> once to confirm the current setting and it switches to set the SDA. • Press other key to start its corresponding function. • When no key has been pressed for 10 seconds, the current setting is confirmed and it switches to auto-run mode automatically.
- Page 18 • Similar to <M1>, press <M2>, <M3>, <M4> or <M5> to select the desired preset memory value. • Press <UP> or <DOWN> to adjust the value (from 1 minute to 23hours and 59minute), press <TIMER> to start the cooking timer and the current value will store in to memory automatically.
- Page 19 When alarm is active • When the real time clock matches with the alarm which has been enabled, alarm becomes active. • As the alarm becomes active, the Cooking timer, if exists, is terminated immediately. • If Beep sound alarm is selected, Sound of beep toggles at the Speaker Muted Radio even radio ON The duration of alarm is 10 minutes...
- Page 20 • Press and hold <DOWN> to search the next radio station by moving the receiving frequency down. Memory review • When the radio is ON, press <M/SCAN> once to scan the 10 preset memory stations. • The review starts from the next memory station or MEM-1 if no memory station is being selected.
- Page 21 ATENTIE: PERICOL ELECTROCUTARE – NU DESCHIDE!!! Tastele 1. Consola montare 11. Trapa baterie 2. MOD 12. MEMORIE / BLOCARE TASTA 3. SUS 13. MEM 5 /10 4. Alarma 1 / VOL + 14. MEM 4/9 5. Cronometru/MOD ALARMA/MOD SDA 15. PORNIRE 6.
- Page 22 Mod de folosire • La pornirea aparatului, data si ora suunt presetate la luni, 1 ianuarie 2007, 0:00 sau12:00AM. • Cele doua alare sunt presetate la 0:00 sau 12:00AM, zilnic, dar dezactivate. • Radioul este oprit. • Apoi trece in modul auto-functionare. Modul auto-functionare (Radio oprit) •...
- Page 23 zile per actiune. Semnul zilei va fi actualizat automat cand data se stabilizeaza. • Apasati <MOD> o data pentru a confirma setarea curenta si trece la setarea SDA. • Apasati alta tasta pentru a porni functia corespunzatoare. • Cand nu se apasa nici o tasta timp de 10 secunde, setarea curenta este confirmata si trece automat in modul auto-functionare.
- Page 24 anterioara a memoriei-1 se stabilizeaza pe LCD. • La fel ca la <M1>, apasati <M2>, <M3>, <M4> sau <M5> pentru a alege valoarea memoriei presetate dorite. • Apasati <SUS> sau <JOS> pentru a ajusta valoarea (de la 1 minut la 23 ore si 59 minute), apasati <CRONOMETRU>...
- Page 25 terminat. Cand alarma este activa • Cand ceasul real ajunge la ora alarmei care a fost activata, alarma devine activa. • Cand alarma devine activa, cronometrul pentru gatit, daca exista, se termina imediat. • Daca se alege alarma cu sonerie, Soneria trece la difuzor Radioul redus la mut devine radio pornit Durata alarmei este de 10 minute...
- Page 26 (50kHz). • Apasati si tineti <SUS> pentru a cauta urmatorul post radio modificand frecventa de receptie crescator. • Press and hold <DOWN> to search the next radio station by moving the receiving frequency down. Revizuirea memoriei • Cand radioul este pornit, apasati <M/SCAN> o data pentru a scana cele 10 posturi presetate in memorie.