Publicité
Liens rapides
Publicité

Manuels Connexes pour CLIVET BOX 2 950x950


Sommaire des Matières pour CLIVET BOX 2 950x950
- Page 1 BOX 2 950x950 Serie IA3-XY da 70M a 160M M0KA00001-00 10-2021...
- Page 2 Gentile Cliente, La ringraziamo per aver preferito un prodotto CLIVET. Il modello BOX 2 950x950 da Lei scelto, è un prodotto ad elevate prestazioni, di concezione e tecnologia avanzata, di elevata affidabilità e qualità costruttiva. Le suggeriamo di affidarne la gestione e la manutenzione a personale professionalmente qualificato di Sua fiducia, che utilizzi, quando necessario, solo ricambi originali.
- Page 3 INDICE Generalità ............4 4 Manutenzione ..........28 Avvertenze generali e regole per la 4.1 Pulizia dell’unità interna sicurezza 4.2 Pulizia del filtro dell’aria 1.2 Descrizione componenti del sistema 4.3 Pulizia dell’unità esterna 1.3 Accessori 4.4 Riparazione delle perdite di refrigerante 1.4 Identificazione 4.5 Periodi di inutilizzo prolungato 4.6 Manutenzione a inizio stagione...
- Page 4 Avvertenze generali e regole per la sicurezza AVVERTENZA – Il presente manuale è proprietà di CLIVET e ne è vietata la riproduzione o la cessione a terzi dei contenuti del presente documento. Tutti i diritti sono riservati. Esso è parte integrante del prodotto; assicurarsi che sia sempre a corredo dell’apparecchio, anche in caso di vendita/trasferimento ad altro proprietario, affinché...
- Page 5 Generalità ATTENZIONE PERICOLO – Quando si collegano le linee frigorifere, evitare l’ingresso nell’unità di sostanze o gas diversi dal refrigerante specificato. La presenza di altri gas o sostanze può ridurre le prestazioni dell’unità e causare un innalzamento anomalo della pressione nel ciclo di refrigerazione. Questo può generare rischi di esplosione e conseguenti lesioni.
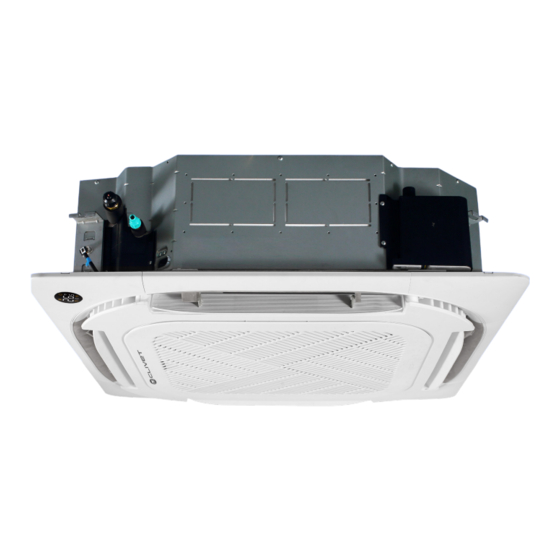
- Page 6 Generalità Descrizione componenti del sistema Fig. 1 1 Pompa di scarico (nell’unità interna) 5 Ingresso aria 2 Uscita aria 6 Display led 3 Feritoia di ventilazione 7 Tubo di drenaggio 4 Griglia anteriore 8 Linee frigorifere AVVERTENZA Le immagini del presente manuale sono fornite a solo scopo illustrativo. L’aspetto del proprio apparecchio può differire leggermente dalle illustrazioni qui riportate.
- Page 7 Generalità Accessori Il condizionatore è provvisto dei seguenti accessori. Per installarlo, usare tutti i componenti e gli accessori d’installazione specificati. Un’installazione non corretta può provocare perdite d’acqua, scosse elettriche e incendi, o causare il malfunzionamento dell’apparecchio. Descrizione Aspetto Quantità Dima di carta per l’installazione Installazione dell’unità...
- Page 8 Generalità Identificazione L’unita interna e l’unità esterna sono identificabili attraverso l’etichetta matricolare che riporta i dati tecnici, prestazionali dell’apparecchio e quanto richiesto dalla Legislazione in vigore. Etichetta matricolare Unità interna Fig. 2 PRESTARE CAUTELA La manomissione, l’asportazione, la mancanza delle etichette di identificazione o quant’altro non permetta la sicura identificazione del prodotto, rende difficoltosa qualsiasi operazione di installazione e manutenzione.
- Page 9 Installazione 2 INSTALLAZIONE Installazione - avvertenze preliminari AVVERTENZA Ricevimento del prodotto Prima di installare l’unità interna, consultare l’etichetta sulla confezione del prodotto L’apparecchio viene fornito imballato in più colli. La per controllare che il numero di modello movimentazione deve essere effettuata con appropriati corrisponda a quello dell’unità...
- Page 10 Installazione Installazione unità interna Carica di refrigerante Superficie minima [kg] 32,8 2.4.1 Locale di installazione 34,7 PRESTARE CAUTELA 36,6 L’apparecchio deve essere collocato in un 38,5 locale ben ventilato, con una superficie minima 7,956 40,1 che varia in base alla quantità di refrigerante presente.
- Page 11 Installazione È VIETATO installare l’unità interna nei È VIETATO installare l’unità interna nei seguenti luoghi: seguenti luoghi: – in un bagno o in un locale adibito a – aree di trivellazione o fracking per estrazione lavanderia, perché l’eccesso di umidità petrolifera;...
- Page 12 Installazione 2.4.2 Appendere l’unità interna 1 Usando la dima di carta in dotazione, realizzare un foro rettangolare nel soffitto lasciando almeno 1 m di >1 m >1 m distanza su tutti i lati. La dimensione del foro dovrà essere 40mm più grande della dimensione del corpo (vedere “Fig.
- Page 13 Installazione Livello dell’acqua Fig. 9 AVVERTENZA Fig. 7 Verificare che l’unità interna sia in posizione orizzontale. L’unità è dotata di una pompa di scarico e di un interruttore a galleggiante. Se AVVERTENZA l’unità viene inclinata in direzione opposta Il lato inferiore dell’unità deve trovarsi 10- a quella del flusso di condensa (con il lato 18 mm più...
- Page 14 Installazione 2.4.3 Predisposizione per i tubi di 2.4.4 Tubo di drenaggio collegamento Il tubo di drenaggio ha la funzione di scaricare l’acqua dall’unità. Un’installazione non corretta può causare È necessario realizzare un foro nella parete in cui far danni all’unità e altri danni materiali. passare le linee frigorifere, il tubo di drenaggio e i cavi elettrici che collegheranno l’unità...
- Page 15 Installazione 3 Collegare l’estremità del tubo di drenaggio al tubo di uscita dell’unità. Avvolgere l’estremità del tubo e Soffitto fissarla saldamente con una fascetta stringitubo. ≤30 cm 1 - 1,5 m Tubo di drenaggio ≤53 cm ≤75 cm 22 cm Fascetta stringitubo metallica Isolamento...
- Page 16 Installazione 2.4.5 Configurazione con due unità interne (TWIN) COMBINAZIONI POSSIBILI Le unità interne TWIN sono progettate per essere installate in una singola stanza. Il comando permette di controllare l’unità principale mentre la secondaria ne esegue le impostazioni di on/off, set-point, modalità...
- Page 17 Installazione Per utilizzare il giunto a Y, tagliare il tubo seguendo lo schema di “Fig. 18” per ottenere le dimensioni corrette ATTENZIONE PERICOLO per adattarsi al tubo interno ed esterno. – Il giunto a Y deve essere installato orizzontalmente. Un angolo superiore a 10° Tubazioni liquido può...
- Page 18 Installazione COLLEGAMENTO UNITÀ TWIN Le 2 unità interne devono essere collegate nella stessa fonte di alimentazione. Collegare i terminali X, Y, E delle unità interne con cavo schermato. Unità interna 1 Unità interna 2 Unità esterna Fig. 20 Alimentazione Alimentazione Segnale unità...
- Page 19 Installazione 2.4.6 Collegamenti elettrici 4 Far passare il cavo di alimentazione e il cavo di segnale dall’uscita per i cavi. Per l’alimentazione e comunicazione tra l’unità interna e quella esterna sono necessari dei cavi con le seguenti caratteristiche: Quadro elettrico Alimentazione Segnale Unità...
- Page 20 Installazione ON-OFF REMOTO Per l’ingresso del morsetto CN23 del comando remoto Morsettiere unità INTERNA Morsettiere unità INTERNA (ON-OFF) e il connettore rapido di JR6 (1)L (2)N Fig. 25 – Rimuovere il connettore rapido di JR6 quando si utilizza la funzione ON-OFF; –...
- Page 21 Installazione VENTILATORE ARIA ESTERNA 2.4.7 Montaggio del pannello Per l’ingresso del morsetto CN8 del nuovo motore dell’aria esterna È VIETATO appoggiare il pannello a faccia in giù sul pavimento, contro una parete o su una superficie irregolare. 1 Rimuovere la griglia anteriore. –...
- Page 22 Installazione 3 Installare il pannello – Agganciare la griglia di aspirazione sul pannello, collegare i connettori del motore della serranda – Allineare il pannello anteriore al corpo principale, e della scatola di controllo sul pannello ai tenendo conto della posizione delle tubazioni corrispondenti connettori del quadro principale.
- Page 23 Installazione – Fissare le coperture di installazione ai quattro angoli spingendole verso l’interno. PRESTARE CAUTELA Se l’unità non viene appesa correttamente e rimane uno spazio vuoto, per garantire un funzionamento corretto sarà necessario regolare l’altezza dell’unità. L’altezza dell’unità può essere regolata allentando il dado superiore e regolando il dado inferiore.
- Page 24 Installazione 2.4.8 Canali derivati Queste unità hanno la possibilità di prevedere dei piccoli canali per climatizzare una piccola stanza vicina. Le unità sono predisposte per la canalizzazione su tutti e 4 i lati. 4-install hanger Body Gas side Liquid side E-parts box Service hole for draining pump...
- Page 25 3 USO ATTENZIONE PERICOLO – Se si verifica una condizione anomala Descrizione componenti del sistema (ad esempio si sente odore di bruciato), spegnere subito l’unità chiedere assistenza al rivenditore per evitare rischi di lesioni, incendio o folgorazione. – EVITARE che l’unità interna o il telecomando si bagnino.
- Page 26 Funzionamento manuale Altre funzioni (senza telecomando) – Impostazioni predefinite Nel caso in cui il telecomando non funzioni, l’unità Quando il condizionatore d’aria si riavvia dopo può essere azionata manualmente con il tasto di un’interruzione della corrente elettrica, vengono comando manuale situato sull’unità interna. Si noti ripristinate le impostazioni predefinite in fabbrica che l’azionamento manuale è...
- Page 27 Telecomando MODE ON/OFF Presenta le modalità Tasto di accensione/ operative nel seguente ordine: spegnimento dell’unità AUTO » COOL » DRY » HEAT » FAN TEMP Aumenta la temperatura a incrementi di 1°C. La temperatura massima è di 30°C Usato per selezionare la TEMP velocità...
- Page 28 Manutenzione 4 MANUTENZIONE Pulizia del filtro dell’aria Il filtro impedisce che polvere e altre particelle entrino È buona norma pulire periodicamente sia le parti nell’unità interna. L’accumulo di polvere può ridurre interne che quelle esterne dell’apparecchio. Questo ne l’efficienza del condizionatore d’aria. Per un’efficienza garantisce il buon funzionamento e la durata nel tempo.
- Page 29 Manutenzione Pulizia dell’unità esterna 3 Staccare la griglia dall’unità principale inclinandola a 45°, sollevandola leggermente e tirandola quindi in Se la batteria dell’unità esterna è intasata, togliere le avanti. foglie e i detriti e poi eliminare la polvere con un getto d’aria o un po’...
- Page 30 Manutenzione Periodi di inutilizzo prolungato Manutenzione a inizio stagione Se si prevede di non utilizzare il condizionatore per un Dopo un lungo periodo di non utilizzo, o prima di un periodo prolungato, procedere come segue: periodo di uso frequente, procedere come segue: Controllare che i cavi siano Pulire tutti i filtri Pulire tutti i filtri...
- Page 31 Manutenzione Ricerca guasti ATTENZIONE PERICOLO Se si dovesse verificare UNA QUALSIASI delle seguenti condizioni, spegnere subito l’unità. – Il cavo di alimentazione è danneggiato o è insolitamente caldo. – Si sente un odore di bruciato. – L’unità emette rumori forti o anomali. –...
- Page 32 Manutenzione 4.7.2 Anomalie e rimedi In caso di problemi, eseguire i seguenti controlli prima di rivolgersi a un centro di assistenza. Anomalie Possibili cause Rimedi È possibile che la temperatura impostata sia più alta della temperatura ambiente Impostare una temperatura più bassa del locale Lo scambiatore di calore dell’unità...
- Page 33 Manutenzione Codici di errore visualizzati sul display dell’unità interna Spia del tem- Codice errore Causa porizzatore EH 00 / Errore parametro EEPROM dell’unità interna EH 0A EL 01 Errore di comunicazione dell’unità da interno/esterno Velocità del ventilatore interno al di fuori dell’intervallo normale (per alcuni EH 03 modelli) EH 60...
- Page 34 Manutenzione CODICI DI ERRORE VISUALIZZATI SUL TELECOMANDO. Per visualizzare gli allarmi utilizzare la funzione “Query mode” dal telecomando (vedere: technical manual special modes). Codice errore Descrizione EH 00 / Errore parametro EEPROM dell’unità interna EH 0A EL 01 Errore di comunicazione dell’unità da interno/esterno EH bA Errore di comunicazione tra l'unità...
- Page 35 Manutenzione Protezione massima temperatura del compressore o protezione dell’alta temperatura del modulo PC 02 PC 40 Errore di comunicazione tra chip principale esterno e chip di azionamento del compressore PC 41 Protezione rilevamento ingresso corrente PC 42 Errore di avvio del compressore PC 43 Protezione mancanza di fase (trifase) PC 44...
- Page 36 Smaltimento 5 SMALTIMENTO Il produttore è iscritto al Registro Nazionale AEE, in RAEE professionali: tutti i RAEE diversi da quelli provenienti conformità all’attuazione della direttiva 2012/19/UE e delle dai nuclei domestici di cui al punto sopra. relative norme nazionali vigenti sui rifiuti di apparecchiature Queste apparecchiature possono contenere: elettriche ed elettroniche.
- Page 37 Allegati 6 ALLEGATI Schemi elettrici unità interna...
- Page 38 EGALE APPRESENTANTE CLIVET S.P.A. - Via Camp Lonc, 25 - Z.I. VILLAPAIERA - 32030 FELTRE (BL) – ITALIA Cap. Soc. Eur 20.000.000 i.v. – C.F. e reg.Impr. BL n°.00708410253 – R.E.A. n°.66577 –P.I./ VAT :IT 00708410253 Tel. +39 0439 3131 - Fax +39 0439 313300 – Sito Web : www.clivet.it...
- Page 39 Allegati...
- Page 40 E IL BENESSERE DELL’INDIVIDUO E DELL’AMBIENTE www.clivet.com vendita e assistenza PRONTO CLIVET ASSISTENZA DEDICATA: PRONTO CLIVET Assistenza SPLIT Clivet (solo Italia): Tel. 041/5099169 Lu-Ve 09:00-20:00, Sa 09:00-12:00 (festivi esclusi) split@clivet.support CLIVET SPA Via Camp Lonc 25, Z.I. Villapaiera 32032 Feltre (BL) - Italy Tel.
- Page 41 BOX 2 950x950 IA3-XY series from 70M to 160M...
- Page 42 Dear Customer, Thank you for choosing a CLIVET product. The BOX 2 950x950 model which you have chosen is a high performance product of advanced design and technology, high reliability and quality construction. We suggest that you entrust its management and maintenance to professionally qualified personnel you trust, who, when necessary, only use original spare parts.
- Page 43 INDEX General Details ..........4 4 Maintenance ........... 28 General warnings and safety rules 4.1 Cleaning the indoor unit 1.2 Description of system components 4.2 Cleaning the air filter 1.3 Accessories 4.3 Cleaning the outdoor unit 1.4 Identification 4.4 Repairing refrigerant leaks 4.5 Extended periods of inactivity 2 Installation ............
- Page 44 WARNING – This manual is the property of CLIVET and reproduction or transfer to third parties of the contents of this document is prohibited. All rights reserved. It is an integral part of the product; make sure that it is always supplied with the appliance, even in case of sale/transfer to another owner, so that it can be consulted by the user or by personnel authorized to carry out maintenance and repairs.
- Page 45 General Details CAUTION DANGER – When connecting refrigerant piping,keep substances or gases other than the specified refrigerant from entering the unit. The presence of other gases or substances can reduce unit performance and cause an abnormal increase in pressure in the refrigeration cycle. This can lead to explosion hazards and resulting injuries. –...
- Page 46 General Details Description of system components Fig. 1 1 Drain pump (in the indoor unit) 5 Air inlet 2 Air outlet 6 Display LED 3 Ventilation slit 7 Drainage pipe 4 Front grille 8 Refrigerant piping WARNING The images in this manual are provided for illustrative purposes only. The appearance of your device may differ slightly from the illustrations shown here.
- Page 47 General Details Accessories The air conditioner is equipped with the following accessories. Use all specified installation components and accessories to install it. Incorrect installation may cause water leakage, electric shock and fire, or cause the unit to malfunction. Description Aspect Quantity Paper template for installation Indoor unit...
- Page 48 General Details Identification The indoor unit and the outdoor unit can be identified by the serial number label that shows the technical and performance data of the unit and what is required by the legislation in force. Serial number label Indoor unit Fig. 2 CAUTION...
- Page 49 Installation 2 INSTALLATION Installation - preliminary warnings WARNING Product receiving Before installing the indoor unit, consult the label on the product package to check that the The appliance is supplied packed in several parcels. model number matches the model number of Handling must be carried out by appropriate means in the outdoor unit.
- Page 50 Installation Indoor unit installation Refrigerant charge Minimum surface [kg] 32.8 2.4.1 Installation room 34.7 CAUTION 36.6 appliance must placed 38.5 well-ventilated room, with a minimum surface 7.956 40.1 area that varies according to the amount of refrigerant present. The following information can help you choose a suitable location for the indoor unit.
- Page 51 Installation It is PROHIBITED to install the indoor It is PROHIBITED to install the indoor unit in the following locations: unit in the following locations: – in a bathroom or laundry room, because – oil extraction drilling or fracking areas; excess humidity can reduce its service life –...
- Page 52 Installation 2.4.2 Hang the indoor unit 1 Using the paper template provided, make a rectangular hole in the ceiling leaving a clearance of at least 1 m >1 m >1 m on all sides. The hole must be 40mm bigger than the body (see “Fig. 4”).
- Page 53 Installation Water level Fig. 9 WARNING Fig. 7 Check that the indoor unit is horizontal. The unit has a drain pump and a float switch. If the unit tilts in the opposite direction to that of WARNING the condensate flow (with the drain pipe side The bottom of the unit must be 10-18 mm higher raised), the float switch may not work properly than the false ceiling.
- Page 54 Installation 2.4.3 Preparation for connection pipes 2.4.4 Drainage pipe It is necessary to make a hole in the wall where the The drainage pipe is used to drain the water from the refrigerant piping, drainage pipe and electrical cables unit. Incorrect installation can cause damage to the unit that will connect the indoor unit to the outdoor unit will and other material damage.
- Page 55 Installation DRAIN TEST 4 If connecting more than one drainage pipe, follow the installation diagram below: Check that the drainage pipe is not blocked. This test must be carried out in new builds before finishing the ceiling. 0-53 cm ≥ 10 cm Fig. 14 WARNING –...
- Page 56 Installation 2.4.5 Configuration with TWIN indoor units POSSIBLE COMBINATIONS TWIN indoor units are designed to be installed in one room. The controller is used to control the main unit while the secondary unit follows the on/off, set-point, operating mode and fan speed settings.
- Page 57 Installation To use the Y joint, cut the pipe following the diagram in “Fig. 18” to fit the internal and external pipe. CAUTION DANGER – The Y joint must be installed horizontally. Liquid pipes An angle of more than 10° can cause 95 ±10 malfunctions.
- Page 58 Installation TWIN UNIT CONNECTION The 2 indoor units must be connected to the same power supply source. Connect the E, Y, X terminals of both indoor units with shielded cable. Indoor unit 2 Indoor unit 1 Outdoor unit Fig. 20 Outdoor unit power Indoor unit power Signal supply...
- Page 59 Installation 2.4.6 Electrical connections 4 Pass the power cable and the signal cable through the cable outlet. Cables with the following characteristics are required for power supply and communication between the indoor and outdoor units: Electrical panel Power supplied Signal from outdoor from outdoor unit unit Indoor...
- Page 60 Installation REMOTE ON-OFF For the input of the remote control terminal CN23 INDOOR unit terminal blocks Morsettiere unità INTERNA (ON-OFF) and the JR6 quick-release connector (1)L (2)N Fig. 25 – Remove the JR6 quick-release connector when using the ON-OFF function; – When the remote switch is OFF (OPEN), the unit will be turned off;...
- Page 61 Installation OUTDOOR AIR FAN 2.4.7 Assembling the panel For the input of terminal CN8 of the new outdoor air motor IT IS PROHIBITED TO place the panel face down on the floor, against a wall or on an uneven surface. 1 Remove the front grille.
- Page 62 Installation 3 Install the panel – Connect the two connectors of the ventilation slit motor to the corresponding cables in the electrical – Align the front panel with the main body, taking panel. into account the position of the pipes and the drain side.
- Page 63 Installation – Fasten the installation covers to the four corners by pushing them inwards. CAUTION If the unit is not hung properly and there is an empty space, the height of the unit will have to be adjusted to ensure correct operation. The height of the unit can be adjusted by unscrewing the top nut and adjusting the bottom nut.
- Page 64 Installation 2.4.8 Derived ducts These units can be fitted with small ducts for air conditioning a small room nearby. The units are designed for ducting on all 4 sides. 4-install hanger Body Gas side Liquid side E-parts box Service hole for draining pump Fig. 36 WARNING...
- Page 65 3 USE CAUTION DANGER – If an abnormal condition occurs (e.g. Description of system components there is a smell of burning), turn the unit off immediately and ask the dealer for assistance to avoid the risk of injury, fire or electrocution.
- Page 66 Manual operation (without remote Other functions control) – Default settings If the remote control does not work, the unit can be When the air conditioner restarts after a power operated manually with the manual control button failure, the factory default settings are restored located on the indoor unit.
- Page 67 Remote control MODE ON/OFF Presents the operating Unit switch-on/off button modes in the following order: AUTO » COOL » DRY » HEAT » FAN TEMP Increases the temperature by 1°C at a time. The maximum temperature is 30°C Used to select the fan speed TEMP from the following options: Reduces the temperature...
- Page 68 Maintenance 4 MAINTENANCE Cleaning the air filter The filter stops dust and other particles from entering the It is good practice to periodically clean both the internal indoor unit. A build-up of dust can reduce the efficiency and external parts of the appliance. This guarantees its of the air conditioner.
- Page 69 Maintenance Cleaning the outdoor unit 3 Detach the grille from the main unit by tilting it 45°, lifting it slightly and then pulling it forward. If the battery in the outdoor unit is clogged, remove the leaves and debris and then remove the dust with a jet of air or water.
- Page 70 Maintenance Extended periods of inactivity Maintenance at the start of the season If you do not plan to use the air conditioner for an extended period of time, proceed as follows: After a long period of non-use, or before a period of frequent use, proceed as follows: Clean all filters Activate the Ventilation mode...
- Page 71 Maintenance Troubleshooting CAUTION DANGER If any of the following conditions occur, turn the unit off immediately. – The power cable is damaged or unusually hot. – You can smell burning. – The unit makes loud or abnormal noises. – A fuse blows or the circuit breaker trips frequently. –...
- Page 72 Maintenance 4.7.2 Anomalies and remedies If problems occur, please check the following before contacting a service centre. Anomalies Possible causes Remedies The set temperature may be higher than Set a lower temperature the room temperature The heat exchanger of the indoor or Clean the heat exchanger (Service Centre) outdoor unit is dirty Remove the filter and clean it following...
- Page 73 Maintenance Error codes displayed on the indoor unit display Error code Cause Timer light EH 00 / Indoor unit EEPROM parameter error EH 0A EL 01 Indoor / outdoor unit communication error EH 03 The indoor fan speed is operating outside of the normal range(for some models) EH 60 Indoor room temperature sensor T1 is in open circuit or has short circuited EH 61...
- Page 74 Maintenance ERROR CODES DISPLAYED ON THE REMOTE CONTROL. Use the “Query mode” function on the remote control to display the alarms (see: technical manual special modes). Error code Description EH 00 / Indoor unit EEPROM parameter error EH 0A EL 01 Indoor / outdoor unit communication error EH bA Communication error between indoor unit and indoor external fan module...
- Page 75 Maintenance PC 02 Top temperature protection of compressor or High temperature protection of IPM module PC 40 Communication error between outdoor main chip and compressor driven chip PC 41 Current Input detection protection PC 42 Compressor start error PC 43 Lack of phase (3 phase) protection PC 44 Outdoor unit zero speed protection...
- Page 76 Disposal 5 DISPOSAL The manufacturer is registered on the National EEE Register, Professional WEEE: all WEEE which comes from something in compliance with implementation of Directive 2012/19/EU other than private households. and pertinent national regulations on electrical and electronic This equipment may contain: equipment waste.
- Page 77 Attachments 6 ATTACHMENTS Indoor unit wiring diagrams...
- Page 78 EGALE APPRESENTANTE CLIVET S.P.A. - Via Camp Lonc, 25 - Z.I. VILLAPAIERA - 32030 FELTRE (BL) – ITALIA Cap. Soc. Eur 20.000.000 i.v. – C.F. e reg.Impr. BL n°.00708410253 – R.E.A. n°.66577 –P.I./ VAT :IT 00708410253 Tel. +39 0439 3131 - Fax +39 0439 313300 – Sito Web : www.clivet.it...
- Page 79 Attachments...
- Page 80 FOR 30 YEARS WE HAVE BEEN OFFERING SOLUTIONS FOR SUSTAINABLE COMFORT THE WELL-BEING OF PEOPLE AND THE ENVIRONMENT www.clivet.com sales and service CLIVET SPA Via Camp Lonc 25, Z.I. Villapaiera 32032 Feltre (BL) - Italy Tel. +39 0439 3131 - Fax +39 0439 313300 info@clivet.it...
- Page 81 BOX 2 950x950 Série IA3-XY de 70M à 160M...
- Page 82 Cher Client, Merci d'avoir choisi un produit CLIVET. Le modèle BOX 2 950x950 que vous avez choisi, est un produit aux hautes performances, avec une conception et une technologie de pointe, d’une excellente fiabilité et d’une fabrication de qualité. Nous vous suggérons de confier la gestion et l’entretien à un personnel professionnellement qualifié de votre choix, qui n'utilise, le cas échéant, que des pièces de rechange d'origine.
- Page 83 INDEX Généralités ............. 4 4 Entretien ............28 Avertissements généraux et consignes 4.1 Nettoyage de l'unité interne de sécurité 4.2 Nettoyage du filtre à air 1.2 Description des composants du système 4.3 Nettoyage de l’unité externe 1.3 Accessoires 4.4 Réparation des fuites de réfrigérant 1.4 Identification 4.5 Périodes d'inutilisation prolongée 4.6 Entretien en début de saison...
- Page 84 MISE EN GARDE – Ce manuel est la propriété de CLIVET et sa reproduction ou le transfert à des tiers du contenu de ce document est interdit. Tous les droits sont réservés. Il fait partie intégrante du produit ; il faut donc s’assurer qu'il est toujours fourni avec l'appareil, même en cas de vente/transfert à...
- Page 85 Généralités ATTENTION DANGER – Lors du raccordement des lignes frigorifiques, éviter l’entrée de substances ou de gaz autres que le réfrigérant spécifié dans l'unité. La présence d'autres gaz ou de substances peut réduire les performances de l'unité et provoquer une augmentation anormale de la pression dans le cycle de réfrigération. Cela peut entraîner des risques d'explosion et des blessures consécutives.
- Page 86 Généralités Description des composants du système Fig. 1 1 Pompe d’évacuation (dans l'unité interne) 5 Entrée air 2 Sortie air 6 Écran LED 3 Volet de ventilation 7 Tuyau de drainage 4 Grille avant 8 Lignes frigorifiques MISE EN GARDE Les images de ce manuel sont fournies à...
- Page 87 Généralités Accessoires Le climatiseur est équipé des accessoires suivants. Pour l'installer, il faut utiliser toutes les pièces et accessoires d'installation spécifiés. Une mauvaise installation incorrecte entraîner des fuites d'eau, des décharges électriques et des incendies, ou provoquer un dysfonctionnement de l'appareil. Description Aspect Quantité...
- Page 88 Généralités Identification L'unité interne et l'unité externe sont identifiables au moyen de l'étiquette du numéro de série qui indique les données techniques, les performances de l'appareil et ce qui est requis par la législation en vigueur en la matière. Étiquette du numéro de série Unité...
- Page 89 Installation 2 INSTALLATION Installation - mises en garde préliminaires Réception du produit MISE EN GARDE L'appareil est livré emballé dans plusieurs colis. Avant d'installer l'unité interne, il faut vérifier La manutention doit être effectuée avec des engins l'étiquette située sur l'emballage du produit de appropriés compte tenu du poids total du colis.
- Page 90 Installation Installation de l’unité interne Charge de réfrigérant Surface minimale [kg] 34,7 2.4.1 Pièce pour l’Installation 36,6 FAIRE ATTENTION 38,5 L'appareil doit être placé dans une pièce bien 7,956 40,1 aérée, avec une surface minimale qui varie en fonction de la quantité de réfrigérant présent. Les indications suivantes peuvent vous aider à...
- Page 91 Installation IL EST INTERDIT d'installer l'unité IL EST INTERDIT d'installer l'unité interne dans les endroits suivants : interne dans les endroits suivants : – dans une salle de bains ou dans une buanderie, – zones de forage ou de fracturation pour car un excès d'humidité...
- Page 92 Installation 2.4.2 Accrocher l’unité interne 1 À l'aide du gabarit en papier fourni, percer un trou rectangulaire dans le plafond en laissant une distance >1 m >1 m d'au moins 1 m de tous les côtés. La taille du trou doit être 40 mm plus grande que la taille du corps (voir “Fig.
- Page 93 Installation Niveau d'eau Fig. 9 MISE EN GARDE Fig. 7 Vérifier que l'unité interne est en position horizontale. L'unité est équipée d'une pompe d’évacuation et d'un interrupteur à flotteur. MISE EN GARDE Si l'unité est inclinée dans le sens opposé à La partie inférieure de l'unité...
- Page 94 Installation 2.4.3 Prédisposition pour les tuyaux de 2.4.4 Tuyau de drainage raccordement Le tuyau de drainage a la fonction d’évacuer l'eau de l'unité. Une mauvaise installation peut endommager Il est nécessaire de faire un trou dans le mur pour faire passer l'unité...
- Page 95 Installation 3 Raccorder l'extrémité du tuyau de drainage au tuyau de sortie de l'unité. Enrouler l'extrémité du tuyau et la Plafond fixer solidement à l’aide d’un collier de serrage. ≤30 cm 1 - 1,5 m Tuyau de drainage ≤53 cm ≤75 cm 22 cm Collier de serrage en...
- Page 96 Installation 2.4.5 Configuration avec deux unités internes (TWIN) COMBINAISONS POSSIBLES Les unités internes TWIN sont conçues pour être installées dans une seule pièce. La commande permet de contrôler l'unité principale alors que la secondaire effectue ses configurations de marche/ arrêt, point de consigne, mode de fonctionnement et vitesse du ventilateur. UNITÀ...
- Page 97 Installation Pour utiliser le joint en Y, couper le tuyau en suivant le schéma de “Fig. 18”» pour obtenir les bonnes dimensions ATTENTION DANGER pour s'adapter au tuyau interne et externe. – Le joint en Y doit être installé horizontalement. Un angle supérieur à...
- Page 98 Installation RACCORDEMENT DE L'UNITÉ TWIN Les 2 unités internes doivent être connectées à la même source d’alimentation. Connecter les bornes E, Y, X des deux unités internes avec le câble blindé. Unité interne 1 Unité interne 2 Unité externe Fig. 20 Alimentation unité...
- Page 99 Installation 2.4.6 Branchements électriques 4 Faire passer le câble d'alimentation et le câble de signal par la sortie des câbles. Pour l'alimentation électrique et la communication entre les unités interne et externe, des câbles ayant les caractéristiques suivantes sont nécessaires : Boîtier électrique Alimentation Signal de l'unité...
- Page 100 Installation ON-OFF À DISTANCE Pour l'entrée de la borne CN23 de la télécommande Morsettiere unità INTERNA Borniers unité INTERNE (ON-OFF) et le connecteur rapide de JR6 (1)L (2)N Fig. 25 – Retirer le connecteur rapide de JR6 lors de l'utilisation de la fonction ON-OFF ; –...
- Page 101 Installation VENTILATEUR AIR EXTÉRIEUR 2.4.7 Montage sur panneau Pour l'entrée de la borne CN8 du nouveau moteur d'air extérieur IL EST INTERDIT de poser le panneau face vers le bas sur le sol, contre un mur ou une surface inégale. 1 Retirer la grille avant.
- Page 102 Installation 3 Installer le panneau – Accrocher la grille d’aspiration sur le panneau, raccorder les connecteurs du moteur du volet – Aligner le panneau avant avec le corps principal, et du boîtier de commande sur le panneau aux en tenant compte de la position des tuyauteries et connecteurs correspondants du tableau principal.
- Page 103 Installation FAIRE ATTENTION – Fixer les couvercles d'installation aux quatre coins Si l'unité n'est pas suspendue correctement en les poussant vers l'intérieur. et qu'il reste un espace vide, il faut régler la hauteur de l'unité pour assurer un bon fonctionnement. La hauteur de l'unité peut être réglée en desserrant l'écrou supérieur et en réglant l'écrou inférieur.
- Page 104 Installation 2.4.8 Conduits dérivés Ces unités ont la possibilité de prévoir de petits conduits pour climatiser une petite pièce voisine. Les unités sont prévues pour la canalisation sur les 4 côtés. Support à 4 installations Corps Côté gaz Côté liquide Boîtier pièces électroniques Trou de service...
- Page 105 Utilisation 3 UTILISATION ATTENTION DANGER – Si une condition anormale se produit Description des composants du (telle qu'une odeur de brûlé), éteindre immédiatement l'unité et contacter le système service après-vente du revendeur pour éviter tout risque de blessure, d'incendie ou d’électrocution.
- Page 106 Utilisation Fonctionnement manuel Autres fonctions (sans télécommande) – Configurations par défaut Si la télécommande ne fonctionne pas, l'unité peut Lorsque le climatiseur redémarre après une être actionnée manuellement à l'aide de la touche coupure de courant, les configurations d'usine de commande manuelle située sur l'unité interne. par défaut (mode AUTO, vitesse du ventilateur Il faut noter que le fonctionnement manuel ne doit être (fan) AUTO, 24°C) sont rétablies.
- Page 107 Utilisation Télécommande ON/OFF MODE Touche de marche/arrêt Affiche les modes de de l’unité fonctionnement dans l'ordre suivant : AUTO » COOL » DRY » HEAT » FAN TEMP Augmente la température par paliers de 1°C. La température maximale est de 30°C Utilisé...
- Page 108 Entretien 4 ENTRETIEN Nettoyage du filtre à air Le filtre empêche la poussière et d’autres particules de Il est recommandé de nettoyer périodiquement les pénétrer dans l'unité interne. L'accumulation de poussière parties internes et externes de l'unité. Cela garantit son peut réduire l'efficacité...
- Page 109 Entretien Nettoyage de l’unité externe 3 Détacher la grille de l'unité principale en l'inclinant à 45°, en la soulevant légèrement puis en la tirant vers l'avant. Si la batterie de l'unité externe est obstruée, il faut enlever les feuilles et les détritus, puis éliminer la poussière à l’aide d’un jet d'air ou d’un peu d'eau.
- Page 110 Entretien Périodes d'inutilisation prolongée Entretien en début de saison En cas de décision de ne pas utiliser le climatiseur pendant Après une longue période de d’inutilisation ou avant une une période prolongée, il faut procéder comme suit : période d'utilisation fréquente, il faut procéder comme suit : Contrôler que les câbles Nettoyer tous les Nettoyer tous les...
- Page 111 Entretien Diagnostic des pannes ATTENTION DANGER Si L’UNE des conditions suivantes se produit, il faut immédiatement éteindre l’unité. – Le cordon d'alimentation est endommagé ou est anormalement chaud. – Il y a une odeur de brûlé. – L'unité émet des bruits forts ou anormaux. –...
- Page 112 Entretien 4.7.2 Anomalies et remèdes En cas de problèmes, il faut effectuer les contrôles suivants avant de contacter un centre de service. Anomalies Causes possibles Remèdes Il est possible que la température configurée soit supérieure à la Configurer une température plus basse température ambiante de la pièce L'échangeur de chaleur de l'unité...
- Page 113 Entretien Codes d’erreur affichés sur l’écran de l’unité interne Voyant Code erreur Cause lumineux du timer EH 00 / Erreur paramètre EEPROM unité intérieure EH 0A EL 01 Erreur communication unité intérieure / extérieure La vitesse du ventilateur intérieur est en dehors de la plage normale (pour EH 03 certains modèles) Le capteur de température ambiante intérieure T1 est en circuit ouvert ou en...
- Page 114 Entretien CODES D’ERREUR AFFICHÉS SUR LA TÉLÉCOMMANDE. Pour afficher les alarmes, utiliser la fonction « Query mode » de la télécommande (voir : manuel technique modes spéciaux). Code erreur Description EH 00 / Erreur paramètre EEPROM unité intérieure EH 0A EL 01 Erreur communication unité...
- Page 115 Entretien Protection contre les températures supérieures du compresseur ou Protection contre les PC 02 températures élevées du module IPM Erreur de communication entre la puce principale extérieure et la puce d’entraînement du PC 40 compresseur PC 41 Protection détection entrée de courant PC 42 Erreur de démarrage du compresseur PC 43...
- Page 116 Élimination 5 ÉLIMINATION Le producteur est inscrit dans le Registre National EEE, Les DEEE professionnels : tous les DEEE autres que ceux conformément à l’application de la directive 2012/19/UE et provenant des foyers domestiques mentionnés au point des réglementations nationales correspondantes en vigueur ci-dessus.
- Page 117 Pièces jointes 6 PIÈCES JOINTES Schémas électrique de l'unité interne...
- Page 118 EGALE APPRESENTANTE CLIVET S.P.A. - Via Camp Lonc, 25 - Z.I. VILLAPAIERA - 32030 FELTRE (BL) – ITALIA Cap. Soc. Eur 20.000.000 i.v. – C.F. e reg.Impr. BL n°.00708410253 – R.E.A. n°.66577 –P.I./ VAT :IT 00708410253 Tel. +39 0439 3131 - Fax +39 0439 313300 – Sito Web : www.clivet.it...
- Page 119 Pièces jointes...
- Page 120 OFFRONS DES SOLUTIONS POUR UN CONFORT DURABLE ET LE BIEN-ÊTRE DES PERSONNES ET DE L’ENVIRONNEMENT ww.clivet.com vente et assistance CLIVET SPA Via Camp Lonc 25, Z.I. Villapaiera - 32032 Feltre (BL) - Italie Tél. +39 0439 3131 - Fax +39 0439 313300 info@clivet.it...
- Page 121 BOX 2 950x950 Serie IA3-XY 70M bis 160M...
- Page 122 Weist darauf hin, dass in diesem Gerät entflammbares Kältemittel enthalten ist. GARANTIE Das Produkt CLIVET verfügt über eine herkömmliche Garantie, die ab dem Kaufdatum des Geräts gültig ist und deren Bedingungen in den ALLGEMEINEN VERKAUFSBEDINGUNGEN unter www.clivet.com aufgeführt sind. WARNUNG –...
- Page 123 INDEX Allgemeines ............ 4 4 Wartung ............28 Allgemeine Hinweise und 4.1 Reinigung der Inneneinheit Sicherheitsregeln 4.2 Reinigung des Luftfilters 1.2 Beschreibung der Systemkomponenten 4.3 Reinigung der Außeneinheit 1.3 Zubehör 4.4 Reparatur von Kältemittellecks 1.4 Kennzeichnung 4.5 Längerer Stillstand 4.6 Wartung zu Saisonbeginn 2 Installation ............
- Page 124 Allgemeine Hinweise und Sicherheitsregeln WARNUNG – Dieses Handbuch ist Eigentum von CLIVET und es ist verboten, den Inhalt dieses Dokuments zu vervielfältigen oder an Dritte weiterzugeben. Alle Rechte vorbehalten. Es ist ein wesentlicher Bestandteil des Produkts, weshalb sicherzustellen ist, dass es das Gerät bei einem Verkauf/einer Übertragung an einen anderen Eigentümer immer begleitet, so dass es vom Benutzer oder dem autorisierten Personal für...
- Page 125 Allgemeines ACHTUNG GEFAHR – Beim Anschluss der Kältemittelleitungen darauf achten, dass keine sonstigen Substanzen oder Gase außer dem spezifizierten Kältemittel in das Gerät gelangen. Sonstige Gase oder Substanzen mindern die Geräteleistung und können anormal hohe Drücke im Kältekreislauf bewirken. Dadurch kann eine Explosion verursacht und können Personen verletzt werden.
- Page 126 Allgemeines Beschreibung der Systemkomponenten Abb. 1 1 Ablasspumpe (in der Inneneinheit) 5 Lufteingang 2 Luftausgang 6 LED-Display 3 Luftleitlamelle 7 Ablassleitung 4 Vorderes Gitter 8 Kältemittelleitungen WARNUNG Die Abbildungen in diesem Handbuch dienen nur zur Veranschaulichung. Die Form und das Design Ihres Geräts können geringfügig von den hier gezeigten Abbildungen abweichen.
- Page 127 Allgemeines Zubehör Die Klimaanlage wird mit folgendem Zubehör geliefert. Für die Installation der Klimaanlage müssen sämtliche Installations- und Zubehörteile verwendet werden. Eine unsachgemäße Installation kann Wasserleckagen, einen Stromschlag, Brand oder den Ausfall des Geräts zur Folge haben. Beschreibung Aussehen Menge Pappschablone für die Installation Installation der...
- Page 128 Allgemeines Kennzeichnung Die Inneneinheit und die Außeneinheit können anhand des Aufklebers mit der Seriennummer bestimmt werden, auf dem die technischen Daten und Leistungsdaten des Geräts sowie die Anforderungen der geltenden Rechtsvorschriften aufgeführt sind. Seriennummernschild Inneneinheit Abb. 2 VORSICHT Die Manipulation, das Entfernen, das Fehlen von Kennzeichnungsetiketten oder alles andere, was die sichere Identifizierung des Produkts unmöglich macht, erschwert alle Installations- und Wartungsarbeiten.
- Page 129 Installation 2 INSTALLATION Installation – einleitende Hinweise WARNUNG Anlieferung des Produkts Vor der Installation der Inneneinheit anhand Aufklebers Gerätekarton Das Gerät wird in mehrere Packstücke verpackt geliefert. sicherstellen, dass die Modellnummer der Die Handhabung muss unter Berücksichtigung des Inneneinheit mit der Modellnummer der Gesamtgewichts des Packstücks mit geeigneten Mitteln Außeneinheit übereinstimmt.
- Page 130 Installation Installation der Inneneinheit Kältemittelfüllung Mindestfläche [kg] 32,8 2.4.1 Aufstellungsort 34,7 VORSICHT 36,6 Das Gerät muss in einem gut belüfteten Raum 38,5 mit einer Mindestfläche aufgestellt werden, 7,956 40,1 die je nach der Menge des vorhandenen Kältemittels variiert. Die folgenden Angaben können bei der Auswahl einer geeigneten Position für die Inneneinheit hilfreich sein.
- Page 131 Installation ES IST VERBOTEN, die Inneneinheit an ES IST VERBOTEN, die Inneneinheit an den folgenden Stellen zu montieren: den folgenden Stellen zu montieren: – In einem Badezimmer oder Wäscheraum, – In Bereichen mit Ölförderung oder Fracking. denn übermäßige Feuchtigkeit kann das Gerät –...
- Page 132 Installation 2.4.2 Einhängen der Inneneinheit 1 Die beiliegende Pappschablone anlegen und einen rechteckigen Ausschnitt in die Decke schneiden. Dabei >1 m >1 m auf allen Seiten einen Abstand von mindestens 1 m lassen. Die Größe des Lochs sollte 40 mm größer sein als die Größe des Körpers (siehe „Abb.
- Page 133 Installation Wasser- spiegel Abb. 9 WARNUNG Abb. 7 Sicherstellen, dass Inneneinheit waagerecht hängt. Das Gerät ist mit einer eingebauten Kondensatpumpe und einem WARNUNG Schwimmerschalter ausgestattet. Wenn Unterseite Geräts muss sich das Gerät entgegen der Fließrichtung des 10-18 mm über der Zwischendecke befinden. Kondenswassers geneigt ist (die Ablaufleitungs- Normalerweise sollte „L“...
- Page 134 Installation 2.4.3 Vorrüstung für die Anschlussrohre 2.4.4 Ablassleitung Ein Loch in die Wand bohren, um die Kältemittelleitungen, Die Ablassleitung dient zur Ableitung des Kondenswassers die Ablassleitung und die Stromkabel durchzuziehen, die aus dem Gerät. Ein fehlerhafter Einbau kann Geräte- und Innen- und Außeneinheit verbinden.
- Page 135 Installation 3 Das Ende der Ablassleitung mit dem Auslassrohr des Geräts verbinden. Das Ende der Leitung isolieren und Decke das Ende mit einer Rohrschelle festspannen. ≤30 cm 1 - 1,5 m Ablassleitung ≤53 cm ≤75 cm 22 cm Rohrschelle aus Metall Isolierung Anschluss der Ablassleitung...
- Page 136 Installation 2.4.5 Konfiguration mit zwei Inneneinheiten (TWIN) KOMBINATIONSMÖGLICHKEITEN Die Inneneinheiten der Baureihe TWIN sind für eine Installation in einem einzigen Raum konzipiert. Mit der Steuerung wird die Haupteinheit gesteuert, während die zweite Einheit gemäß den Einstellungen für Ein/Aus, den Sollwerten, dem Funktionsmodus und der Geschwindigkeit des Ventilators arbeitet. UNITÀ...
- Page 137 Installation Um die Y-Verbindung zu verwenden, das Rohr gemäß der Abbildung von „Abb. 18“ abschneiden, um die richtige WARNUNG Größe für das Innen- und Außenrohr zu erhalten. Darauf achten, dass Länge Kältemittelleitung, die Anzahl der Biegungen Flüssigkeitsleitungen und der Höhenunterschied zwischen Innen- 95 ±10 und Außeneinheit den Anforderungen in Tabelle 7.1 entsprechen.
- Page 138 Installation ANSCHLUSS DER TWIN-EINHEIT Die 2 Inneneinheiten müssen an dieselbe Stromquelle angeschlossen werden. Verbinden Sie die Klemmen X, Y, E beider Inneneinheiten mit einem abgeschirmten Kabel. Inneneinheit 1 Inneneinheit 2 Außeneinheit Abb. 20 Versorgung des Versorgung des Signal Außengeräts Innengeräts TWIN-Konfiguration Kabelanzahl/ Kabelanzahl/...
- Page 139 Installation 2.4.6 Stromanschlüsse 4 Das Netzkabel und das Signalkabel durch den Kabelausgang führen. Für die Stromversorgung und Kommunikation zwischen Innen- und Außeneinheiten sind Kabel mit folgenden Eigenschaften erforderlich: Schalttafel Versorgung vom Signal vom Inne- Außengerät Außengerät neinheit Kabelanzahl/ Kabelanzahl/ Kabelausgang Querschnitt Querschnitt 2 x 1 mm...
- Page 140 Installation REMOTE EIN-AUS Für den Eingang der CN23-Klemme der Fernsteuerung Klemmleisten INNEN-Einheit Morsettiere unità INTERNA (ON-OFF) und des JR6-Schnellanschlusses (1)L (2)N Abb. 25 – Den JR6-Schnellanschluss entfernen, wenn die ON-OFF-Funktion verwendet wird. – Wenn sich der Fernschalter in der Position OFF (ÖFFNEN) befindet, wird das Gerät ausgeschaltet.
- Page 141 Installation AUSSENLUFTVENTILATOR 2.4.7 Montage der Platte Für den Eingang der CN8-Klemme des neuen Außenluftmotors ES IST VERBOTEN Die Platte mit der Vorderseite nach unten auf den Boden, an eine Wand oder auf eine unebene Fläche zu legen. 1 Das vordere Gitter zu entfernen. –...
- Page 142 Installation 3 Die Platte montieren – Das Ansauggitter mit der Blende verbinden, Anschlüsse Klappenmotors – Die vordere Blende mit dem Hauptkörper Anschlusskastens Blende ausrichten, dabei die Position der Leitungen und entsprechenden Anschlüssen die Seite für den Auslass berücksichtigen. Hauptschalttafel verbinden. –...
- Page 143 Installation – Die Montageabdeckungen an den vier Ecken anbringen, sie dafür nach innen schieben. VORSICHT Wenn das Gerät nicht sachgemäß aufgehängt wird und ein Spalt verbleibt, muss die Höhe des Geräts angepasst werden, um einen ordnungsgemäßen Betrieb zu gewährleisten. Die Höhe des Geräts kann durch Lösen der oberen Mutter und Verstellen der unteren Mutter eingestellt werden.
- Page 144 Installation 2.4.8 Ableitungskanäle Diese Geräte haben die Möglichkeit, mit Hilfe von kleinen Kanälen einen kleinen Nebenraum zu klimatisieren. Die Geräte sind an allen 4 Seiten für eine Kanalisierung vorbereitet. 4-Montageaufhängung Körper Gasseite Flüssigkeitsseite Elektrokasten Serviceöffnung für die Entleerung der Pumpe Abb.
- Page 145 Verwendung 3 VERWENDUNG ACHTUNG GEFAHR – Wenn abnormaler Zustand eintritt Beschreibung der (z.B. Brandgeruch), Gerät sofort ausschalten und den zuständigen Händler Systemkomponenten kontaktieren, um die Gefahr von Verletzungen, Feuer oder Stromschlägen zu vermeiden. – Darauf achten, dass die Inneneinheit und die Fernbedienung NICHT nass werden.
- Page 146 Verwendung Manueller Betrieb Sonstige Funktionen (ohne Fernbedienung) – Standardeinstellung Falls die Fernbedienung nicht funktioniert, kann das Beim Wiederanlauf nach einem Stromausfall setzt sich Gerät manuell mit der manuellen Steuertaste an der die Klimaanlage auf die Werkseinstellungen zurück Inneneinheit bedient werden. Man beachte, dass die (AUTO-Modus, Ventilatorgeschwindigkeit (Fan)
- Page 147 Verwendung Fernbedienung MODE (MODUS) ON/OFF (EIN/AUS) Zeigt die Betriebsmodi in der Ein/Aus-Taste des folgenden Reihenfolge an: Geräts AUTO » KÜHLEN» TROCKNEN » HEIZEN » TEMP VENTILATOR Erhöht die Temperatur in Schritten von 1°C. Die Höchsttemperatur beträgt 30°C VENTILATOR Dient zum Auswählen der TEMP Ventilatorgeschwindigkeit aus Reduziert die Temperatur...
- Page 148 Wartung 4 WARTUNG Reinigung des Luftfilters Der Filter verhindert, dass Staub und sonstige Partikel in die Es empfiehlt sich, sowohl die inneren als auch die Inneneinheit gelangen. Staubablagerungen können den äußeren Teile des Geräts regelmäßig zu reinigen. Dies Wirkungsgrad der Klimaanlage verringern. Damit stets eine garantiert seine einwandfreie Funktion und Haltbarkeit.
- Page 149 Wartung 3 Das vordere Gitter aus der Haupteinheit nehmen, 8 Das vordere Gitter wieder anbringen und das indem es auf 45° angewinkelt, leicht nach oben Displaykabel wieder Steuermodul gedrückt und dann nach vorn herausgezogen wird. Gerätekörper anschließen. Reinigung der Außeneinheit Wenn das Register der Außeneinheit verstopft ist, die Blätter und Ablagerungen entfernen und dann den Staub mit einem Luftstrahl oder ein wenig Wasser beseitigen.
- Page 150 Wartung Längerer Stillstand Wartung zu Saisonbeginn Wenn die Klimaanlage über einen längeren Zeitraum Nach einem längeren Stillstand bzw. vor einer Phase des nicht benutzt werden soll, wie folgt vorgehen: häufigen Gebrauchs, folgendermaßen vorgehen: Den Belüftungsmodus Sicherstellen, dass die Alle Filter reinigen Alle Filter reinigen aktivieren, bis das Gerät Kabel nicht beschädigt sind.
- Page 151 Wartung Fehlersuche ACHTUNG GEFAHR In folgenden Fällen muss das Gerät sofort ausgeschaltet werden! – Das Netzkabel ist schadhaft oder stark erwärmt. – Brandgeruch wird bemerkt. – Das Gerät erzeugt laute oder anormale Geräusche. – Eine Sicherung brennt durch oder der Schutzschalter löst häufig aus. –...
- Page 152 Wartung 4.7.2 Störungen und Abhilfen Im Fall von Funktionsstörungen sollten vor einer Kontaktaufnahme mit dem Kundendienst die folgenden Punkte überprüft werden. Störung Mögliche Ursache Abhilfen Die eingestellte Temperatur kann höher sein als die Umgebungstemperatur des Eine niedrigere Temperatur einstellen. Raums. Der Wärmetauscher der Innen- oder der Den Wärmetauscher reinigen (Kundendienst).
- Page 153 Wartung Auf dem Display des Innengeräts angezeigte Fehlercodes Kontrol- Fehlercode Ursache lleuchte der Zeitschaltuhr EH 00 / Innengerät EEPROM-Parameterfehler OFF (AUS) EH 0A EL 01 Kommunikationsfehler Innen-/Außengerät OFF (AUS) Die Geschwindigkeit des Innenraumventilators liegt außerhalb des normalen EH 03 OFF (AUS) Bereichs (bei einigen Modellen) EH 60 Der Innenraumtemperaturfühler T1 hat einen offenen Kreis oder ist kurzgeschlossen...
- Page 154 Wartung AUF DER FERNBEDIENUNG ANGEZEIGTE FEHLERCODES. Um die Alarme einzusehen, verwenden Sie die Funktion „Abfragemodus" der Fernbedienung (siehe: Technisches Handbuch Sondermodi). Fehlercode Beschreibung EH 00 / Innengerät EEPROM-Parameterfehler EH 0A EL 01 Kommunikationsfehler Innen-/Außengerät EH bA Kommunikationsfehler zwischen Innengerät und externem Innenventilatormodul EH 30 Parameterfehler des externen Innenraumventilators EH 35...
- Page 155 Wartung PC 02 Hochtemperaturschutz des Verdichters oder Hochtemperaturschutz des IPM-Moduls PC 40 Kommunikationsfehler zwischen dem Hauptchip im Außenbereich und dem verdichtergesteuerten Chip PC 41 Stromeingangserkennungsschutz PC 42 Fehler beim Starten des Verdichters PC 43 Fehlender Phasenschutz (3 Phasen) PC 44 Schutz des Außengeräts bei Nullgeschwindigkeit PC 45 Fehler 341PWM...
- Page 156 Entsorgung 5 ENTSORGUNG Der Hersteller ist gemäß der Umsetzung der Richtlinie Gewerbliche Elektro- und Elektronikaltgeräte: alle 2012/19/EU und der einschlägigen nationalen Vorschriften Elektro- und Elektronikaltgeräte, die nicht aus den oben für Elektro- und Elektronikaltgeräte im nationalen genannten Haushalten stammen. AEE-Register registriert. Diese Geräte können enthalten: Die Richtlinie schreibt die fachgerechte Entsorgung von –...
- Page 157 Anlagen 6 ANLAGEN Schaltpläne Inneneinheit...
- Page 158 EGALE APPRESENTANTE CLIVET S.P.A. - Via Camp Lonc, 25 - Z.I. VILLAPAIERA - 32030 FELTRE (BL) – ITALIA Cap. Soc. Eur 20.000.000 i.v. – C.F. e reg.Impr. BL n°.00708410253 – R.E.A. n°.66577 –P.I./ VAT :IT 00708410253 Tel. +39 0439 3131 - Fax +39 0439 313300 – Sito Web : www.clivet.it...
- Page 159 Anlagen...
- Page 160 SEIT 30 JAHREN BIETEN WIR LÖSUNGEN FÜR NACHHALTIGEN KOMFORT, WOHLBEFINDEN DES MENSCHEN UND SCHUTZ DER UMWELT www.clivet.com Verkauf und Kundendienst CLIVET SPA Via Camp Lonc 25, Z.I. Villapaiera 32032 Feltre (BL) - Italien Tel. +39 0439 3131 - Fax +39 0439 313300 info@clivet.it...