
Manuels Connexes pour Golfomania Fairway Buddy


Sommaire des Matières pour Golfomania Fairway Buddy
- Page 1 Fairway Buddy Bedienungsanleitung Manuel d ’utilisation Manuale d ’uso User manual...
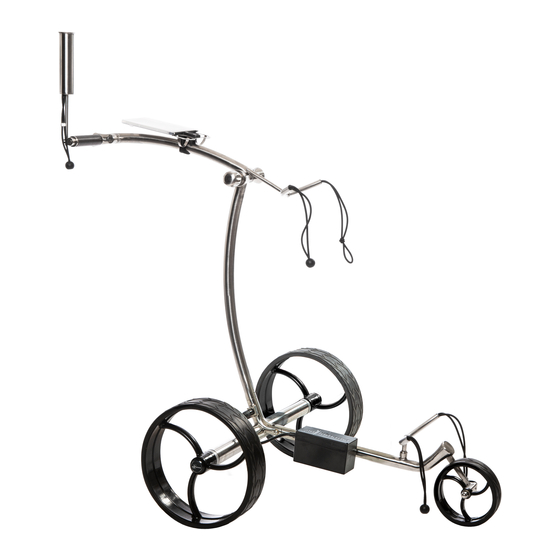
- Page 3 Fairway Buddy: Elektro-Golftrolley mit Lithium-Batterie Inhalt und Bestandteile Transporttasche mit separatem Räderfach ■ 2 Antriebsräder ■ Längsachse mit Vorderrad ■ Antriebsachse mit Doppelrohrmotor ■ Faltbarer Caddyrahmen mit Steuergriff und Bedienungseinheit ■ Scorecardhalter mit Schrauben und Inbusschlüssel ■ Schirmhalter ■ Getränkehalter ■...
- Page 4 Erste Inbetriebnahme Zusammenfügen des Trolleys: Zusammenfügen von Längsachse und Antriebsachse ■ (Abb. 1). Einsetzen der Antriebsräder: dabei Stift an Radnabe ■ eindrücken und Rad einrasten (Abb. 2). Achtung: Erste Einraststufe = Freilaufmodus (leichtgängiger manueller Betrieb). Zweite Einraststufe = Motorbetrieb. Stellen Sie sicher, dass die Räder korrekt (hörbar) eingerastet sind.
-
Page 5: Sicherheitshinweise
Einstellen Geradeauslauf Bei einer allfälligen Abweichung vom Geradeauslauf kann dies ganz einfach justiert werden: 1. Lösen Sie die Radmutter leicht auf der linken Seite (in Fahrtrichtung). 2. Durch Drehen der zwei kleinen Inbusschrauben auf der Vorder- und Rückseite der Radaufhängung kann die Position des Rades justiert werden. -
Page 6: Bedienung
Bedienung LED-Anzeige: ■ Kein Licht = kein Strom/Batterie nicht eingesteckt ■ Anzeige brennt konstant = in Betrieb ■ Anzeige flackert = Standby, Parkbremse ■ eingeschaltet Start: Knopf A drücken. Der Trolley fährt in der ■ letztmals gewählten Geschwindigkeit. Stopp: Knopf A drücken. Die automatische ■... -
Page 7: Caddy De Golf Électrique Avec Batterie Lithium
Fairway Buddy: Caddy de golf électrique avec batterie lithium Contenu et pièces Sac de transport avec compartiment séparé pour les roues ■ 2 roues motrices ■ Axe longitudinal avec roue avant ■ Axe d’entraînement avec deux moteurs tubulaires ■ Cadre pliable avec poignée de commande et unité de commande ■... -
Page 8: Première Mise En Route
Première mise en route Assemblage du chariot: Assemblage de l’axe longitudinal et de l’axe ■ d’entraînement (ill. 1). Mise en place des roues motrices: glisser le moyeu de ■ la roue sur l’axe et appuyer pour l’enclencher (ill. 2). Attention: 1 niveau d’enclenchement = mode roue libre (utilisation manuelle plus souple), 2 niveau... -
Page 9: Réglage Du Déplacement En Ligne Droite
Réglage du déplacement en ligne droite Toute variation du déplacement en ligne droite est très simple à ajuster: 1. Desserrez légèrement l’écrou de la roue sur le côté gauche (dans le sens de la marche). 2. La position de la roue peut être ajustée en tournant les deux petites vis à... -
Page 10: Utilisation
Utilisation Affichage LED: ■ Diode éteinte = pas de courant/batterie non ■ enclenchée Diode allumée = en marche ■ Diode clignotante = stand-by, frein parking ■ enclenché Démarrage: appuyer sur le bouton A. Le chariot ■ avance à la vitesse précédemment sélectionnée. Arrêt: appuyer sur le bouton A. - Page 11 Fairway Buddy: Carrello da golf elettrico con batteria al litio Contenuto e componenti Borsa per il trasporto con scomparto separato per le ruote ■ 2 ruote motrici ■ Asse longitudinale con ruota anteriore ■ Asse motore con motore a doppio tubo ■...
-
Page 12: Prima Messa In Funzione
Prima messa in funzione Assemblaggio del carrello: Assemblaggio dell’asse longitudinale e dell’asse ■ motore (fig. 1). Montaggio delle ruote motrici: spingere il perno sul ■ mozzo della ruota e far scattare la ruota in posizione. Attenzione: prima posizione = folle (modalità manuale più... -
Page 13: Avvertenze Di Sicurezza
Impostazione della marcia in linea retta In caso di un eventuale spostamento dalla linea retta, la regolazione è semplice da effettuare: 1. Allentare leggermente il dado della ruota sul lato sinistro (in direzione di marcia). 2. Girando le due viti a brugola piccole sul lato anteriore e posteriore della sospensione della ruota è... - Page 14 Utilizzo Spia LED: ■ Spenta = non c’è corrente/la batteria non è inserita ■ Spia accesa fissa = in funzione ■ Spia lampeggiante = standby, freno di ■ stazionamento inserito Avvio: premere il tasto A. Il carrello si muove all’ultima ■...
- Page 15 Fairway Buddy: Electric Golf Caddy with Lithium Battery Contents and components Transport bag with separate wheel compartment ■ 2 drive (rear) wheels ■ Longitudinal axis with front wheel ■ Drive axle with double-tube motor ■ Collapsible caddy frame with control handle and panel ■...
-
Page 16: Initial Start-Up
Initial start-up Assembling the trolley: Fit the longitudinal axis to the drive axis (Fig. 1). ■ Fit the drive (rear) wheels: push in the pin on the ■ wheel hub and click the wheel into place. Note: Click once = freewheel mode (smooth manual operation). -
Page 17: Important
Setting wheel alignment If the cart veers away when driving straight ahead, this can be easily adjusted: 1. Loosen the lug nut on the left side slightly (in the direction of travel). 2. The wheel position can be adjusted by turning the two small Allen screws at the front and back of the wheel suspension. -
Page 18: Operating
Operating LED display: ■ No light = no power/battery not plugged in ■ Display constantly illuminated = in operation ■ Display flickers = standby, parking brake ■ activated To start: Press button A. The trolley will run at ■ the last speed selected. To stop: Press button A. - Page 20 GmbH Alte Landstrasse 32 CH-8800 Thalwil T +41 43 377 99 02 F +41 43 377 99 05 info@golfomania.ch www.golfomania.ch Gültig ab/Valable dès le/Valido da/Valid from: 1. 1. 2018 Änderungen vorbehalten/Sous réserve de modifications/Con riserva di modifiche/Subject to change...