Publicité
Les langues disponibles
Les langues disponibles
Liens rapides
DAB+/Bluetooth
Radio de chantier DAB+/Bluetooth
DAB+/Bluetooth
Radio para obras con DAB+/
Bluetooth
Radio de cantiere DAB+/Bluetooth
DAB+/Bluetooth
MEDION
®
Manual de instrucciones
®
LIFE
®
E66877 (MD 43877)
Bedienungsanleitung
Notice d'utilisation
Istruzioni per l'uso
-Baustellenradio
®
-werkplaatsradio
®
Job Site Radio
®
Handleiding
User Manual
®
®
Publicité

Manuels Connexes pour Medion LIFE E66877


Sommaire des Matières pour Medion LIFE E66877
- Page 1 Istruzioni per l‘uso User Manual DAB+/Bluetooth -Baustellenradio ® Radio de chantier DAB+/Bluetooth ® DAB+/Bluetooth -werkplaatsradio ® Radio para obras con DAB+/ Bluetooth ® Radio de cantiere DAB+/Bluetooth ® DAB+/Bluetooth Job Site Radio ® MEDION LIFE ® ® E66877 (MD 43877)
- Page 2 Inhalt Informationen zu dieser Bedienungsanleitung ........5 1.1. Zeichenerklärung ....................5 Bestimmungsgemäßer Gebrauch .............. 7 Sicherheitshinweise ..................8 3.1. Das Gerät sicher aufstellen ................9 3.2. Stromversorgung ....................9 3.3. Umgang mit Akkus .....................11 3.4. Reinigung und Aufbewahrung ..............11 3.5. Spritzwasserschutz .....................12 EU Konformitätsinformation ..............
- Page 3 10.5. Senderinformationen anzeigen ..............26 10.6. Sender speichern ....................26 10.7. Gespeicherte Sender wiedergeben ..............26 Bluetooth Modus ..................26 11.1. Bluetooth-Geräte erstmalig koppeln ............27 11.2. Wiedergabe starten/anhalten ................27 11.3. Anrufe verwalten ....................28 AUX Modus ....................28 12.1. Externes Wiedergabegerät anschließen .............28 Komfortfunktionen ................... 29 13.1.
- Page 4 1. Informationen zu dieser Bedienungsanleitung Vielen Dank, dass Sie sich für unser Produkt entschieden haben. Wir wünschen Ihnen viel Freude mit dem Gerät. Lesen Sie vor Inbetriebnahme die Sicherheitshinweise und die gesamte Anleitung aufmerksam durch. Beachten Sie die Warnungen auf dem Ge- rät und in der Bedienungsanleitung.
- Page 5 Hinweise in der Bedienungsanleitung beachten! Aufzählungspunkt / Information über Ereignisse während der Bedie- • nung Auszuführende Handlungsanweisung Schutzklasse II Elektrogeräte der Schutzklasse II sind Elektrogeräte die durchge- hend doppelte und/oder verstärkte Isolierung besitzen und keine An- schlussmöglichkeiten für einen Schutzleiter haben. Das Gehäuse ei- nes isolierstoffumschlossenen Elektrogerätes der Schutzklasse II kann teilweise oder vollständig die zusätzliche oder verstärkte Isolierung bilden.
- Page 6 2. Bestimmungsgemäßer Gebrauch Dies ist ein Gerät der Unterhaltungselektronik. Das Baustellenradio dient der Wiedergabe von Audiomaterial, welches via Bluetooth oder AUX zugespielt werden kann. Des Weiteren können Radiosendungen wiedergegeben werden. Der genannte Empfangsbereich stellt die technischen Möglich- keiten des Gerätes dar. Außerhalb dieses Bereiches empfange- ne Informationen dürfen nicht verwendet oder weiter verbreitet werden.
- Page 7 3. Sicherheitshinweise WARNUNG! Verletzungsgefahr! Verletzungsgefahr für Kinder und Personen mit ver- ringerten physischen, sensorischen oder mentalen Fä- higkeiten (beispielsweise teilweise Behinderte, älte- re Personen mit Einschränkung ihrer physischen und mentalen Fähigkeiten) oder Mangel an Erfahrung und Wissen (beispielsweise ältere Kinder). ...
- Page 8 3.1. Das Gerät sicher aufstellen Warten Sie mit dem Anschluss des Geräts, wenn das Gerät von einem kalten in einen warmen Raum gebracht wird. Das dabei entstehende Kondenswasser kann unter Umständen das Gerät zerstören. Wenn das Gerät Zimmertemperatur er- reicht hat, kann das Gerät gefahrlos in Betrieb genommen werden.
- Page 9 Betreiben Sie das Gerät nur an geerdeten, leicht zugängli- chen Steckdosen mit 100-240 V ~ 50/60 Hz. Wenn Sie sich der Stromversorgung am Auf stel lungsort nicht sicher sind, fragen Sie beim betreffenden Energieversorger nach. Verwenden Sie das Netzanschlusskabel nicht mehr, wenn ei- ner der beiden Stecker oder das Kabel beschädigt sind.
- Page 10 Das Baustellenradio und die Zubehörteile nicht verwenden, wenn diese Beschädigungen, Rauchentwicklungen oder unge- wöhnliche Betriebsgeräusche aufweisen. Trennen Sie in diesem Fall unverzüglich die Stromversorgung. Die Lichtquelle dieser Leuchte ist nicht ersetzbar. Wenn die Licht- quelle ihr Lebensdauerende erreicht hat, ist das gesamte Gerät zu ersetzen.
- Page 11 Bitte beachten Sie, dass der Spritzwasserschutz nur in der aufrechten (normalen) Position des Baustellen- radios gewährleistet ist. 4. EU Konformitätsinformation Hiermit erklärt Medion AG, dass sich dieses Gerät in Übereinstimmung mit den grundlegenden Anforderungen und den übrigen einschlägigen Bestimmungen be- findet: •...
- Page 12 6. Lieferumfang GEFAHR! Erstickungsgefahr! Es besteht Erstickungsgefahr durch Verschlucken oder Einatmen von Kleinteilen oder Folien. Halten Sie die Verpackungsfolie von Kindern fern. Entnehmen Sie das Produkt aus der Verpackung und entfernen Sie sämtliches Verpackungsmaterial. Bitte überprüfen Sie die Vollständigkeit der Lieferung und benachrichtigen Sie uns bitte innerhalb von 14 Tagen nach dem Kauf, falls die Lieferung nicht kom- plett ist.
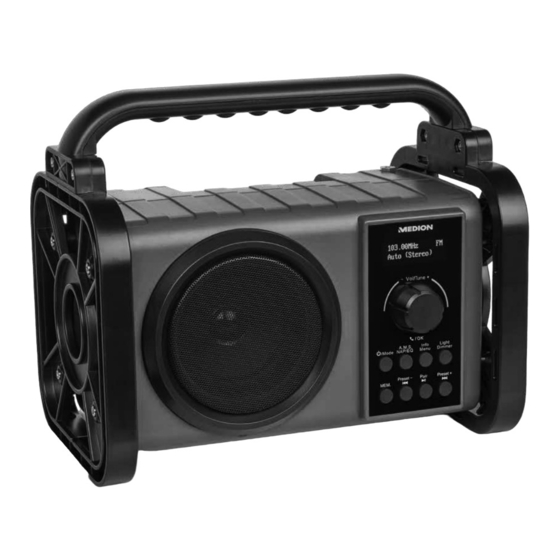
- Page 13 7. Geräteübersicht 7.1. Vorderseite Antenne Anzeige von Uhrzeit/Datum, Betriebsart, Radiosender, Display Systemeinstellungen, Lautstärke Lautstärke verringern/erhöhen Mikrofon • AMS (Automatische Sendersuche) • NAP (Countdown-Zeit) • EQ (Klangeffekte/Klangregelung)
- Page 14 • Licht Ein-/Ausschalten • Dimmer für Displaybeleuchtung einstellen • Systemeinstellungen • Auswahl der übergeordneten Menüebene • Informationen zum aktuellen Sender • Sendersuchlauf • Navigation in den Menüs • Akku-Ladezustand • Sleep-Timer • Im Menü navigieren, nächster Titel/Sender • Wiedergabe starten/pausieren •...
- Page 15 7.2. Rückseite 17 16 DC IN 9V Anschluss für Netzadapter Klemmscheibe der Staufachverriegelung Typenschild (Unterseite) Staufach für externe Geräte AUX IN Audio-Anschluss für externes Gerät (im Staufach) Rändelschraube der Staufachverriegelung LED-Arbeitslicht...
- Page 16 8. Inbetriebnahme 8.1. Netzbetrieb anschließen Verwenden Sie zum Anschluss des Radios ausschließlich den mitgelieferten Netzad- apter. Auf dem Netzadapter befindet sich ein Typenschild mit den entsprechenden Angaben. Verbinden Sie den Stecker des Netzadapters mit dem Netzkabel-Anschluss D C I N 9 V des Gerätes. ...
- Page 17 8.3. Gerät einschalten/ausschalten 8.3.1. Gerät einschalten Drücken Sie die Taste , um das Gerät einzuschalten. Die Uhrzeit und das Datum ist im Display zu sehen. 8.3.2. Gerät ausschalten Halten Sie die Taste gedrückt, um das Gerät in den Standby-Modus zu schalten.
- Page 18 8.5. Uhrzeit/Datum einstellen 8.5.1. Uhrzeit/Datum manuell einstellen Das Gerät ist eingeschaltet oder befindet sich im Standby-Modus. Halten Sie die Taste gedrückt. Das Menü Setup <System> wird angezeigt. Drücken Sie die Taste Das Menü System <Uhrzeit> wird angezeigt. Drücken Sie die Taste Das Menü...
- Page 19 Wählen Sie <Update von DAB> oder <Update von FM> aus, wenn die Uhrzeit und das Datum automatisch bezogen werden soll. Wählen Sie <Kein Update>, wenn die Uhrzeit und das Datum nicht automatisch bezogen werden soll. Die Uhrzeit und das Datum wird je nach Auswahl automatisch bezogen. 8.5.3.
- Page 20 8.6. DAB Sendersuchlauf erstmalig starten Das Gerät ist eingeschaltet oder befindet sich im Standby Modus. Drücken Sie die Taste Der DAB Sendersuchlauf startet. Nach Beendigung des Suchlaufs • wird die Anzahl der gespeicherten Sender angezeigt. • sind die Sender in der Senderliste alphabetisch sortiert •...
- Page 21 8.10. Modus wählen Die folgenden Betriebsarten können gewählt werden: Modus Beschreibung Wiedergabe eines digitalen Radiosenders Wiedergabe eines analogen Radiosenders Wiedergabe einer externen Audioquelle über den AUX-An- Hilfseingang schluss • Wiedergabe einer Audioquelle von einem externen Bluetooth bluetoothfähigem Gerät Paarung • Anrufsteuerung eines bluetoothfähigen Mobiltelefons ...
- Page 22 9.3. Sender speichern Sie können bis zu 30 DAB Sender speichern. Wählen Sie den DAB Sender aus, den Sie speichern möchten. Halten Sie die Taste gedrückt, bis Progr. speichern angezeigt wird. Drücken Sie die Taste oder mehrmals, bis ein freier oder belegter und numerierte Speicherplatz angezeigt wird.
- Page 23 Drücken Sie die Taste oder mehrmals, um die gewünschte DAB Fre- quenz einzustellen. Drücken Sie die Taste Die neue DAB Frequenz ist eingestellt. 9.6. DRC Funktion einstellen DRC (Dynamic Range Compression) ist eine Funktion, um die Lautstärke lauterer Klänge zu verringern und die Lautstärke leiserer Klänge zu erhöhen.
- Page 24 10. FM Modus 10.1. Signalqualität für Sendersuchlauf auswählen Halten Sie die Taste gedrückt. Das Menü FM <Suchlauf-Einstellung> wird angezeigt. Drücken Sie die Taste Wählen Sie im Menü Suchlauf-Einstellung <Alle Sender> aus, um nach FM Sen- dern mit schwachem und starkem Signal zu suchen. ...
- Page 25 10.5. Senderinformationen anzeigen Drücken Sie die Taste mehrmals um die folgenden Informationen anzuzei- gen: – Sendertyp/ Senderfrequenz/Aktueller Titel – Uhrzeit/Datum 10.6. Sender speichern Sie können bis zu 30 FM Sender speichern. Wählen Sie den FM Sender aus, den Sie speichern möchten. ...
- Page 26 11.1. Bluetooth-Geräte erstmalig koppeln Bekannte externe Geräte, die bereits einmal gekoppelt wurden, werden zukünftig direkt verbunden. Eine er- neute Kopplung ist nicht notwendig. Zur erneuten Ver- bindung aktivieren Sie lediglich den Bluetooth-Modus an beiden Geräten. Wählen Sie die Betriebsart Bluetooth Paarung. ...
- Page 27 11.3. Anrufe verwalten Eingehende Anrufe werden von dem Baustellenradio durch ein akustisches Signal angekündigt und unter- brechen die Audiowiedergabe. 11.3.1. Anruf annehmen Drücken Sie die Taste Die Sprachübertragung erfolgt über das Mikrofon und den Lautsprecher. 11.3.2. Anruf beenden Halten Sie die Taste gedrückt.
- Page 28 Stecken Sie den Stecker eines 3,5 mm Klinkenkabels in den AUX IN-Anschluss des Baustellenradios. Stecken Sie den anderen Stecker des Klinkenkabels in den AUX-Ausgangs Ihres externen Gerätes. Schalten Sie das externe Gerät ein. Starten Sie die Wiedergabe an Ihrem externen Gerät. ...
- Page 29 13.2. Sleep Timer verwenden Das Gerät bietet einen Ausschalt-Timer, den Sie in den jeweiligen Modi DAB, FM, Bluetooth und Hilfseingang (AUX) aktivieren können. Das Gerät wird nach Ablauf der eingestellten Zeit (Aus, 15 Min., 30 Min., 45 Min., 60 Min., 75 Min. oder 90 Min. ) in den Standby Modus versetzt.
- Page 30 13.4. Arbeitslicht verwenden Sie können das eingebaute Arbeitslicht aktivieren. WARNUNG! Augenschäden! Blicken Sie bei Betrieb nicht für längere Zeit in die Licht- quelle. Dies kann für die Augen schädlich sein. Blicken Sie nicht in die Lichtquelle. Schalten Sie das Arbeitslicht bei nichtgebrauch aus. 13.4.1.
- Page 31 13.5. Displaybeleuchtung dimmen Sie können die Displaybeleuchtung in den Stufen „hell“ und „dunkel“ dimmen und ausschalten. Drücken Sie die Taste wiederholt, um die Displaybeleuchtung einzustel- len. 13.6. Akku-Ladestatus Der Akku-Ladestatus kann ausschließlich im Akku-Be- trieb abgerufen werden. Stellen Sie sicher, dass sich das Gerät im Akku-Betrieb befindet. ...
- Page 32 14. Servicefunktionen 14.1. Gerät auf Werkseinstellungen zurücksetzen Die aktuellen Einstellungen des Gerätes können auf die Einstellungen des Auslie- fungszustandes zurückgesetzt werden. Folgende Eisntellungen werden dabei zu- rückgesetzt: • Sprache • Uhrzeit und Datum • DAB/FM-Sender und Senderspeicher Das Zurücksetzen des Gerätes auf die Werkseinstellungen kann aus allen Modi aus- geführt werden.
- Page 33 15. Reinigung Vor der Reinigung ziehen Sie bitte den Netzstecker aus der Steckdose. Für die Rei- nigung verwenden Sie ein trockenes, weiches Tuch. Vermeiden Sie chemische Lö- sungs- und Reinigungsmittel, weil diese die Oberfläche und/oder Beschriftungen des Geräts beschädigen können. 16.
- Page 34 17. Entsorgung VERPACKUNG Ihr Gerät befindet sich zum Schutz vor Transportschäden in einer Verpa- ckung. Verpackungen sind aus Materialien hergestellt, die umweltscho- nend entsorgt und einem fachgerechten Recycling zugeführt werden können. GERÄT Alle mit dem nebenstehenden Symbol gekennzeichneten Elektro- bzw. Elektronikgeräte dürfen nicht im normalen Hausmüll entsorgt werden, sondern sind vom Endnutzer am Ende ihrer Lebenserwartung einer vom unsortierten Siedlungsabfall getrennten Erfassung zuzuführen.
- Page 35 stellen sowie ggf. weitere Annahmestellen für die Wiederverwendung der Altgeräte zur Verfügung. Die Adressen können Sie von Ihrer Kom- munalverwaltung erhalten. Verfügt das Altgerät über Datenspeicher, sollten vor der Rückgabe alle Daten extern gesichert und von dem Altgerät dauerhaft und unwider- ruflich gelöscht werden.
- Page 36 18. Technische Daten Netzadapter BUREAU VERITAS Hersteller Hung Kay Modell HKP15-0901000dV Eingangsspannung AC 100-240V ~ 50/60Hz 0,4A MAX Ausgangsspannung DC 9V 1A, 9W Durchschnittliche Effizienz im Betrieb 83.04 % Leistungsaufnahme bei Nulllast 0.069 W Akku Hersteller Huizhou Huiyi New Energy Co., Ltd Modell HY-FY18650-7.4V 2INR19/66 Ausgangsspannung...
- Page 37 Ihre Erfahrungen austauschen und Ihr Wissen weiter- geben. Sie finden unsere Service-Community unter community.medion.com. • Gerne können Sie auch unser Kontaktformular unter www.medion.com/contact nutzen. • Selbstverständlich steht Ihnen unser Serviceteam auch über unsere Hotline oder postalisch zur Verfügung.
- Page 38 Kontaktieren Sie zuerst immer unseren Kundenservice. 20. Datenschutzerklärung Sehr geehrter Kunde! Wir teilen Ihnen mit, dass wir, die MEDION AG, Am Zehnthof 77, 45307 Essen als Ver- antwortlicher Ihre personenbezogenen Daten verarbeiten. In datenschutzrechtlichen Angelegenheiten werden wir durch unseren betrieb- lichen Datenschutzbeauftragten, erreichbar unter MEDION AG, Datenschutz, Am Zehnthof 77, D –...
- Page 40 Sommaire Informations concernant la présente notice d’utilisation ...... 43 1.1. Explication des symboles .................43 Utilisation conforme .................. 45 Consignes de sécurité................46 3.1. Installation de l’appareil en toute sécurité ..........47 3.2. Alimentation électrique ..................48 3.3. Manipulation des batteries ................49 3.4. Nettoyage et stockage ..................50 3.5.
- Page 41 10.5. Affichage d’informations relatives à la station .........64 10.6. Mise en mémoire de stations ................64 10.7. Lecture de stations mises en mémoire ............64 Mode Bluetooth ..................64 11.1. Appairage de périphériques Bluetooth ............65 11.2. Démarrage/arrêt de la lecture ................65 11.3. Gestion des appels .....................66 Mode AUX ....................
- Page 42 1. Informations concernant la présente notice d’utilisation Merci d’avoir choisi notre produit. Nous vous souhaitons une bonne uti- lisation. Veuillez lire attentivement les consignes de sécurité et la notice d’utili- sation dans son intégralité avant la mise en service de l’appareil. Tenez compte des avertissements figurant sur l’appareil et dans la notice d’utilisation.
- Page 43 Tenez compte des remarques contenues dans la notice d’utilisation ! Énumération/Information sur des événements se produisant pendant • l’utilisation Action à exécuter Classe de protection II Les appareils électriques de la classe de protection II sont des appa- reils électriques qui possèdent une isolation double continue et/ou renforcée et qui ne présentent pas de possibilité...
- Page 44 2. Utilisation conforme Ce produit est un appareil lié au domaine de l’électronique de loisir. La radio de chantier sert à lire du matériel audio qui peut être transmis via Bluetooth ou port AUX. Par ailleurs, elle permet de retransmettre des émissions de radio. La plage de réception mentionnée représente les possibilités techniques de l’appareil.
- Page 45 • N’exposez pas l’appareil à des conditions extrêmes. À éviter : – humidité de l’air élevée ou contact avec des liquides ; – températures extrêmement hautes ou basses ; – rayonnement direct du soleil ; – flamme nue. 3. Consignes de sécurité AVERTISSEMENT ! Risque de blessure ! Risque de blessure pour les enfants et les person- nes présentant des capacités physiques, sensoriel- les ou mentales restreintes (p. ex.
- Page 46 Conservez tous les emballages utilisés (sachets, garnitures de polystyrène, etc.) hors de portée des enfants. 3.1. Installation de l’appareil en toute sécurité Si l’appareil est déplacé d’une pièce froide vers une pièce chaude, attendez avant de le brancher. L’eau de condensati- on due au changement de température pourrait détruire l’ap- pareil.
- Page 47 3.2. Alimentation électrique La prise de courant doit se trouver à proximité de l’appareil et toujours être facilement accessible. Posez les câbles de ma- nière à ce que personne ne puisse marcher ou trébucher des- sus. Pour couper l’alimentation électrique, débranchez la fiche d’alimentation de l’appareil de la prise de courant.
- Page 48 connectable pour éviter toute consommation de courant lorsque l’appareil est éteint. La fiche d’alimentation de la radio de chantier sert de dispo- sitif de séparation. Tant que la radio de chantier est raccordée au réseau électrique, les pièces se trouvant à l’intérieur con- duisent l’électricité...
- Page 49 à la verti- cale. 4. Information relative à la conformité UE Par la présente, Medion AG déclare que cet appareil est conforme aux exigences de base et autres réglementations en vigueur : • Directive RED 2014/53/UE •...
- Page 50 5. Informations sur les marques déposées La marque et les logos Bluetooth® sont des marques déposées de Bluetooth SIG, Inc. et sont utilisés par Medion sous licence. Les autres marques déposées appartiennent à leurs propriétaires respectifs. 6. Contenu de la livraison DANGER !
- Page 51 7. Vue d’ensemble de l’appareil 7.1. Face avant Antenne Affichage de l’heure et de la date, du mode de Écran fonctionnement, de la station de radio, des réglages système, du volume sonore Diminution/augmentation du volume Microphone...
- Page 52 • AMS (recherche automatique de stations) • NAP (minuterie à rebours) • EQ (effets sonores/réglage de la sonorité) • Allumage/extinction de la lampe • Réglage du variateur de luminosité de l’écran • Paramètres système • Sélection du niveau supérieur dans le menu •...
- Page 53 7.2. Face arrière 17 16 DC IN 9 V Prise pour adaptateur secteur Rondelle de verrouillage du compartiment de rangement Plaque signalétique (partie inférieure) Compartiment de rangement pour appareils externes Port audio pour appareil externe (dans le compartiment de AUX IN rangement) Vis moletée de verrouillage du compartiment de rangement Lampe LED de travail...
- Page 54 8. Mise en service 8.1. Raccordement à l’alimentation secteur Pour raccorder la radio au réseau électrique, utilisez exclusivement l’adaptateur sec- teur fourni. Une plaque signalétique comportant les informations correspondantes se trouve sur l’adaptateur secteur. Reliez la fiche de l’adaptateur secteur à la prise du cordon d'alimentation D C I N 9 V de l’appareil.
- Page 55 8.3. Mise en marche/arrêt de l’appareil 8.3.1. Mise en marche de l’appareil Appuyez sur la touche pour allumer l’appareil. L’heure et la date sont affichées à l’écran. 8.3.2. Arrêt de l’appareil Maintenez la touche enfoncée pour mettre l’appareil en mode Veille. En mode Veille, l’appareil passe automatiquement en mode économie d’énergie après 30 secondes lorsqu’il fonctionne sur batterie.
- Page 56 8.5. Réglage de l’heure/de la date 8.5.1. Réglage manuel de l’heure/de la date L’appareil est allumé ou se trouve en mode Veille. Maintenez la touche enfoncée. Le menu Setup <System> s’affiche. Appuyez sur la touche Le menu System <Uhrzeit> s’affiche. ...
- Page 57 Sélectionnez <Update von DAB> ou <Update von FM> si vous souhaitez que l’heure et la date soient automatiquement réglées. Sélectionnez <Kein Update>, si vous ne souhaitez pas que l’heure et la date soient automatiquement réglées. L’heure et la date sont réglées automatiquement selon la sélection effectuée. 8.5.3.
- Page 58 8.6. Première recherche de stations de radio DAB L’appareil est allumé ou se trouve en mode Veille. Appuyez sur la touche La recherche de stations DAB démarre. Lorsque la recherche est terminée • le nombre de stations mémorisées s’affiche ; •...
- Page 59 8.10. Sélection du mode Les modes de fonctionnement suivants peuvent être sélectionnés : Mode Description Lecture de station de radio numérique Lecture de station de radio analogique Entrée auxi- Lecture d’une source audio externe via le port AUX liaire • Lecture d’une source audio externe à partir d’un appareil compatible Bluetooth Appairage Bluetooth...
- Page 60 9.3. Mise en mémoire de stations Vous pouvez mémoriser jusqu’à 30 stations DAB. Sélectionnez la station DAB que vous souhaitez mettre en mémoire. Maintenez la touche enfoncée, jusqu’à ce que l’écran affiche Progr. speichern. Appuyez autant de fois que nécessaire sur la touche jusqu’à...
- Page 61 Appuyez autant de fois que nécessaire sur les touches pour régler la fréquence DAB souhaitée. Appuyez sur la touche La nouvelle fréquence DAB est réglée. 9.6. Réglage de la fonction DRC La fonction DRC (Dynamic Range Compression) permet d’harmoniser le volume so- nore des stations de radio.
- Page 62 Appuyez sur la touche La fonction TA est réglée. 10. Mode FM 10.1. Sélection de la qualité du signal pour la recherche de stations Maintenez la touche enfoncée. Le menu FM <Suchlauf-Einstellung> s’affiche. Appuyez sur la touche ...
- Page 63 10.4. Sélection d’une station de radio Sélectionnez le mode de fonctionnement FM. La station de radio FM actuellement sélectionnée est lue. Appuyez sur la touche Appuyez sur la touche jusqu’à ce que la station FM souhaitée s’af- fiche.
- Page 64 11.1. Appairage de périphériques Bluetooth Les périphériques externes connus, qui ont déjà été ap- pairés une fois, seront connectés directement les fois suivantes. Aucun nouvel appairage n’est nécessaire. Pour effectuer une nouvelle connexion, activez simple- ment le mode Bluetooth sur les deux appareils. ...
- Page 65 11.3. Gestion des appels Les appels entrants sont annoncés par un signal sonore sur la radio de chantier qui interrompt alors la lecture audio 11.3.1. Prise d’appel Appuyez sur la touche La transmission vocale s’effectue par le biais du microphone et du haut-parleur. 11.3.2.
- Page 66 12.1. Branchement d’un périphérique de lecture externe Mettez la radio de chantier en mode Veille. Éteignez votre périphérique externe. Déverrouillez la porte du compartiment de rangement à l’arrière de la radio de chantier. Pour ce faire, desserrez l’écrou moleté et tournez la rondelle de verrouillage. ...
- Page 67 Placez le périphérique externe à l’intérieur du compartiment de rangement. Fermez la porte du compartiment de rangement. Verrouillez-la. Pour ce faire, tournez la rondelle de verrouillage et serrez la vis moletée. Allumez la radio de chantier. ...
- Page 68 13.3. Utilisation de la minuterie à rebours (NAP) L’appareil dispose d’une fonction de minuterie à rebours (utile p. ex. pour signaler la fin d’un temps de pause), qui peut être activée dans les différents modes DAB, FM, Bluetooth et Hilfseingang (AUX). Une fois le temps réglé écoulé (Arrêt, 10 min., 15 min., 30 min., 45 min., 60 min., 75 min.
- Page 69 13.4.1. Allumage de la lampe de travail Tournez la lampe de travail afin qu’elle ne soit pas orientée vers l’appareil. Maintenez la touche enfoncée jusqu’à ce que la lampe s’allume. 13.4.2. Extinction de la lampe de travail Maintenez la touche enfoncée jusqu’à...
- Page 70 13.6. État de charge de la batterie L’état de charge de la batterie ne peut être consulté qu’en mode de fonctionnement sur batterie. Vérifiez que l’appareil se trouve en mode de fonctionnement sur batterie. Mode DAB : appuyez sur la touche 7 fois de suite pour afficher l’état de charge de la batterie.
- Page 71 14.2. Affi chage de la version logicielle En cas de défaillance quelconque de l’appareil, il pourra être utile de fournir la versi- on logicielle de l’appareil aux techniciens du SAV. L’affichage de la version logicielle est possible dans tous les modes. ...
- Page 72 PROBLÈME CAUSE POSSIBLE SOLUTION • Ajustez la fréquence de la sta- Réception ra- tion. dio inexistante Les signaux émis sont ou de mauvaise trop faibles. • Changez éventuellement l’ap- qualité pareil de place. Le volume est réglé à un Pas de son •...
- Page 73 18. Caractéristiques techniques Adaptateur secteur BUREAU VERITAS Fabricant Hung Kay Modèle HKP15-0901000dV Tension d’entrée CA 100-240 V ~ 50/60 Hz 0,4 A max. Tension de sortie CC 9 V 1 A, 9 W Efficacité moyenne de fonctionne- 83,04 % ment Consommation électrique à charge 0,069 W nulle Batterie Fabricant Huizhou Huiyi New Energy Co., Ltd Modèle...
- Page 74 Au sein de notre Service-Community, vous pouvez discuter avec d’autres utili- sateurs ainsi qu’avec nos collaborateurs pour partager vos expériences et vos connaissances. Vous pouvez accéder à notre Service-Community ici : community.medion.com. • Vous pouvez également utiliser notre formulaire de contact disponible ici : www.medion.com/contact.
- Page 75 En matière de protection des données, nous sommes assistés par le délégué à la protection des données personnelles de notre entreprise, que vous pouvez contac- ter à l’adresse MEDION AG, Datenschutz, Am Zehnthof 77, D - 45307 Essen ; daten- schutz@medion.com. Nous traitons vos données dans le cadre du traitement de la garantie et des processus connexes (p. ex.
- Page 76 (art. 77 du RGPD en liaison avec le § 19 de la BDSG - Loi fédérale allemande sur la protection des données). Pour MEDION AG, il s’agit du Commissaire d’État à la Protection des Données et à la liberté d’information de Rhénanie-du-Nord-West- phalie, Postfach 200444, 40212 Düsseldorf, www.ldi.nrw.de.
- Page 78 Inhoud Informatie over deze gebruiksaanwijzing ..........81 1.1. Betekenis van de symbolen ................81 Beoogd gebruik ..................83 Veiligheidsvoorschriften ................84 3.1. Het apparaat veilig opstellen ................85 3.2. Stroomvoorziening .....................85 3.3. Omgaan met accu’s ....................87 3.4. Reinigen en opbergen ..................87 3.5. Spatwaterdichtheid ....................88 EU-conformiteitsinformatie ..............
- Page 79 10.5. Zenderinformatie weergeven ..............102 10.6. Zenders opslaan ....................102 10.7. Opgeslagen zenders afspelen ..............102 Bluetoothmodus ..................102 11.1. Bluetoothapparaten voor het eerst koppelen ........103 11.2. Afspelen starten/onderbreken ..............103 11.3. Oproepen beheren ..................104 AUX-modus ....................104 12.1.
- Page 80 1. Informatie over deze gebruiksaanwijzing Hartelijk dank dat u voor ons product hebt gekozen. Wij wensen u veel plezier met het apparaat. Lees de veiligheidsvoorschriften en de volledige gebruiksaanwijzing aandachtig door voordat u het apparaat in gebruik neemt. Neem de waarschuwingen op het apparaat en in de gebruiksaanwijzing in acht.
- Page 81 Opsommingsteken/informatie over gebeurtenissen die zich tijdens • de bediening kunnen voordoen Instructie voor een uit te voeren handeling Veiligheidsklasse II Elektrische apparaten van veiligheidsklasse II zijn elektrische appara- ten die in hun geheel zijn voorzien van een dubbele en/of extra ster- ke isolatie en geen aansluitmogelijkheden hebben voor een aardlei- ding.
- Page 82 2. Beoogd gebruik Dit apparaat behoort tot de consumentenelektronica. De bouwradio dient voor het afspelen van audio via bluetooth of AUX. Ook radioprogramma's kunnen worden beluisterd. Het vermelde ontvangstbereik geeft de technische mogelijkhe- den van het apparaat aan. Informatie die buiten dit bereik wordt ontvangen, mag niet worden gebruikt of verder worden ver- spreid.
- Page 83 • Stel het apparaat niet bloot aan extreme omstandigheden. Vermijd: – hoge luchtvochtigheid en vocht; – extreem hoge en lage temperaturen; – direct zonlicht; – open vuur. 3. Veiligheidsvoorschriften WAARSCHUWING! Gevaar voor letsel! Gevaar voor letsel bij kinderen en personen met een li- chamelijke, zintuiglijke of verstandelijke beperking (zo- als personen met een handicap en ouderen met een li- chamelijke en verstandelijke beperking) of met gebrek...
- Page 84 Bewaar al het gebruikte verpakkingsmateriaal (zakken, stuk- ken polystyreen, enzovoort) buiten het bereik van kinderen. 3.1. Het apparaat veilig opstellen Wacht even met het aansluiten van het apparaat nadat het van een koude in een warme ruimte is gebracht. Door de con- densvorming die hierbij optreedt, kan het apparaat bescha- digd raken.
- Page 85 Sluit dit apparaat alleen aan op een geaard, goed toeganke- lijk stopcontact van 100-240 V~ 50/60 Hz. Als u twijfelt over de stroomvoorziening op de plaats van installatie, neem dan contact op met het energiebedrijf. Gebruik het netsnoer niet meer als een van beide stekkers of het snoer beschadigd is.
- Page 86 Gebruik de bouwradio en de accessoires niet als deze bescha- digingen vertonen, rook produceren of ongewone geluiden voortbrengen. Trek in dat geval de stekker onmiddellijk uit het stopcontact. De lichtbron van dit apparaat kan niet vervangen worden. Als de lichtbron aan het einde van zijn levensduur is, moet het hele apparaat vervangen worden.
- Page 87 Houd er rekening mee dat de spatwaterdichtheid al- leen gegarandeerd is, als de bouwradio rechtop (in de normale stand) staat. 4. EU-conformiteitsinformatie Hierbij verklaart Medion AG dat dit apparaat in overeenstemming is met de funda- mentele eisen en de overige toepasselijke voorschriften: • RA-richtlijn 2014/53/EU •...
- Page 88 6. Inhoud van de levering GEVAAR! Verstikkingsgevaar! Er bestaat verstikkingsgevaar door het inslikken of ina- demen van kleine onderdelen of folie. Houd de verpakkingsfolie uit de buurt van kinderen. Haal het product uit de verpakking en verwijder al het verpakkingsmateriaal. ...
- Page 89 7. Overzicht van het apparaat 7.1. Voorkant Antenne Weergave van tijd/datum, modus, radiozender, Display systeeminstellingen, volume Volume verlagen/verhogen Microfoon • AMS (automatisch zenders zoeken) • NAP (countdowntijd) • EQ (klankeffecten/klankregeling)
- Page 90 • Lamp in-/uitschakelen • Dimmer voor displayverlichting instellen • Systeeminstellingen • Naar het bovenliggende menu • Informatie over de huidige zender • Zenders zoeken • Navigatie door de menu’s • Laadniveau accu • Sleeptimer • Binnen het menu navigeren, volgende titel/zender •...
- Page 91 7.2. Achterkant 17 16 DC IN 9V Aansluiting voor netadapter Klemschijf van vergrendeling opbergvak Typeplaatje (onderkant) Opbergvak voor externe apparaten AUX IN Audioaansluiting voor extern apparaat (in het opbergvak) Kartelschroef van de vergrendeling van het opbergvak Ledwerklamp...
- Page 92 8. Ingebruikname 8.1. Aansluiten op de netvoeding Gebruik voor het aansluiten van de radio uitsluitend de meegeleverde netadapter. Op de netadapter bevindt zich een typeplaatje met de gegevens van de adapter. Steek de stekker van de netadapter in de DC IN 9V-netsnoeraansluiting van het apparaat.
- Page 93 8.3. Apparaat inschakelen/uitschakelen 8.3.1. Apparaat inschakelen Druk op de toets om het apparaat in te schakelen. De tijd en datum zijn op het display te zien. 8.3.2. Apparaat uitschakelen Houd de toets ingedrukt om het apparaat in de stand-bymodus te zet- ten.
- Page 94 8.5. Tijd/datum instellen 8.5.1. Tijd/datum handmatig instellen Het apparaat is ingeschakeld of bevindt zich in de stand-bymodus. Houd de toets ingedrukt. Het menu Setup <System> verschijnt. Druk op de toets Het menu System <Uhrzeit> verschijnt. Druk op de toets Het menu Uhrzeit <Zeit/Datum einstellen>...
- Page 95 Selecteer <Update von DAB> of <Update von FM> als de tijd en de datum auto- matisch moeten worden ingesteld. Selecteer <Kein Update> als tijd en datum niet automatisch ingesteld moeten worden. De tijd en datum worden, afhankelijk van de selectie, automatisch ingesteld. 8.5.3.
- Page 96 8.7. Volume instellen Draai terwijl het apparaat is ingeschakeld de knop in de richting - om het volume te verlagen. Draai terwijl het apparaat ingeschakeld is de knop in de richting + om het volume te verhogen. Op het display wordt het ingestelde volume gedurende ca. 6 seconden weergege- ven.
- Page 97 8.10. Modus selecteren De volgende modi kunnen geselecteerd worden: Modus Omschrijving Een digitale radiozender afspelen Een analoge radiozender afspelen Hulpingang Een externe audiobron via de AUX-aansluiting afspelen • Een audiobron van een extern, bluetoothcompatibel apparaat afspelen Bluetooth koppelen • Oproepbesturing van een bluetoothcompatibele mobiele telefoon ...
- Page 98 9.3. Zenders opslaan U kunt maximaal 30 DAB-zenders opslaan. Selecteer de DAB-zenders die u wilt opslaan. Houd de toets ingedrukt tot Progr. speichern verschijnt. Druk meerdere keren op de toets tot er een vrije of al bezette en genummerde opslagplaats wordt weergegeven.
- Page 99 Het menu Manuell einstellen en de huidige DAB-frequentie verschijnen. Druk de toets meerdere keren in om de gewenste DAB-frequentie in te stellen. Druk op de toets De nieuwe DAB-frequentie is ingesteld. 9.6. DRC-functie instellen DRC (Dynamic Range Compression) is een functie om het volume van hardere klan- ken te verlagen en het volume van zachtere klanken te verhogen.
- Page 100 10. FM-modus 10.1. Signaalkwaliteit voor zenders zoeken selecteren Houd de toets ingedrukt. Het menu FM <Suchlauf-Einstellung> verschijnt. Druk op de toets Selecteer in het menu Suchlauf-Einstellung <Alle Sender> om naar FM-zenders met een zwak en sterk signaal te zoeken. ...
- Page 101 10.5. Zenderinformatie weergeven Druk meerdere keren op de toets om de volgende informatie weer te ge- ven: – Zendertype/zenderfrequentie/huidige titel – Tijd/datum 10.6. Zenders opslaan U kunt maximaal 30 FM-zenders opslaan. Selecteer de FM-zenders die u wilt opslaan. ...
- Page 102 11.1. Bluetoothapparaten voor het eerst koppelen Bekende externe apparaten die al een keer gekoppeld zijn, worden daarna altijd direct met elkaar verbonden. Opnieuw koppelen is niet nodig. Om opnieuw verbin- ding te maken, hoeft u alleen de bluetoothmodus op beide apparaten te activeren. ...
- Page 103 11.3. Oproepen beheren Inkomende oproepen worden door de bouwradio met een geluidssignaal aangekondigd en het afspelen van audio wordt dan onderbroken. 11.3.1. Oproep aannemen Druk op de toets De spraakoverdracht gebeurt via de microfoon en luidspreker. 11.3.2. Oproep beëindigen ...
- Page 104 Steek de stekker van een 3,5mm-audiokabel in de AUX IN-aansluiting van de bouwradio. Steek de andere stekker van de audiokabel in de AUX-uitgang van uw externe apparaat. Schakel het externe apparaat in. Start het afspelen op het externe apparaat. ...
- Page 105 Hilfseingang (AUX) kunt activeren. Het apparaat wordt na afloop van de ingestelde tijd (uit, 15 min, 30 min, 45 min, 60 min, 75 min of 90 min) in de stand-bymodus ge- zet. Houd de toets ingedrukt. Het menu DAB, FM, Bluetooth of Hilfseingang wordt weergegeven. ...
- Page 106 13.4. Werklamp gebruiken U kunt de ingebouwde werklamp inschakelen. WAARSCHUWING! Oogletsel! Kijk tijdens het gebruik niet gedurende langere tijd in de lichtbron. Dit kan schadelijk zijn voor de ogen. Kijk niet in de lichtbron. Schakel de werklamp uit als u deze niet gebruikt. 13.4.1.
- Page 107 13.5. Displayverlichting dimmen U kunt de displayverlichting op de niveaus “helder” en “donker” instellen en uitzet- ten. Druk meerdere keren op de toets om de displayverlichting in te stellen. 13.6. Laadniveau accu Het laadniveau van de accu kan uitsluitend in de accu- modus worden opgeroepen.
- Page 108 14. Servicefuncties 14.1. Het apparaat terugzetten naar de fabrieksinstellingen De huidige instellingen van het apparaat kunnen worden teruggezet op de fa- brieksinstellingen. De volgende instellingen worden daarbij gereset: • Taal • Tijd en datum • DAB-/FM-zender en zendergeheugen Het apparaat kan vanuit alle modi op de fabrieksinstellingen worden teruggezet. ...
- Page 109 15. Reiniging Haal de netstekker uit het stopcontact voordat u het apparaat gaat reinigen. Ge- bruik voor het reinigen een droge, zachte doek. Vermijd het gebruik van chemische oplos- en reinigingsmiddelen, omdat hierdoor het oppervlak en/of de opschriften van het apparaat beschadigd kunnen raken. 16.
- Page 110 17. Afvalverwerking VERPAKKING Het apparaat zit ter bescherming tegen transportschade in een verpak- king. Verpakkingen zijn gemaakt van materialen die milieuvriendelijk kunnen worden afgevoerd en vakkundig kunnen worden gerecycled. APPARAAT Het apparaat heeft een geïntegreerde accu. Doe het apparaat aan het einde van de levensduur in geen geval bij het gewone huishoudelijke afval.
- Page 111 18. Technische gegevens Netadapter BUREAU VERITAS Fabrikant Hung Kay Model HKP15-0901000dV Ingangsspanning AC 100-240 V ~ 50/60 Hz 0,4 A MAX Uitgangsspanning DC 9 V 1 A, 9 W Gemiddelde efficiëntie tijdens gebruik 83,04% Ingangsvermogen bij nullast 0,069 W Accu Fabrikant Huizhou Huiyi New Energy Co., Ltd Model HY-FY18650-7.4V 2INR19/66 Uitgangsspanning...
- Page 112 • In onze Service-Community vindt u andere gebruikers en onze medewerkers en daar kunt u uw ervaringen uitwisselen en uw kennis delen. U vindt onze Service-Community onder community.medion.com. • U kunt natuurlijk ook ons contactformulier gebruiken onder www.medion.com/contact.
- Page 113 20. Privacyverklaring Geachte klant, Hierbij delen wij u mede dat wij, MEDION AG, Am Zehnthof 77, 45307 Essen, Duits- land, als verwerkingsverantwoordelijke uw persoonsgegevens verwerken. In aangelegenheden met betrekking tot privacy worden wij ondersteund door de functionaris voor gegevensbescherming van ons bedrijf, die te bereiken is via MEDI- ON AG, Datenschutz, Am Zehnthof 77, 45307 Essen, Duitsland;...
- Page 114 Contenido Información acerca de este manual de instrucciones ......117 1.1. Explicación de los símbolos ................117 Uso conforme a lo previsto ..............119 Indicaciones de seguridad ..............120 3.1. Colocación segura del aparato ..............121 3.2. Alimentación eléctrica ................... 121 3.3.
- Page 115 10.5. Visualización de la información de emisoras ......... 138 10.6. Guardado de emisoras ................... 138 10.7. Reproducción de emisoras guardadas ............. 138 Modo Bluetooth ..................138 11.1. Primer emparejamiento de dispositivos con Bluetooth ....139 11.2. Iniciar/parar la reproducción ............... 139 11.3.
- Page 116 1. Información acerca de este manual de instrucciones Muchas gracias por haber elegido nuestro producto. Le deseamos que disfrute con este aparato. Antes de la puesta en servicio, lea atentamente las indicaciones de segu- ridad y todo el manual. Tenga en cuenta las advertencias que aparecen en el propio aparato y en el manual de instrucciones.
- Page 117 Respete las indicaciones del manual de instrucciones. • Signo de enumeración/información sobre eventos durante el manejo. Instrucción operativa que debe ejecutarse. Clase de protección II Los aparatos eléctricos de la clase de protección II son aparatos que disponen de un aislamiento doble o reforzado continuo y que no tie- nen posibilidad de conexión de un conductor de puesta a tierra.
- Page 118 2. Uso conforme a lo previsto Este es un aparato de la electrónica de consumo. La radio para obras sirve para reproducir archivos de audio a tra- vés de Bluetooth o un puerto AUX. Además, también se pueden reproducir emisiones de radio. Las posibilidades técnicas del aparato vienen dadas por la zona de cobertura indicada.
- Page 119 3. Indicaciones de seguridad ¡ADVERTENCIA! ¡Peligro de sufrir lesiones! Peligro de lesiones para niños y personas con capaci- dades mentales, sensoriales o físicas reducidas (como personas con discapacidad parcial, personas mayores con limitaciones en sus capacidades físicas y mentales) o con falta de experiencia y conocimiento (como niños mayores).
- Page 120 3.1. Colocación segura del aparato No conecte inmediatamente el aparato cuando este se haya trasladado de una zona fría a una cálida. El agua condensada que se forma podría estropear el aparato en determinadas cir- cunstancias. Cuando el aparato haya alcanzado la temperatu- ra ambiente, ya se puede poner en servicio con total seguri- dad.
- Page 121 Enchufe el aparato solo a tomas de corriente accesibles y co- nectadas a tierra con 100-240 V ~ 50/60 Hz. Si no está seguro de la alimentación eléctrica en el lugar de instalación, consul- te al proveedor de energía en cuestión. ...
- Page 122 No inserte ningún objeto en los orificios. ¡Existe peligro de descarga eléctrica! No use la radio para obras ni los accesorios si presentan da- ños, desprenden humo o emiten sonidos anómalos en funcio- namiento. En estos casos, desconecte inmediatamente la ali- mentación eléctrica.
- Page 123 (nor- mal). 4. Información de conformidad UE Por la presente, Medion AG declara que este aparato cumple los requisitos básicos y el resto de disposiciones pertinentes: • Directiva 2014/53/UE sobre la comercialización de equipos radioeléctricos •...
- Page 124 6. Volumen de suministro ¡PELIGRO! ¡Peligro de asfixia! Existe peligro de asfixia por la ingestión o inhalación de piezas pequeñas o láminas de plástico. Mantenga la lámina de plástico del embalaje alejada de los niños. Extraiga el producto del embalaje y retire todo el material de embalaje. ...
- Page 125 7. Vista general del aparato 7.1. Parte delantera Antena Indicación de hora/fecha, modo operativo, emisora de radio, Pantalla ajustes del sistema, volumen Bajar/subir volumen Micrófono • AMS (búsqueda automática de emisoras) • NAP (tiempo de cuenta atrás) • EQ (efectos de sonido/regulación de sonido)
- Page 126 • Encender/apagar la luz • Dimmer para ajustar el brillo de la pantalla • Ajustes del sistema • Selección de niveles de menú superiores • Información sobre la emisora actual • Búsqueda de emisoras • Navegación por los menús • Nivel de carga de la batería •...
- Page 127 7.2. Parte trasera 17 16 DC IN 9V Conexión para el adaptador de alimentación Disco de apriete para cierre del compartimento Placa de características (parte inferior) Compartimento para aparatos externos Conexión de audio para aparato externo (en el comparti- AUX IN mento) Tornillo moleteado para cierre del compartimento Luz de trabajo LED...
- Page 128 8. Puesta en servicio 8.1. Conexión del funcionamiento con cable Para la conexión de la radio, utilice únicamente el adaptador de alimentación sumi- nistrado. En el adaptador de alimentación hay una placa de características con los da- tos correspondientes. Conecte la clavija del adaptador de alimentación a la conexión para cable de ali- mentación DC IN 9V del aparato.
- Page 129 8.3. Encendido/apagado del aparato 8.3.1. Encendido del aparato Pulse la tecla para encender el aparato. La hora y la fecha pueden verse en la pantalla. 8.3.2. Apagado del aparato Mantenga pulsada la tecla para cambiar el aparato al modo Standby. Cuando el aparato está...
- Page 130 8.5. Ajuste de la hora/fecha 8.5.1. Ajuste manual de la hora/fecha El aparato está encendido o se encuentra en el modo Standby. Mantenga pulsada la tecla Se abre el menú Setup <System>. Pulse la tecla Se abre el menú System <Uhrzeit>. ...
- Page 131 cha se ajusten automáticamente. Seleccione <Kein Update> si no desea que la hora y la fecha se ajusten automá- ticamente. La hora y la fecha se ajustan automáticamente en función de la selección. 8.5.3. Ajuste del formato de hora/fecha ...
- Page 132 8.6. Primera búsqueda de emisoras DAB El aparato está encendido o se encuentra en el modo Standby. Pulse la tecla Se inicia la búsqueda de emisoras DAB. Una vez finalizada la búsqueda • se muestra el número de emisoras memorizadas; •...
- Page 133 8.10. Selección de modo Pueden seleccionarse los siguientes modos operativos: Modo Descripción Reproducción de una emisora de radio digital Reproducción de una emisora de radio analógica Entrada au- Reproducción de una fuente de audio externa a través de la co- xiliar nexión AUX •...
- Page 134 9.3. Guardado de emisoras Puede guardar hasta 30 emisoras DAB. Seleccione la emisora DAB que desea guardar. Mantenga pulsada la tecla hasta que en la pantalla se muestre Progr. speichern. Pulse varias veces la tecla hasta que se muestre una posición de memoria libre u ocupada y numerada.
- Page 135 Pulse varias veces la tecla para ajustar la frecuencia DAB deseada. Pulse la tecla La nueva frecuencia DAB está ajustada. 9.6. Ajuste de la función DRC DRC (Dynamic Range Compression) es una función para reducir el volumen de soni- dos altos y aumentar el volumen de sonidos bajos.
- Page 136 10. Modo FM 10.1. Selección de la calidad de señal para la búsqueda de emisoras Mantenga pulsada la tecla Se abre el menú FM <Suchlauf-Einstellung>. Pulse la tecla En el menú Suchlauf-Einstellung, seleccione <Alle Sender> para buscar emiso- ras FM con señal tanto débil como fuerte.
- Page 137 10.5. Visualización de la información de emisoras Pulse varias veces la tecla para ver la siguiente información: – tipo de emisora/frecuencia de emisora/pista actual; – hora/fecha; 10.6. Guardado de emisoras Puede guardar hasta 30 emisoras FM. Seleccione la emisora FM que desea guardar. ...
- Page 138 11.1. Primer emparejamiento de dispositivos con Bluetooth Los dispositivos externos conocidos que ya se han em- parejado una vez se conectarán directamente en el fu- turo. No es necesario emparejarlos de nuevo. Para vol- ver a establecer la conexión, solo tiene que activar el modo Bluetooth en ambos aparatos.
- Page 139 11.3. Gestión de llamadas Las llamadas entrantes se anuncian a través de la radio para obras mediante una señal acústica e interrumpen la reproducción. 11.3.1. Aceptación de una llamada Pulse la tecla La transmisión por voz se lleva a cabo a través del micrófono y del altavoz. 11.3.2.
- Page 140 Abra la puerta del compartimento. Enchufe el conector de un cable de clavija jack de 3,5 mm en la conexión AUX IN de la radio para obras. Enchufe el otro conector del cable de clavija jack en la salida AUX de su disposi- tivo externo.
- Page 141 Pulse la tecla y seleccione el modo Hilfseingang/Auxiliary Input. Se reproduce la señal de audio de su dispositivo externo. 13. Funciones de confort 13.1. Ecualizador Durante el funcionamiento, pulse la tecla Se muestra el efecto de sonido actual (p. ej., FLAT). ...
- Page 142 13.3. Uso del temporizador NAP El aparato cuenta con un temporizador de cuenta atrás (p. ej., para avisar del fin del tiempo de descanso) que se puede activar en los modos DAB, FM, Bluetooth y Hil- fseingang (AUX). Una vez transcurrido el tiempo ajustado (OFF, 10 min, 15 min, 30 min, 45 min, 60 min, 90 min o 120 min) se emite un tono de aviso a intervalos re- gulares.
- Page 143 13.4.1. Encendido de la luz de trabajo Gire la luz de trabajo de tal modo que no apunte al aparato. Mantenga pulsada la tecla hasta que la luz de trabajo se encienda. 13.4.2. Apagado de la luz de trabajo ...
- Page 144 13.6. Nivel de carga de la batería El nivel de carga de la batería solo puede consultarse en el modo de funcionamiento a batería. Asegúrese de que el aparato se encuentra en el modo de funcionamiento a ba- tería. ...
- Page 145 14. Funciones de servicio 14.1. Reseteo del aparato a la confi guración de fábrica La configuración actual del aparato se puede restablecer a los ajustes de fábrica. Se restablecen los siguientes ajustes: • idioma; • hora y fecha; • emisoras DAB/FM y memoria de emisoras. El reseteo del aparato a la configuración de fábrica se puede ejecutar desde cual- quier modo operativo.
- Page 146 15. Limpieza Antes de limpiar el aparato, desenchúfelo de la toma de corriente. Utilice para la limpieza un paño seco y suave. No utilice disolventes ni productos de limpieza quí- micos, puesto que podrían dañar la superficie o las inscripciones del aparato. 16.
- Page 147 17. Eliminación EMBALAJE El aparato se envía embalado para protegerlo de posibles daños duran- te el transporte. Los embalajes están hechos con materiales que pueden desecharse de forma respetuosa con el medioambiente y llevarse a un punto de reciclaje. APARATO El aparato está...
- Page 148 18. Datos técnicos Adaptador de alimentación BUREAU VERITAS Fabricante Hung Kay Modelo HKP15-0901000dV Tensión de entrada CA 100-240 V ~ 50/60 Hz 0,4 A MÁX Tensión de salida CC 9 V 1 A, 9 W Eficiencia media durante el funciona- 83,04 % miento Consumo de potencia en vacío 0,069 W Batería Fabricante...
- Page 149 • Si lo desea, también puede utilizar nuestro formulario de contacto que encon- trará en www.medion.com/contact. • Por supuesto, nuestro equipo de asistencia técnica también está a su disposición a través de nuestra línea directa o por correo postal.
- Page 150 En el caso de las cuestiones legales relacionadas con la protección de datos, esta- mos a su disposición a través de nuestro responsable de la protección de datos em- presarial, al que puede localizar en MEDION AG, Datenschutz, Am Zehnthof 77, D – 45307 Essen; datenschutz@medion.com. Por nuestra parte, procesamos sus datos para fines de ejecución de la garantía y procesos con ello relacionados (p. ej., repara-...
- Page 152 Sommario Informazioni relative alle presenti istruzioni per l’uso ......155 1.1. Spiegazione dei simboli ................. 155 Utilizzo conforme ..................157 Indicazioni di sicurezza ................158 3.1. Installazione sicura del dispositivo ............159 3.2. Alimentazione elettrica .................. 159 3.3. Utilizzo delle batterie ricaricabili ..............161 3.4.
- Page 153 10.5. Visualizzazione delle informazioni sulla stazione radio ..... 176 10.6. Memorizzazione di una stazione ..............176 10.7. Riproduzione di una stazione radio memorizzata ....... 176 Modalità Bluetooth ................. 176 11.1. Prima associazione dei dispositivi via Bluetooth ........177 11.2. Avvio/arresto della riproduzione ..............177 11.3.
- Page 154 1. Informazioni relative alle presenti istruzioni per l’uso Grazie per aver scelto il nostro prodotto. Ci auguriamo che sia di vostro gradimento. Prima di utilizzare il prodotto, leggere attentamente le indicazioni di si- curezza e le presenti istruzioni nella loro interezza. Osservare le avver- tenze riportate sul dispositivo e nelle istruzioni per l’uso.
- Page 155 Osservare le indicazioni contenute nelle istruzioni per l’uso! Punto elenco/informazioni relative a eventi che si possono verificare • durante l’utilizzo Istruzioni operative da seguire Classe di protezione II I dispositivi elettrici della classe di protezione II possiedono un isola- mento permanente doppio e/o rinforzato e non hanno possibilità di connessione per un conduttore di terra.
- Page 156 2. Utilizzo conforme Questo è un dispositivo dell’elettronica di consumo. La radio da cantiere è destinata alla riproduzione di materiale audio trasmesso via USB, Bluetooth o AUX. Possono essere inol- tre riprodotte trasmissioni radio. La gamma di ricezione indicata riflette le possibilità tecniche del dispositivo.
- Page 157 3. Indicazioni di sicurezza AVVERTENZA! Pericolo di lesioni! Pericolo di lesioni per bambini e persone con ridot- te capacità fisiche, sensoriali o intellettive (ad esempio persone parzialmente disabili, anziani con capacità fisi- che o intellettive ridotte) o con carenza di esperienza e di conoscenze (ad esempio bambini grandi).
- Page 158 3.1. Installazione sicura del dispositivo Dopo aver trasportato il dispositivo da un ambiente freddo a uno caldo, attendere prima di collegarlo. In determinate circo- stanze la formazione di condensa potrebbe danneggiare il di- spositivo. Quando il dispositivo ha raggiunto la temperatura ambiente è...
- Page 159 Collegare il dispositivo solo a prese con messa a terra facil- mente accessibili da 100-240 V ~ 50/60 Hz. In caso di dubbi sull’alimentazione elettrica nel luogo di posizionamento, ri- volgersi al fornitore di energia interessato. Non utilizzare il cavo di alimentazione se la spina o il cavo sono danneggiati.
- Page 160 Non utilizzare la radio da cantiere e gli accessori se presenta- no danni, producono fumo o emettono rumori insoliti. In que- sti casi staccare immediatamente la spina dalla presa elettrica. La sorgente luminosa di questo dispositivo non può essere sostituita.
- Page 161 è garantita solo se la radio da cantiere si tro- va in posizione eretta (normale). 4. Informazioni sulla conformità UE Medion AG dichiara che il dispositivo è conforme ai requisiti essenziali e alle altre di- sposizioni vigenti in materia: •...
- Page 162 6. Contenuto della confezione PERICOLO! Pericolo di soffocamento! Pericolo di soffocamento in caso di ingestione o inala- zione di componenti piccoli o pellicole dell’imballaggio. Tenere la pellicola dell’imballaggio fuori dalla porta- ta dei bambini. Estrarre il prodotto dalla confezione e rimuovere tutto il materiale d’imballaggio. ...
- Page 163 7. Panoramica del dispositivo 7.1. Lato anteriore Antenna Visualizzazione di ora/data, modalità di funzionamento, Display stazione radio, impostazioni di sistema, volume Riduzione/aumento del volume Microfono • AMS (ricerca automatica delle stazioni) • NAP (conto alla rovescia) • EQ (effetti sonori/regolazione del suono)
- Page 164 • Accensione/spegnimento della luce • Regolazione dell’illuminazione del display • Impostazioni di sistema • Selezione del menu di livello superiore • Informazioni sulla stazione attuale • Ricerca delle stazioni radio • Navigazione all’interno dei menu • Stato di carica della batteria •...
- Page 165 7.2. Lato posteriore 17 16 DC IN 9 V Ingresso per alimentatore Piastra di bloccaggio del meccanismo di chiusura del vano posteriore Targhetta (lato inferiore) Vano per dispositivi esterni AUX IN Presa audio per dispositivi esterni (nel vano posteriore) Vite a testa zigrinata del meccanismo di chiusura del vano posteriore Luce di lavoro LED...
- Page 166 8. Messa in funzione 8.1. Collegamento alla rete elettrica Per collegare la radio, utilizzare esclusivamente l’alimentatore fornito. Sull’alimentato- re si trova una targhetta con i rispettivi dati. Collegare la spina dell’alimentatore alla presa per il cavo di alimentazione DC IN 9 V del dispositivo. ...
- Page 167 8.3. Accensione/spegnimento del dispositivo 8.3.1. Accensione del dispositivo Premere il tasto per accendere il dispositivo. Sul display vengono visualizzate l’ora e la data. 8.3.2. Spegnimento del dispositivo Mantenere premuto il tasto per portare il dispositivo in modalità Stan- dby.
- Page 168 8.5. Impostazione di ora/data 8.5.1. Impostazione manuale di data e ora Il dispositivo è acceso o si trova in modalità Standby. Mantenere premuto il tasto Viene visualizzato il menu Setup <System>. Premere il tasto Viene visualizzato il menu System <Uhrzeit>. ...
- Page 169 la data vengano acquisite automaticamente. Selezionare <Kein Update> per fare in modo che l’ora e la data non vengano ac- quisite automaticamente. L’ora e la data vengono acquisite automaticamente in base alla selezione. 8.5.3. Impostazione del formato di ora/data ...
- Page 170 8.7. Regolazione del volume Durante il funzionamento del dispositivo, ruotare la manopola di regolazione in direzione - per ridurre il volume. Durante il funzionamento, ruotare la manopola di regolazione in direzio- ne + per aumentare il volume. Il volume impostato viene visualizzato sul display per circa 6 secondi. 8.8.
- Page 171 8.10. Selezione della modalità È possibile selezionare le seguenti modalità: Modalità Descrizione Riproduzione di una stazione radio digitale Riproduzione di una stazione radio analogica Ingresso ausi- Riproduzione di una sorgente audio esterna tramite la porta liario • Riproduzione di una sorgente audio da un dispositivo esterno con tecnologia Bluetooth Associazione Bluetooth...
- Page 172 9.3. Memorizzazione di una stazione Si possono memorizzare fino a 30 stazioni radio DAB. Selezionare la stazione radio DAB che si desidera memorizzare. Mantenere premuto il tasto fino a che non viene visualizzata l’opzione Progr. speichern. Premere più volte il tasto fino a che non viene visualizzata una posizione di memoria libera oppure occupata e numerata.
- Page 173 Vengono visualizzati il menu Manuell einstellen e la frequenza DAB attuale. Premere più volte il tasto oppure per impostare la frequenza DAB de- siderata. Premere il tasto La nuova frequenza DAB è impostata. 9.6. Impostazione della funzione DRC La funzione DRC (Dynamic Range Compression) serve per ridurre il volume dei suo- ni troppo alti e aumentare quello dei suoni troppo bassi.
- Page 174 Selezionare <Aus> per disattivare la funzione TA. Selezionare <Ein> per attivare la funzione TA. Premere il tasto La funzione TA è impostata. 10. Modalità FM 10.1. Selezione della qualità del segnale delle stazioni radio da cercare Mantenere premuto il tasto Viene visualizzato il menu FM <Suchlauf-Einstellung>.
- Page 175 10.4. Selezione di una stazione Selezionare la modalità di funzionamento FM. Viene riprodotta la stazione radio FM attuale. Premere il tasto Premere il tasto finché non viene visualizzata la stazione radio FM desiderata. Premere il tasto Viene riprodotta la stazione radio FM desiderata.
- Page 176 11.1. Prima associazione dei dispositivi via Bluetooth I dispositivi esterni noti, che sono già stati associati al- meno una volta, vengono associati direttamente. Non è necessario eseguire una nuova procedura di associazio- ne. Per l’associazione basta attivare la modalità Blueto- oth su entrambi i dispositivi.
- Page 177 11.3. Gestione delle chiamate Le chiamate in arrivo vengono segnalate dalla radio da cantiere mediante un segnale acustico che interrompe la riproduzione audio. 11.3.1. Accettazione di una chiamata Premere il tasto La trasmissione vocale ha luogo tramite il microfono e l’altoparlante. 11.3.2.
- Page 178 12.1. Collegamento di un dispositivo di riproduzione esterno Portare la radio da cantiere in modalità Standby. Spegnere il dispositivo esterno. Sbloccare lo sportello del vano posto sul retro della radio da cantiere. Svitare il dado zigrinato e ruotare la piastra di bloccaggio. ...
- Page 179 Posizionare il dispositivo esterno all’interno del vano posteriore. Chiudere lo sportello del vano posteriore. Bloccare lo sportello del vano posteriore. Ruotare la piastra di bloccaggio e avvitare la vite zigrinata. Accendere la radio da cantiere. Premere il tasto e selezionare la modalità...
- Page 180 13.3. Utilizzo della funzione di conto alla rovescia Il dispositivo offre la funzione di conto alla rovescia (ad es. per indicare la fine di una pausa) attivabile nelle diverse modalità DAB, FM, Bluetooth e Hilfseingang (AUX). Trascorso il periodo di tempo impostato (off, 10 min., 15 min., 30 min., 45 min., 60 min., 75min., 90 min.
- Page 181 13.4.1. Accensione della luce da lavoro Orientare la luce da lavoro in modo che sia rivolta lontano dal dispositivo. Mantenere premuto il tasto finché la luce da lavoro non si accende. 13.4.2. Spegnimento della luce da lavoro Mantenere premuto il tasto finché...
- Page 182 13.6. Stato di carica della batteria Lo stato di carica della batteria può essere visualizzato esclusivamente quando il dispositivo è alimentato dalla batteria. Assicurarsi che il dispositivo sia alimentato dalla batteria. Modalità DAB: premere il tasto 7 volte in rapida successione per visualizzare lo stato di carica della batteria.
- Page 183 14.2. Visualizzazione della versione del software In caso di malfunzionamento del dispositivo può essere utile comunicare al servizio clienti il numero di versione del software. Le informazioni sulla versione del softwa- re possono essere richiamate in qualsiasi modalità. Mantenere premuto il tasto ...
- Page 184 15. Pulizia Prima della pulizia estrarre la spina dalla presa di corrente. Per la pulizia utilizzare un panno morbido e asciutto. Evitare solventi e detergenti chimici perché possono danneggiare la superficie e/o le scritte sul dispositivo. 16. In caso di problemi PROBLEMA POSSIBILE CAUSA SOLUZIONE...
- Page 185 17. Smaltimento IMBALLAGGIO L’imballaggio protegge il dispositivo da eventuali danni durante il tra- sporto. Gli imballaggi sono prodotti con materiali che possono essere smaltiti nel rispetto dell’ambiente e destinati a un corretto riciclaggio. DISPOSITIVO Il dispositivo è dotato di una batteria integrata. Al termine del ciclo di vita del dispositivo non smaltirlo in nessun caso assieme ai normali rifiu- ti domestici, bensì...
- Page 186 18. Dati tecnici Alimentatore BUREAU VERITAS Costruttore Hung Kay Modello HKP15-0901000dV Tensione in entrata AC 100-240 V ~ 50/60 Hz 0,4 A MAX Tensione in uscita DC 9V 1A, 9W Efficienza media durante il funziona- 83,04% mento Potenza assorbita a vuoto 0069 W Batteria Costruttore Huizhou Huiyi New Energy Co., Ltd Modello...
- Page 187 Il nostro team di assistenza è raggiungibile anche via telefonicamente. Italia Orari di apertura Assistenza Post-Vendita Lun.-ven.: 9.00-17.00 02 - 360 003 40 Indirizzo del servizio di assistenza G2-DUAL S.a.S. MEDION Service Center Via Brigata Reggio, 47/AB 42124 Reggio Emilia Italia...
- Page 188 Svizzera Orari di apertura Assistenza Post-Vendita Lun.-ven.: 9.00-19.00 0848 - 33 33 32 Indirizzo del servizio di assistenza MEDION/LENOVO Service Center Ifangstrasse 6 8952 Schlieren Svizzera Note legali Copyright © 2023 Ultimo aggiornamento: 21.04.2023 Tutti i diritti riservati. Le presenti istruzioni per l’uso sono protette da copyright.
- Page 189 BDSG) (art. 23 GDPR). Sussiste inoltre il diritto di ricorso presso un’au- torità di controllo competente per la protezione dei dati (art. 77 GDPR in combinato disposto con § 19 BDSG). Per MEDION AG si tratta dell’incaricato regionale per la protezione dei dati e la libertà d’informazione della Renania Settentrionale-Vestfalia: Landesbeauftragte für Datenschutz und Informationsfreiheit Nordrhein Westfalen,...
- Page 190 Content Information about this user manual ............193 1.1. Explanation of symbols .................. 193 Proper use ....................195 Safety instructions .................. 196 3.1. Setting up the device safely ................. 197 3.2. Power supply ..................... 197 3.3. Handling the rechargeable batteries ............199 3.4.
- Page 191 10.5. Displaying station information ..............214 10.6. Storing a radio station ..................214 10.7. Playing a stored station .................. 214 Bluetooth mode ..................214 11.1. Connecting Bluetooth devices for the first time ........215 11.2. Start/pause playback ..................215 11.3. Managing calls ....................
- Page 192 1. Information about this user manual Thank you for choosing our product. We hope you enjoy using this de- vice. Please read the safety instructions and the user manual carefully before using the device for the first time. Note the warnings on the device and in the user manual.
- Page 193 • Bullet point/information on steps during operation Instruction to be carried out Protection class II Electrical devices in protection class II are devices that have double and/or reinforced insulation throughout, and do not have an option for connecting a protective earth. The housing of an electrical device in protection class II, with surrounding insulating material, might ei- ther form all of the additional or reinforced insulation, or part of it.
- Page 194 2. Proper use This is a home entertainment device. The site radio is used to play audio material which can be played via Bluetooth or AUX. In addition, radio stations can be played. The specified reception frequency range represents the techni- cal possibilities of the device.
- Page 195 3. Safety instructions WARNING! Risk of injury! Risk of injury to children and persons with limited phys- ical, sensory or mental abilities (for example, partial- ly disabled people or older people with limited physi- cal and mental abilities) or to those without experience and knowledge (such as older children).
- Page 196 3.1. Setting up the device safely If the device has been moved from a cold room to a warm room, wait before connecting it to the power supply. The re- sulting condensation may damage the device. The device can be operated safely as soon as it has reached room tempera- ture.
- Page 197 Only operate the device from an earthed, easily accessible 100–240 V ~ 50/60 Hz mains socket. Contact the local energy supplier if you have any questions about the power supply at the installation location. Do not use the power cable if either the plug or cable is dam- aged.
- Page 198 Do not use the site radio and accessories if they are damaged, generate smoke or emit unusual operating noises. In this case, disconnect the power supply immediately. The light source for this device is not replaceable. When the light source has reached the end of its life, the entire device must be replaced.
- Page 199 (normal) position. 4. EU Declaration of Conformity Medion AG hereby declares that this device complies with the fundamental require- ments and the other relevant provisions of the following: • EMC Directive 2014/53/EU •...
- Page 200 6. Package contents DANGER! Risk of choking and suffocation! There is a risk of choking and suffocation due to swal- lowing or inhaling small parts or plastic wrap. Keep the plastic packaging out of the reach of chil- dren. ...
- Page 201 7. Device overview 7.1. Front Antenna Display the time/date, operating mode, radio station, system Display settings, volume Reduce/increase volume Microphone • AMS (automatic station search) • NAP (countdown time) • EQ (sound effects/sound control)
- Page 202 • Switch light on/off • Set dimmer for display lighting • System settings • Select higher-level menu • Information about the current station • Station search • Navigation in the menus • Battery charge level • Sleep timer • Navigate in the menu, next track/station •...
- Page 203 7.2. Rear 17 16 DC IN 9V Connection for mains adapter Catch for storage compartment lock Type plate (underneath) Storage compartment for external devices Audio connection for external device (in storage compart- AUX IN ment) Knurled screw for storage compartment lock LED work light...
- Page 204 8. Getting started 8.1. Mains operation Only use the supplied mains adapter to connect the radio. The mains adapter has a type plate with the corresponding information on it. Connect the mains adapter plug to the device’s DC IN 9V power cable connection. ...
- Page 205 8.3. Switching the device on/off 8.3.1. Switching on the device Press the button to switch on the device. The time and date are visible on the display. 8.3.2. Switching off the device Press and hold the button to switch the device to standby mode. When the device is in standby mode during battery op- eration, the device automatically switches to ener- gy-saving mode after 30 seconds.
- Page 206 8.5. Setting the time/date 8.5.1. Setting the time/date manually The device is switched on or in standby mode. Press and hold the button. The Setup <System> menu is shown on the display. Press the button. The System <Uhrzeit> menu is shown on the display. ...
- Page 207 Select <Update von DAB> or <Update von FM> if the time and date is to be set automatically. Select <Kein Update> if the time and date are not to be set automatically. The time and date are set automatically according to your selection. 8.5.3.
- Page 208 8.6. Starting the DAB station search for the fi rst time The device is switched on or in standby mode. Press the button. The DAB station search starts. Once the search has ended • the number of stored stations is displayed; •...
- Page 209 Mode Description Digital radio station playback Analogue radio station playback Auxiliary in- Playback of an external audio source via the AUX connection • Playback of an audio source from an external Bluetooth- Bluetooth enabled device pairing • Call control for a Bluetooth-enabled mobile phone ...
- Page 210 9.3. Storing a radio station You can store up to 30 DAB stations. Select the DAB station you want to store. Press and hold the button until Progr. speichern is shown on the display. Press the button several times until a free or occupied and numbered memory slot is shown on the display.
- Page 211 Press the button several times to set the desired DAB frequency. Press the button. The new DAB frequency is now set. 9.6. Setting the DRC function DRC (Dynamic Range Compression) is a function that reduces the volume of louder sounds and boosts the volume of quieter sounds.
- Page 212 10. FM mode 10.1. Selecting the signal quality for the station search Press and hold the button. The FM <Suchlauf-Einstellung> menu is shown on the display. Press the button. In the Suchlauf-Einstellung menu, select <Alle Sender> to search for all FM sta- tions with weak and strong signals.
- Page 213 10.5. Displaying station information Press the button several times to display the following information: – Station type/station frequency/current track – Time/date 10.6. Storing a radio station You can store up to 30 FM stations. Select the FM station you want to store. ...
- Page 214 11.1. Connecting Bluetooth devices for the fi rst time Known external devices, which have already been paired once, will be connected again automatically in the future. It is not necessary to pair the devices again. To reconnect, simply activate Bluetooth mode on both devices.
- Page 215 11.3. Managing calls Incoming calls are announced by an acoustic signal from the site radio and interrupt audio playback. 11.3.1. Accepting a call Press the button. Voice transmission takes place via the microphone and speaker. 11.3.2. Ending a call ...
- Page 216 Insert a 3.5 mm jack cable into the AUX IN jack on the site radio. Insert the other connector on the jack cable into the AUX output on your exter- nal device. Switch on the external device. ...
- Page 217 once the set time has elapsed (Off, 15 min., 30 min., 45 min., 60 min., 75 min. or 90 min.). Press and hold the button. The DAB, FM, Bluetooth or Hilfseingang menu is shown on the display. Press the button several times until <System>...
- Page 218 13.4. Using the work light You can enable the work light. WARNING! Risk of damage to the eyes! Do not look directly into the light source for a longer period of time during operation. This can damage your eyes. Do not look directly into the light source. ...
- Page 219 13.5. Dimming the display lighting You can set the display lighting to “bright” and “dim” and switch it off. Press the button repeatedly to set the display lighting. 13.6. Battery charge level The battery charge level can only be viewed during bat- tery operation.
- Page 220 14. Service functions 14.1. Resetting the device to factory settings The current device settings can be reset to the factory settings. This process resets the following settings: • Language • Time and date • DAB/FM station and station memory The device can be reset to factory settings from all modes. ...
- Page 221 15. Cleaning Before cleaning, pull the plug out of the mains socket. Use a soft, dry cloth to clean the device. Avoid the use of chemical solutions and cleaning products because these may damage the device surface and/or the labels on it. 16.
- Page 222 17. Disposal PACKAGING Your device has been packaged to protect it from damage in transit. The packaging is made of materials that can be recycled in an environmen- tally friendly manner. DEVICE The device is fitted with an integrated rechargeable battery. At the end of its service life, do not dispose of the device in the normal household rubbish.
- Page 223 18. Technical specifi cations Mains adapter BUREAU VERITAS Manufacturer Hung Kay Model HKP15-0901000dV Input voltage AC 100–240 V ~ 50/60 Hz 0.4 A MAX Output voltage DC 9 V 1 A, 9 W Average efficiency during operation 83.04% Power consumption with zero load 0.069 W Rechargeable battery Manufacturer...
- Page 224 In our Service Community, you can meet other users as well as our staff, and you can also share your experiences and pass on your knowledge. You will find our Service Community at http://community.medion.com. • Alternatively, use our contact form at www.medion.com/contact.
- Page 225 20. Privacy statement Dear Customer, We wish to inform you that we, MEDION AG, Am Zehnthof 77, 45307 Essen, Germa- ny process your personal data as a data controller. For matters regarding data protection, we are supported by our company data pro- tection officer, who can be contacted at MEDION AG, Datenschutz, Am Zehnthof 77, D –...