Publicité
Les langues disponibles
Les langues disponibles
Liens rapides
Publicité

Manuels Connexes pour GoodHome 3663602434337


Sommaire des Matières pour GoodHome 3663602434337
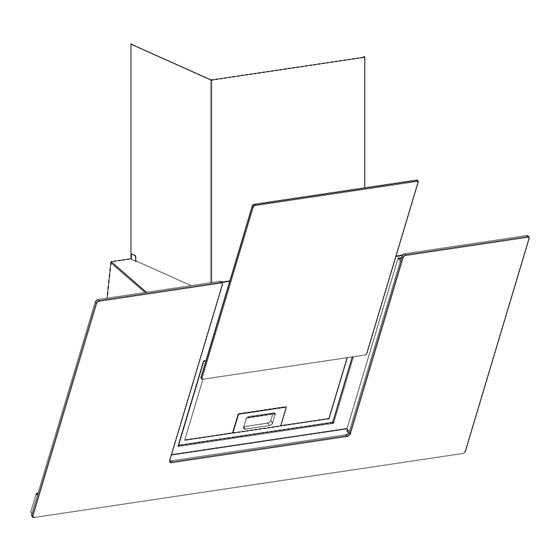
- Page 1 GHAGML90 3663602434337 V9180319...
- Page 2 EN Contents FR Contenu PL Zawartość RO Cuprins Preparation Préparation Czynności wstępne Pregătire Installation Installation Montaż Instalare Utilisation Użytkowanie Utilizare Care & Maintenance Entretien et maintenance Czyszczenie i konserwacja Îngrijire și întreținere...
- Page 3 EN IMPORTANT - Please read FR IMPORTANT : lire PL WAŻNE — przed użyciem RO IMPORTANT - Citiți cu carefully the separate attentivement le guide de należy się uważnie zapoznać atenție ghidul separat safety guide before use. sécurité avant utilisation. z dołączonymi oddzielnie privind siguranța înainte de informacjami dotyczącymi utilizarea produsului.
- Page 4 EN Installation FR Installation PL Montaż RO Instalare EN VENT PACK (Ø150mm) PACK D’AÉRATION (Ø 150 mm) PL ZESTAW WENTYLACYJNY (Ø150 mm) RO SET EVACUARE (Ø150 mm) CARBFILT 50 EN Choose a type of installation: Ducted option A (extraction to the outside) or Recirculation option B (no extraction to the outside).
- Page 5 EN Installation FR Installation PL Montaż RO Instalare Mark the wall with the hole positions as shown in the diagram. The fixings supplied are suitable for solid walls only. When fixing to any other type of wall use suitable alternative fixings. Warning: Caution! Before drilling it is extremely important to check the wall for hidden pipes, electrical cables etc using an appropriate detection device.
- Page 6 EN Installation FR Installation PL Montaż RO Instalare...
- Page 7 EN Installation FR Installation PL Montaż RO Instalare 01] x1 [01] 103-335mm [03] x1 [05] [03] / [04] [04] x1 694-927mm [05] x4 "...
- Page 8 EN Installation FR Installation PL Montaż RO Instalare Installation électrique Electrical Installation Toute l’installation doit être effectuée par une personne All installation must be carried out by a competent compétente ou un électricien qualifié. Avant de person or qualifed electrician. Before connecting the raccorder le câble d’alimentation, s’assurer que la mains supply ensure that the mains voltage corresponds tension de secteur correspond à...
- Page 9 EN Installation FR Installation PL Montaż RO Instalare Conectarea la alimentarea Instalacja elektryczna electrică Montaż musi zostać wykonany przez osobę kompetentną Instalarea trebuie să fie realizată în totalitate de o lub wykwalifikowanego elektryka. Przed podłączeniem persoană competentă sau de un electrician calificat. zasilania upewnić...
- Page 10 EN Installation FR Installation PL Montaż RO Instalare EN IMPORTANT: To proceed with installation, the cooker hood must be connected to a power supply. Ensure that the electrical installation is completed before proceeding with step 06. FR IMPORTANT : pour procéder à l'installation, la hotte aspirante doit être connectée à une alimentation.
- Page 11 EN Installation FR Installation PL Montaż RO Instalare [05] x2 [05] x2...
- Page 12 EN Installation FR Installation PL Montaż RO Instalare EN Only for ducted option. Uniquement pour l'option avec conduit. PL Tylko dla opcji kanałowej. RO Doar pentru opțiunea cu tubulatură.
- Page 13 EN Installation FR Installation PL Montaż RO Instalare EN Only for recirculation option. Uniquement pour l'option de recyclage. PL Tylko dla opcji recyrkulacyjnej. RO Doar pentru opțiunea de recirculare. [07] 07] x2...
- Page 14 EN Installation FR Installation PL Montaż RO Instalare CARBFILT 50...
- Page 15 EN Installation FR Installation PL Montaż RO Instalare EN Turn the power on at the isolation switch and the glass will retract automatically. FR Remettre l'alimentation au niveau de l'interrupteur d'isolement. La vitre se replie automatiquement. PL Włączyć zasilanie za pomocą odłącznika — szyba cofnie się automatycznie. RO Porniți alimentarea de la întrerupătorul de izolare și sticla se va retrage automat.
- Page 16 EN Use FR Utilisation PL Użytkowanie RO Utilizare Before you start WARNING: Read the instructions before using the appliance. Switch on the appliance at the switched fused connection unit. The appliance is ready for use. Functions & Settings Control panel To obtain the best results from your cooker hood it is recommended that you leave it switched on for a short time after you have finished cooking.
- Page 17 EN Use FR Utilisation PL Użytkowanie RO Utilizare Setting the Movement Sensor Within 30 seconds of turning on the mains power, press the Timer and Light Icons together for 2 seconds to adjust the Movement Sensor. Repeat this process to alter the sensor setting if required. The LED display will show the selected mode. Sensor enabled the display will flash for 5 seconds - default setting.
- Page 18 RO Utilizare Controlling a GoodHome cooker hood remotely IMPORTANT: This section is only applicable if you have purchased a GoodHome cooker hood. The process for connecting the hood to the hob happens in three stages: A) Configure the hob to transmit a radio frequency signal.
- Page 19 The hood will also show the double “A” symbols in its control panel to indicate pairing is complete. IMPORTANT: Once the hob and hood are paired and locked together you can now choose to use your GoodHome appliances in three ways, Independent Control, Semi-Automatic Control and Automatic Control.
- Page 20 EN Use FR Utilisation PL Użytkowanie RO Utilizare NOTE: You do not need to complete the pairing process again if you switch off the Hood connection on the hob. The link is stored in memory and will be reactivated once you have switched Hood connection back on. NOTE: If you touch the Cooker Hood Control Panel key before connectivity is complete you will see this message on screen: See your manual on how to Level...
- Page 21 EN Use FR Utilisation PL Użytkowanie RO Utilizare IMPORTANT: The extraction rate of the hood will vary based upon the total power output selected on the hob, as shown in the table below. Each hob cooking zone has a maximum rated output of 10 comprising 1-9 and Boost (10). Speed Level of the Hood Combined Power Output of the Hob Speed 2...
- Page 22 EN Use FR Utilisation PL Użytkowanie RO Utilizare 2. Adjust the brightness level by rotating the 360° Master Control Key between 0-5. 3. You can also adjust the lamp colour temperature by touching the Lighting Control Icon in this sequence: (a) ...
- Page 23 EN Use FR Utilisation PL Użytkowanie RO Utilizare Avant de commencer AVERTISSEMENT : lire les instructions avant d’utiliser l’appareil. Mettre l’appareil en marche sur l’unité de raccordement avec fusibles et interrupteur. L’appareil est prêt à l’emploi. Fonctions et réglages Panneau de commande Pour obtenir les meilleurs résultats de votre hotte, il est recommandé...
- Page 24 EN Use FR Utilisation PL Użytkowanie RO Utilizare Réglage du capteur de mouvement Dans les 30 secondes suivant la mise sous tension, appuyer simultanément sur les icônes de minuterie et d’éclairage pendant 2 secondes pour régler le capteur de mouvement. Répéter l’opération pour modifier le réglage du capteur si nécessaire.
- Page 25 Commande à distance d’une hotte aspirante GoodHome IMPORTANT : cette section est seulement applicable si vous avez acheté une hotte aspirante GoodHome. Le processus de connexion de la hotte à la plaque de cuisson comprend trois étapes : A) Configuration de la plaque de cuisson pour la transmission d’un signal de fréquence radio.
- Page 26 également le symbole « A » en double pour indiquer que le jumelage est terminé. IMPORTANT : une fois la plaque de cuisson et la hotte jumelées et connectées ensemble, vous pouvez choisir d’utiliser vos appareils GoodHome de trois façons : commande indépendante, commande semi-automatique et commande automatique.
- Page 27 EN Use FR Utilisation PL Użytkowanie RO Utilizare 2. Commande semi-automatique : le bouton de connexion de la hotte sur Connect la plaque de cuisson est activé. Le How to connect to hood ventilateur et l'extraction de la hotte peuvent être contrôlés grâce à la touche Hood connection principale de commande 360°...
- Page 28 EN Use FR Utilisation PL Użytkowanie RO Utilizare Extraction 3. Pour commander automatiquement le taux d’extraction de la hotte, appuyer sur l’icône de commande d’extraction automatique sur la plaque de cuisson. L’icône devient verte et la plaque de cuisson règle automatiquement le taux d’extraction en fonction de la puissance de fonctionnement de la plaque.
- Page 29 EN Use FR Utilisation PL Użytkowanie RO Utilizare Changement de la couleur et de la luminosité de la lampe de la hotte aspirante à partir de la plaque de cuisson Sélectionner le panneau de commande de la hotte aspirante à partir du menu principal. Appuyer sur l’icône commande d’éclairage pour sélectionner la fonction de commande de luminosité.
- Page 30 EN Use FR Utilisation PL Użytkowanie RO Utilizare Przed rozpoczęciem użytkowania OSTRZEŻENIE: Przed rozpoczęciem korzystania z urządzenia zapoznać się z instrukcją obsługi. Włączyć urządzenie za pomocą zestawu wyłącznika z bezpiecznikiem. Urządzenie jest gotowe do użytku. Funkcje i ustawienia Panel sterowania W celu zapewnienia możliwie jak najlepszego działania okapu kuchennego zaleca się, aby pozostawić...
- Page 31 EN Use FR Utilisation PL Użytkowanie RO Utilizare Ustawianie czujnika ruchu W ciągu 30 sekund od włączenia zasilania sieciowego nacisnąć jednocześnie i przytrzymać przez 2 sekundy ikony timera i oświetlenia, aby wyregulować czujnik ruchu. W razie potrzeby powtórzyć tę procedurę, aby zmienić ustawienie czujnika.
- Page 32 5 do 1. Zdalne sterowanie okapem GoodHome WAŻNE: Ta sekcja ma zastosowanie tylko w przypadku zakupu okapu kuchennego GoodHome. Proces podłączania okapu do płyty grzejnej przebiega w trzech etapach: A) Skonfigurować płytę grzejną tak, aby emitowała sygnał o częstotliwości radiowej.
- Page 33 Na panelu sterowania okapu również będzie wyświetlany symbol dwóch „A” oznaczający zakończenie parowania. WAŻNE: Po sparowaniu i połączeniu na stałe płyty grzejnej z okapem można wybrać jeden z trzech sposobów korzystania z urządzeń GoodHome: sterowania niezależnego, półautomatycznego i automatycznego. 1. Sterowanie niezależne — przycisk połączenia z okapem na płycie grzejnej...
- Page 34 EN Use FR Utilisation PL Użytkowanie RO Utilizare 3. Sterowanie automatyczne — przycisk połączenia z okapem na płycie grzejnej Connect jest aktywny, a sterowanie wentylatorem How to connect to hood oraz wyciągiem okapu jest zależne od ustawień mocy płyty grzejnej. Hood connection UWAGA: W przypadku wyłączenia połączenia z okapem na płycie nie trzeba powtarzać...
- Page 35 EN Use FR Utilisation PL Użytkowanie RO Utilizare 3. Aby automatycznie sterować siłą wyciągu okapu, dotknąć ikony automatycznego sterowania wyciągiem na płycie grzejnej. Ikona zmieni kolor na zielony, a płyta będzie automatycznie dostosowywać siłę wyciągu okapu zgodnie z mocą wyjściową płyty. Szczegółowe informacje znajdują się w poniższej tabeli. Jest to sterowanie automatyczne. WAŻNE: Siła wyciągu okapu będzie się...
- Page 36 EN Use FR Utilisation PL Użytkowanie RO Utilizare Zmiana koloru i jasności oświetlenia na okapie kuchennym z poziomu płyty Wybrać panel sterowania okapu kuchennego z menu głównego. Dotknąć ikony sterowania oświetleniem Q, aby wybrać funkcję regulacji jasności. 2. Ustawić poziom jasności, obracając główny przycisk sterujący 360° w zakresie 0–5. 3.
- Page 37 EN Use FR Utilisation PL Użytkowanie RO Utilizare Înainte de a începe AVERTISMENT: Citiți instrucțiunile înainte de utilizarea aparatului. Porniți aparatul de la unitatea de conectare cu comutator de siguranță. Aparatul este gata de utilizare. Funcții și setări Panou de control Pentru a obține cele mai bune rezultate de la hota de bucătărie, se recomandă...
- Page 38 EN Use FR Utilisation PL Użytkowanie RO Utilizare Configurarea senzorului de mișcare În 30 de secunde de la pornirea sursei de alimentare, apăsați pictogramele Temporizator și Lumină simultan timp de 2 secunde, pentru a regla senzorul de mișcare. Repetați acest proces pentru a modifica setarea senzorului, dacă este necesar.
- Page 39 1. Controlarea de la distanță a unei hote de bucătărie GoodHome IMPORTANT: Această secțiune se aplică numai dacă ați cumpărat o hotă de bucătărie GoodHome. Procesul de conectare a hotei la plită constă în trei etape: A) Configurați plita pentru a transmite un semnal de frecvență radio.
- Page 40 De asemenea, hota va afișa simbolurile duble „A” pe panoul său de control, pentru a indica faptul că s-a realizat asocierea. IMPORTANT: După ce plita și hota sunt cuplate și blocate, puteți alege să folosiți aparatele GoodHome în trei moduri, Control independent, Control semiautomat și Control automat.
- Page 41 EN Use FR Utilisation PL Użytkowanie RO Utilizare 2. Control semiautomat - Butonul de conectare a Hotei de pe plită este pornit Connect și puteți gestiona manual ventilatorul hotei How to connect to hood și rata de evacuare cu ajutorul butonului Principal 360 de pe panoul de control al Hood connection plitei.
- Page 42 EN Use FR Utilisation PL Użytkowanie RO Utilizare Extraction 3. Pentru a controla manual rata de evacuare a hotei, atingeți pictograma Control automat evacuare de pe plită. Pictograma va deveni verde, iar plita va ajusta în mod automat rata de evacuare a hotei conform cu puterea de ieșire a plitei.
- Page 43 EN Use FR Utilisation PL Użytkowanie RO Utilizare Modificarea culorii lămpii și a luminozității hotei de bucătărie de la plită Selectați Panoul de control al hotei de bucătărie din Meniul principal. Atingeți pictograma Control lumină pentru a selecta funcția de control al luminozității. 2.
- Page 44 EN Care & maintenance Entretien et maintenance PL Czyszczenie i konserwacja RO Îngrijire și întreținere Care & maintenance IMPORTANT: Turn off the power after Step 1 below before replacing the carbon filters. Carbon filter replacement Replace carbon filters every three months. To change the carbon filters: 1. ...
- Page 45 EN Care & maintenance Entretien et maintenance PL Czyszczenie i konserwacja RO Îngrijire și întreținere Aluminium grease filter cleaning Aluminium filters: To avoid fires, clean thoroughly once a month. Remove both grease filters as shown and soak in hot water and detergent for an hour. If using a dishwasher position the filters vertically to improve the cleaning process. 1 MONTH >...
- Page 46 EN Care & maintenance Entretien et maintenance PL Czyszczenie i konserwacja RO Îngrijire și întreținere Entretien et maintenance IMPORTANT : couper l’alimentation après l’étape 1 ci-dessous avant de remplacer les filtres à charbon. Remplacement du filtre à charbon Remplacer les filtres à charbon tous les trois mois. Pour changer les filtres à...
- Page 47 EN Care & maintenance Entretien et maintenance PL Czyszczenie i konserwacja RO Îngrijire și întreținere Nettoyage du filtre à graisse en aluminium Filtres en aluminium : Pour éviter les incendies, bien les nettoyer une fois par mois. Retirer les deux filtres à graisse comme indiqué...
- Page 48 EN Care & maintenance Entretien et maintenance PL Czyszczenie i konserwacja RO Îngrijire și întreținere Czyszczenie i konserwacja WAŻNE: Przed wymianą filtrów węglowych należy wyłączyć zasilanie po wykonaniu czynności 1 poniżej. Wymiana filtra węglowego Filtry węglowe należy wymieniać co trzy miesiące. Aby wymienić...
- Page 49 EN Care & maintenance Entretien et maintenance PL Czyszczenie i konserwacja RO Îngrijire și întreținere Czyszczenie aluminiowego filtra odtłuszczającego Filtry aluminiowe: Aby uniknąć pożaru, dokładnie czyścić filtry co miesiąc. Zdemontować oba filtry odtłuszczające w pokazany sposób i zamoczyć je na godzinę w roztworze ciepłej wody i detergentu. W przypadku korzystania ze zmywarki ustawić...
- Page 50 EN Care & maintenance Entretien et maintenance PL Czyszczenie i konserwacja RO Îngrijire și întreținere Îngrijire și întreținere IMPORTANT: Înainte de înlocuirea filtrelor din carbon, opriți alimentarea după ce ați realizat Pasul 1 de mai jos. Înlocuirea filtrului din carbon Înlocuiți filtrele din carbon la fiecare trei luni.
- Page 51 EN Care & maintenance Entretien et maintenance PL Czyszczenie i konserwacja RO Îngrijire și întreținere Curățarea de grăsime a filtrului din aluminiu Filtre din aluminiu: Pentru evitarea incendiilor, curățați bine lunar. Îndepărtați ambele filtre conform instrucțiunilor și înmuiați-le în apă fierbinte cu detergent timp de o oră. Dacă folosiți o mașină de spălat vase, poziționați filtrele vertical pentru îmbunătățirea procesului de curățare.
- Page 52 Addresses Manufacturer • Fabricant • Producent • Producător: Kingfisher International Products Limited, 3 Sheldon Square, London, W2 6PX, United Kingdom www.kingfisher.com/products Kingfisher International Products B. V . Rapenburgerstraat 175E 1011 VM Amsterdam The Netherlands Distributor: B&Q plc, Chandlers Ford, Hants, SO53 3LE United Kingdom www.diy.com Screwfix Direct Limited, Trade House,...