Table des Matières
Publicité
Les langues disponibles
Les langues disponibles
Liens rapides
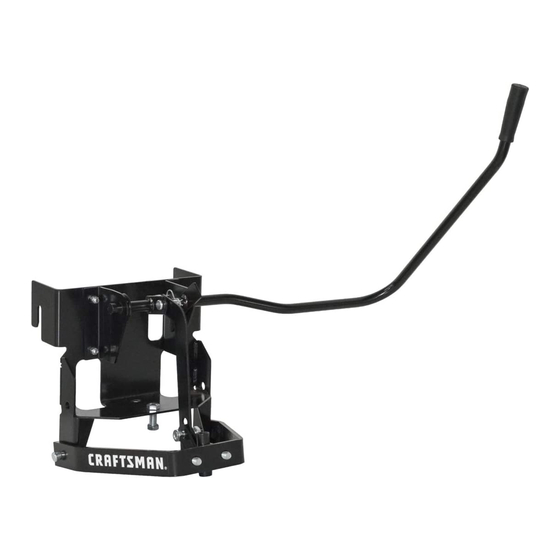
SLEEVE HITCH
ATTELAGE À MANCHON
ACOPLE DE MANGA
COMPATIBLE wITH:
cmXGram1130043
cmXGram1130044
cmXGram1130045
cmXGram1130047
This attachment is for "Garden Tractors" only. The sleeve hitch is not designed to fit or
be used on "Yard Tractors" or "Lawn Tractors".
If you have questIons or comments, contact us.
Pour toute questIon ou tout commentaIre, nous contacter.
sI tIene dudas o comentarIos, contáctenos.
1-888-331-4569
InstructIon Manual | GuIde d'utIlIsatIon | Manual de InstructIones
www.CrAFTSMAN.COM
CMXGZBF7124586
Publicité
Table des Matières

Sommaire des Matières pour Craftsman CMXGZBF7124586
- Page 1 This attachment is for "Garden Tractors" only. The sleeve hitch is not designed to fit or be used on "Yard Tractors” or "Lawn Tractors". CMXGZBF7124586 If you have questIons or comments, contact us. Pour toute questIon ou tout commentaIre, nous contacter.
-
Page 2: Safety Warnings
English (original instructions) Français (traduction de la notice d’instructions originale) Español (traducido de las instrucciones originales) Definitions: Safety Alert Symbols and Words This instruction manual uses the following safety alert symbols and words to alert you to hazardous situations and your risk of personal injury or property damage. - Page 3 EnglIsh CArtOn COntentS 24732 47950 25715 65404 67054 65369 65370 HArDWAre PACKAge COntentS A (2) B (2) C (4) F (3) D (1) E (4) 47947 47951 43087 43063 43350 HA3980 O (1) N (1) 25685 23625 P (3) L (4) 43343 43303 I (1)
- Page 4 01/2019 1A239H40436 CMXGRAM1130047 MTD LLC P.O. BOX 361131 Step 2: (fig. 2) www.Craftsman.com CLEVELAND, OH 44136 PATENT www.OPEpatents.com 1. Place the Left Pivot Bracket onto the end of the Lift Lever Assembly (the Right Pivot Bracket comes already T200 & T300 TRACTORS GO installed on the assembly).
-
Page 5: Frame Assembly
EnglIsh 917 ASSembLy Step 5: (fig. 5) 1. Hook the Sleeve Hitch Frame assembly onto the weld Step 4A: (fig. 4A) pins. Attached the bottom of the assembly to the tractor If your tractor looks like figure 4A hitch using a 5/8" x 1-3/4" hex bolt (B) and a 5/8" nylock nut (H). - Page 6 247 ASSembLy Lift ASSembLy Step 4: (fig. 4) Step 1: (fig. 1) 1. Hook the Sleeve Hitch Frame assembly onto the 1. Assemble the two 5/8" jam nuts (G) halfway onto the shoulder bolts of the tractor frame. Attach the bottom two 5/8"...
-
Page 7: Important
If you are not completely satisfied with the performance of For product, service or warranty information contact us at: your CRAFTSMAN Power Tool or Nailer for any reason, you can return it within 90 days from the date of purchase with a Para obtener información sobre el producto, el... - Page 8 AvertiSSementS générAUx SUr LA AVeRtISSeMeNt : lire tous les avertissements de sécurité et toutes les directives. Le non-respect SéCUrité DeS OUtiLS des avertissements et des directives pourrait se AVeRtISSeMeNt : lisez tous les avertissements de solder par un choc électrique, un incendie et/ou une sécurité, toutes les instructions, les illustrations blessure grave.
-
Page 9: Fonctionnement
étape 4b : (fig. 4b) ASSembLAge De LevAge si le tracteur ressemble à la figure 4B étape 1 : (fig. 1) 1. Enlever les écrous des deux boulons illustrés, de chaque 1. Assembler les deux contre-écrous 5/8 po (G) à côté... -
Page 10: Utilisation
électrique ou ramener l’avant de la benne vers le timon jusqu’à ce que de la cloueuse CRAFTSMAN , celui-ci peut le retourner, le verrou s’enclenche. accompagné d’un reçu, dans les 90 jours à compter de la date d’achat pour obtenir un remboursement intégral, sans... -
Page 11: Ensamblaje 917
ADvertenCiAS generALeS De ADVeRteNCIA: Lea todas las advertencias de seguridad e instrucciones. El incumplimiento SegUriDAD PArA HerrAmientAS de las advertencias e instrucciones puede provocar eLéCtriCAS descargas eléctricas, incendios o lesiones graves. ADVeRteNCIA: Nunca modifique la herramienta ADVeRteNCIA: Lea todas las advertencias eléctrica, ni tampoco ninguna de sus piezas. -
Page 12: Ensamblaje 247
Paso 4b: (fig. 4b) enSAmbLAJe DeL COnJUntO De eLevACiÓn si su tractor se parece al de la figura 4B Paso 1: (fig. 1) 1. Quite las tuercas de los dos pernos mostrados de cada 1. Enrosque las dos contratuercas 5/8" (G) hasta la mitad lado del tractor, dejando los pernos en su lugar. - Page 13 OPerACiÓn garantía limitada por tres años • Mueva la palanca de elevación hacia atrás para bajar el CRAFTSMAN reparará o reemplazará, sin cargo, cualquier acople de manga. defecto debido a materiales o mano de obra defectuosos por un año desde la fecha de compra. Esta garantía no •...
- Page 14 Sleeve HitcH cmXgZBf7124586...
- Page 15 parT no. descripTion 67054 Sleeve Hitch Frame 25715 Pivot Bracket, Left 25714 Pivot Bracket, Right 43350 Bolt, Carriage 3/8-16 x 1" HA21362 Hex Lock Nut, 3/8-16 65404 Sleeve Hitch Lift Assembly 64625 Lift Lever Assembly 24732 Lifting Link Plate 47947 Bolt, Hex 5/8-11 x 2"...
- Page 16 Stanley Black & Decker, Inc., used under license. es una marca registrada de Stanley Black & Decker, Inc., utilizada bajo licencia. est une marque déposée de Stanley Black & Decker, Inc., utilisée sous licence. © 2018 CRAFTSMAN Product Manufactured by: Producto fabricado por: Produit fabriqué...


