Table des Matières
Publicité
Les langues disponibles
Les langues disponibles
Liens rapides
Publicité
Chapitres
Table des Matières

Manuels Connexes pour SPORTSTECH KS500


Sommaire des Matières pour SPORTSTECH KS500
- Page 1 KS500...
- Page 3 Sehr geehrter Kunde wir freuen uns, dass Sie sich für ein Gerät aus der SPORTSTECH Produktpalette entschieden haben. SPORTSTECH Sportgeräte bieten Ihnen hohe Qualität und neue Technologie. Um die Leistungsfähigkeit des Gerätes voll nutzen zu können und viele Jahre Freude an Ihrem Gerät zu haben, lesen Sie bitte vor der Inbetriebnahme und dem Beginn des Trainings dieses Benutzerhandbuch sorgfältig durch und verwenden Sie das Gerät den Anweisungen entsprechend.
- Page 4 Aufbau, Benutzung, Abbau. 1. QR-Code scannen 2. Videos anschauen 3. Schnell und sicher starten Link zu den Videos: https://service.innovamaxx.de/ks500_video Uns gibt es auch auf Social Media! Hol dir die neuesten Produktinfos, Trainingsinhalte uvm. auf unserer: Instagram-Seite Facebook-Seite https://www.instagram.com/sportstech.de https://www.facebook.com/sportstech.de...
-
Page 5: Table Des Matières
INHALTSVERZEICHNIS 1. WICHTIGE SICHERHEITSHINWEISE ................6 2. HINWEISE ZUR NUTZUNG ..................7 3. EXPLOSIONSZEICHNUNG/ERSATZTEILLISTE ............. 8 4. LIEFERUMFANG ..................... 9 5. MONTAGEANLEITUNG ................... 10 6. ÜBUNGSVORSCHLÄGE ................... 13... -
Page 6: Wichtige Sicherheitshinweise
BITTE DIESE BEDIENUNGSANLEITUNG AN EINEM SICHEREN PLATZ AUFBEWAHREN. Es ist wichtig, vor der Montage und Nutzung des KS500 das gesamte Handbuch zu lesen. Sichere und effiziente Nutzung kann nur erreicht werden, wenn das KS500 ordnungsgemäß montiert, gewartet und verwendet wird. Es liegt in Ihrer Verantwor- tung zu gewährleisten, dass alle Benutzer des KS500 über alle Vorsichtsmaßnahmen... -
Page 7: Hinweise Zur Nutzung
2. HINWEISE ZUR NUTZUNG Stellen Sie sicher, dass der Türrahmen in einem guten Zustand ist. Er muss die Belastungen aushalten, die durch die Nutzung der Klimmzugstange entstehen (dies gilt z.B. nicht für Rigips- wände). Nutzen Sie bei der Klimmzugstangen-Station NUR die obere Stange zur Ausführung der Übun- gen. -
Page 8: Explosionszeichnung/Ersatzteilliste
3. EXPLOSIONSZEICHNUNG/ERSATZTEILLISTE Unter folgendem Link Unter folgendem Link finden Sie die Explosionszeichnung finden Sie die Explosionszeichnung und die Ersatzteile-Liste: und die Ersatzteile-Liste: https://service.innovamaxx.de/ks500_spareparts https://service.innovamaxx.de/ks500_spareparts Recyclingkreislauf Verpackungsmaterialien können wieder dem Rohstoffkreislauf zugeführt werden. Entsorgen Sie die Verpackung gemäß den aktuellen Bestimmungen. Informationen erhalten Sie bei den Rückgabe- und Sammelsystemen Ihrer Gemeinde. -
Page 9: Lieferumfang
4. LIEFERUMFANG zusammengebaute Klimmzugstangen-Station optionale Dip-Station Unterlegscheibe M8 Mutter M8 Bolzenschraube Plastik-Türrahmenschutzblöcke... -
Page 10: Montageanleitung
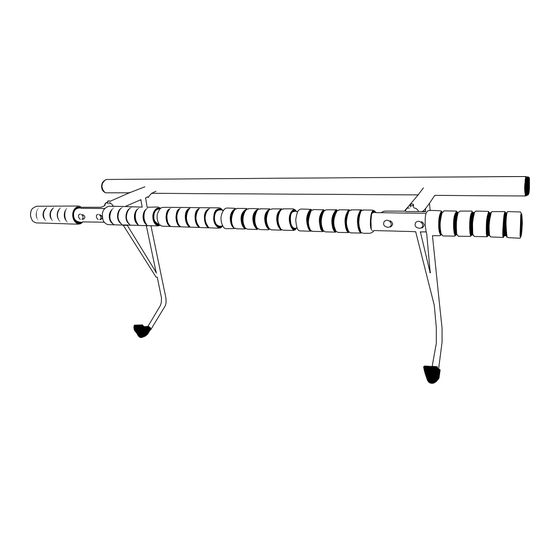
5. MONTAGEANLEITUNG Vor der Installation prüfen Sie bitte aus welchem Ma- terial Ihr gewünschter Montageort besteht und ob er tragfähig ist. Schritt 1 + 2: Türhaken aufklappen und einrasten Legen Sie die Stange auf den Boden. Ziehen Sie jetzt die beiden Türhaken in die Richtung der Pfeile nach unten und dann auseinander, bis beide Haken in senkrechter Position stehen. - Page 11 Schritt 3: Einhängen der Stange Stellen Sie sich auf die Seite des Türrahmens, auf der sich die Tür in die entgegengesetzte Richtung öffnet. Führen Sie die Haken durch die Türöffnung, sodass die Enden der Türhaken auf dem Türrah- men aufliegen. Hinweis: Bevor Sie die Stangen einhängen, müssen Sie die beiden beiliegenden Plastik-Türrahmen- schutzblöcke so auf die Stange schieben, dass die Auflagefläche zum Boden zeigt.
- Page 12 Hinweis: Die Spannweite der optionalen Dip-Station ist individuell anpassbar. Es gibt insgesamt sechs Schraubenlöcher an der waagerechten Dip-Station Stange, davon sind drei links und drei rechts. Beim Zusammenschrauben der Dip-Station empfehlen wir Ihnen die inneren zwei Schraublöcher zu nutzen. Unterlegscheibe M8 Mutter M8 Bolzenschraube Schritt 4: Einhaken der optionalen Dip-Station...
-
Page 13: Übungsvorschläge
6. ÜBUNGSVORSCHLÄGE Neben dem typischen Klimmzug sind u.a. folgende Übungen mit der Klimmzugstange von Sportstech möglich. Dehnübungen Dehnen Sie Ihren Körper ausreichend vor und nach den Übungen, um Krämpfe oder Verletzun- gen vorzubeugen. 1. Knie- und Hüftdehnung Halten Sie die Klimmzugstange mit Ihren Händen in entgegen-... - Page 14 3. Oberkörperdehnung Halten Sie sich an der Klimm- zugstange fest, beugen Sie langsam die Knie und halten Sie Ihren Kopf nach vorne geneigt. Heben Sie Ihre Füße vom Bo- den und bleiben Sie einige Zeit in dieser Position. 4. Bauchtraining Halten Sie sich an der Klimmzugstange fest, die Arme sind fast komplett ge- streckt.
- Page 15 Dear customer, We are pleased you chose a device from the SPORTSTECH product range. SPORTSTECH sports equip- ment offers you high quality and new technology. In order to fully use the potential of your device and be able to enjoy it for many years, please read this manual carefully before starting up and beginning of training, and use the device according to the instruc- tions.
- Page 16 1. Scan the QR code 2. Watch videos 3. Start fast and safely Link to the videos: https://service.innovamaxx.de/ks500_video We are also on social media! Get the latest product information, training content and much more on our: Instagram-page Facebook-page https://www.instagram.com/sportstech.de https://www.facebook.com/sportstech.de...
- Page 17 TABLE OF CONTENTS 1. IMPORTANT SAFETY INFORMATION ................. 19 2. INFORMATION ON HOW TO USE................20 3. EXPLODED DRAWING/SPARE PARTS LIST ..............21 4. PACKAGE CONTENTS ..................... 22 5. ASSEMBLY INSTRUCTIONS..................23 6. EXERCISE SUGGESTIONS..................26...
-
Page 18: Important Safety Information
5. Make sure that all screws, nuts, and knobs are tightened before starting to use the device. 6. Ensure that your equipment is firmly fixed before using. 7. The safety level of the KS500 can only be maintained if it is regularly examined for damage and/or wear and tear. 8. For home use only. -
Page 19: Information On How To Use
2. INFORMATION ON HOW TO USE Make sure that the door frame is in good condition. It must withstand the loads caused by the use of the pull-up bar (this does not apply, for example, to plasterboard walls). ONLY use the top bar of the pull-up bar station to perform the exercises. 3. -
Page 20: Exploded Drawing/Spare Parts List
3. EXPLODED DRAWING/SPARE PARTS LIST At the following link At the following link you will find the exploded drawing you will find the exploded drawing and the spare parts list: and the spare parts list: https://service.innovamaxx.de/ks500_spareparts https://service.innovamaxx.de/ks500_spareparts Recycling loop Packaging material can be conveyed back to the raw material cycle. Dispose of packaging material in accordance with legal provisions. Information can be retrieved from the return or collections systems of your community. -
Page 21: Package Contents
4. PACKAGE CONTENTS Assembled pull-up bar station optional dip station Washer M8 nut M8 bolt screw Plastic door frame protection blocks... -
Page 22: Assembly Instructions
5. ASSEMBLY INSTRUCTIONS Prior to installation, please check of which material your desired installation location is made and whether it is resilient. Step 1 + 2: Open door hooks and snap into place Put the bar on the floor. Now pull the two door hooks downwards in the direction of the arrows and then apart until both hooks are in the vertical position. - Page 23 Step 3: Hooking in the rod Stand on the side of the door frame where the door opens in the opposite direction. Pass the hooks through the door opening so that the ends of the door hooks rest on the door frame. Note: Before suspending the rods, you must slide the two enclosed plastic door frame protection blocks onto the rod so that the support surface faces the floor.
- Page 24 Note: The range of the optional dip station can be individually ad- justed. There are six screw holes in the horizontal dip station rod, three of which are on the left and three on the right. When screwing the Dip-Station together, we recommend using the two inner screw holes.
-
Page 25: Exercise Suggestions
6. EXERCISE SUGGESTIONS Apart from the typical pull-up, with this pull-up bar by Sportstech you can also do the following types of exercises. Stretching exercises Stretch your body sufficiently before and after the exercises to prevent cramps or injuries. 1. Knee and Hip Stretching... - Page 26 3. Upper Body Stretching Hold the pull-up bar firmly with your hands, bend your knees slowly, and keep your head til- ted forward. Lift your feet off the floor and stay in this position for some time. 4. Abdominal workout Hold on to the pull-up bar, the arms are almost completely stretched.
- Page 27 Estimado cliente, Nos complace que haya elegido un dispositivo de la línea de productos SPORTSTECH. Las máquinas de deporte de SPORTSTECH ofrecen una gran calidad y una tecnología innovadora. Con el fin de usar todo el potencial de su dispositivo y para que pueda disfrutarlo durante muchos años, por favor lea este manual cuidadosamente antes de comenzar a ejercitarse, y use el dispositivo de acuer- do a las instrucciones.
- Page 28 Montaje, Utilizar, Desmontaje. 1. Escanear el código QR 2. Ver vídeos 3. Comienza rápido y seguro Enlace a los videos: https://service.innovamaxx.de/ks500_video ¡También estamos en redes sociales! Obtenga la última información sobre nuestros productos, entrenamientos y mucho más aquí: Instagram Facebook https://www.instagram.com/sportstech.de https://www.facebook.com/sportstech.de...
- Page 29 CONTENIDO 1. INFORMACIÓN IMPORTANTE DE SEGURIDAD ............30 2. NOTAS SOBRE EL USO ................... 31 3. DIBUJO DE EXPLOSIÓN/LISTA DE REPUESTOS ............32 4. CONTENIDO ......................33 5. INSTRUCCIONES DE MONTAJE ................34 6. SUGERENCIAS DE EJERCICIOS ................37...
-
Page 30: Información Importante De Seguridad
Es importante leer la totalidad de este manual antes de ensamblar y usar la KS500. Solo se podrá conseguir un uso efectivo y seguro si la KS500 se ensambla, se man- tiene y se usa adecuadamente. Es su responsabilidad asegurarse de que todos los usuarios de la KS500 estén informados sobre todas las advertencias y precauciones. -
Page 31: Notas Sobre El Uso
2. NOTAS SOBRE EL USO Asegúrese de que el marco de la puerta esté en buenas condiciones. Tiene que soportar las tensiones causadas por el uso de la barra de elevación (esto no se aplica, por ejemplo, a las paredes de placas de yeso). En la estación de barra de mentón, SOLO use la barra superior para realizar los ejercicios. -
Page 32: Dibujo De Explosión/Lista De Repuestos
3. DIBUJO DE EXPLOSIÓN/LISTA DE REPUESTOS En el siguiente enlace En el siguiente enlace encontrarás el dibujo de explosión encontrarás el dibujo de explosión y la lista de repuestos: y la lista de repuestos: https://service.innovamaxx.de/ks500_spareparts https://service.innovamaxx.de/ks500_spareparts Reciclaje loop El material de empaque puede trasladarse de nuevo al ciclo de materias primas. Deshágase del material de empaque de acuerdo a las normativas legales. Puede encontrar información en los sistemas de recolección de su comunidad. - Page 33 4. CONTENIDO Chin-bares montada en la estación estación de inmersión opcional Arandela Tuerca M8 Perno M8 Bloques de protección de marco para la puerta de plástico...
-
Page 34: Instrucciones De Montaje
5. INSTRUCCIONES DE MONTAJE Antes de la instalación, por favor revise de qué mate- rial está hecho su lugar deseado de instalación y si es resistente. Paso 1 + 2: abra el gancho de la puerta y asegúrelo bien en su posición Coloque el poste en el suelo. - Page 35 Paso 3: Instalación de la barra Párese en el lado del marco de la puerta donde la puerta se abre en la dirección opuesta. Pase los ganchos a través de la abertura de la puerta de modo que los extremos de los ganchos de la puerta descansen en el marco de la puerta.
- Page 36 Nota: El lapso de la estación dip opcional es personalizable. Hay un total de seis orificios para tornillos en la varilla de la esta- ción de dip horizontal, tres de los cuales están a la izquierda y tres están a la derecha. Cuando atornille la estación de inmersión, le recomendamos que use los dos orificios de los tornillos internos.
-
Page 37: Sugerencias De Ejercicios
6. SUGERENCIAS DE EJERCICIOS Además de los ejercicios típicos, con esta barra para dominadas de Sportstech también puede hacer los siguientes tipos de ejercicios. Ejercicios de estiramiento Estire su cuerpo suficientemente antes y después de ejercitarse para prevenir calambres o lesiones. - Page 38 Estiramiento de la parte superior del cuerpo Sostenga la barra firmemente con sus manos, doble sus ro- dillas lentamente y mantenga su cabeza inclinada hacia adelante. Levante sus pies desde el suelo y permanezca en esta posición durante algún tiempo. 4.
- Page 39 FRANÇAIS Cher client, Nous sommes ravis que vous ayez choisi un appareil de la gamme de produits SPORTSTECH. Les équi- pements sportifs SPORTSTECH vous offrent une qualité élevée et une technologie innovante. Afin d'utiliser pleinement le potentiel de votre appareil et de pouvoir l'apprécier pendant de nombreuses années, lisez attentivement ce manuel avant l'utilisation et le début de votre entraînement et utilisez l'ap-...
- Page 40 3. Démarrez rapidement et en toute sécurité Lien vers les vidéos: https://service.innovamaxx.de/ks500_video Vous pouvez aussi nous trouver sur les réseaux sociaux! Retrouve les dernières informations sur les produits, le contenu des entraînements et bien plus encore sur notre: la page Instagram la page Facebook https://www.instagram.com/sportstech.de https://www.facebook.com/sportstech.de...
- Page 41 TABLE DES MATIÈRES 1. INSTRUCTIONS IMPORTANTES DE SÉCURITÉ ............45 2. NOTES SUR L‘UTILISATION ..................46 3. DESSIN ÉCLATÉ/LISTE DES PIÈCES DE RECHANGE ........... 47 4. CONTENU DU PAQUET ................... 48 5. INSTRUCTIONS D‘ASSEMBLAGE ................49 6. SUGGESTIONS D‘EXERCICES .................. 52...
-
Page 42: Instructions Importantes De Sécurité
Assurez-vous que votre équipement est fermement et solidement fixé avant de l‘utiliser. Le niveau de sécurité du KS500 ne peut être maintenu que s’il fait l’objet d’un examen pério- dique visant à déceler les dommages et/ou l’usure. Pour un usage domestique seulement. -
Page 43: Notes Sur L'utilisation
2. NOTES SUR L‘UTILISATION Assurez-vous que le cadre de la porte est en bon état. Il doit résister aux contraintes causées par l‘utilisation de la barre de traction (cela ne s‘applique pas, par exemple, aux murs en placoplâtre). Utilisez UNIQUEMENT la barre supérieure pour effectuer les exercices. 3. -
Page 44: Dessin Éclaté/Liste Des Pièces De Rechange
3. DESSIN ÉCLATÉ/LISTE DES PIÈCES DE RECHANGE A l‘adresse suivante A l‘adresse suivante vous trouverez le dessin éclaté vous trouverez le dessin éclaté et la liste des pièces de rechange : et la liste des pièces de rechange : https://service.innovamaxx.de/ks500_spareparts https://service.innovamaxx.de/ks500_spareparts Chaîne du recyclage Les matériaux d‘emballage peuvent être transportés vers le cycle des matières premières. -
Page 45: Contenu Du Paquet
4. CONTENU DU PAQUET Barre de traction assem- blée Station parallèle en optionopcional Rondelle Ecrou M8 Boulon M8 Protection de cadre de porte en plas- tique... -
Page 46: Instructions D'assemblage
5. INSTRUCTIONS D‘ASSEMBLAGE Avant l‘installation, veuillez vérifiez de quel matériel, l‘installation de votre lieu désirée a été faite et si elle est résiliente. Étape 1 + 2: Ouvrez le crochet de la porte et verrouillez-le en place Posez la barre sur le sol. Maintenant, tirez les deux crochets de porte dans le sens des flèches vers le bas, puis séparez-les jusqu‘à... - Page 47 Étape 3: Fixez la barre Tenez-vous sur le côté de la porte. Passez les crochets dans l’ouverture de la porte de sorte que les extrémités des crochets reposent sur le cadre de la porte. Remarque: Avant de fixer les barres, vous devez faire glisser les deux blocs de protection du cadre de por- te en plastique sur la barre de manière à...
- Page 48 Remarque: La portée de la station de parallèle optionnelle est per- sonnalisable. Il y a un total de six trous de vis sur la station horizontale (3 de chaque côté). Lors du vissage de la station, nous vous recommandons d‘utiliser les deux trous de vis intérieurs.
-
Page 49: Suggestions D'exercices
6. SUGGESTIONS D‘EXERCICES Mise à part la traction typique, avec cette barre de traction de Sport- stech, vous pouvez également effectuer les exercices suivants. Exercices d‘étirement Étirez votre corps suffisamment avant et après les exercices pour éviter les crampes ou les blessures. -
Page 50: Étirement De La Partie Supérieure Du Corps
Étirement de la partie supérieure du corps Tenez fermement la barre de traction avec vos mains, pliez vos genoux lentement et main- tenez votre tête inclinée vers l‘avant. Soulevez les pieds du sol et restez dans cette position pendant un certain temps. 4. - Page 51 ITALIANO Gentile cliente Siamo lieti che abbiate scelto un dispositivo della gamma SPORTSTECH. L‘attrezzatura sportiva SPORT- STECH ti offre alta qualità e tecnologia innovativa. Per sfruttare a pieno il potenziale del dispositivo e poterlo utilizzare per molti anni, raccomandiamo di leggere attentamente questo manuale prima di iniziare l’allenamento e di utilizzare il dispositivo seguen-...
- Page 52 2. Guarda il video 3. Inizia ad allenarti veloce e sicuro Link per il Video: https://service.innovamaxx.de/ks500_video Ci siamo anche sui social! Scopri le ultime novità sui prodotti, contenuti per l'allenamento e molto altro ancora sul nostro: pagina Instagram pagina Facebook https://www.instagram.com/sportstech.de https://www.facebook.com/sportstech.de...
- Page 53 INDICE 1. INFORMAZIONI IMPORTANTI SULLA SICUREZZA ............54 2. INFORMAZIONI D‘USO .................... 55 3. DISEGNO ESPLOSO/LISTA DEI PEZZI DI RICAMBIO ............ 56 4. CONTENUTO DI SPEDIZIONE ................... 57 5. ISTRUZIONI DI ASSEMBLAGGIO ................58 6. SUGGERIMENTI DI ESERCIZI ................61...
-
Page 54: Informazioni Importanti Sulla Sicurezza
PER ULTERIORE RIFERIMENTO. È importante leggere l‘intero manuale prima di assemblare e utilizzare la KS500. Un uso sicuro ed efficiente può essere raggiunto solo se la KS500 è assemblata, man- tenuta e utilizzata correttamente. È responsabilità dell’utente di assicurare che tutti gli utenti della KS500 siano informati di tutte le avvertenze e le precauzioni. -
Page 55: Informazioni D'uso
2. INFORMAZIONI D‘USO Assicuratevi che il telaio della porta sul quale volete fissare la barra sia in un buono stato. Questo deve essere in grado di sopportare il carico derivato dall‘utilizzo della barra per trazioni (va da sè che ad esempio l‘intercapedine non può essere utilizzata come zona di fissaggio). Nell‘esecuzione degli esercizi con la stazione barra per trazioni si prega di utilizzare SOLO la barra superiore. -
Page 56: Disegno Esploso/Lista Dei Pezzi Di Ricambio
DISEGNO ESPLOSO/LISTA DEI P 3. DISEGNO ESPLOSO/LISTA DEI PEZZI DI RICAMBIO Al seguente link Al seguente link troverete il disegno esploso troverete il disegno esploso e la lista dei pezzi di ricambio: e la lista dei pezzi di ricambio: https://service.innovamaxx.de/ks500_spareparts https://service.innovamaxx.de/ks500_spareparts Riciclaggio dei rifiuti Il materiale di imballaggio può... -
Page 57: Contenuto Di Spedizione
PEZZI DI RICAMBIO 4. CONTENUTO DI SPEDIZIONE Stazione barra per trazioni assemblata Dip station opzionale Rondella Dado M8 Bullone M8 Blocchi in plastica per protezione telaio porta... -
Page 58: Istruzioni Di Assemblaggio
5. ISTRUZIONI DI ASSEMBLAGGIO Prima di iniziare verificate di quale materiale è costitu- ita la base su cui volete montare la barra, controllando che sia una zona resistente ai carichi. Step 1 + 2: aprire i ganci per la parete e chiuderli a scatto Mettete la barra sul pavimento. - Page 59 Step 3: Appendere la barra Mettetevi a fianco alla parete, lateralmente, vicino alla porta ma in direzione opposta rispetto all‘apertura della stessa. Fate passare i ganci attraverso l‘apertura della porta in modo che le estre- mità degli stessi poggino sul suo telaio. Consiglio: Prima di appendere la barra è...
- Page 60 Consiglio: L‘apertura della dip station è regolabile individualmente. Vi sono in tutto sei fori per viti sulla barra orizzontale: tre a si- nistra e tre a destra. Per avvitare la stazione vi consigliamo di utilizzare i due fori centrali. Rondella Dado M8 Bullone M8 Step 4: agganciare la stazione per trazioni opzionale...
-
Page 61: Suggerimenti Di Esercizi
6. SUGGERIMENTI DI ESERCIZI Oltre alle classiche trazioni, con questa barra per trazioni realizzata da Sportstech è possibile fare anche i seguenti esercizi. Esercizi di stretching Allunga il tuo corpo prima e dopo gli esercizi per prevenire i crampi o le lesioni. - Page 62 Esercizi di stretching per la parte superiore del corpo Afferra la barra per trazioni con le mani, piega le ginocchia len- tamente e tieni la testa inclinata in avanti. Solleva i piedi da terra e rimani in questa posizione per un po‘...
- Page 63 GEBRUIKSAANWIJZING NEDERLANDS Geachte klant, We zijn blij dat je een apparaat uit het SPORTSTECH-assortiment hebt gekozen. De sportuitrusting van SPORTSTECH brengt hoogwaardige apparaten met nieuwe technologieën. Lees vóór gebruik deze gebruikershandleiding aandachtig door en gebruik het apparaat zoals aangege- ven. Zo zul je ten volle van de prestaties van het apparaat kunnen profiteren en er vele jaren geniet van hebben.
- Page 64 1. Scan de QR-code 2. Bekijk video‘s 3. Begin snel en veilig Link naar de video's: https://service.innovamaxx.de/ks500_video We zijn ook actief op social media! Raadpleeg voor de meest recente productinformatie, trainingen en nog veel meer, onze: Instagram-pagina Facebook-pagina https://www.instagram.com/sportstech.de https://www.facebook.com/sportstech.de...
- Page 65 INHOUD 1. BELANGRIJKE VEILIGHEIDSINSTRUCTIES ..............66 2. AANWIJZINGEN VOOR GEBRUIK ................67 3. EXPLOSIETEKENING/ONDERDELENLIJST ..............68 4. LEVERINGSOMVANG ....................69 5. MONTAGE-INSTRUCTIES ..................70 6. TRAININGSVOORSTELLEN ..................73...
-
Page 66: Belangrijke Veiligheidsinstructies
1. BELANGRIJKE VEILIGHEIDSINSTRUCTIES BEWAAR DEZE HANDLEIDING OP EEN VEILIGE PLAATS. 1. Het is belangrijk om de hele handleiding te lezen voordat je de KS500 installeert en gebruikt. Veilig en efficiënt gebruik kan alleen worden bereikt als de KS500 correct wordt geïnstalleerd, onderhouden en gebruikt. -
Page 67: Aanwijzingen Voor Gebruik
2. AANWIJZINGEN VOOR GEBRUIK Zorg ervoor dat het deurframe in goede staat is. Het moet bestand zijn tegen de druk die ontstaat door het gebruik van de optrekstang (dit geldt bijvoorbeeld niet voor wanden uit gipskarton). Gebruik voor het station van de pull-up bar ALLEEN de bovenste stang om de oefeningen uit te voeren. -
Page 68: Explosietekening/Onderdelenlijst
3. EXPLOSIETEKENING/ONDERDELENLIJST Onder de volgende link Onder de volgende link vind je de explosietekening vind je de explosietekening en de reserveonderdelenlijst: en de reserveonderdelenlijst: https://service.innovamaxx.de/ks500_spareparts https://service.innovamaxx.de/ks500_spareparts Recyclingcyclus Verpakkingsmaterialen kunnen worden teruggebracht in de grondstoffenkringloop. Voer de verpakking af volgens de geldende voorschriften. Informatie kan worden verkregen uit de retournerings- en ophaalsystemen van je gemeente. -
Page 69: Leveringsomvang
4. LEVERINGSOMVANG gemonteerd optrekstation optioneel dipstation Sluitringen M8-moeren M8-schroefbouten Plastic beschermingsblokjes voor het deurkozijn... -
Page 70: Montage-Instructies
5. MONTAGE-INSTRUCTIES Controleer voor installatie uit welk materiaal de ge- wenste installatielocatie bestaat en of deze stabiel is. Stap 1 + 2: De deurhaken openen en vergrendelen Leg de stang op de vloer. Trek nu de twee deurhaken in de richting van de pijl omlaag en vervolgens uit elkaar totdat beide haken verticaal staan. - Page 71 Stap 3: De stang inhangen Ga aan de kant van het deurkozijn staan waar de deur in de tegenovergestelde richting opent. Steek de haken door de deuropening zodat de uiteinden van de deurhaken op het deurkozijn rusten. Let op: Voordat je de stang inhangt, moet je de twee ingesloten plastic beschermingsblokjes voor het deurkozijn op de stang schuiven, zodanig dat het draagvlak naar de vloer is gericht.
- Page 72 Let op: De spanwijdte van het optionele dipstation kan individu- eel worden aangepast. Er zijn in totaal zes schroefgaten op de horizontale stang van het dipstation, drie aan de linkerkant en drie aan de rechterkant. We raden aan om bij het vastschroeven van het dipstation de twee binnenste schroefgaten te gebruiken.
-
Page 73: Trainingsvoorstellen
6. TRAININGSVOORSTELLEN Naast de typische optrekoefeningen zijn de volgende oefeningen ook mogelijk met de optrekstang van Sportstech. Rekoefeningen Strek je lichaam voldoende uit voor en na de oefeningen om krampen of letsel te voorkomen. 1. Uitrekken van knieën en heupen... - Page 74 3. Uitrekken van het bovenlichaam Houd je stevig vast aan de optrekstang, buig langzaam je knieën en kantel je hoofd naar voren. Til je voeten van de grond en blijf een tijdje in die positie. 4. Buiktraining Houd de optrekstang vast, de armen zijn bijna volledig gestrekt.
- Page 76 Verkauf durch / Distributed by / Distribuido por / Distribué / Distribuito da / Verkoop via Sportstech Brands Holding GmbH Potsdamer Platz 11 10785 Berlin +49 30 220 663 569 http://www.sportstech.de...