Table des Matières
Publicité
Les langues disponibles
Les langues disponibles
Liens rapides
Réf. : 29052018
Cet appareil est destiné à être raccordé au réseau téléphonique sur les installations
privées (PBX) de la Communauté Européenne.
This product is meant to be connected to private installations (PBX) of the European
Community.
All manuals and user guides at all-guides.com
NOTICE D'UTILISATION
USER MANUAL
Henri DEPAEPE SAS
75-77 rue du Pré Brochet
95110 SANNOIS France
Tel : +33 (0) 1 30 25 81 60
Publicité
Table des Matières

Manuels Connexes pour Depaepe Telecom Process


Sommaire des Matières pour Depaepe Telecom Process
- Page 1 All manuals and user guides at all-guides.com NOTICE D’UTILISATION USER MANUAL Réf. : 29052018 Cet appareil est destiné à être raccordé au réseau téléphonique sur les installations privées (PBX) de la Communauté Européenne. This product is meant to be connected to private installations (PBX) of the European Community.
-
Page 2: Spécifications Techniques
Identification du produit : Nature : Terminal de Télécommunications Type : Poste téléphonique sans fil - DECT Référence commerciale : PROCESS Autres informations : Fonction GAP Déclare sous son entière responsabilité que le produit décrit ci-dessus est conforme aux exigences essentielles de la directive 1999/5/CE du Parlement européen et du Conseil du 9 mars 1999 concernant... -
Page 3: Technical Specifications
Product identification: Family : Telecommunications Terminal Equipment Type : DECT- cordless telephone set Model: PROCESS Other information: GAP compliant We, Henri DEPAEPE SAS, hereby declare that this product is in conformity with the essential requirements and other relevant provisions of the R&TTE directive 1999/5/EC of the European Parliament and of the... -
Page 4: Table Des Matières
All manuals and user guides at all-guides.com SOMMAIRE INTRODUCTION ..............................5 PRECAUTIONS ..............................5 FONCTIONS ................................ 5 AFFICHEUR/DESCRIPTION ..........................6 INSTALLATION..............................9 MENU DES REGLAGES ............................. 9 Menu combiné fonction1: REPERTOIRE ....................... 10 Menu combiné fonction 2: JOURNAL ......................11 Menu combiné... -
Page 5: Introduction
All manuals and user guides at all-guides.com INTRODUCTION Pour vous familiariser avec ce téléphone, nous vous suggérons de lire attentivement ce manuel avant utilisation. Remarques importantes: Il est recommandé de charger la batterie pendant environ 12 heures avant d’utiliser ce téléphone. Un bip signale le positionnement correct du combiné... -
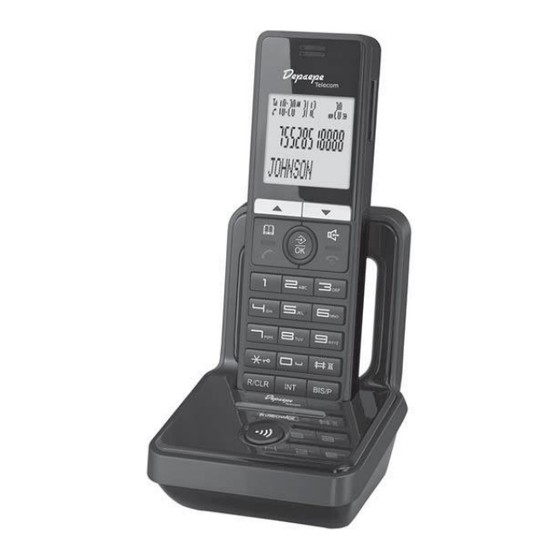
Page 6: Afficheur/Description
All manuals and user guides at all-guides.com Transfert d’appel vers un autre combiné et appel de combiné à combiné Conférence entre 1 correspondant extérieur et 2 combinés Choix de 10 sonneries Volume ajustable : sonnerie/écouteur/haut-parleur Association possible de mélodies de sonnerie pour certains appels ... - Page 7 All manuals and user guides at all-guides.com 1 AFFICHEUR 5 DECROCHE 8 INT 11 CLAVIER 2 et 3 NAVIGATION 6 SET/OK 9 HP 12 BIS/PAUSE 4 REPERTOIRE 7 R/EFFAC. 10 RACCROCHE/OFF 13 LED EN CHARGE/UTILISATION 15 ENTREE LIGNE 14 PAGING 16 ENTREE ALIMENTATION...
- Page 8 All manuals and user guides at all-guides.com Icone Fonctions des touches clavier Au repos, appuyer pour prendre la ligne. Au repos ou en conversation, appuyer pour passer en mains-libres. Au repos, permet d’entrer dans le menu des fonctions ; Valide les sélections & actions. En conversation, appuyer pour le secret micro.
-
Page 9: Installation
All manuals and user guides at all-guides.com INSTALLATION 1) Relier le cordon de ligne à son entrée sous la base (LINE). 2) Relier le cordon d’alimentation à son entrée sous la base (DC). 3) Installer les batteries dans le combiné. Note: A moins que vous n’ayez modifié... -
Page 10: Menu Combiné Fonction1: Repertoire
All manuals and user guides at all-guides.com CHOIX LANGUE 16 CHOIX NOM COMBINE ACTIVE REPONSE AUTO DESACTIVE RESTRICTION Par défaut 0000 DATE/HEURE CHOISIR BASE BASE 1,2,3,4 et AUTO RAZ COMBINE Par défault 0000 ASSOCIATION BASE 1(2,3,4) Menu combiné fonction1: REPERTOIRE Chaque combiné... -
Page 11: Tout Effacer
All manuals and user guides at all-guides.com – “ space 0 MODIFIER ENTREE Appuyer sur ▲ ou ▼ pour sélectionner MODIFIER ENTREE. Cette fonction permet de modifier n’importe quel enregistrement dans le répertoire. Appuyer sur SET/OK le 1er enregistrement dans le répertoire s’affichera . Appuyer sur ▲... -
Page 12: Menu Combiné Fonction 3: Reglages Base
All manuals and user guides at all-guides.com Menu combiné fonction 3: REGLAGES BASE A partir de cette section du menu, appuyer sur SET/OK et utiliser ▲ ou ▼ pour sélectionner les actions suivantes: ANNULER COMBINE Cette fonction permet de supprimer l’enregistrement d’un combiné sur une base. Appuyer sur SET/OK, l’afficheur indique ANNULER COMB. -
Page 13: Menu Combiné Fonction 4: Reglages Combine
All manuals and user guides at all-guides.com Appuyer sur SET/OK puis sur ▲ ou ▼ pour sélectionner PARAM. ORIGINE. Appuyer sur SET/OK pour confirmer. L’afficheur indique PIN? saisir le code PIN (par défaut 0000). Appuyer sur SET/OK pour confirmer. Si le code PIN est correct, tous les réglages de la base seront restaurés aux réglages sortie usine. -
Page 14: Reglage Sons
All manuals and user guides at all-guides.com Appuyer sur ▲ ou ▼ pour sélectionner SONNERIE INT ou SONNERIE EXT. Appuyer sur SET/OK pour confirmer. Appuyer sur ▲ ou ▼ pour sélectionner le réglage MELODIE ou VOLUME. MELODIE, 1) Appuyer sur SET/OK pour confirmer. 2) Appuyer sur ▲... - Page 15 All manuals and user guides at all-guides.com NOM COMBINE Cette opération permet de changer le nom du combiné. Appuyer sur SET/OK puis, à l’aide de ▲ ou ▼ sélectionner NOM COMBINE Appuyer sur SET/OK, un curseur clignotera sur la ligne de saisie du nom. Entrer le nom à...
-
Page 16: Menu Combiné Fonction 5: Association
All manuals and user guides at all-guides.com CHOISIR BASE Il est possible d’enregistrer un combiné sur plusieurs bases (jusqu’à un maximum de 4 bases), et de sélectionner la base avec laquelle utiliser le combiné. Appuyer sur SET/OK puis, à l’aide de ▲ ou ▼ sélectionner CHOISIR BASE. Appuyer sur SET/OK, l’afficheur indique BASE 1 +. -
Page 17: Autres Fonctions
All manuals and user guides at all-guides.com AUTRES FONCTIONS Mains-libres pour obtenir la tonalité, composer votre numéro, vous pourrez converser en “mains-libres” Appuyer sur avec la personne appelée. Vous pouvez également répondre à un appel en “mains-libres” en appuyant sur En mode mains-libres, le niveau d’écoute du haut-parleur peut être réglé... -
Page 18: Fonctions Multi-Combines
All manuals and user guides at all-guides.com Maintenir la touche appuyée pendant environ 2 secondes. Une tonalité est émise, l’icone disparaît et l’afficheur retourne en mode veille. FONCTIONS MULTI-COMBINES Un maximum de 5 combinés peut être enregistré sur une même base. 4 bases au maximum peuvent enregistrer un même combiné. - Page 19 All manuals and user guides at all-guides.com secteur. Le combiné ne charge pas sur la base Vérifier que les batteries sont insérées correctement. Vérifier que le combiné est placé correctement sur la base. Les batteries peuvent être hors d’usage. Remplacez-les par des nouvelles. ...
-
Page 20: Introduction
All manuals and user guides at all-guides.com INTRODUCTION Thank you for purchasing our newest DECT single model, the manual is designed to familiarize you with this phone. To get the maximum use from the phone, we suggest that you read this instruction manual carefully before using. -
Page 21: Lcd Display/Lcd Map/Key Pad Description
All manuals and user guides at all-guides.com Call transfer to other handset and Intercom call between two handsets Conference call between external call and two handsets 10 ringing tones for selection Ringing tone/earpiece/hands-free volume adjustable Different melody for different call available ... - Page 22 All manuals and user guides at all-guides.com...
- Page 23 All manuals and user guides at all-guides.com Icon Function Definition In standby mode press once to take the handset into off hook mode. In standby mode press once to take the handset to hand free mode. Entry to the menu functions in the idle mode; Confirming selections &...
-
Page 24: Installation
All manuals and user guides at all-guides.com INSTALLATION 1) Plug the main power lead into the bottom of the base unit. 2) Plug the main adapter into mains socket with the switch on the socket set to off. 3) Switch on main power at the socket. 4) Fit the batteries in the handset Note: If you do not modify the password yourself, all the passwords in this manual are default as 0000. -
Page 25: Auto Answer
All manuals and user guides at all-guides.com AUTO ANSWER BARRING default 0000 DATE&TIME SELECT BASE BASE 1,2,3,4 and AUTO HS DEFAULT default 0000 REGISTRATION BASE 1(2,3,4) Handset Menu function1: PHONE BOOK Each individual handset has its own phonebook, independent of each other handset. Press SET/OK key. -
Page 26: Handset Menu Function 2: Call Log
All manuals and user guides at all-guides.com 1) Press SET/OK key to enter, the first record in the phone book will be displayed. 2) Press ▲ or ▼ key to select the designated record to change. Once a record has been selected, the user will have the option to edit each of the name/number and change melody. -
Page 27: Dial Mode
All manuals and user guides at all-guides.com DIAL MODE The user can select to change the mode will dial. Press SET/OK key, then press ▲ or ▼ key to select DIAL MODE item. Press SET/OK key to enter, press ▲ or ▼ key to select TONE or PULSE dial mode. Press SET/OK key to confirm your selection. - Page 28 All manuals and user guides at all-guides.com 2) Press SET/OK key to confirm. 3) Press ▲ or ▼ key to select ON or OFF, press SET/OK key to confirm. Selection of OFF will turn the alarm off, and the user is dropped back to the ALARM menu surface, selection of ON option will turn the alarm on, then the user will be requested to set the alarm time.
-
Page 29: Tone Setup
All manuals and user guides at all-guides.com NOTE:1) If you select VOLUME OFF for INT RING, when internal call to this unit, it will not ring; 2) If you select VOLUME OFF for EXT RING, there will be a ringing off icon display on LCD and when there is an incoming call, the handset will not ring.(Shortcut key: press and hold key to... -
Page 30: Select Base
All manuals and user guides at all-guides.com AUTO ANSWER BARRING The Handset can be set to disable the outgoing call numbers that begin with the barring number set. The user is able to select to enable/disable this feature. Note that internal calls to intercom or conference will still be available. -
Page 31: Handset Menu Function 5: Registration
All manuals and user guides at all-guides.com Handset Menu function 5: REGISTRATION This function allows the user to register the handset to a specified base. Before registering a handset to the base, the base should first be put into subscription mode, by pressing and holding the key for 5 seconds, the base IN USE/CHARGE LED flashing. -
Page 32: Pre-Dialing
All manuals and user guides at all-guides.com Pre-dialing The unit has pre-dialing function, when you may enter and edit the number before dial it out. The following procedure describes how to use this function: 1. In idle mode, enter the number you want to dial. During entering, you can press R/CLR key to correct the number. -
Page 33: Trouble Shooting
All manuals and user guides at all-guides.com Then press INT key once, you will be prompted to select the number of the internal handset with which you wish to connect, press the registered sequence number of the handset you want to call The destination handset will ring.