Publicité
Les langues disponibles
Les langues disponibles
Liens rapides
All manuals and user guides at all-guides.com
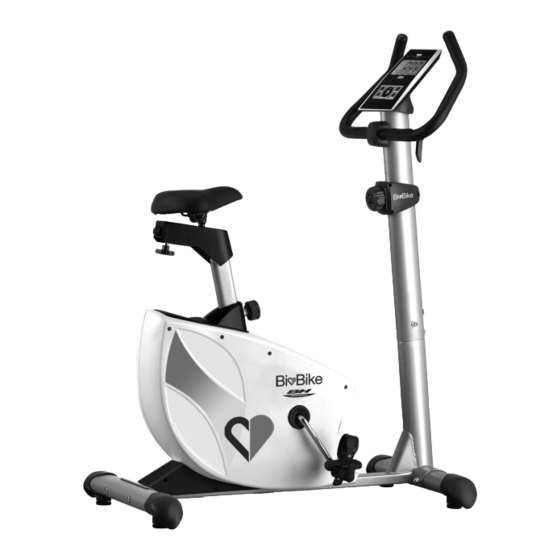
H6716
Instrucciones de montaje y utilización
Instructions for assembly and use
Instructions de montage et utilisation
Montage und gebrauchsanleitung
Instruções de montagem e utilização
Istruzioni di montaggio e uso
Montage-en gebruiksinstrukties
Publicité

Manuels Connexes pour BH FITNESS Bio Bike H6716


Sommaire des Matières pour BH FITNESS Bio Bike H6716
- Page 1 All manuals and user guides at all-guides.com H6716 Instrucciones de montaje y utilización Instructions for assembly and use Instructions de montage et utilisation Montage und gebrauchsanleitung Instruções de montagem e utilização Istruzioni di montaggio e uso Montage-en gebruiksinstrukties...
- Page 2 All manuals and user guides at all-guides.com Fig.1 Fig.2 Fig.3...
- Page 3 All manuals and user guides at all-guides.com Fig.4 Fig.5 Fig.6 Fig.7...
- Page 4 All manuals and user guides at all-guides.com Fig.8 Fig.9...
- Page 5 All manuals and user guides at all-guides.com Español AVISO IMPORTANTE DE asistencia de una persona cualificado o un médico. SEGURIDAD.- 10 Antes de utilizar este aparato, PRECAUCIONES. realice calentamiento Esta bicicleta ha sido diseñada y ejercicios de estiramiento. construida de modo que proporcione 11 No utilice la bicicleta si no funciona la máxima seguridad.
- Page 6 All manuals and user guides at all-guides.com 5 Su unidad sólo puede ser usada por de manillar (8), Fig.3, introduzca el una persona al mismo tiempo. cable del hand-grip (26) por la ranura 6 Utilice prendas de vestir y calzado como muestra en la Fig.3A y 3B, y adecuado.
- Page 7 All manuals and user guides at all-guides.com Seguido coloque los 3 tornillos (14) No ajuste la inclinación del sillín las arandelas curvadas (13), alinee el cuando esté sentado en él. tubo de manillar y apriete fuertemente 7. MONTAJE DE LOS los tornillos.
- Page 8 All manuals and user guides at all-guides.com NIVELACION.- ligeramente por la parte delantera y empujando, como muestra la Fig.9. Una vez colocada la unidad en su Guarde su máquina en un lugar seco lugar definitivo, para la realización del menores variaciones ejercicio, compruebe...
- Page 9 All manuals and user guides at all-guides.com English IMPORTANT SAFETY ADVICE.- 11 Do not use the bicycle if it is not working correctly. PRECAUTIONS. Caution: Consult your doctor This bicycle has been designed and before beginning to use the bicycle. constructed provide maximum...
- Page 10 All manuals and user guides at all-guides.com 1. ASSEMBLY INSTRUCTIONS.- 4. FITTING THE MONITOR.- Take the unit out of its box and make Take the monitor (24) and remove the sure that all of the pieces are there four screws (25) from the base of the Fig.1.
- Page 11 All manuals and user guides at all-guides.com Now insert the saddle post into the hand crank, also marked with an (R), in hole on the main body (1), fit the a clockwise direction. Tighten securely, saddle post knob (21) and adjust the Fig.7.
- Page 12 All manuals and user guides at all-guides.com Do not hesitate to get touch with the BH RESERVES THE RIGHT TO Technical Assistance Service if you MODIFY THE SPECIFICATIONS OF have any queries by phoning customer ITS PRODUCTS WITHOUT PRIOR services (see last page in manual) NOTICE.
- Page 13 All manuals and user guides at all-guides.com Français IMPORTANTES CONSIGNES DE fabricant. 8 Ne pas poser d’objets coupants aux SÉCURITÉ.- abords de la machine. PRÉCAUTIONS. 9 Les personnes handicapées ne Cette bicyclette a été conçue et pourront utiliser la machine que si fabriquée de façon à...
- Page 14 All manuals and user guides at all-guides.com 3 Les parents ou personnes à qui des les rondelles courbées (5) et les enfants ont été confiés doivent tenir écrous aveugles (6) et vissez très fort. compte de leur soif de curiosité qui Prendre le tube du support avant muni peut conduire...
- Page 15 All manuals and user guides at all-guides.com 5. MONTAGE DU TUBE DU très fort le pommeau (21) dans le sens des aiguilles d’une montre. GUIDON.- Tenez fermement le tube guidon (8) et RÉGLAGE HORIZONTAL.- connectez les connecteurs du câble Pour régler la selle sur la position du renvoi (9) et (10) Fig.5.
- Page 16 All manuals and user guides at all-guides.com RÉGLAGE DE L’EFFORT.- DÉPLACEMENT & Pour le contrôle de l’effort régulier des RANGEMENT.- exercices, cet appareil dispose d’un Cet appareil dispose de roulettes (40) bouton de tension (11), placé sur le qui permettent un déplacement facile. tube du guidon (8) avec différentes Ces roulettes sont placées à...
- Page 17 All manuals and user guides at all-guides.com Deutsch WICHTIGER 8 Achten Sie darauf, dass sich in der Nähe des Gerätes keine scharfen SICHERHEITSHINWEIS.- Gegenstände befinden. VORSICHTSMASSNAHMEN. 9 Behinderte Personen dürfen das Dieses Fahrrad wurde so entwickelt Gerät nur mit Unterstützung durch und konstruiert, dass es maximale qualifiziertes oder...
- Page 18 All manuals and user guides at all-guides.com Dieses Gerät darf unter keinen Kurvenscheiben (5) und Blindmuttern Umständen als Spielzeug verwendet (6) ein und ziehen Sie sie gut fest. werden. 3. ANBRINGEN DES LENKERS.- Eigentümer muss sich Setzen Sie den Lenker (15) in die vergewissern, dass alle Benutzer des Lenkstange (8), Fig.3;...
- Page 19 All manuals and user guides at all-guides.com Stecken Sie dann die Lenkstange (8) Knauf dann wieder in Pfeilrichtung in das aus dem festgedreht werden Fig.6A. Hauptrahmen tretende Rohr. NEIGUNG DES SATTELS.- Achten Sie dabei darauf, dass die Der Sattel kann nach vorn oder nach Kabel nicht eingeklemmt...
- Page 20 All manuals and user guides at all-guides.com REGULIEREN DES TRANSPORT UND LAGERUNG.- WIDERSTANDS.- Das Gerät verfügt über Räder (40), die Verschieben desselben Für Steuerung eines wesentlich erleichtern. Räder gleichmäßigen Widerstands während befinden sich auf der Vorderseite des Ihres Trainings verfügt dieses Gerät Geräts.
- Page 21 All manuals and user guides at all-guides.com Português AVISO IMPORTANTE DE volta da máquina. pessoas alguma SEGURANÇA.- incapacidade não deverão utilizar a PRECAUÇÕES. máquina sem a assistência de uma Esta bicicleta desenhada pessoa qualificado ou de um médico. construída de modo a proporcionar a 10 Antes de utilizar este aparelho, máxima segurança.
- Page 22 All manuals and user guides at all-guides.com 4 É responsabilidade do proprietário porcas cegas (6) e aperte com força. assegurar-se que todos os usuários 3. COLOCAÇÃO DO GUIADOR.- da máquina estejam adequadamente Coloque o guiador (15) no tubo do informados sobre todas guiador (8), Fig.3.
- Page 23 All manuals and user guides at all-guides.com Em seguida coloque os 3 parafusos conseguir a inclinação desejada e (14) os anéis curvados (13), alinhe o depois aperte a porca com força. tubo do guiador e aperte com força os Não deverá regular a inclinação do parafusos.
- Page 24 All manuals and user guides at all-guides.com NIVELAMENTO.- guardá-la, levantando, ligeiramente a parte da frente e empurrando, como Depois de ter colocado a unidade no mostra a Fig.9. Deverá guardar a sua seu lugar definitivo, para a realização máquina num lugar seco, com as do exercício, comprove se a sua menores variações de temperatura colocação...
- Page 25 All manuals and user guides at all-guides.com Italiano AVVERTIMENTO IMPORTANTE persone handicappate dovranno usare l’ apparecchio senza l’ DI SICUREZZA.- assistenza di una persona qualificata PRECAUZIONI. o un medico. Questa bicicletta è stata disegnata e 10 Prima di usare questo apparecchio, costruita in modo che garantisca la realizzi un riscaldamento con esercizi massima sicurezza.
- Page 26 All manuals and user guides at all-guides.com 4 È responsabilità del proprietario l’ dadi ciechi (6) e stringa con forza. assicurarsi che tutti gli utenti dell’ 3. COLLOCAZIONE DEL appareccio siano stati correttamente MANUBRIO.- informati tutte precauzioni necessarie da prendere. Collochi il manubrio (15) nel tubo del 5 Il suo apparecchio solo può...
- Page 27 All manuals and user guides at all-guides.com nel tubo che fuoriesce dal corpo INCLINAZIONE DEL SELLINO.- principale (1), facendo attenzione a Il sellino si può inclinare in avanti od non agganciare i cavi, verifichi se il indietro. comando di tensione (11) funziona Allenti il dado (87) mostrato nella correttamente.
- Page 28 All manuals and user guides at all-guides.com Per aumentare la resistenza della spostamento. Le ruote che si trovano pedalata lei giri il comando di tensione nella parte anteriore (11), in senso orario (+), fino ad apparecchio faciliteranno la manovra ottenere sforzo di collocare il suo apparecchio nel allenamento sia quello ideale per lei.
- Page 29 All manuals and user guides at all-guides.com Nederlands BELANGRIJKE beschreven deze handleiding. Gebruik GEEN accessoires die niet VEILIGHEIDSVOORSCHRIFTEN. worden aanbevolen door de fabrikant. VOORZORGSMAATREGELEN. 8 Plaats geen scherpe voorwerpen in Deze hometrainer dusdanig de buurt van het apparaat. ontworpen en geconstrueerd om een Invaliden dienen apparaat...
- Page 30 All manuals and user guides at all-guides.com dienen er rekening mee te houden dat (2), waarbij u er rekening mee dient te dezen van nature nieuwsgierig zijn en houden de twee rode stippen (A) te dat dit tot gevaarlijke situaties en plaatsen zoals wordt getoond in Fig.2, gedrag kan leiden.
-
Page 31: De Aanduidingen Rechts En Links
All manuals and user guides at all-guides.com Neem de spanningskabel (11) van de HORIZONTALE INSTELLING.- framebuis (8) en bevestig deze aan de Om de horizontale stand van het zadel onderste spanningshouder (12), zoals te regelen, draait u de instelknop (82) wordt getoond in Fig.5A. - Page 32 All manuals and user guides at all-guides.com REGELING VAN DE VERPLAATSING EN WEERSTAND.- OPBERGEN.- Om de weerstand te regelen tijdens Dit apparaat is uitgerust met wieltjes de oefening, beschikt dit apparaat (40) verplaatsen over een weerstandsregelaar (11), die vergemakkelijkt. twee wieltjes zich op de framebuis (8) bevindt, met bevinden zich aan de voorkant van het...
- Page 33 All manuals and user guides at all-guides.com H6716...
- Page 34 All manuals and user guides at all-guides.com Para pedido de repuesto: Indicar el código de la pieza y la cantidad To order replacement parts: State the part code and Quantity Pour toute commande pièces détachées: Indiquer le code de la pièce et la quantité Bestellung von Ersatzteilen: Bitte angeben Teil-code und Menge Para encomenda de peça de recambio: Indicar o código da peça ea quantidade Per ordinare pezzi di ricambio: Indicare il codice del pezzo e la quantità...
- Page 35 All manuals and user guides at all-guides.com H6715021 H6716052 H6715083 H6715022 H6715053 H6716084 H6715023 H6715054 H6715085 H6716024 H6715055 H6715086 H6715025 H6715056 H6715087 H6715026 H6715057 G01 H6715G01 H6715027 H6715058 G02 H6715G02 H6715028 H6715059 G03 H6715G03 H6715029 H6715060 G04 H6715G04 H6716030 H6715061 H6715031 H6715062...
- Page 36 All manuals and user guides at all-guides.com Español Por medio de la presente Exercycle S.L. declara que este producto cumple con los requisitos esenciales y cualesquiera otras disposiciones aplicables o exigibles de la Directiva 2004/108/CE. Hereby, Exercycle S.L, declares that this product is in compliance with English the essential requirements and other relevant provisions of Directive 2004/108/EC.
- Page 37 Fax: +33 0810 00 290 Fax: +34 945 56 05 27 e-mail: info@bhfitness.pt e-mail: e-mail: sat@bhfitness.es savfrance@bhfitness.com BH FITNESS NORTH AMERICA BH FITNESS MEXICO BH FITNESS UK 20155 Ellipse BH Exercycle de México S.A. de Halliards, Terrington Drive Foothill Ranch...