Publicité
Les langues disponibles
Les langues disponibles
Liens rapides
Publicité

Manuels Connexes pour Matrix ICR50


Sommaire des Matières pour Matrix ICR50
- Page 1 ICR50...
- Page 2 ENGLISH FRANÇAIS ESPAÑOL...
- Page 3 WARNING SAVE THESE INSTRUCTIONS Read the OWNER’S GUIDE before use. When using an electrical TO REDUCE THE RISK OF BURNS, FIRE, ELECTRICAL product, basic precautions should always be followed, including the SHOCK OR INJURY TO PERSONS: following: Read all instructions before using this equipment. It is the responsibility of the owner to ensure that all users of this equipment are •...
- Page 4 To prevent damage to the equipment, the assembly instructions must be reviewed and corrective actions should be taken. SERIAL NUMBER MODEL: ICR50 MATRIX INDOOR CYCLE * Use the information above when calling for service.
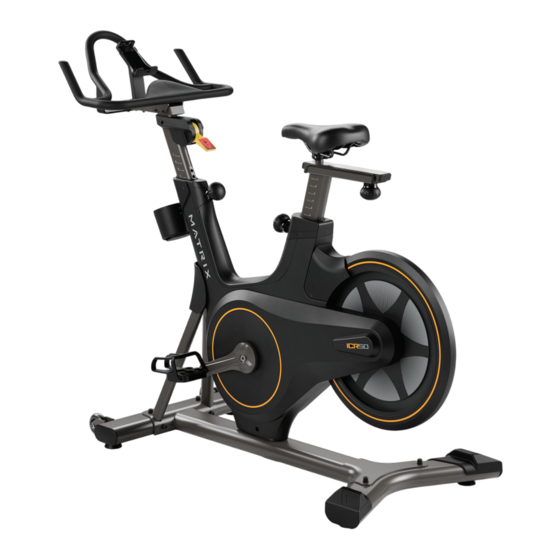
- Page 5 TENSION CONTROL & EMERGENCY BRAKE LEVER DEVICE HOLDER HANDLEBAR HEIGHT ADJUSTMENT KNOB HANDLEBARS SADDLE WATER BOTTLE HOLDER HORIZONTAL SADDLE ADJUSTMENT KNOB PEDALS SADDLE HEIGHT CRANK ADJUSTMENT KNOB TRANSPORT WHEELS FLYWHEEL FRONT STABILIZER TUBE MAIN FRAME LEVELERS REAR STABILIZER TUBE...
- Page 6 Hardware Hardware Bolt (M8x20L) Screw (pre-installed) Flat Washer (M8) Flat Washer Arc Washer (M8) Torque Value 30 Nm / 22 lb-ft. Hardware Hardware OPTIONAL IX DISPLAY Bolt (M6x15L) Bolt (M6x15L) Flat Washer (M6) Flat Washer (M6) Bolt (M6x20L) Screw (M4x12L) IX only: Screw (M4x15L) Torque Value 12 Nm / 9 lb-ft.
- Page 7 BEFORE YOU BEGIN LOCATION OF THE EQUIPMENT Place the equipment on a level and stable surface away from direct sunlight. The intense UV light can cause discoloration on the plastics. Locate your equipment in an area with cool temperatures and low humidity. Please leave a clear zone on all sides of the equipment that is at least 60 cm (2 ft).
- Page 8 HOW TO ADJUST THE INDOOR CYCLE The indoor cycle can be adjusted for maximum comfort and exercise effectiveness. The instructions below describe one approach to adjusting the indoor cycle to ensure optimal user comfort and ideal body positioning; you may choose to adjust the indoor cycle differently. SADDLE ADJUSTMENT Proper saddle height helps ensure maximum exercise efficiency and comfort, while reducing the risk of injury.
- Page 9 RESISTANCE CONTROL / EMERGENCY BRAKE The resistance lever is located in front of the handlebars and provides 11 levels of pedaling resistance. To increase the resistance, push the tension control lever towards the ground. To decrease the resistance, push the lever upwards. IMPORTANT: •...
- Page 10 TROUBLESHOOTING COMMON PRODUCT QUESTIONS PROBLEM: The exercise bike makes a squeaking or chirping noise Verify the following: 1) The exercise bike is on a level surface 2) Loosen all bolts attached during the assembly process, grease the threads, and tighten again ARE THE SOUNDS MY EXERCISE BIKE MAKES NORMAL? Our exercise bikes are some of the quietest available PROBLEM: Seat or handlebar post move after locked into position...
- Page 11 If this troubleshooting section does not remedy the problem, discontinue use. Clean the indoor cycle using soft cloths or paper towels or Please reference contact information from local other Matrix approved solution (cleaning agents should AFTER EACH USE service or on the next page for assistance.
- Page 12 LABOR: 1 YEAR Matrix shall cover the labor cost for the repair of the device for the period specified above from the date of the original purchase, so long...
- Page 13 • Any attempt to repair this equipment creates a risk of injury. Matrix is not responsible or liable for any damage, loss or liability arising from any personal injury incurred during the course of, or as a result of any repair or attempted repair of your fitness equipment by other than an authorized service technician.
- Page 14 AVERTISSEMENT CONSERVEZ CES INSTRUCTIONS Lisez le GUIDE DU PROPRIÉTAIRE avant utilisation. Lors de l'utilisation d'un POUR RÉDUIRE LE RISQUE DE BRÛLURE, D’INCENDIE, DE CHOC ÉLECTRIQUE produit électrique, des précautions de base doivent toujours être respectées, OU DE BLESSURE : notamment les suivantes : Lisez toutes les instructions avant d'utiliser cet équipement.
- Page 15 Pour éviter d'endommager l'équipement, les instructions d'assemblage doivent être vérifiées et des mesures correctives doivent être prises. NUMÉRO DE SÉRIE MODÈLE : VÉLO D'INTÉRIEUR ICR50 MATRIX * Utilisez les informations ci-dessus lorsque vous appelez pour un service.
- Page 16 CONTRÔLE DE TENSION ET LEVIER DE FREIN D'URGENCE SUPPORT POUR APPAREILS BOUTON DE RÉGLAGE DE LA HAUTEUR DU GUIDON GUIDONS SELLE PORTE-BIDON BOUTON DE RÉGLAGE PÉDALES DE SELLE HORIZONTAL BOUTON DE RÉGLAGE MANIVELLE DE LA HAUTEUR DE SELLE ROUES DE TRANSPORT VOLANT TUBE STABILISATEUR AVANT CHÂSSIS PRINCIPAL...
- Page 17 Matériel Qté Matériel Qté Boulon (M8x20L) Vis (pré-installé) Rondelle plate (M8) Rondelle plate Rondelle bombée (M8) Valeur de couple 30 Nm / 22 livres-pieds Matériel Qté Matériel Qté IX AFFICHAGE EN OPTION Boulon (M6x15L) Boulon (M6x15L) Rondelle plate (M6) Rondelle plate (M6) Boulon (M6x20L) Vis (M4x12L) IX seulement: Vis (M4x15L)
- Page 18 AVANT DE COMMENCER EMPLACEMENT DE L'ÉQUIPEMENT Placez l'équipement sur une surface plane et stable, à l'abri de la lumière directe du soleil. La lumière UV intense peut provoquer une décoloration des plastiques. Placez votre équipement dans une zone avec des températures fraîches et une faible humidité. Veuillez laisser une zone libre autour de l'équipement d'au moins 60 cm (2 pieds).
- Page 19 COMMENT RÉGLER LE VÉLO D'INTÉRIEUR Le vélo d'intérieur peut être réglé pour un maximum de confort et d'efficacité. Les instructions ci-dessous décrivent une approche du réglage du vélo d'intérieur pour assurer un confort optimal à l'utilisateur et un positionnement idéal du corps mais vous pouvez choisir d'ajuster le vélo d'intérieur différemment.
- Page 20 CONTRÔLE DE RÉSISTANCE / FREIN D'URGENCE Le levier de résistance est situé devant le guidon et offre 11 niveaux de résistance de pédalage. Pour augmenter la résistance, poussez le levier de contrôle de la tension vers le sol. Pour diminuer la résistance, tirez le levier vers le haut.
- Page 21 DÉPANNAGE QUESTIONS COURANTES SUR LES PRODUITS PROBLÈME : Le vélo d'exercice émet un grincement ou un son strident. Vérifiez les éléments suivants : 1) Le vélo d'exercice est sur une surface de niveau. 2) Desserrez tous les boulons fixés pendant le processus d’assemblage, graissez les filets et resserrez. LES SONS ÉMIS PAR MON VÉLO D'EXERCICE SONT-ILS NORMAUX ? PROBLÈME : La selle ou le guidon bougent après avoir été...
- Page 22 Nettoyez la machine entière avec de l'eau et un savon • Depuis combien de temps ce problème se produit-il ? doux ou une autre solution approuvée par Matrix (les produits de nettoyage doivent être exempts d'alcool et • Ce problème se produit-il à chaque utilisation ? Avec chaque utilisateur ? HEBDOMADAIREMENT d'ammoniac).
- Page 23 CADRE : 5 ANS de l'assistance clientèle formés par téléphone, par e-mail ou via notre site Web. Matrix garantit le cadre contre les défauts de fabrication et les matériaux pour la période spécifiée ci-dessus à partir de la date d'achat d'origine, tant que l'appareil...
- Page 24 équipement de fitness par des personnes autres qu'un technicien de service agréé. Toutes les réparations que vous tentez d’effectuer sur votre appareil de fitness sont effectuées À VOS RISQUES et Matrix ne pourra être tenue responsable des blessures qui pourraient en résulter pour la personne ou les biens.
- Page 25 ADVERTENCIA GUARDE ESTAS INSTRUCCIONES Lea el MANUAL DE INSTRUCCIONES antes de utilizar la unidad. A la hora PARA REDUCIR EL RIESGO DE QUEMADURAS, INCENDIOS, DESCARGAS de utilizar un producto eléctrico, siempre se deben adoptar precauciones ELÉCTRICAS O LESIONES PERSONALES: básicas, entre ellas, las siguientes: Lea todas las instrucciones antes de utilizar este equipo.
- Page 26 Para evitar daños en el equipo, deben revisarse las instrucciones de montaje y deben tomarse medidas correctivas. NÚMERO DE SERIE MODELO: ICR50 MATRIX INDOOR CYCLE * Indique la anterior información cuando llame al servicio de asistencia técnica.
- Page 27 PALANCA DE CONTROL DE TENSIÓN Y FRENO DE EMERGENCIA SOPORTE PARA DISPOSITIVOS PERILLA DE AJUSTE DE ALTURA DEL MANILLAR MANILLAR SILLÍN PORTABOTELLAS PERILLA DE AJUSTE HORIZONTAL DEL SILLÍN PEDALES PERILLA DE AJUSTE BIELA DE ALTURA DEL SILLÍN RUEDAS DE TRANSPORTE VOLANTE DE INERCIA BASTIDOR PRINCIPAL TUBO ESTABILIZADOR DELANTERO TUBO ESTABILIZADOR...
- Page 28 Piezas de tornillería Cantidad Piezas de tornillería Cantidad Perno (M8x20L) Tornillo (preinstalada) Arandela plana (M8) Arandela plana Arandela de arco (M8) Par de apriete 30 Nm / 22 lb-ft. Piezas de tornillería Cantidad Piezas de tornillería Cantidad IX PANTALLA OPCIONAL Perno (M6x15L) Perno (M6x15L) Arandela plana (M6)
- Page 29 ANTES DE COMENZAR UBICACIÓN DEL EQUIPO Coloque el equipo sobre una superficie estable y nivelada que no esté expuesta a la luz directa del sol. La luz ultravioleta intensa puede provocar que el plástico se decolore. Coloque el equipo en un lugar con temperaturas frescas y bajos niveles de humedad.
- Page 30 CÓMO AJUSTAR LA BICICLETA ESTÁTICA La bicicleta estática puede ajustarse para conseguir una comodidad y eficacia máximas durante el ejercicio. Las siguientes instrucciones describen un método para ajustar la bicicleta estática con el fin de garantizar la máxima comodidad del usuario y una posición corporal ideal, si bien puede ajustar la bicicleta estática de manera diferente.
- Page 31 CONTROL DE RESISTENCIA/FRENO DE EMERGENCIA La palanca de resistencia está situada delante del manillar y ofrece 11 niveles de resistencia de pedaleo. Para aumentar la resistencia, empuje la palanca de control de la tensión hacia el suelo. Para reducir la resistencia, tire de la palanca hacia arriba.
- Page 32 RESOLUCIÓN DE PROBLEMAS PREGUNTAS HABITUALES SOBRE EL PROBLEMA: La bicicleta de entrenamiento emite crujidos o chirridos. PRODUCTO Realice las siguientes comprobaciones: 1) La bicicleta de entrenamiento se encuentra en una superficie nivelada. 2) Afloje todos los pernos instalados durante el proceso de montaje, engrase las roscas y vuelva a apretar los pernos.
- Page 33 Limpie toda la máquina con agua y un jabón suave, o resolución de problemas, como las siguientes: bien con cualquier otro producto aprobado por Matrix (los • ¿Desde cuándo tiene este problema? productos de limpieza no deben contener ni alcohol ni SEMANAL amoníaco).
- Page 34 Matrix ofrece una garantía del bastidor frente a los defectos de mano de obra y del material durante el período indicado a partir de la fecha de compra original, siempre y cuando el dispositivo siga estando en posesión del propietario original.
- Page 35 • Cualquier intento de reparar este equipo conlleva un riesgo de lesiones. Matrix no es responsable de ningún daño, pérdida o inconveniente derivado de cualquier daño personal sufrido durante o tras una reparación o intento de reparación de su equipo de entrenamiento por parte de alguien que no sea un técnico de mantenimiento autorizado.
- Page 36 © 2020 Johnson Health Tech ICR50 Rev 1.1 A ENG FRE SPE...