Publicité
Les langues disponibles
Les langues disponibles
Publicité
Table des Matières

Manuels Connexes pour Duronic HV180

Sommaire des Matières pour Duronic HV180
- Page 1 Mica Heater - HV180 PLEASE READ ALL THE INSTRUCTIONS BEFORE USE...
-
Page 3: Table Des Matières
Contents English Manual Manuel d’utilisation en français Gebrauchsanleitung auf Deutsch Manual de Instrucciones en Español Manuale D’istruzioni In Italiano Instrukcja obsługi. Polski... -
Page 5: English Manual
English Manual... - Page 6 4.5kg 50/60Hz x550(H)mm The Duronic HV180 uses a Mica heating element, which is a leading technology in the world of heating. Our model is oil-free and offers more much more than a standard heater. The HV180 heats up within one minute, making it a very cost-effective and energy-efficient heater.
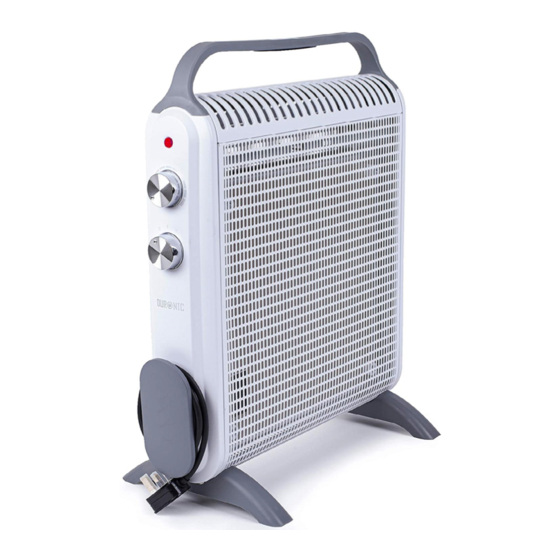
- Page 7 1. Handle 7. Power cable with plug 2. Power indicator 8. Top cover 3. Temperature control dial 9. Rear cover 4. Power control dial 10. Protective mesh 5. Front cover 11. Legs 6. Cable storage hook...
- Page 8 • If either the appliance or power cable is damaged, return the heater to Duronic for service or repair by a professional technician. • Never open and repair the machine yourself. Do not modify the machine in any way that is not described in the instructions for use.
- Page 9 • Keep the appliance and cable away from sources of heat, sharp objects or anything that might cause damage. • To avoid overheating, do not cover the heater. To prevent a possible fire hazard, do not block the air intakes or the outlet in any way. •...
- Page 10 • Before cleaning, turn off the heater. Unplug the power cable and allow the heater to cool down. • Do not put the heater away until it has cooled down completely. Store the heater in cool dry location when not in use. •...
- Page 11 Operating Instructions Please read these instructions in full before using this heater and retain for future reference. When not in use: Check that the power switch dial is turned OFF [0] (Fig 1) and the temperature control dial is turned OFF (Fig 2).
- Page 12 Operating Instructions (continued) Anti-Frost Function: This function will keep the surrounding temperature above ‘freezing point’. To activate this function, simply plug in the power cable and turn the temperature control dial to the snowflake position. Overheat Protection A warning label saying “DO NOT COVER” has been placed on the heater to warn against putting anything on top of the heater.
- Page 13 Cleaning • Before cleaning, turn off the heater. Unplug the power cable and allow the heater to cool down. • Do not immerse the power cord, plug or the heater itself into water or any liquid. Do not pour water or any liquid over the heater. •...
- Page 14 Troubleshooting Heater does not heat up: 1. Check if the heater is 2. Check if the temperature working or not. setting is in the right position. 3. Check if there is any 4. The heater does not function when object covering the front one set of elements are not working.
- Page 15 Refund or replacement is at the discretion of that company. Duronic Products are offered with a 1 year guarantee under the following conditions: The product must be returned to the retailer with original proof of purchase.
-
Page 16: Manuel D'utilisation En Français
Manuel d’utilisation en français... - Page 17 Notre modèle est sans huile et offre bien plus qu'un appareil de chauffage standard. Le HV180 chauffe en une minute, ce qui en fait un appareil de chauffage économique et économe en énergie.
- Page 18 1. Poignée 7. Câble d'alimentation 8. Capot supérieur Indicateur de puissance 9. Capot arrière Cadran de contrôle de température 10. Grille de protection Cadran de contrôle de puissance 11. Pieds Capot avant Crochet de rangement du câble...
- Page 19 Une attention particulière doit être donnée là où les enfants et personnes vulnérables sont présentes. • Si l'appareil ou le câble d'alimentation est endommagé, veuillez contacter Duronic ou faites réparer par un technicien professionnel. • N'essayez jamais d'ouvrir et de réparer l'appareil vous-même. Ne modifiez pas l'appareil d'une façon qui n'est pas décrite dans les instructions d'utilisation.
- Page 20 • Gardez l'appareil et le câble à l'écart des sources de chaleur, d'objets pointus ou de tout objet qui pourrait endommager l'appareil. • Pour éviter la surchauffe, ne couvrez pas le radiateur. Pour éviter un possible risque d’incendie, ne bloquez pas les conduits d’entrée et de sortie d’air de quelque manière.
- Page 21 • Avant de nettoyer, éteignez l'appareil. Débranchez le câble d'alimentation et laissez le radiateur refroidir. • Ne rangez pas l'appareil de chauffage tant qu'il n'a pas complètement refroidi. Rangez l'appareil de chauffage dans un endroit frais et sec lorsqu'il n'est pas utilisé.
- Page 22 Instructions d'utilisation Veuillez lire ces instructions entièrement avant d'utiliser ce radiateur et conservez ce manuel comme référence. Lorsque l'appareil n'est pas utilisé : Vérifiez que le cadran de contrôle de puissance est éteint [0] (Fig 1) et que le cadran de contrôle de la température est éteint (Fig 2).
- Page 23 Instructions d'utilisation (suite) Fonction anti-gel : Cette fonction gardera la température ambiante au dessus du «point de congélation». Pour activer cette fonction, branchez simplement l’appareil et placez le cadran de contrôle de température sur la position flocon. Protection anti-surchauffe Une étiquette avec l'avertissement "NE PAS COUVRIR"...
- Page 24 Nettoyage • Avant de nettoyer le radiateur, vérifiez que celui-ci soit éteint. Débranchez l'alimentation et laissez le chauffage refroidir. • N'immergez pas le câble, la fiche, ou le radiateur dans l'eau ou tout autre liquide. • Pour nettoyer le radiateur de manière sécurisée, utilisez un aspirateur pour enlever la poussière présente sur la grille.
- Page 25 Dépannage Le radiateur ne chauffe pas : 1. Vérifiez que le 2. Vérifiez si le réglage de chauffage est en la température est dans fonctionnement. la bonne position. 4. Le radiateur ne fonctionne pas Vérifiez qu'aucun objet ne recouvre la façade lorsqu'un ensemble d'éléments ne du chauffage.
- Page 26 Garantie Garantie et service après-vente 1 an de garantie de la part de Shine-Mart Ltd, propriétaire de la marque Duronic. NOTE : CES DÉCLARATIONS N’AFFECTENT EN RIEN VOTRE DROIT STATUTAIRE EN TANT QUE CONSOMMATEUR Ce produit a été produit en suivant les procédures de contrôle de qualité les plus strictes en utilisant des matériaux de qualité...
-
Page 27: Gebrauchsanleitung Auf Deutsch
Gebrauchsanleitung auf Deutsch... - Page 28 Technologien, wenn es ums Heizen geht. Dieses Modell ist frei von Heizöl und bietet mehr, als normale Heizungen. Die HV180 Heizung erreicht innerhalb einer Minute Betriebstemperatur, was sie besonders kosteneffizient macht. Ein großer Griff an der Oberseite macht diese Heizung besonders portabel.
- Page 29 1. Griff 7. Netzstecker 2. Leistungsanzeige 8. Oberseite 3. Temperaturregler 9. Hinterseite 4. Leistungsregler 10. Schutzgitter 5. Frontseite 11. Beine 6. Kabelmanagement...
- Page 30 Nähe sind. • Wenn das Gerät oder das Netzkabel defekt sind, setzen Sie sich mit dem Kundenservice von Duronic auseinander. Geschulte Techniker können Ihnen das Gerät fachmännisch reparieren. Öffnen Sie niemals das Gerät selbst und versuchen es eigenständig zu •...
- Page 31 Stecken Sie keine Fremdkörper in das Gerät. Dies kann zu Elektroschocks, • Feuer oder Beschädigungen am Gerät führen. Stellen Sie das Gerät und Kabel nicht in der Nähe von Wärmequellen oder • scharfen Objekten auf, die das Gerät beschädigen können. Um ein Überhitzen zu vermeiden, decken Sie die Heizung nicht zu.
- Page 32 • Stellen Sie sicher, dass das Netzkabel sicher verstaut wird, sodass niemand darüber stolpern oder drauftreten kann. • Bevor Sie das Gerät reinigen, schalten Sie es aus. Ziehen Sie den Netzstecker und warten Sie, bis sich das Gerät abgekühlt hat. Verstauen Sie die Heizung nicht, ehe es komplett ausgekühlt ist.
- Page 33 Bedienungsanleitung Bitte lesen Sie die Anweisungen gründlich durch und bewahren Sie die Anleitung für spätere Fragen auf. Wenn nicht in Gebrauch: Stellen Sie sicher, dass der Leistungsregler auf Aus gestellt wird [0] (Fig 1) und der Temperatur- regler ebenfalls auf Aus gestellt wird (Fig 2). Fig 1 Fig 2 Anschließen des Geräts:...
- Page 34 Bedienungsanleitung (weiterführend) Antifrost-Funktion: Diese Funktion sorgt dafür, dass die Umgebungstemperatur über dem Gefrierpunkt liegt. Die Funktion lässt sich am Temperaturregler über das Schneeflockensymbol einstellen. Überhitzungsschutz: Die Heizung hat einen Warnhinweis mit der Aufschrift "DO NOT COVER", also "nicht zudecken", um darauf hinzuweisen, das Gerät nicht zu bedecken.
- Page 35 Reinigung • Schalten Sie die Heizung aus, bevor Sie sie reinigen. Ziehen Sie den Netzstecker und warten Sie, bis sich die Heizung abgekühlt hat. • Tauchen Sie niemals weder den Stecker, das Kabel, oder der kompletten Heizkörper unter Wasser, oder anderen Flüssigkeiten. Gießen Sie auch kein Wasser oder andere Flüssigkeiten über die Heizung.
- Page 36 Fehlerbehebung Die Heizung wird nicht warm: 1. Prüfen Sie, ob die 2. Prüfen Sie, ob der Tem- Heizung funktioniert. peraturregler in der richtigen Position ist. 3. Prüfen Sie, ob etwas 4. Die Heizung wird nicht funktionieren, die Heizung verdeckt. wenn eine dieser Funktionen gestört ist.
- Page 37 Gewährleistung Shine-Mart Ltd, der Markeninhaber von Duronic Produkten, bietet 1 Jahr Gewährleistung. HINWEIS: DIESE BEDINGUNGEN BEEINFLUSSEN IHRE GESETZLICHE RECHTE ALS VERBRAUCHER NICHT Dieses Produkt wurde unter strengen Qualitätskontrollen produziert und aus hochwertigen Materialien hergestellt, um ausgezeichnete Leistung und Zuverlässigkeit zu gewährleisten.
-
Page 38: Manual De Instrucciones En Español
Manual De Instrucciones En Español... - Page 39 1800W 4.5kg 50/60Hz x550(H)mm El HV180 de Duronic usa un elemento calefactor de mica, considerado tecnología punta en el mundo de la calefacción. El HV180 calienta en un minuto, haciéndolo un calefactor bastante rentable y energéticamente efectivo. Equipado con un mango, mover y recolocar este calefactor portátil de un sitio a otro, es una tarea fácil y sencilla.
- Page 40 1. Mango Cable de alimentación 2. Indicador de potencia Cubierta superior Marcador de control de temperatura Cubierta trasera Marcador de control de potencia Rejilla protectora Cubierta frontal Patas Gancho para almacenar cable de alimentación...
- Page 41 • Si el calefactor o el cable de alimentación están dañados, por favor, devuelva el producto a Duronic para un servicio de atención al cliente o bien para reparar por un técnico profesional. •...
- Page 42 • Mantenga el aparato y el cable alejado de fuentes de calor, objetos afilados o cualquier otra cosa que pueda causar daños. Para evitar que el calefactor se sobrecaliente, no cubra el aparato. • Para prevenir un posible peligro de incendio, no bloquee las entradas o salidas de aire del aparato de ninguna manera.
- Page 43 • Apague el calefactor antes de limpiar. Desenchufe el aparato y permita que el calefactor se enfríe del todo. • No guarde el calefactor ni lo almacene hasta que este no se haya enfriado del todo. Guárdelo en un lugar frío y seco cuando no se vaya a usar.
- Page 44 Instrucciones de uso Por favor, lea este manual de instrucciones antes de usar este calefactor y guárdelo en caso de necesitar referencia en un futuro. Cuando no esté en uso: Compruebe que el control de encendido esté apagado (en OFF 0) (Fig 1) y que el control de temperatura está...
- Page 45 Instrucciones de uso (continuación) Función Anti-Frost Esta función mantendrá la temperatura de alrededor del calefactor por encima del “punto de congelación”. Para activar esta función, tan solo enchufa el aparato y gire el control de temperatura hasta el icono del copo de nieve.
- Page 46 Limpieza • Antes de limpiar, apague el calefactor. Desconecte el cable y permita que el calefactor se enfríe del todo. • No inmersa el cable, el enchufe o el propio calefactor en agua o cualquier otro líquido. No derrame agua o cualquier otro líquido sobre el calefactor.
- Page 47 Resolución de problemas El calefactor no emite calor: Compruebe si el Compruebe si la calefactor está temperatura está encendido o no. correctamente ajustada. Compruebe que no hay El calefactor no funciona cuando ningún objeto cubriendo uno solo de los elementos deja de la parte frontal del funcionar.
- Page 48 Reembolso o reemplazo es a discreción de la compañía. Productos Duronic se ofrecen con una garantía de 1 año bajo las siguientes condiciones: El producto debe ser devuelto al vendedor con comprobante de compra original.
-
Page 49: Manuale D'istruzioni In Italiano
Manuale D’istruzioni In Italiano... - Page 50 4.5 kg 50/60Hz x550(A)mm Il Duronic HV180 è una stufa elettrica con elementi riscaldante in mica, una tecnologia leader nel mondo di stufe elettriche. Il nostro modello è senza olio e offre più di un riscaldamento standard. L'HV180 riscalda in un minuto, il che la rende una stufa efficiente dal punto di vista energetico.
- Page 51 1. Maniglia Cavo di alimentazione 2. Indicatore di energia Copertura superiore 9. Copertura Controllo della temperatura posteriore Controllo della potenza Griglia protettiva Copertura anteriore Supporti 6. Gestione cavi...
- Page 52 • Se l'apparecchio o il cavo di alimentazione sono danneggiati, restituire la stufa a Duronic per assistenza o riparazione da parte di un tecnico. • Non tentare mai di riparare il prodotto da soli. Non modificare il prodotto in alcun modo che non sia descritto nelle istruzioni per l'uso.
- Page 53 • Tenere l'apparecchio e il cavo lontano da fonti di calore, oggetti appuntiti o qualsiasi cosa che possa causare danni. surriscaldamento, non coprire la stufa. Per prevenire un • Per evitare il possibile rischio di incendio, non ostruire in alcun modo le prese d'aria. •...
- Page 54 • Prima di pulire spegnere la stufa. Scollegare il cavo di alimentazione e lasciare che la stufa raffreddi. • Non conservare la stufa finché non sia completamente fredda. Conservare la stufa in un luogo fresco e asciutto quando non è in uso. •...
- Page 55 Istruzioni per l'uso Si prega di leggere le istruzioni prima di utilizzare questa stufa e di conservarle per riferimento futuro. Quando non in uso: Verificare che la manopola dell'interruttore di alimentazione sia su OFF [0] (Fig 1) e che la manopola di controllo della temperatura sia su OFF (Fig 2).
- Page 56 Istruzioni per l'uso Funzione antigelo: Questa funzione manterrà la temperatura ambiente al di sopra del "punto di congelamento". Per attivare questa funzione, è sufficiente collegare il cavo di alimentazione e ruotare la manopola di controllo della temperatura sul fiocco di neve. Protezione contro il surriscaldamento: Sulla stufa è...
- Page 57 Pulizia • Prima di pulire, spegnere la stufa. Scollegare il cavo di alimentazione e lasciare che raffreddi. • Non immergere il cavo di alimentazione, la spina o la stufa in acqua o liquidi. Non versare acqua o liquidi sulla stufa. •...
- Page 58 Risoluzione dei problemi La stufa non riscalda: controllare se la stufa Controllare se è stata si accende. selezionata una temperatura. Controllare se c'è La stufa non funziona quando un qualche oggetto che set di elementi non funziona. copre la parte anteriore della stufa.
- Page 59 Inoltre, non possiamo garantire l’apparecchio se è stato modificato o riparato dall’acquirente o da terzi. 1 anno di garanzia da Shine-Mart Ltd, proprietari del marchio commerciale Duronic. NOTA: QUESTE DICHIARAZIONI NON INFLUISCONO SUI DIRITTI LEGALI DEL CONSUMATORE Questo prodotto è...
-
Page 60: Instrukcja Obsługi. Polski
Instrukcja obsługi. Polski... - Page 61 1800W 4,5 kg 50/60Hz 550(H)mm Duronic HV180 wykorzystuje elementy grzewcze Mica, które wiodą prym w technologii grzewczej. Ten produkt jest bezolejowy i oferuje dużo więcej niż standardowy grzejnik. Nagrzewa się w ciągu minuty co pozytywnie wpływa na oszczędność kosztów energii oraz wydajność.
- Page 62 Przewód zasilający z wtyczką Wskaźnik zasilania Górna obudowa Pokrętło reg. temperatury Pokrywa tylna 10. Siatka Pokrętło reg. mocy ochronna Obudowa Nóżki Organizer do kabla...
- Page 63 Zachowaj ostrożność podczas korzystania z urządzenia w obecności dzieci i osób szczególnej troski. • W przypadku uszkodzenia urządzenia lub kabla zasilającego należy zwrócić go do firmy Duronic w celu serwisu lub naprawy przez profesjonalnego technika. • Nigdy nie próbuj samodzielnie rozkręcać lub naprawiać urządzenia.
- Page 64 • Urządzenie i przewód zasilający trzymać z dala od źródeł ciepła, ostrych przedmiotów lub czegokolwiek, co może spowodować uszkodzenie. • Nie zakrywaj urządzenia, aby uniknąć przegrzania. W celu zapobiegania potencjalnemu zagrożeniu pożarem, nie należy w żaden sposób blokować otworów wlotowych i wylotowych. •...
- Page 65 • Wyłączyć urządzenie przed przystąpieniem do czyszczenia. Wyciągnąć wtyczkę z gniazdka i odstawić urządzenie do ostygnięcia. • Nie odstawiać grzejnika do przechowywania, dopóki całkowici nie ostygnie. Przechowywać w chłodnym i suchym miejscy, gdy nie jest w użyciu. • Ten produkt przeznaczony jest do dobrze izolowanych przestrzeni lub do użytku okazjonalnego.
- Page 66 Obsługa Prosimy o zapoznanie się z niniejszą instrukcją przed użyciem grzejnika i zachowanie jej na przyszłość. Gdy nieużywany: Upewnij się, że pokrętło zasilania jest w pozycji "wyłączony" [0] (Rys.1) oraz pokrętło temperatury jest w pozycji "wyłączony" (Rys.2) Rys. 1 Rys. 2 Podłączanie do zasilania: Podłącz przewód zasilający do odpowiedniego gniazdka zasilającego (o mocy nie mniejszej niż...
- Page 67 Obsługa (c. d.) Funkcja przeciw zamarzaniu: Funkcja ta pozwala na utrzymanie temperatury otoczenia powyżej punku zamarzania. W celu aktywowania ustawienia podłącz przewód zasilający i ustaw pokrętło na pozycję śnieżynki. Zabezpieczenie przed przegrzaniem Naklejka "DO NOT COVER" - nie zakrywaj; została umieszczona na urządzeniu w celu przypomnienia o niezakrywaniu górnej części grzejnika.
- Page 68 Czyszczenie • Przed przystąpieniem do czyszczenia wyłącz urządzenie. Odłącz od zasilania i odstaw do ostygnięcia. • Nie zanurzać w wodzie lub innych płynach przewodu zasilającego, wtyczki lub samego grzejnika. • W celu bezpiecznego oczyszczenia grzejnika użyj odkurzacza do usunięcia pokładów kurzu i pyłu na kratce zabezpieczającej. Przetrzyj grzejnik suchą ściereczką, aby usunąć...
- Page 69 Rozwiązywanie problemów Grzejnik nie nagrzewa się: Sprawdź, czy Sprawdź, czy grzejnik jest pokrętło temperatury włączony. jest we właściwej pozycji. Sprawdź, czy przednią Grzejnik nie będzie działał, jeżeli część grzejnika nie któryś z elementów ustawień nie są zasłania jakiś uruchomione. przedmiot. Grzejnik nie działa: Sprawdź, czy Sprawdź, czy działa główne...
- Page 70 Warunki Gwarancji 1 Rok Gwarancji firmy Shine-Mart LTD, marki handlowej Duronic Products. UWAGA: ten dokument nie wpływa na twoje ustawowe prawo jako konsumenta. Ten produkt został wykonany zgodnie z restrykcyjnymi normami kontroli i wykorzystuje najwyższej jakości materiały dla uzyskania doskonałej wydajności i niezawodności.
- Page 71 DUR®NIC...