Table des Matières
Publicité
Les langues disponibles
Les langues disponibles
Liens rapides
Cyclonic Bagged Cylinder Vacuum Cleaner, 3.0 Litre, 700 W,
with Suction Control EU (15F)
Aspirateur Cylindrique avec Sac Cyclonique, 3,0 Litres, 700 W,
avec Commande de la Puissance d'Aspiration UE (15F)
Zylinderförmiger Zyklon-Staubsauger mit Beutel, 3,0 Liter,
700 W, mit Steuerung der Saugleistung EU (15F)
Aspirapolvere Cilindrico a Ciclone con Sacco, 3,0 litri, 700 W,
con Controllo della Potenza di Aspirazione EU (15F)
Aspirador Cilíndrico Ciclónico Con Bolsa, 3 Litros, 700 W,
Con Control de Succión UE (15F)
Cyclone cilinderstofzuiger met zak, 3,0 liter, 700 W,
met zuigkrachtregeling EU (15F)
B07D43B982
Publicité
Table des Matières

Manuels Connexes pour AmazonBasics B07D43B982


Sommaire des Matières pour AmazonBasics B07D43B982
- Page 1 Aspirapolvere Cilindrico a Ciclone con Sacco, 3,0 litri, 700 W, con Controllo della Potenza di Aspirazione EU (15F) Aspirador Cilíndrico Ciclónico Con Bolsa, 3 Litros, 700 W, Con Control de Succión UE (15F) Cyclone cilinderstofzuiger met zak, 3,0 liter, 700 W, met zuigkrachtregeling EU (15F) B07D43B982...
- Page 2 English ..... . . 3 Français ..... 26 Deutsch .
-
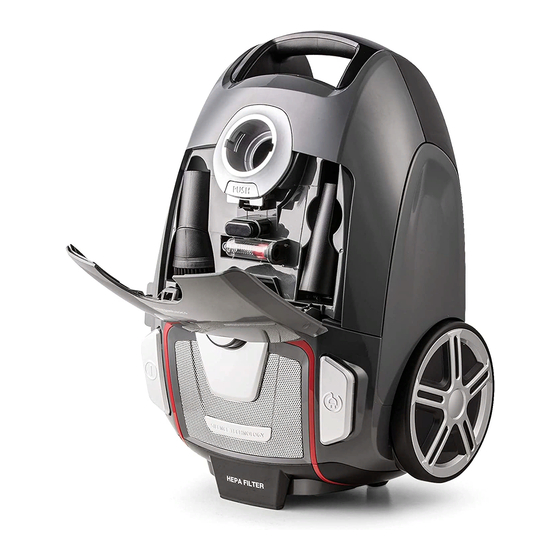
Page 3: Product Description
Product Description C D E Hose intake Dust bag capacity indicator Accessory compartment... - Page 4 Power suction control 1 Cable winder switch Power cord with power plug HEPA filter Holder for hard floor brush On/off button Motor filter Dust bag x3 Carrying handle Front cover Extension release switch Extension tube Tube release switch Hard floor brush Hard floor brush release switch Hard floor/brush function switch Furniture nozzle...
-
Page 5: Accessories
Crevice nozzle Power suction control 2 Hose nozzle release switch Flexible hose Accessories Accessory Intended for... Rugs, carpets Hard floor Tiles, wooden floors, brush linoleum Removes dust and tiny pieces of fabric Furniture from crevices, corners, nozzle cracks and other places hard to reach, ideal e.g. -
Page 6: Important Safeguards
IMPORTANT SAFEGUARDS Read these instructions carefully and retain them for future use. If this product is passed to a third party, then these instructions must be included. When using electrical appliances, basic safety precautions should always be followed to reduce the risk of fire, electric shock, and/or injury to persons including the following: WARNING... - Page 7 • This appliance can be used by children aged from 8 years and above and persons with reduced physical, sensory or mental capabilities or lack of experience and knowledge if they have been given supervision or instruction concerning use of the appliance in a safe way and understand the hazards involved.
- Page 8 • Before connecting the product to the power supply, check that the power supply voltage and current rating corresponds with the power supply details shown on the product rating label. • Do not pull the power plug out of the electrical outlet by the power cord and do not wrap the power cord around the product.
-
Page 9: Intended Use
WARNING The signal word that indicates a hazard with a medium level of risk which, if not avoided, could result in death or serious injury. CAUTION The signal word that indicates a hazard with a low level of risk which, if not avoided, could result in minor or moderate injury. -
Page 10: Before First Use
Before First Use • Carefully remove all packaging materials and retain for future use. • Check for transport damages. • Before connecting the product to the power supply, check that the power supply voltage and current rating corresponds with the power supply details shown on the product rating label. - Page 11 • Insert the flexible hose (X) into the hose intake (A) at the front of the product. • Turn the flexible hose (X) clockwise until it is locked securely. Step 2: • Insert the narrow end of the flexible hose (X) into the extension tube (O).
- Page 12 Step 3: • Push the tube release switch (P) and extend the length of the extension tube (O). Step 4:...
- Page 13 • Insert the other end of the extension tube (O) into the connector of the hard floor brush (Q) (or other accessory from the accessory compartment (C). Operation Connecting to an electrical outlet: • Pull out the power cord (F). •...
- Page 14 Turning on/off: • Before use, set the power suction control (D) to MIN. • To turn on, press the on/off button (I). NOTICE Increase/decrease suction power by rotating the power suction control of the main unit or the flexible hose handle (D)/(V). •...
-
Page 15: Cleaning And Maintenance
Cleaning and Maintenance WARNING Risk of electric shock! To prevent electric shock, unplug before cleaning. WARNING Risk of electric shock! During cleaning do not immerse the electrical parts of the product in water or other liquids. Never hold the product under running water. Replacing the dust bag (K) •... - Page 16 • Remove the dust bag (K). • Insert new dust bag (K). • Close the front over (M). NOTICE When the dust bag capacity indicator (B) turns red, the dust bag (K) must be replaced.
- Page 17 Replacing the HEPA filter (G) • Remove the compartment lid at the back of the product. • Remove the old HEPA filter (G) from the compartment. • Insert a new HEPA filter.
- Page 18 • Reinstall the compartment lid into place. NOTICE It is recommended to replace the HEPA filter once a year for optimal performance. Cleaning the motor filter (J) • Open the front cover (M) and remove the dust bag (K).
- Page 19 • Pull out the motor filter bracket. • Remove the motor filter (J) from the bracket. • Rinse the motor filter with lukewarm water and allow it to air-dry.
- Page 20 • When the motor filter is completely dry, reinstall it into the bracket then into the bracket receptacle. NOTICE Replace the motor filter (J) if it is damaged. General cleaning advice • To clean, wipe with a soft, slightly moist cloth. •...
- Page 21 Troubleshooting Problem Solution Motor does not • Connect to a suitable start power supply. Check if it is powered. Weak suction • Clear the flexible hose and power the accessories of any obstructions. • Close both power suction controls. • Remove and clean the filters.
- Page 22 Dismantling for maintenance 1. Hose, extension tube, dust bag, exhaust grid, filter and all accessories can be disassembled or detached without any tools. 2. Front cover, cable winder, switch, power suction control and on/off button can be disassembled by using a screwdriver. 3.
- Page 23 Specifications Voltage/frequency: 220-240 V~, 50/60 Hz Power consumption: 700 W Capacity: Product dimensions 460 x 260 x 306 mm (W x H x D): Product net weight: 5.7 kg Protection class: Class II Operational motor 500 hrs lifetime:...
- Page 24 Disposal The Waste Electrical and Electronic Equipment (WEEE) Directive aims to minimise the impact of electrical and electronic goods on the environment, by increasing re-use and recycling and by reducing the amount of WEEE going to landfill. The symbol on this product or its packaging signifies that this product must be disposed separately from ordinary household wastes at its end of life.
- Page 25 Feedback and Help Love it? Hate it? Let us know with a customer review. AmazonBasics is committed to delivering customer-driven products that live up to your high standards. We encourage you to write a review sharing your experiences with the product.
-
Page 26: Description Du Produit
Description du produit C D E Orifice du flexible d’aspiration Indicateur de la capacité du sac à poussière Compartiment pour accessoires... - Page 27 Commande de la puissance d’aspiration 1 Commutateur d’enroulement du cordon Cordon d’alimentation muni d’une fiche secteur Filtre HEPA Support pour brosse pour sols durs Bouton On/Off (Marche/Arrêt) Filtre du moteur Sac à poussière x 3 Poignée de transport Capot avant Commutateur de déverrouillage de la rallonge Tube télescopique Commutateur de déverrouillage du tube...
-
Page 28: Accessoires
Commande de la puissance d’aspiration 2 Commutateur de déverrouillage de la buse du tuyau Flexible d’aspiration Accessoires Accessoire Prévu pour... Moquettes, tapis Brosse pour sols Carrelage, parquets, durs linoléum Retire la poussière et les minuscules morceaux de tissu des fissures, Buse pour des coins, des fentes meubles... -
Page 29: Mesures De Sécurité Importantes
MESURES DE SÉCURITÉ IMPORTANTES Veuillez lire attentivement les présentes instructions et les conserver afin de pouvoir vous y référer ultérieurement. En cas de cession de ce produit à un tiers, le présent manuel d’utilisation doit également lui être remis. Lorsque vous utilisez des appareils électriques, vous devez toujours prendre des mesures de sécurité... - Page 30 ATTENTION Ne pas diriger le tuyau, le tube ou tout autre accessoire vers les yeux ou les oreilles, et ne pas l’introduire dans la bouche. Ne pas utiliser sur les animaux de compagnie. • Cet appareil peut être utilisé par des enfants de 8 ans et plus et par des personnes ayant des capacités physiques, sensorielles ou mentales réduites ou manquant d’expérience...
- Page 31 • Prenez des précautions supplémentaires lorsque vous travaillez dans des escaliers. • Disposez le cordon de façon à ce qu’il ne soit pas possible de le tirer ou de s’y empêtrer. Maintenez l’appareil ainsi que son cordon hors de la portée des enfants. •...
-
Page 32: Description Des Termes D'avertissement
CONSERVEZ CES INSTRUCTIONS DESCRIPTION DES TERMES D’AVERTISSEMENT DANGER Terme d’avertissement indiquant un danger associé à un niveau de risque élevé qui, s’il n’est pas évité, entraîne la mort ou des blessures graves. AVERTISSEMENT Terme d’avertissement indiquant un danger associé à un niveau de risque moyen qui, s’il n’est pas évité, peut entraîner la mort ou des blessures graves. -
Page 33: Avant La Première Utilisation
• Ne pas utiliser le produit pour aspirer des cendres, des objets volumineux, des objets pointus, p.ex. verre, ou pour aspirer des liquides ou des substances inflammables. • Ce produit est exclusivement destiné à un usage domestique. Il n’est pas conçu pour un usage commercial. -
Page 34: Montage
DANGER Risque d’étouffement ! Conservez tous les matériaux d’emballage hors de la portée des enfants. Ces matériaux constituent une source de danger potentiel, par ex. étouffement. Montage Étape 1 : • Insérez le tuyau flexible (X) dans l’entrée du tuyau (A) à l’avant du produit. •... - Page 35 Étape 2 : • Insérez l’extrémité étroite du tuyau flexible (X) dans le tube d’extension (O). Elle devrait s’enclencher. Étape 3 : • Appuyez sur le commutateur de déverrouillage du tube (P), puis étirez complètement le tube d’extension (O).
- Page 36 Étape 4 : • Insérez l’autre extrémité du tube d’extension (O) dans le connecteur de la brosse pour sol durs(Q) (ou un autre accessoire du compartiment pour accessoires (C).
-
Page 37: Utilisation
Utilisation Branchement à une prise de courant : • Retirez le cordon d’alimentation (F). • Branchez la fiche d’alimentation sur une prise de courant appropriée. REMARQUE Ne pas étirer le cordon d’alimentation au-delà de l’indication rouge sur le cordon. - Page 38 Mise sous/hors tension : • Avant toute utilisation, positionnez la commande de puissance d’aspiration (D) sur MIN. • Pour mettre sous tension l’appareil, appuyez sur le bouton On/Off (Marche/Arrêt) (I). REMARQUE Augmentez/diminuez la puissance d’aspiration en tournant la commande de puissance d’aspiration de l’unité principale ou la poignée du flexible (D)/(V).
-
Page 39: Nettoyage Et Entretien
REMARQUE Guidez le cordon d’alimentation de l’autre main pour vous assurer que le cordon ne fouette pas et ne provoque pas de dommages. Nettoyage et Entretien AVERTISSEMENT Risques d’électrocution ! Afin de prévenir tout risque d’électrocution, débranchez le produit avant de le nettoyer. AVERTISSEMENT Risques d’électrocution ! En cours de nettoyage, ne pas plonger les... - Page 40 • Retirez le sac à poussière (K). • Insérer un nouveau sac à poussière (K). • Refermez le capot avant (M).
- Page 41 REMARQUE Lorsque le voyant de capacité du sac à poussière (B) devient rouge, le sac à poussière (K) doit être remplacé. Remplacement du filtre HEPA (G) • Retirez le couvercle du compartiment situé au dos du produit. • Retirez l’ancien filtre HEPA (G) du compartiment.
- Page 42 • Insérez un nouveau filtre HEPA. • Remettez en place le couvercle du compartiment. REMARQUE Nous vous recommandons de remplacer le filtre HEPA une fois par an pour en tirer des performances optimales.
- Page 43 Nettoyage du filtre moteur (J) • Ouvrez le capot avant (M), puis retirez le sac à poussière (K). • Retirez le support du filtre moteur.
- Page 44 • Retirez le filtre moteur (J) du support. • Rincez le filtre moteur à l’eau tiède, puis laissez-le sécher à l’air libre. • Lorsque le filtre moteur est complètement sec, réinstallez-le dans le support puis dans le réceptacle du support. REMARQUE Remplacez le filtre moteur (J) s’il est endommagé.
- Page 45 Conseil de nettoyage général • Nettoyez le produit en l’essuyant à l’aide d’un chiffon doux légèrement humide. • Séchez le produit après le nettoyage. • Ne jamais utiliser de détergents corrosifs, de brosses métalliques, de lavettes abrasives ou d’ustensiles tranchants ou en métal pour nettoyer le produit.
-
Page 46: Dépannage
Dépannage Problème Solution Le moteur ne • Branchez l’appareil à une démarre pas source d’alimentation appropriée. Vérifiez s’il est alimenté. Faible • Dégagez le flexible et puissance les accessoires de toute d’aspiration obstruction. • Fermez les deux commandes de puissance d’aspiration. -
Page 47: Démontage Pour Entretien
Démontage pour entretien : 1. La brosse, le tuyau, le tube extensible, le bac à poussière, la grille d’aspiration, le filtre et tous les accessoires peuvent être démontés ou extraits sans aucun outil. 2. 2. Le capot frontal, l’enrouleur de câble, le sélecteur, la commande de puissance d’aspiration et l’interrupteur marche/arrêt peuvent être démontés à... -
Page 48: Caractéristiques
Caractéristiques 220 à 240 V~, Tension/fréquence : 50/60 Hz Consommation 700 W électrique : Capacité : Dimensions du produit 460 x 260 x 306 mm (L x H x P) : Poids net du produit : 5,7 kg Classe de protection : Classe II Durée de vie opérationnelle 500 h du moteur :... -
Page 49: Mise Au Rebut
Mise Au Rebut La directive relative aux déchets d’équipements électriques et électroniques (DEEE) vise à réduire au minimum l’impact des produits électriques et électroniques sur l’environnement, en augmentant la réutilisation et le recyclage et en réduisant la quantité de DEEE mis en décharge. -
Page 50: Vos Avis Et Aide
Vos Avis et Aide Vous l’adorez ? Vous le détestez ? Faites-le nous savoir en laissant un commentaire. AmazonBasics s’engage à vous offrir des produits axés sur les besoins de la clientèle et répondant à vos normes élevées. Nous vous encourageons à rédiger un commentaire visant à partager vos expériences sur le produit. - Page 51 Produktbeschreibung C D E Schlaucheinlass Staubbeutel-Kapazitätsanzeige Zubehörfach...
- Page 52 Steuerung der Saugleistung 1 Schalter für Kabelaufwicklung Anschlussleitung und Stecker HEPA-Filter Halter für Bodenbürste Ein-/Aus-Taste Motorfilter Staubbeutel x3 Tragegriff Vordere Abdeckung Entriegelung für Verlängerungsrohr Verlängerungsrohr Schalter für Rohrerweiterung Bodenbürste Entriegelung für Bodenbürste Funktionsschalter für Bodenbürste Möbeldüse...
- Page 53 Fugendüse Steuerung der Saugleistung 2 Schlauchdüsenentriegelung Flexibler Schlauch Zubehör Zubehörteil Vorgesehen für ... Teppiche Boden- Fliesen, Holzböden, bürste Linoleum Entfernt Staub und kleine Stoffstücke aus Ritzen, Ecken, Rissen Möbeldü- und anderen schwer zu erreichenden Stellen, ideal z. B. für Gitterroste in Autos Ritzen, Ecken, Risse Fugendü-...
-
Page 54: Wichtige Sicherheitshinweise
WICHTIGE SICHER- HEITSHINWEISE Lesen Sie diese Anweisungen sorgfältig und bewahren Sie sie zur künftigen Verwendung auf. Wenn dieses Produkt an Dritte weitergegeben wird, muss diese Gebrauchsanweisung beigefügt werden. Bei der Verwendung von Elektrogeräten sollten immer grundlegende Sicherheitsmaßnahmen befolgt werden, um die Gefahr von Feuer, Stromschlag und/oder Verletzungen zu reduzieren, einschließlich der folgenden: WARNUNG... - Page 55 • Dieses Produkt kann von Kindern ab 8 Jahren und von Personen mit eingeschränkten körperlichen, sensorischen oder geistigen Fähigkeiten oder mit Mangel an Erfahrung und Kenntnissen verwendet werden, wenn sie von einer Person beaufsichtigt werden oder Anweisungen zur sicheren Verwendung des Produkts erhalten haben und die mit dem Produkt verbundenen Gefahren verstehen.
- Page 56 • Verlegen Sie die Anschlussleitung so, dass niemand versehentlich daran ziehen oder darüber stolpern kann. Halten Sie das Produkt und dessen Anschlussleitung von Kindern fern. • Wenn Sie eine Verlängerungsleitung verwenden, muss dessen Kapazität für den Stromverbrauch des Produkts geeignet sein. •...
- Page 57 BEWAHREN SIE DIESE ANLEITUNG BESCHREIBUNG DER SIGNALWÖRTER GEFAHR Signalwort, das eine Gefahr mit hohem Risiko anzeigt, die bei Nichtvermeidung zu schweren Verletzungen oder zum Tod führt. WARNUNG Signalwort, das eine Gefahr mit mittlerem Risiko anzeigt, die bei Nichtvermeidung zu schweren Verletzungen oder zum Tod führten kann.
-
Page 58: Vor Der Ersten Verwendung
Verwendungszweck • Dieses Produkt ist nur zum Absaugen von Staub, Flusen und Schmutz von weichen und harten Oberflächen vorgesehen. • Verwenden Sie das Produkt nicht zum Absaugen von Asche, großen Gegenständen, scharfen Gegenständen, z. B. Glas, oder zum Aufsaugen von Flüssigkeiten oder brennbaren Stoffen. -
Page 59: Montage
• Überprüfen Sie vor dem Anschließen des Produkts an die Stromversorgung, ob die Netzspannung und der Nennstrom mit den Angaben auf dem Typenschild des Produkts übereinstimmen. GEFAHR Erstickungsgefahr! Halten Sie Verpackungsmaterialien von Kindern fern – solche Materialien stellen Gefahrensituationen für Kinder, u.a. - Page 60 Schritt 2: • Führen Sie das schmale Ende des flexiblen Schlauches (X) bis zum Einrasten in das Verlängerungsrohr (O) ein. Schritt 3: • Drücken Sie den Schalter für die Rohrerweiterung (P) und passen Sie die Länge des Verlängerungsrohres (O) an.
- Page 61 Schritt 4: • Setzen Sie das andere Ende des Verlängerungsrohres (O) in das Verbindungsstück zur Bodenbürste (Q) oder eines anderen Zubehörteils aus dem Zubehörfach (C) ein.
- Page 62 Betrieb An eine Steckdose anschließen: • Ziehen Sie die Anschlussleitung (F) heraus. • Verbinden Sie den Stecker mit einer geeigneten Steckdose. HINWEIS Ziehen Sie die Anschlussleitung nicht über die rote Markierung an der Leitung heraus.
- Page 63 Ein-/Ausschalten: • Stellen Sie die Saugleistungssteuerung (D) vor der Verwendung auf MIN. • Um das Produkt einzuschalten, drücken Sie die Ein-/Aus-Taste (I). HINWEIS Erhöhen/verringern Sie die Saugleistung, indem Sie die Saugleistungssteuerung am Hauptgerät oder am Griff des flexiblen Schlauches (D)/(V) drehen. •...
-
Page 64: Reinigung Und Pflege
HINWEIS Leiten Sie die Anschlussleitung mit der anderen Hand, um sicherzustellen, dass die Leitung nicht unkontrolliert eingerollt wird und Schäden verursacht. Reinigung und Pflege WARNUNG Gefahr eines Stromschlags! Um Stromschläge zu vermeiden, trennen Sie das Produkt vor der Reinigung vom Stromnetz. WARNUNG Gefahr eines Stromschlags! Tauchen Sie während der Reinigung keine... - Page 65 • Entfernen Sie den Staubbeutel (K). • Setzen Sie einen neuen Staubbeutel (K) ein. • Schließen Sie die vordere Abdeckung (M).
- Page 66 HINWEIS Wenn die Staubbeutel- Kapazitätsanzeige (B) auf Rot wechselt, muss der Staubbeutel (K) ersetzt werden. HEPA-Filter (G) ersetzen • Entfernen Sie die Abdeckung an der Rückseite des Produkts. • Entfernen Sie den alten HEPA-Filter (G) aus dem Fach.
- Page 67 • Legen Sie einen neuen HEPA-Filter ein. • Setzen Sie die Abdeckung wieder auf. HINWEIS Für eine optimale Leistung wird empfohlen, den HEPA-Filter einmal pro Jahr zu wechseln.
- Page 68 Motorfilter (J) reinigen • Öffnen Sie die vordere Abdeckung (M) und entfernen Sie den Staubbeutel (K). • Ziehen Sie an der Motorfilter-Halterung.
- Page 69 • Entfernen Sie den Motorfilter (J) von der Halterung. • Reinigen Sie den Motorfilter mit lauwarmem Wasser und lassen Sie ihn an der Luft trocknen. • Wenn der Motorfilter vollständig getrocknet ist, setzen Sie ihn wieder in die Halterung und danach in den Behälter für die Halterung ein.
- Page 70 Allgemeine Reinigungshinweise • Verwenden Sie zur Reinigung ein weiches, leicht angefeuchtetes Tuch. • Trocknen Sie das Produkt nach der Reinigung. • Verwenden Sie keine ätzenden Reinigungsmittel, Drahtbürsten, Scheuermittel, Metall oder scharfe Materialien, um das Produkt zu reinigen. Wartung • Bewahren Sie das Produkt an einem kühlen, trockenen Ort, außerhalb der Reichweite von Kindern und Haustieren, am besten in der Originalverpackung, auf.
- Page 71 Fehlerbehebung Problem Behebung Der Motor • Schließen Sie das startet nicht Produkt an eine geeignete Steckdose an. Überprüfen Sie, ob die Steckdose mit Strom versorgt wird. Schwache • Befreien Sie den Saugkraft flexiblen Schlauch und die Zubehörteile von Verstopfungen. • Schließen Sie beide Saugleistungssteuerungen.
- Page 72 Demontage zur Wartung 1. Schlauch, Verlängerungsrohr, Staubbeutel, Abluftgitter, Filter und sämtliches Zubehör können ohne Werkzeuge zerlegt oder abgenommen werden. 2. Die vordere Abdeckung, der Schalter für Kabelaufwicklung, die Saugleistungssteuerung und der Ein-/Ausschalter können mit einem Schraubendreher zerlegt werden. 3. Auf die Platine, die Anschlussleitung und den Motorraum können Sie zugreifen, indem Sie 6 Schrauben am Hauptgerät entfernen (2 Schrauben an der Unterseite, 2 Schrauben...
-
Page 73: Technische Daten
Technische Daten Spannung / Frequenz: 220-240 V~, 50/60 Hz Leistungsaufnahme: 700 W Kapazität: Abmessungen des 460 x 260 x 306 mm Produkts (B x H x T): Nettogewicht des 5,7 kg Produkts: Schutzklasse: Klasse II Motorlebensdauer: 500 Std. -
Page 74: Entsorgung
Entsorgung Die Richtlinie über Elektro- und Elektronik- Altgeräte zielt darauf ab, die Auswirkungen von elektrischen und elektronischen Waren auf die Umwelt zu minimieren, durch Steigerung der Wiederverwendung und des Recyclings sowie durch Reduktion der Anzahl an Elektro- und Elektronik-Altgeräten, die auf Mülldeponien landen. - Page 75 Feedback und Hilfe Gefällt es Ihnen? Gefällt es Ihnen nicht? Dann bewerten Sie das Produkt auf unserer Webseite! AmazonBasics setzt sich für die Bereitstellung kundenorientierter Produkte ein, um Ihre hohen Qualitätsstandards zu erfüllen. Bitte schreiben Sie eine Rezension, in der Sie Ihre Erfahrungen mit dem Produkt teilen.
-
Page 76: Descrizione Del Prodotto
Descrizione del prodotto C D E Ingresso tubo Indicatore di capacità del sacchetto filtro Vano accessori... - Page 77 Controllo della potenza di aspirazione 1 Interruttore dell'avvolgicavo Cavo di alimentazione con spina Filtro HEPA Supporto per spazzola per pavimento duro Pulsante ON/OFF Filtro motore Sacchetto filtro x3 Maniglia per il trasporto Coperchio anteriore Interruttore di sblocco prolunga Tubo di prolunga Interruttore di sgancio del tubo Spazzola per pavimento duro Interruttore di sblocco per spazzola per...
- Page 78 Ugello per fessure Controllo della potenza di aspirazione 2 Interruttore di sblocco ugello flessibile Tubo flessibile Accessori Accessorio Indicato per... Spazzola Tappeti, moquette Piastrelle, pavimenti in pavimento legno, linoleum duro Rimuove la polvere e i piccoli pezzi di tessuto da fessure, angoli, crepe Ugello per e altri punti difficili da mobili...
- Page 79 AVVISI DI SICUREZZA IMPORTANTI Leggere attentamente le istruzioni e conservarle per utilizzo futuro. In caso di cessione del prodotto a terzi, accludere parimenti questo manuale utente. Quando si utilizzano apparecchi elettrici, è necessario seguire sempre le precauzioni di sicurezza di base per ridurre il rischio di incendi, scosse elettriche e / o lesioni a persone tra cui: AVVERTENZA Non usare un prodotto...
- Page 80 • L’apparecchio può essere usato da bambini al di sopra degli 8 anni e da persone con ridotte capacità fisiche, psichiche o sensoriali, oppure senza esperienza e conoscenza del prodotto, solo sotto supervisione o a seguito di istruzioni per un uso sicuro del prodotto e conseguente comprensione dei rischi connessi all’utilizzo dello stesso.
- Page 81 • In caso di utilizzo di una prolunga, la capacità deve essere adeguata alla potenza assorbita dal prodotto. • Prima di collegare il prodotto all’alimentazione, verificare che la tensione e la corrente nominale corrispondano ai dati indicati nell’etichetta identificativa del prodotto. •...
- Page 82 CONSERVARE QUESTO MANUALE DELLE ISTRUZIONI DESCRIZIONE DELLE PAROLE DI SEGNALAZIONE PERICOLO Parola di segnalazione che indica un pericolo con un alto livello di rischio che, se non evitato, causa la morte o gravi lesioni. AVVERTENZA Parola di segnalazione che indica un pericolo con un medio livello di rischio che, se non evitato, potrebbe causare la morte o gravi lesioni.
-
Page 83: Uso Previsto
Uso Previsto • Questo prodotto è destinato esclusivamente all’aspirazione di polvere, lanugine e sporco su superfici morbide e dure. • Non utilizzare il prodotto per l’aspirazione di ceneri, oggetti grandi, oggetti taglienti, ad esempio il vetro, o per aspirare liquidi o sostanze infiammabili. - Page 84 • Prima di collegare il prodotto all’alimentazione, verificare che la tensione e la corrente nominale corrispondano ai dati indicati nell’etichetta identificativa del prodotto. PERICOLO Rischio di soffocamento! Tenere qualsiasi materiale d’imballaggio lontano dai bambini: questi materiali sono una potenziale sorgente di pericolo, come il soffocamento. Montaggio Passo 1: •...
- Page 85 Passo 2: • Inserire l’estremità stretta del tubo flessibile (X) nel tubo di prolunga (O). Dovrebbe scattare in posizione. Passo 3: • Spingere l’interruttore di sgancio del tubo (P) ed estendere la lunghezza del tubo di prolunga (O).
- Page 86 Passo 4: • Inserire l’altra estremità del tubo di prolunga (O) nel connettore della spazzola per pavimento duro (Q) (o un altro accessorio del vano accessori (C)).
- Page 87 Funzionamento Collegamento a una presa elettrica: • Estrarre il cavo di alimentazione (F). • Collegare la spina a una presa di corrente idonea. AVVISO Non prolungare il cavo di alimentazione oltre il segno rosso sul cavo.
- Page 88 Accensione / Spegnimento: • Prima dell’uso, impostare il controllo della potenza di aspirazione (D) su MIN. • Per accendere, premere il pulsante on/off (I). AVVISO Aumentare/diminuire la potenza di aspirazione ruotando il controllo della potenza di aspirazione dell’unità principale o il manico del tubo flessibile (D)/(V).
-
Page 89: Pulizia E Manutenzione
Pulizia E Manutenzione AVVERTENZA Rischio di scossa elettrica! Per prevenire il rischio di scossa elettrica, scollegare prima di procedere alla pulizia. AVVERTENZA Rischio di scossa elettrica! Non immergere le parti elettriche del prodotto in acqua o in altri liquidi durante la pulizia. Non tenere mai il prodotto sotto l’acqua corrente. - Page 90 • Rimozione del sacchetto filtro (K). • Inserire un nuovo sacchetto filtro (K). • Chiudere il coperchio anteriore (M). AVVISO Quando l’indicatore di capacità del sacchetto filtro (B) diventa rosso, il sacchetto (K) va sostituito.
- Page 91 Sostituzione del filtro HEPA (G) • Rimuovere il coperchio del vano sul retro del prodotto. • Rimuovere il vecchio filtro HEPA (G) dal vano. • Inserire un nuovo filtro HEPA.
- Page 92 • Rimontare il coperchio del vano in posizione. AVVISO Per ottenere prestazioni ottimali, si consiglia di sostituire il filtro HEPA una volta all’anno. Pulizia del filtro motore (J) • Aprire il coperchio anteriore (M) e rimuovere il sacchetto filtro (K).
- Page 93 • Estrarre la staffa del filtro motore. • Rimuovere il filtro motore (J) dalla staffa. • Risciacquare il filtro del motore con acqua tiepida e lasciarlo asciugare all’aria.
- Page 94 • Quando il filtro del motore è completamente asciutto, reinstallarlo nella staffa e poi nella relativa presa. AVVISO Sostituire il filtro motore (J) se danneggiato. Indicazioni generali per la pulizia • Per la pulizia passare un panno morbido leggermente inumidito. •...
-
Page 95: Risoluzione Dei Problemi
Risoluzione Dei Problemi Problema Soluzione Il motore non si • Collegare a avvia un’alimentazione elettrica adeguata. Controllare se è alimentato. Potenza di • Rimuovere eventuali aspirazione ostruzioni dal tubo debole flessibile e dagli accessori. • Chiudere entrambi i controlli della potenza di aspirazione. - Page 96 Smontaggio per la manutenzione 1. È possibile smontare o staccare il tubo, la prolunga del tubo, il sacchetto per la polvere, la griglia di scarico, il filtro e tutti gli accessori senza utilizzare alcuno strumento. 2. È possibile smontare la protezione frontale, l’avvolgicavo, l’interruttore, il pulsante di comando della potenza di aspirazione e il pulsante on/off utilizzando un cacciavite.
- Page 97 Specifiche Tensione / frequenza: 220-240 V~, 50/60 Hz Consumo di corrente: 700 W Capacità: Dimensioni del 460 x 260 x 306 mm prodotto (L x A x P): Peso netto del 5,7 kg prodotto: Classe di protezione: Classe II Durata di funzionamento 500 ore del motore:...
-
Page 98: Smaltimento
Smaltimento La Direttiva sui rifiuti di apparecchiature elettriche ed elettroniche (RAEE) mira a minimizzare l’impatto di suddette apparecchiature sull’ambiente, aumentando le pratiche di riutilizzo e riciclo e riducendo la quantità di rifiuti RAEE inviati in discarica. Il simbolo su questo prodotto o sull’imballaggio indica che il prodotto dovrà... - Page 99 Feedback e Aiuto Ti piace? Oppure no? Faccelo sapere scrivendo la tua recensione. AmazonBasics si impegna a distribuire prodotti orientati al cliente che siano all’altezza degli standard più elevati. Pertanto, invitiamo i clienti a scrivere una recensione per condividere le proprie esperienze con il prodotto.
-
Page 100: Descripción Del Producto
Descripción del producto C D E Toma del tubo Indicador de capacidad de la bolsa del polvo Compartimento para accesorios... - Page 101 Control de la potencia de succión 1 Botón para enrollar el cable Cable de alimentación con enchufe Filtro HEPA Soporte para el cepillo para suelos duros Botón de encendido/apagado Filtro del motor Bolsa para el polvo, 3 ud. Asa de transporte Cubierta frontal Botón para soltar la extensión Tubo telescópico...
- Page 102 Boquilla para muebles Boquilla para grietas Control de la potencia de succión 2 Botón para soltar la boquilla Tubo flexible Accesorios Accesorio Uso previsto... Tapetes, alfombras Cepillo para suelos Baldosas, suelos de duros madera, linóleo Elimina el polvo y los trozos diminutos de tela de fisuras, esquinas, Boquilla...
-
Page 103: Consejos De Seguridad Importantes
CONSEJOS DE SEGURIDAD IMPORTANTES Lea estas instrucciones atentamente y guárdelas para futuras consultas. Si transfiere el producto a una tercera persona, debe incluir también este manual de instrucciones. Al usar aparatos eléctricos, siempre deben tomarse unas precauciones de seguridad básicas para reducir el riesgo de incendio, de descarga eléctrica y/o de daños personales incluyendo las siguientes: ADVERTENCIA... - Page 104 • Este aparato puede ser usado por niños mayores de 8 años y por personas con capacidades físicas, sensoriales o mentales reducidas, o con falta de conocimiento y experiencia, siempre que estén bajo supervisión o hayan recibido instrucciones sobre el uso seguro del aparato y comprendan todos los peligros relacionados.
- Page 105 • Si se usa un cable alargador, su capacidad debe ser adecuada para la potencia consumida por el producto. • Antes de conectar el producto al suministro de alimentación, compruebe que el voltaje del suministro y la corriente nominal corresponden a los detalles del suministro de alimentación que se muestran en la etiqueta del producto.
- Page 106 DESCRIPCIÓN DE LAS PALABRAS DE ADVERTENCIA PELIGRO La palabra de advertencia que indica un peligro con un nivel alto de riesgo que, si no se evita, provocará la muerte o lesiones graves. ADVERTENCIA La palabra de advertencia que indica un peligro con un nivel medio de riesgo que, si no se evita, podría provocar la muerte o lesiones graves.
-
Page 107: Antes Del Primer Uso
• Este producto solo se ha diseñado para uso doméstico. No es apto para uso comercial. • Este producto solo es apto para usar en interiores secos. • No se aceptará ninguna responsabilidad por los daños provocados por el uso inadecuado o por el incumplimiento de estas instrucciones. - Page 108 Montaje Paso 1: • Inserte el tubo flexible (X) en la toma del tubo (A) situada en la parte delantera del producto. • Gire el tubo flexible (X) hacia la derecha hasta que se bloquee. Paso 2:...
- Page 109 • Inserte el lado estrecho del tubo flexible (X) al tubo telescópico (O). Debería encajar. Paso 3: • Presione el botón para soltar el tubo (P) y alargue el tubo telescópico (O). Paso 4:...
- Page 110 • Inserte el otro lado del tubo telescópico (O) al conector del cepillo para suelos duros (Q) (u otro accesorio del compartimento para accesorios (C)). Funcionamiento Conectar a tuna toma eléctrica: • Extraiga el cable de alimentación (F). • Enchufe el cable a una toma eléctrica adecuada.
- Page 111 Encendido/apagado: • Antes del uso, ajuste el control de succión (D) a MIN. • Para encenderlo, presione el botón de encendido/apagado (I). AVISO Suba o baje la potencia de succión girando el control de succión de la unidad principal o del asa del tubo flexible (D)/(V). •...
-
Page 112: Limpieza Y Mantenimiento
Limpieza y Mantenimiento ADVERTENCIA ¡Riesgo de descarga eléctrica! Para evitar la descarga eléctrica, desenchufe el aparato antes de limpiarlo. ADVERTENCIA ¡Riesgo de descarga eléctrica! Durante la limpieza, no sumerja las piezas eléctricas del producto en agua u otros líquidos. Nunca sujete el producto bajo el agua. Sustitución de la bolsa para el polvo (K) •... - Page 113 • Extraiga la bolsa para el polvo (K). • Inserte la nueva bolsa para el polvo (K). • Cierre la cubierta frontal (M). AVISO Cuando el indicador de llenado de la bolsa para el polvo (B) se encienda en rojo, la bolsa (K) debe sustituirse.
- Page 114 Sustituir el filtro HEPA (G) • Extraiga la tapa del compartimento en la parte trasera del producto. • Retire el filtro HEPA (G) viejo del compartimento. • Inserte un nuevo filtro HEPA.
- Page 115 • Vuelva a colocar la tapa del compartimento en su sitio. AVISO Se recomienda sustituir el filtro HEPA una vez al año para obtener un rendimiento óptimo. Limpieza del filtro del motor (J) • Abra la cubierta frontal (M) y extraiga la bolsa para el polvo (K).
- Page 116 • Extraiga el soporte para el filtro motor. • Retire el filtro del motor (J) del soporte. • Enjuague el filtro con agua tibia y déjelo secar al aire.
- Page 117 • Cuando el filtro del motor esté completamente seco, vuelva a colocarlo en el soporte y, a continuación, en el receptáculo del soporte. AVISO Sustituya el filtro del motor (J) si está dañado. Consejos de limpieza general • Para limpiar, pase un paño suave y ligeramente húmedo.
-
Page 118: Solución De Problemas
Solución De Problemas Problema Solución El motor no • Conecte a una fuente de arranca alimentación adecuada. Compruebe si recibe alimentación. Potencia de • Retire todas las succión débil obstrucciones del tubo flexible y de los accesorios. • Cierre ambos controles de succión. - Page 119 Desmontaje por mantenimiento 1. La manguera, el tubo telescópico, la bolsa para el polvo, la rejilla de escape, el filtro y todos los accesorios se pueden desmontar o separar sin ninguna herramienta. 2. La cubierta frontal, enrollador del cable, el botón, el control de succión de potencia y el interruptor de encendido / apagado se deben desmontar con la ayuda de un tornillo.
- Page 120 Especificaciones Tensión / frecuencia: 220-240 V~, 50/60 Hz Consumo eléctrico: 700 W Capacidad: Dimensiones del producto 460 x 260 x 306 mm (An. x Pr. x Al.): Peso neto del 5,7 kg producto: Clase de protección: Clase II Vida útil del motor: 500 horas...
- Page 121 Eliminación El objetivo de la Directiva sobre residuos de aparatos eléctricos y electrónicos (RAEE) es minimizar el impacto de los bienes eléctricos y electrónicos en el medio ambiente, aumentando la reutilización y el reciclaje y reduciendo la cantidad de RAEE que van a los vertederos.
- Page 122 Comentarios y Ayuda ¿Le encanta? ¿No le gusta nada? Escriba una opinión como cliente. En AmazonBasics nos comprometemos a proveer productos pensados para satisfacer a nuestros clientes y que estén a la altura de sus elevados estándares de calidad. Le animamos a que escriba una opinión sobre su experiencia con el producto.
-
Page 123: Productomschrijving
Productomschrijving C D E Slanginlaat Capaciteitslampje stofzak Accessoirevak... - Page 124 Zuigkrachtregelaar 1 Schakelaar snoerhaspel Netsnoer met stekker HEPA-filter Houder voor borstel voor harde vloeren Aan-uitknop Motorfilter Stofzak x3 Draaghandgreep Voorklep Ontgrendelschakelaar verlengstuk Verlengbuis Buisontgrendelschakelaar Hardevloerborstel Ontgrendelschakelaar hardevloerborstel Functieschakelaar harde vloer/borstel Meubelmondstuk...
- Page 125 Spleetmondstuk Zuigkrachtregelaar 2 Ontgrendelschakelaar slangmondstuk Flexibele slang Accessoires Accessoire Bedoeld voor... Matten, tapijten Borstel voor harde Tegels, houten vloeren, vloeren linoleum Hiermee verwijdert u stof en kleine stukjes stof uit spleten, hoeken, Meubel- scheuren en andere mondstuk moeilijk bereikbare plekken. Ideaal het stofzuigen van bv.
-
Page 126: Belangrijke Voorzorg- Smaatregelen
BELANGRIJKE VOORZORG- SMAATREGELEN Lees deze gebruiksaanwijzing aandachtig door en bewaar ze voor latere referentie. Als dit product wordt overgedragen aan derden, moet deze gebruiksaanwijzing worden inbegrepen. Volg altijd de basisvoorschriften inzake veiligheid op wanneer u elektrische apparaten gebruikt om het risico op brand, elektrische schokken en persoonlijk letsel te beperken, zoals: WAARSCHUWING Gebruik nooit een... - Page 127 • Dit apparaat kan worden gebruikt door kinderen van 8 jaar en ouder of personen met beperkte fysieke, sensorische of mentale capaciteiten of gebrek aan ervaring en kennis als ze onder toezicht staan of als ze aanwijzingen hebben ontvangen over het veilige gebruik van het apparaat en de betrokken gevaren begrijpen.
- Page 128 • Als een verlengsnoer wordt gebruikt, moet de capaciteit ervan geschikt zijn voor het stroomverbruik van het product. • Controleer of de nominale voedingsspanning en -stroom overeenstemmen met de classificatie voor voedingsspanning en -stroom die op het typeplaatje van het apparaat weergegeven zijn, voordat u de stekker in het stopcontact steekt.
- Page 129 BESCHRIJVING VAN WAARSCHUWINGSAAN- DUIDINGEN GEVAAR Deze waarschuwingsaanduiding geeft een hoog risiconiveau aan dat, als het niet wordt voorkomen, overlijden of ernstig letsel veroorzaakt. WAARSCHUWING Deze waarschuwing- saanduiding geeft een gemiddeld risiconiveau aan dat, als het niet wordt voorkomen, overlijden of ernstig letsel kan veroorzaken.
-
Page 130: Beoogd Gebruik
Beoogd gebruik • Dit product is alleen bedoeld voor het stofzuigen van stof, pluisjes en vuil op zachte en harde oppervlakken. • Gebruik het product niet voor het opzuigen van as, grote voorwerpen of scherpe voorwerpen, zoals glas, of om vloeistoffen of ontvlambare stoffen op te zuigen. - Page 131 • Controleer of de nominale voedingsspanning en -stroom overeenstemmen met de classificatie voor voedingsspanning en -stroom die op het typeplaatje van het apparaat weergegeven zijn, voordat u de stekker in het stopcontact steekt. GEVAAR Verstikkingsgevaar! Houd alle verpakkingsmateriaal uit de buurt van kinderen. Dit materiaal kan gevaar, zoals verstikking, opleveren.
- Page 132 Stap 2: • Steek het smalle uiteinde van de flexibele slang (X) in de verlengbuis (O). Deze zou moeten vastklikken. Stap 3: • Druk op de buisontgrendelschakelaar (P) en verleng de verlengbuis (O).
- Page 133 Stap 4: • Steek het andere uiteinde van de verlengbuis (O) in de aansluiting van de hardevloerborstel (Q) (of een ander accessoire uit het accessoirevak (C)).
- Page 134 Werking Ga als volgt te werk om het apparaat aan te sluiten op een stopcontact: • Trek het netsnoer (F) eruit. • Steek de stekker in een geschikt stopcontact. OPMERKING Trek het netsnoer niet voorbij de rode markering op het snoer.
- Page 135 Ga als volgt te werk om het apparaat in- of uit te schakelen: • Stel vóór het gebruik de zuigkrachtregelaar (D) in op MIN. • Om het apparaat in te schakelen, drukt u op de aan-uitknop (I). OPMERKING Verhoog/verlaag de zuigkracht door de zuigkrachtregelaar van het hoofdgedeelte of de handgreep van de flexibele slang (D)/(V) te verdraaien.
-
Page 136: Reiniging En Onderhoud
OPMERKING Leid het netsnoer met de andere hand zodat het snoer niet de tegen behuizing slaat en schade veroorzaakt. Reiniging en onderhoud WAARSCHUWING Gevaar voor elektrische schokken! Haal de stekker uit het stopcontact voordat u het apparaat reinigt om een elektrische schok te voorkomen. - Page 137 • Verwijder de stofzak (K). • Plaats een nieuwe stofzak (K). • Sluit de voorklep (M).
- Page 138 OPMERKING Wanneer de het capaciteitslampje van de stofzak (B) rood brandt, moet de stofzak (K) worden vervangen. Het HEPA-filter (G) vervangen • Verwijder het deksel van het vak aan de achterkant van het product. • Verwijder het oude HEPA-filter (G) uit het vak.
- Page 139 • Plaats een nieuwe HEPA-filter. • Plaats het deksel van het vak terug op zijn plaats. OPMERKING Het wordt aanbevolen om het HEPA-filter een keer per jaar te vervangen om optimale prestaties te garanderen. Het motorfilter reinigen (J) • Open de voorklep (M) en verwijder de stofzak (K).
- Page 140 • Trek de beugel van het motorfilter naar buiten. • Verwijder het motorfilter (J) uit de beugel. • Spoel het motorfilter met lauw water en laat het aan de lucht drogen.
- Page 141 • Wanneer het motorfilter volledig droog is, plaatst u het opnieuw in de beugel en daarna in de beugelhouder. OPMERKING Vervang het motorfilter (J) als het beschadigd is. Algemene reinigingsadviezen • Maak het product schoon met een zachte en licht bevochtigde doek. •...
-
Page 142: Probleemoplossing
Probleemoplossing Probleem Oplossing De motor start • Steek de stekker in een niet geschikt stopcontact. Controleer of het onder spanning staat. Zwakke • Zorg ervoor dat de aanzuigkracht flexibele slang en de accessoires vrij zijn van obstructies. • Sluit beide zuigkrachtregelaars. - Page 143 Uit elkaar halen voor onderhoud 1. De slang, verlengbuis, stofzak, uitlaatrooster, filter en alle toebehoren kunnen zonder gebruik van gereedschap uit elkaar worden gehaald of worden losgemaakt. 2. Het voorste deksel, snoeropwinder, schakelaar, zuigkrachtregelaar en de aan/uit-knop kunnen met behulp van een schroevendraaier uit elkaar worden gehaald.
-
Page 144: Specificaties
Specificaties Spanning/frequentie: 220–240 V~, 50/60 Hz Stroomverbruik: 700 W Capaciteit: 3 l Productafmetingen 460 x 260 x 306 mm (B x H x D): Nettogewicht product: 5,7 kg Beschermingsklasse: Klasse II Levensduur van 500 uur de motor:... - Page 145 Afdanking De Richtlijn inzake Afgedankte Elektrische en Elektronische Apparatuur (AEEA) heeft als doel de impact van elektrische en elektrische goederen tot een minimum te beperken door hergebruik en recycling te stimuleren en de hoeveelheid AEEA die op de stortplaats terechtkomt te beperken. Het symbool op dit product of de verpakking geeft aan dat dit product aan het einde van zijn levensduur niet samen...
- Page 146 Feedback en Hulp Vind je het leuk? Vind je het niet leuk? Beoordeel het product dan op onze website! AmazonBasics is toegewijd aan het leveren van klantgerichte producten die voldoen aan uw hoge standaarden. Wij moedigen u aan om een review te schrijven waarin u uw ervaringen met het product deelt.
- Page 147 MADE IN CHINA FABRIQUÉ EN CHINE HERGESTELLT IN CHINA PRODOTTO IN CINA HECHO EN CHINA GEMAAKT IN CHINA V05-10/19...