Table des Matières
Publicité
Les langues disponibles
Les langues disponibles
Liens rapides
Publicité
Table des Matières

Manuels Connexes pour KOTTEA CK500 PRO 1


Sommaire des Matières pour KOTTEA CK500 PRO 1
- Page 1 KOTTEA CK500 PRO 1 25, rue de Galeben 33380 MIOS FRANCE...
- Page 2 p.17 BIENVENUE CAFÉ À PROPOS DE CES INSTRUCTIONS BOISSON LACTÉE DESCRIPTION EAU CHAUDE p.19 OBJET NETTOYAGE QUOTIDIEN CONSIGNES DE SÉCURITÉ ENTRETIEN DESCRIPTION p.34 TRANSPORT MACHINE À CAFÉ : FACE AVANT ÉLIMINATION DES DÉCHETS MACHINE À CAFÉ : FACE ARRIÈRE ÉLIMINATION DES EAU USÉES SPÉCIFICATIONS MISE AU REBUT DE LA MACHINE ACCESSOIRES ET APPAREILS EN OPTION...
-
Page 3: À Propos De Ces Instructions
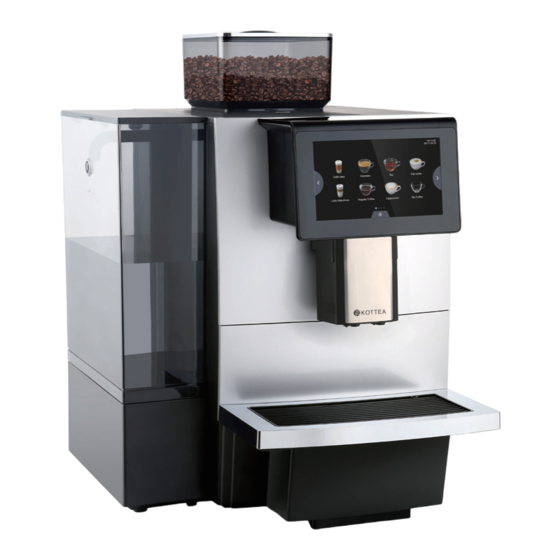
• Les enfants ne sont pas autorisés à jouer avec l’équipement. Le service de nettoyage et d’utilisation ne peut être effectué par des enfants que sous la surveillance d’un adulte. • Les enfants ne sont pas autorisés à nettoyer et à entretenir l’appareil. BIENVENUE •... - Page 4 SPECIFICATIONS Production quotidienne 100 tasses recommandée Production horaire Simple Double Normal Grand MACHINE À CAFÉ : FACE AVANT Espresso Couvercle de la Amerciano trémie à grains Ice Americano Trémie à grains Couvercle du Cappuccino réservoir d’eau Écran tactile Café ordinaire Réservoir d’eau Production d’eau chaude par heure...
-
Page 5: Branchement Électronique
BRANCHEMENT ÉLECTRONIQUE Le branchement électronique doit être conforme à la réglementation locale. La tension d’alimentation doit correspondre aux indications figurant sur la plaque signalétique. Attention : PREREQUIS Danger ! Électricité ! LIEU D’INSTALLATION Veuillez respecter les points suivants : • Les électrodes doivent correspondre aux indications figurant sur la plaque signalétique ! Les étapes suivantes doivent être effectuées par le personnel agréé... -
Page 6: Installation Du Tuyau À Lait
INSTALLATION Étape 2 : Insérez l’autre extrémité du tuyau dans la bonbonne d’eau ou raccordez-la à l’arrivée d’eau du robinet. MACHINE À CAFÉ • Ouvrez la boîte en carton, sortez la machine et les pièces détachées. La machine et tous les accessoires doivent impérativement être installés et stockés dans des endroits à... -
Page 7: Raccordement Du Tuyau De Vidange (Option)
RACCORDEMENT DU TUYAU DE VIDANGE (OPTION) Étape 3 : Placez l’autre extrémité sur le point de raccordement du côté de l’élévateur du réfrigérateur. Insérez d’abord le connecteur blanc de la ligne, puis enfoncez toute l’extrémité, et serrez les vis. Étape1 : Retirez le bac d’égouttement. Étape 4 : Insérez le tuyau à... -
Page 8: Remplissage
RÉGLAGES PAR DÉFAUT Étape 1 : Appuyez sur le bouton de menu à l’écran, entrez le paramètre correspondant (pour les machines qui démarrent pour la première fois, le réglage du mode d’alimentation en eau ne peut pas être modifié, il doit y avoir suffisamment d’eau dans le réservoir). -
Page 9: Mise Hors Tension
MISE HORS TENSION Étape 1 : Cliquez sur « Éteindre » Les étapes suivantes peuvent être effectuées par les utilisateurs finaux : CAFÉ PAR EXEMPLE : PRÉPARER UNE TASSE D’ESPRESSO. Étape 1 : Cliquez sur « Espresso ». La machine lance la préparation du café. Étape 2 : Cliquez sur «... -
Page 10: Nettoyage Quotidien
Étape 2 : Cliquez sur « + » ou « - » à droite du menu pendant que vous préparez un café pour ajuster la boisson. Étape 2 : Cliquez sur « + » ou « - » à droite du menu pendant que vous préparez un café pour ajuster la boisson. Étape 3 : Boisson en cours de préparation... -
Page 11: Rinçage Rapide Du Mousseur À Lait
Étape 2 : Cliquez sur « Rinçage du brasseur », puis passez à l’étape suivante : Étape 2 : Cliquez sur « Rinçage du mousseur à lait », puis passez à l’étape suivante : Étape 3 : « Rinçage rapide du système de brassage en cours, veuillez patienter... » sur l’écran. Step 3: Please remove the milk tube from the milk tank and Insert it into the plughole on the drip tray, click “OK”... -
Page 12: Démontage Et Nettoyage Du Mousseur À Lait
DÉMONTAGE ET NETTOYAGE DU MOUSSEUR À LAIT ENTRETIEN Étape 1 : Retirez le tuyau à lait. Le poste d’entretien doit impérativement être exécuté par des professionnels NETTOYAGE EN PROFONDEUR DU GROUPE CAFÉ Étape 1 : Cliquez sur le raccourci situé en bas de l’écran. Étape 2 : Tenez le support, enlevez le couvercle, puis retirez le mousseur à... -
Page 13: Nettoyage En Profondeur Du Mousseur À Lait
Étape 5 : Suivez les indications affichées à l’écran, puis cliquez sur l’onglet « Oui » pour passer à l’étape suivante : NETTOYAGE EN PROFONDEUR DU MOUSSEUR À LAIT Étape 1 : Cliquez sur le raccourci situé en bas de l’écran. Étape 6 : Suivez les instructions affichées à... - Page 14 Étape 4 : Cliquez sur « Entretien », puis sur l’onglet « Nettoyage en profondeur du mousseur à lait » pour passer Étape 7 : Nettoyage en profondeur du mousseur à lait. Cela peut prendre 15 minutes, veuillez patienter : à...
-
Page 15: Détartrage
Étape 10 : Le nettoyage en profondeur du mousseur à lait est terminé, veuillez cliquer sur l’onglet « OK » pour Étape 2 : Cliquez sur « Menu d’entretien », puis passez à l’étape suivante ; revenir à la page d’accueil. Étape 3 : Saisissez le mot de passe «... - Page 16 Étape 6 : Retirez le réservoir d’eau (veuillez vous référer aux informations affichées pour connaître la quantité), remettez Étape 10 : Le détartrage est terminé, veuillez cliquer sur l’onglet « OK » pour revenir à la page d’accueil. le réservoir d’eau en place, puis cliquez sur l’onglet « Oui » pour passer à l’étape suivante : Étape 7 : Détartrage en cours, veuillez vous référer aux informations à...
-
Page 17: Réglage Du Degré De Mouture
Étape 4 : Cliquez sur « Entretien », puis sur l’onglet « Vidange de l’eau » pour passer à l’étape suivante : Étape 8 : La vidange de l’eau est terminée, veuillez cliquer sur l’icône « Éteindre ». Étape 5 : Cliquez sur l’onglet « OK » pour passer à l’étape suivante. √... - Page 18 CAFÉ Attention : une mauvaise utilisation du café peut être nocive pour la santé ! Les étapes suivantes doivent être effectuées par le personnel agréé par le fabricant. Veuillez respecter les points suivants : • Vérifiez le paquet. TRANSPORT • La capacité de remplissage n’est pas supérieure à la quantité utilisée quotidiennement. •...
-
Page 19: Garantie Et Indemnisation
GARANTIE ET INDEMNISATION En cas de dommages corporels ou matériels causés par les raisons suivantes, notre société n’est pas tenue à l’indemnisation du préjudice : • Non-respect des réglementations. • Installation, test, utilisation, nettoyage, entretien et appareils optionnels non conformes. •... - Page 20 p.17 WELCOME COFFEE ABOUT THESE INSTRUCTIONS MILK DRINK DESCRIPTION HOT WATER p.19 PURPOSE DAILY CLEANING SAFETY INSTRUCTIONS MAINTENANCE DESCRIPTION p.34 TRANSPORTATION COFFEE MACHINE: FRONT SIDE DISPOSAL OF WASTE COFFEE MACHINE: BACK SIDE DISPOSAL OF WASTE WATER SPECIFICATION DISPOSAL OF THE MACHINE ACCESSORIES AND DEVICE OPTIONS p.34 WATER...
- Page 21 • Touching the high temperature components is not permitted. • This equipment can be used by children of 8 years and above, and by persans with reduced physical, sensory or mental abilities or of a lesser level of experience and knowledge when they are supervise d or have been WELCOME trained in the safe use of the equipment.
- Page 22 SPECIFICATION Advise daily output 100 cups Hourly output Single Double Normal Large COFFEE MACHINE: FRONT SIDE Espresso Amerciano Beans hopper cover Ice Americano Beans hopper Water tank cover Cappuccino Regular coffee Touch screen Water tank Hourly hot water output Water tank capacity Coffee outlet cover Milk tube connetion Beans hopper capacity...
- Page 23 WEATHER CONDITION Please observe the follow points, otherwise machine will be damaged: • Temperature should be ranged between +10·c - +40C (50 î -104 î ). PREREQUISITES • Maximum permitted air humidity is 80 % rF. • Using outside of room is not pennitted, otherwise it will be damaged by bad weather. ( Raining, snowing, frost) INSTALLATION SITE If temperature under -0 C:...
-
Page 24: Coffee Machine
INSTALLATION Step 2: Insert the other end of pipe into the barrel water of connect it to the tape water . COFFEE MACHINE • Open the carton box, take out machine and spare parts. The machine and all accessory units are only permitted to be installed and stored in frost-free locations. - Page 25 DRAIN PIPE CONNECTION (OPTION) Step 3: Put the other end onto the connection place of fridge lift side. Insert the white connector of the line first, then put on the whole end, and tighteen the screws. Step 1: Take out the drip tray. Step 4: Insert the milk tube with black connector to the coffe out let.
-
Page 26: Default Setting
DEFAULT SETTING Step 1: Touch the menu button on the screen, input the parameter accordingly; (for machines start up first ztime, the water supply way setting cannot be changed, there should be enough water inside the water tank). FILLING BEANS HOPPER FILLING Open the caver, fill the beans into happer, caver the cap. -
Page 27: Power Off
POWER OFF Step 1: Click «Power off’’. The following steps can be operated by end users. COFFEE FOR EXAMPLE :MAKE A CUP OF ESPRESSO. Step 1: Click «Espresso», then coffee under processing. Step 2: “Standby or Power off ”on display, click «Power off», then rapid rins automatically. Step 2: Drink under processing ... -
Page 28: Daily Cleaning
Step 2: Click “+”or “-” on the right of menu while making coffee, it can adjust the drink. Step 2: Click “+”or “-” on the right of menu while making coffee, it can adjust the drink. Step 3: Drink under processing...click “Cancel”, stop coffee instantly. Step 3: Drink under processing...click “Cancel”, stop coffee instantly. - Page 29 Step 2: Click “Brewer Rinse”, tab to the next step: Step 2: Click “Milk Rinse”, tab to the next step: Step 3: «Brewing system rapid rinse in process, please wait... « on display. Step 3: Please remove the milk tube from the milk tank and Insert it into the plughole on the drip tray, click “OK” tab to the next step: √...
- Page 30 REMOVING AND CLEANING THE MILK FOAM UNIT MAINTENANCE Step1: Remove the milk tube. The maintenance item only be operated by professional people. BREWER DEEP CLEAN Step 1: Click the shortcut below the screen: Step 2: Catch the bracket, take off the cover, pull out the milk frother unit. Step 2: Click “Service Menu”, tab to the next step: Step 3: Take out the connection and silicon spare parts of the milk foam unit for washing.
- Page 31 Step 5: Please operate according to the information on display, then click “Yes” tab to the next step: MILK DEEP CLEAN Step 1: Click the shortcut below the screen: Step 6: Please follow the instruction on the screen, then click “OK”tab to the next step: Step 2: Click “Service Menu”, tab to the next step: Step 7: “Brewing unit deep clean in process, it may need 30 min, please wait...»...
- Page 32 Step 4: Click “Maintenance”, then “Milk deep clean”tab to the next step. Step 7: Milk deep clean in process, it may need 15 min, please wait: Step 5: Click “OK”tab to the next step. Step 8: Remove the milk tube,clean up the container under faucet, fill up water and connect them milk tube. Step 6: Fill up the container (>0.5L) with 0.5L water, insert milk pipe.
- Page 33 Step 10: Milk deep clean is complete, please click“OK” tab back to home page : Step 2: Click “Service Menu”, tab to the next step; Step 3: Input password “1609”, tab to the service menu. √ Milk deep clean is complete, back to home page. DESCALING Step 1: Click the shortcut below the screen: Step 4: Click “Maintenance, then “Descaling”...
- Page 34 Step 6: Take out water tank(The quantity please reference the information on display,put back the water tank, then click Step 10: Descaling completed, please click “OK” tab back to home page. “Yes” tab to the next step: √ Descaling is complete, back to home page. Step 7: Descaling in process, estimated descaling time please check the information on display: WATER DRAINING Step 1: Click the shortcut below the screen:...
- Page 35 Step 4: Click “Maintenance, then “Water draining” tab to the next step: Step 8: Water draining is completed, please click “Power off” icon. Step 5: Click “OK” tab to the next step. √ Water draining is completed, power off. GROUND SETTING Step 1: Raise the cover of hopper, there is a knob can adjust the grounds (the number larger means rough, number smaller means fine).
- Page 36 COFFEE Caution: lt will harmful for the healthy with incorrect operation of coffee! The following steps must be operated to the personnel authorized by the manufacturer. Please must observe the following points: • Check the package. TRANSPORTATION • The filling capacity is no more than the daily usage. •...
- Page 37 WARRANTY AND COMPENSATION Any physical injury or loss of property caused by the following reasons, our company shall not be liable to compensation for the loss: • Not operating with regulations. • lmproper installation, testing, operation, cleaning, maintenance a nd device option. •...