
Manuels Connexes pour clou CL/06.04003.29


Sommaire des Matières pour clou CL/06.04003.29
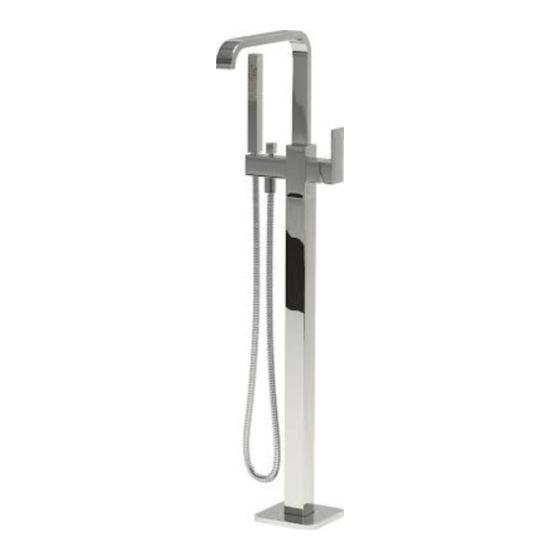
- Page 1 Xo_freestanding bathtub mixer b a t h f i n d i n g s CL/06.04003.29 Montage instructies Installation Instructions Notice de montage Montageanweisungen...
- Page 2 - Om kalkafzettingen te vermijden dient men steeds eerst de kraan in de koude stand te openen en vervolgens naar de gewenste temperatuur. - Clou behoudt zich het recht voor technische en optische wijzigingen aan te brengen t.o.v. afgebeelde producten.
- Page 3 - To avoid scale always turn on cold water first before adjusting to the desired tem- perature. - Clou reserves the right to introduce technical and visual changes with respect to the depicted images. - Due to changes in production it is possible that given dimensions are no longer cor- rect.
- Page 4 - Pour éviter les dépôts de calcaire ouvriz toujours d’abord le robinet d’eau froide et adaptez par la suite à la température souhaitée. - Clou se réserve le droit pour tout changement technique ou optique par rapport à la photo représentant le produit.
- Page 5 - Nach Gebrauch ist die Armatur auf “Kalt-Wasser” zu stellen. Vor dem nächsten Ge- brauch, bitte die gewünschte Temperatur einstellen. - Clou behält sich das Recht auf technische und optische Änderungen in Bezug auf die dargestellten Bilder vor. . - Aufgrund von Änderungen in der Produktion ist es möglich, dass angegebene Maße nicht mehr korrekt sind.
- Page 6 cold...
- Page 7 Checking List Name QT Y. spou t han d shower hos e S2m m he x wrenc h S4m m he x wrenc h connectin g pip e wate r inle t pipe M5x8 he x screw M5 washe r wate r test bas e rubbe r ring rubbe r wate r stop...
- Page 9 Neem de kartonnen stofbe- scherming en de rubber be- schermbussen uit de monta- gebox. Take the cardboard dust cover and the rubber protection cyl- inders out of the plastic box. Retirez le capot de protection en carton et les douilles de protection en caoutchouc de la boîte de montage.
- Page 10 Bepaal de positie van de kraan. Fix the position of the tap. Déterminer la position de la robinetterie. Fixieren Sie die Position der Armatur. Boor de gaten (ø 10 mm). Drill the holes (ø 10 mm). Percer les trous (ø 10 mm). Bohren Sie die Löcher (ø...
- Page 11 Monteer de waterleidingen. Connect the water pipes. Raccorder les tuyaux d’eau. cold Schliessen Sie die Wasserlei- tungen an. Installeer de montagebox, draai de bouten vast nadat de hoogte van de montagebox bepaald is. Install the mounting box, fasten the bolts after adjusting the level.
- Page 12 Na vastdraaien van de bouten nogmaals waterpas plaatsen. Level the box again after tight- ening the bolts. Niveler à nouveau la boîte après le serrage des boulons. Richten Sie die Box wieder nach dem Anziehen der Schrauben. Neem de kartonnen stofbe- scherming uit de montagebox.
- Page 13 Installeer de onderdelen voor de water test, inclusief de rub- ber beschermbussen. Install the spare parts for the water test, including the rub- ber protection cylinders. Installer les pièces servant à tester, y compris les douilles de protection en caoutchouc. col d Installieren Sie die Ersatzteile für den Wassertest, einschl.
- Page 14 Verwijder de rubber bescherm- bussen weer. Remove the rubber protection cylinders. Retirer les douilles de protec- tion en caoutchouc. Entfernen Sie die Gummi- Schutz Zylindern. Bevestig de testonderdelen terug en installeer de flexi- bele buis om de leidingen te reinigen. Install the testing parts and install the flexible tube for cleaning the pipes.
- Page 15 Open de hoekstopkranen om de leidingen te spoelen Open the angle valves to let the water flush clean the pipes. Ouvrir les robinets d’équerre pour nettoyer les conduites d’eau. Öffnen Sie die Eckventile, damit das bündig fließt. Somit reini- gen Sie die Rohre. Verwijder de testonderdelen en de flexibele buis.
- Page 16 Plaats de kartonnen stofbe- scherming terug. Place back the cardboard dust cover. Replacez le capot de protection en carton. cold Legen Sie den Staubschutz wieder ein. ho t Betegel de vloer, werk alle ope- ningen rond de montagebox af met siliconkit. Pave the tiles, finish all gaps around the mounting box with silicon.
- Page 17 Verwijder het uitstekende gedeelte van de montage- box, verwijder de kartonnen stofbescherming. Remove the protruding part of the mounting box, remove the cardboard dust cover. Retirer la partie saillante de la boîte de montage, enlever le capot de protection en carton. Entfernen Sie den überste- henen Rand des Einbaukörper.
- Page 18 Plaats de waterleidingen in de kraan in de gaten in de monta- gebox (1). Bevestig de bevesti- gingsrozet op de montagebox (2). Insert the water pipes of the tap in the holes of the mount- ing box (1). Install the mount- ing rosette on the mounting box (2).
- Page 19 Installeer de handdouche. Install the hand shower. Installer la douchette. Installieren Sie die Handbrau- 360˚ diverte r diverter cold cold ho t ho t...
- Page 20 Office Clou bv Thermiekstraat 1 NL-6361 HB Nuth T +31 (0)45 524 56 56 F +31 (0)45 524 6000 Warehouse Thermiekstraat 1 NL-6361 HB Nuth info@clou.nl www.clou.nl...