Publicité
Les langues disponibles
Les langues disponibles
Liens rapides
Permox
®
SilentCare
Sauerstoffkonzentrator
Gebrauchsanweisung, Seite 2
Oxygen Concentrator
Instructions for Use, page 16
Zuurstofconcentrator
Gebruiksaanwijzing, pagina 30
Concentrateur d'oxygène
Notice d'utilisation, page 44
Concentratore di ossigeno
Istruzioni per l'uso, pagina 58
Concentrador de oxígeno
Instrucciones de uso, página 72
This "Instructions for Use" manual is published for public use and is only meant for your information.
We do not guarantee the accuracy of these instructions with respect to your specific device type or status.
Only the "Instructions for Use" manual delivered together with a device is officially published for the use of that specific device.
Because you care
Emergency Care · OR/Anesthesia · Critical Care · Perinatal Care · Home Care
Publicité
Chapitres

Manuels Connexes pour Dräger Medical Permox SilentCare


Sommaire des Matières pour Dräger Medical Permox SilentCare
- Page 1 Permox ® SilentCare Sauerstoffkonzentrator Gebrauchsanweisung, Seite 2 Oxygen Concentrator Instructions for Use, page 16 Zuurstofconcentrator Gebruiksaanwijzing, pagina 30 Concentrateur d’oxygène Notice d’utilisation, page 44 Concentratore di ossigeno Istruzioni per l’uso, pagina 58 Concentrador de oxígeno Instrucciones de uso, página 72 This "Instructions for Use"...
-
Page 2: Table Des Matières
Inhaltsverzeichnis ® Permox SilentCare Sauerstoffkonzentrator Gebrauchsanweisung, Inhaltsverzeichnis Was ist was..................12 Zu Ihrer Sicherheit................3 Frontansicht ..................12 Hinweise zum sicheren Gebrauch ..........3 Rückansicht..................12 Zweckbestimmung ................3 Steuerpanel..................13 Abnehmbare Anfeuchter-Einheit ..........13 Vor dem Gebrauch ................4 Anschluss der Schläuche und Kabel ......... 13 Vorbereiten .................. -
Page 3: Zu Ihrer Sicherheit
Atemluft abhängen. Bei Patienten, die ständig eine erhöhte Sauerstoff-Konzentra- Instandhaltung tion benötigen, darf Permox SilentCare nur in Verbindung mit Instandsetzungen am Gerät nur durch Service Personal von einer Notversorgung benutzt werden, z. B. aus Sauerstoff-Fla- Dräger Medical oder von Dräger Medical autorisiertes Service schen. -
Page 4: Vor Dem Gebrauch
Gerät nicht über Treppenstufen zerren, Gefahr der Beschädigung. Gerät heben Permox SilentCare hat ein Gewicht von ca. 25 kg. Wenn mög- lich sollte das Gerät nicht gehoben werden. Wenn es gehoben werden muss: 1 Taste drücken und den Teleskop-Handgriff ganz hinein- schieben. -
Page 5: Vorbereiten
Vorbereiten Vorbereiten Schritt 1 Gerät platzieren Die abnehmbare Anfeuchter-Einheit ermöglicht einen großen Anwendungsbereich wobei das Gerät an einem Ort platziert bleiben kann. Für eine optimale Sauerstoff-Leistung die folgenden Hinweise beachten: Gerät in einem gut belüfteten, trockenen, kühlen und staubarmen Raum platzieren. Schadstoffe und Rauch vermeiden. -
Page 6: Anfeuchter-Einheit Vorbereiten
Schritt 4 Anfeuchter-Einheit platzieren Die Anfeuchter-Einheit ist abnehmbar und kann am gewünsch- ten Ort platziert werden. Anfeuchter-Einheit aus dem Permox SilentCare heraus- nehmen, 4 Verlängerungsschlauch von der Haspel abwickeln und Anfeuchter-Einheit an gewünschten Ort platzieren. Sicherstellen, dass der Schlauch nicht geknickt oder gequetscht wird, sonst kann kein Sauerstoff fließen. -
Page 7: Betrieb
2 Die rote Alarmlampe leuchtet kurz, begleitet von einem kur- zen Alarmton. 3 Die grüne Lampe leuchtet. Nach ca. 10 Sekunden startet das Gerät. Wurde Permox SilentCare eingeschaltet ohne gesteckten Netzstecker, setzt ein kontinuierlicher Alarmton ein. Dann: Netzstecker stecken, der Alarmton verstummt. -
Page 8: Nasenbrille Anlegen
Betrieb Schritt 7 Nasenbrille anlegen 1 Die beiden kurzen Schlauchstutzen in die Nasenlöcher ein- führen. 2 Die Schläuche über die Ohren führen. 3 Die Muffe verschieben, bis die Nasenbrille fest sitzt. 4 Das Schlauchende auf die Tülle des Anfeuchters stecken. Alle Schläuche auf korrekten Anschluss prüfen. -
Page 9: Pflege
Pflege Pflege Zu Hause Im Krankenhaus Täglich: Hygienevorschriften des Krankenhauses beachten. Das Wasser der Anfeuchterflasche wechseln. Mit jedem neuen Patienten eine neue Nasenbrille benut- Anfeuchterflasche und Kappe in klarem, lauwarmen Was- zen, um Infektionen zu vermeiden. ser spülen. Äußere Oberfläche der Nasenbrille mit klarem, lauwarmen Wasser spülen, die offenen Enden nach unten halten, so Wöchentlich: dass kein Wasser eindringt. -
Page 10: Wartung
Sämtliche Inhalationsschläuche und Filter Bei jedem neuen Benutzer austauschen oder nach Anweisung des Arztes. Gerät entsorgen Am Ende der Nutzungsphase: Permox SilentCare nach Rücksprache mit den zuständigen Entsorgungsunternehmen der fachgerechten Entsorgung zuführen. Die jeweils geltenden Vorschriften beachten. This "Instructions for Use" manual is published for public use and is only meant for your information. -
Page 11: Fehler - Ursache - Abhilfe
Fehler – Ursache – Abhilfe Fehler – Ursache – Abhilfe Im Fehlerfall den Abhilfe-Empfehlungen Schritt für Schritt folgen. Fehler Ursache Abhilfe Gerät läuft nicht, Gerät ist eingeschaltet, aber Netzkabel 1. Sicherstellen, dass das Netzkabel Dauerton ertönt ist nicht gesteckt. korrekt gesteckt ist. Sicherung durchgebrannt. -
Page 12: Was Ist Was
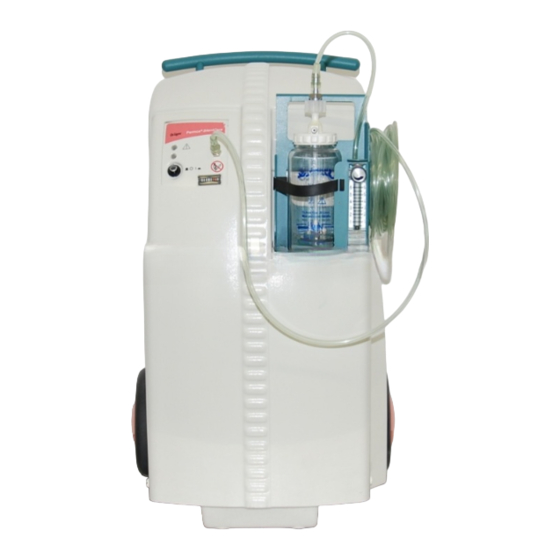
Was ist was Was ist was Frontansicht 1 Teleskop-Handgriff 2 Zweiter Handgriff zum Heben 3 Abnehmbare Anfeuchter-Einheit mit Flowmeter Rückansicht 4 Staubfilter zum Filtern der angesaugten Luft 5 Auslass für Abluft 6 Gerätesteckdose für Netzkabel 7 Betriebsstundenzähler 8 Leistungsschild This "Instructions for Use" manual is published for public use and is only meant for your information. We do not guarantee the accuracy of these instructions with respect to your specific device type or status. -
Page 13: Steuerpanel
Was ist was Steuerpanel 9 Sauerstoff-Ausgang 10 EIN/AUS Schalter » « 11 Grüne Lampe » « für eingeschaltetes Gerät 12 Rote Lampe » « für Alarme Symbol : Gebrauchsanweisung lesen 13 Symbol : Feuer, offenes Licht und Rauchen verboten Abnehmbare Anfeuchter-Einheit 14 Verlängerungsschlauch 15 Haspel für Verlängerungsschlauch 16 Flowmeter... -
Page 14: Technische Daten
C und 50 % rel. Feuchte 3) gemessen in 1 m Abstand 4) Permox SilentCare löst einen Alarm aus, wenn es nicht ordnungsgemäß funktioniert. Dabei kann die Sauerstoff-Konzentration unter 82 Vol.% absinken 5) Universal Medical Device Nomenclature System – Nomenklatur für Medizingeräte This "Instructions for Use"... -
Page 15: Funktionsbeschreibung
Zischgeräusch. Die abwechselnde Regenerierung der beiden Molekularsiebe ermöglicht eine kontinuierliche Sauerstoff-Anreicherung. Bestell-Liste Benennung / Beschreibung Sach-Nr. 57 30 289 Permox SilentCare Grundgerät bestehend aus: Konzentrator, Netzkabel, tragbare Anfeuchter-Einheit 6 L, Verlängerungs- schlauch 7,5 m, Nasenbrille. Länderspezifische Einheiten verfügbar Zubehör Insufflation:... - Page 16 Contents ® Permox SilentCare Oxygen Concentrator Instructions for Use Contents What's what ..................26 For Your Safety................17 Safety instructions................17 Front view ..................26 Rear view ..................26 Intended Use ...................17 Control panel ................... 27 Before Use ..................18 Portable humidifier unit ..............27 Connection of hoses and cables ..........
-
Page 17: For Your Safety
For Your Safety For Your Safety Intended Use Permox SilentCare – for oxygen enrichment of the breathing Strictly follow the Instructions for Use air for long-term oxygen therapy at home and in hospitals. Any use of the apparatus requires full understanding and strict Only for patients whose vital functions are not directly and observation of these instructions. -
Page 18: Before Use
Do not pull the unit up steps and stairs, otherwise it may be damaged. Lifting the unit Permox SilentCare weighs approx. 25 kg. It should not be lifted at all if possible. If the unit must be lifted: 1 Press the button and push the telescopic handle completely down. -
Page 19: Preparation
Preparation Preparation Step 1 Positioning the unit The portable humidifier unit enables a large range of action without having to move the concentrator to another position. The following points must be noted to ensure an optimum supply of oxygen: Place the unit in a well ventilated, dry, cool and dust-free room. -
Page 20: Preparing The Humidifier Unit
Positioning the humidifier unit The humidifier unit can be detached and positioned wherever it is needed. Remove the humidifier unit from the Permox SilentCare, 4 unroll the extension hose from the reel and position the humidifier unit where it is needed. -
Page 21: Operation
3 The green lamp lights up. The unit starts after approx. 10 seconds. A continuous alarm tone will sound if the Permox SilentCare has been switched on without plugging in the mains cable. Then: Plug in the mains cable, the alarm tone ceases. -
Page 22: Fitting The Nasal Cannula
Operation Step 7 Fitting the nasal cannula 1 Insert the two short nozzles into the nasal passages. 2 Lead the hoses over the ears. 3 Adjust the sleeve until the nasal cannula fits securely. 4 Connect the end of the hose to the humidifier. Check that all hoses have been connected correctly. -
Page 23: Care
Care Care At home In the hospital Daily: Note the hospital hygiene regulations. Change the water in the humidifier bottle. Use a new nasal cannula for each patient in order to Rinse the humidifier bottle and cap in clear, lukewarm avoid infection. -
Page 24: Maintenance
Must be replaced for each new user or as directed by the doctor. Disposal of the unit At the end of its service life: Permox SilentCare must be disposed of as required in consultation with the relevant waste management companies. The applicable regulations must be observed. -
Page 25: Fault - Cause - Remedy
Fault – Cause – Remedy Fault – Cause – Remedy If a fault arises, follow the recommended step-by-step procedure. Fault Cause Remedy Unit does not run, Unit has been switched on but the mains 1. Check that the mains cable continuous acoustic alarm cable is not plugged in. -
Page 26: What's What
What's what What's what Front view 1 Telescopic handle 2 Second handle for lifting the unit 3 Portable humidifier unit with flowmeter Rear view 4 Dust filter for the air intake 5 Outlet for exhaust air 6 Appliance socket for mains cable 7 Operating hours counter 8 Rating plate This "Instructions for Use"... -
Page 27: Control Panel
What's what Control panel 9 Oxygen outlet 10 ON/OFF switch » « 11 Green lamp » « shows unit is switched on 12 Red lamp » « for alarms Symbol : Read Instructions for Use 13 Symbol : No smoking, no naked lights Portable humidifier unit 14 Extension hose 15 Reel for extension hose... -
Page 28: Technical Data
C and 50 % rel. humidity 3) measured at a distance of 1 m 4) Permox SilentCare will generate an alarm if it does not function properly. In this case oxygen concentration may fall below 82 vol.% 5) Universal Medical Device Nomenclature System This "Instructions for Use"... -
Page 29: Functional Description
Alternate regeneration of the two molecular sieves permits continuous oxygen enrichment. Order List Part name / description Part Number 57 30 289 Permox SilentCare basic unit Consisting of: Concentrator, mains cable, portable humidifier unit 6 L, extension tube 7.5 m, nasal cannula Country specific units are available. - Page 30 Inhoud ® Permox SilentCare Zuurstofconcentrator Gebruiksaanwijzing Inhoud Fouten – oorzaken – remedies ..........39 Voor de veiligheid van uzelf............31 Aanwijzingen voor het veilige gebruik........31 Wat is wat..................40 Vooraanzicht ..................40 Beoogd gebruik................31 Achteraanzicht................. 40 Voor het gebruik................32 Bedienpaneel ..................
-
Page 31: Voor De Veiligheid Van Uzelf
Bij patiënten, die voortdurend een verhoogde zuurstof- Instandhouding concentratie nodig hebben, mag Permox SilentCare alleen in Het apparaat mag alleen door service technici van Dräger combinatie met een noodvoorziening (bijv. uit zuurstofflessen) Medical of door Dräger Medical geautoriseerd personeel worden toegepast. -
Page 32: Voor Het Gebruik
Het apparaat niet over traptreden trekken, kans op beschadiging. Apparaat optillen Permox SilentCare heeft een gewicht van ca. 25 kg. Het apparaat bij voorkeur niet optillen. Wanneer het moet worden opgetild: 1 Knop indrukken en de telescopische handgreep helemaal naar beneden duwen. -
Page 33: Voorbereiden
Voorbereiden Voorbereiden Stap 1 Apparaat plaatsen De draagbare bevochtiger maakt een groot bewegingsgebied mogelijk waarbij het apparaat op één plaats kan blijven staan. Voor optimale prestaties de onderstaande aanwijzingen opvolgen: Apparaat in een goed geventileerde, droge, koele en stofvrije ruimte opstellen. Schadelijke stoffen en rook voorkomen. -
Page 34: Bevochtiger Voorbereiden
Bevochtiger neerzetten De bevochtiger is afneembaar en kan op de gewenste plaats worden opgesteld. Bevochtiger uit de Permox SilentCare verwijderen, 4 Verlengslang van de haspel wikkelen en de bevochtiger op de gewenste plaats opstellen. Opletten dat de slang niet geknikt of bekneld raakt want anders kan er geen zuurstof doorheen. -
Page 35: Werking
2 Het rode alarmlampje gaat even aan, begeleid door een korte alarmtoon. 3 Het groene lampje brandt. Na ca. 10 seconden start het apparaat. Wanneer Permox SilentCare zonder aangesloten netstekker wordt ingeschakeld, is er een ononderbroken alarmtoon te horen. Dan: Stekker in het stopcontact steken, de alarmtoon gaat uit. -
Page 36: Neusbril Plaatsen
Werking Stap 7 Neusbril plaatsen 1 De beide korte buisjes in de neusgaten plaatsen. 2 De slangen over de oren leiden. 3 De mof verschuiven totdat de neusbril vast zit. 4 Het einde van de slang op de aansluiting van de bevochtiger steken. -
Page 37: Klein Onderhoud
Klein onderhoud Klein onderhoud Thuis In het ziekenhuis Dagelijks: Voorschriften van het ziekenhuis m.b.t. de hygiëne in acht nemen. Het water in de bevochtigerfles verversen. Fles van de bevochtiger en ook de dop met helder, warm Voor elke nieuwe patiënt een nieuwe neusbril gebruiken water spoelen. -
Page 38: Groot Onderhoud
Vervangen bij elke nieuwe gebruiker of volgens aanwijzing van de arts. Apparaat afvoeren Aan het einde van de gebruiksduur: Permox SilentCare na ruggespraak met de bevoegde milieudiensten op de juiste manier laten afvoeren. De geldende regelgeving opvolgen. This "Instructions for Use" manual is published for public use and is only meant for your information. -
Page 39: Fouten - Oorzaken - Remedies
Fouten – oorzaken – remedies Fouten – oorzaken – remedies Bij fouten de storingswijzer stap voor stap opvolgen. Fout Oorzaak Remedie Apparaat werkt niet, Het apparaat is ingeschakeld maar de 1. De stekker van het netsnoer een ononderbroken toon is te horen stekker van het netsnoer zit niet in het in het stopcontact steken. -
Page 40: Wat Is Wat
Wat is wat Wat is wat Vooraanzicht 1 Telescopische handgreep 2 Tweede handgreep om op te tillen 3 Draagbare bevochtiger met flowmeter Achteraanzicht 4 Stoffilter voor aangezogen lucht 5 Uitlaat voor afgewerkte lucht 6 Aansluiting voor netsnoer 7 Bedrijfsurenteller 8 Typeplaatje This "Instructions for Use"... -
Page 41: Bedienpaneel
Wat is wat Bedienpaneel 9 Zuurstof uitgang 10 AAN/UIT-schakelaar » « 11 Groen lampje » « voor ingeschakeld apparaat 12 Rood lampje » « voor alarmen Symbool : Gebruiksaanwijzing lezen 13 Symbool : Vuur, open vlam en roken verboden Draagbare bevochtiger 14 Verlengslang 15 Haspel voor verlengslang 16 Flowmeter... -
Page 42: Technische Gegevens
C en 50 % rel. vochtigheid 3) gemeten op een afstand van 1 m 4) Permox SilentCare zal een alarm genereren wanneer het apparaat niet goed functioneert. De zuurstofconcentratie kan dan dalen tot onder 82 vol.% 5) Universal Medical Device Nomenclature System – Nomenclatuur voor medische apparatuur This "Instructions for Use"... -
Page 43: Functiebeschrijving
De afwisselende regeneratie van de beide zeven maakt een continue zuurstofverrijking mogelijk. Bestellijst Benaming/beschrijving Artikel- nummer 57 30 289 Permox SilentCare basisapparaat bestaande uit: Concentrator, netsnoer, draagbare bevochtiger 6 L, verlengslang 7,5 m, neusbril. Landspecifieke uitvoeringen zijn beschikbaar Toebehoren... - Page 44 Sommaire ® Permox SilentCare Concentrateur d’oxygène Notice d’utilisation Sommaire Pour votre sécurité ............... 45 Défaut – Cause – Remède............53 Consignes pour une utilisation sûre .......... 45 Nomenclature................. 54 Domaine d’application ..............45 Face avant ..................54 Face arrière ..................54 Avant l'utilisation ................
-
Page 45: Pour Votre Sécurité
Pour votre sécurité Pour votre sécurité Domaine d’application Permox SilentCare – pour l’oxygénation de l’air respiratoire Observer la notice d'utilisation lors de l’oxygénothérapie de longue durée à domicile et en Toute manipulation de l'appareil présuppose la connaissance milieu hospitalier. et l'observation exactes de cette notice d'utilisation. -
Page 46: Avant L'utilisation
Ne pas tirer l'appareil derrière soi pour monter des marches d'escalier, risque d'endommagement. Pour soulever l’appareil Permox SilentCare a un poids d'env. 25 kg. Il est préférable de ne pas soulever l'appareil dans la mesure du possible. S'il est nécessaire de le soulever: 1 Appuyer sur la touche et enfoncer entièrement la poignée... -
Page 47: Préparation
Préparation Préparation ère opération Mise en place de l'appareil L'humidificateur amovible élargit le domaine d'application, tout en permettant de laisser l'appareil au même endroit. Pour une fourniture optimale d'oxygène, observer les consignes suivantes: Installer l’appareil dans un endroit bien aéré, sec, frais et exempt de poussière. -
Page 48: Préparation De L'humidificateur
Mise en place de l'humidificateur L'humidificateur est amovible et peut être installé à l’endroit souhaité. Retirer l'humidificateur du Permox SilentCare, 4 dérouler le tuyau de rallonge du dispositif d'enroulement et installer l'humidificateur à l'endroit souhaité. S'assurer que le tuyau n'est pas plié ou écrasé, car la circulation de l’oxygène serait interrompue dans ce cas. -
Page 49: Fonctionnement
3 Le voyant vert est allumé. L'appareil démarre au bout d'env. 10 secondes. Si le Permox SilentCare a été mis en service sans que la fiche secteur soit branchée, un signal d'alarme sonore continu retentit. Dans ce cas: Brancher la fiche secteur, le signal sonore d'alarme cesse. -
Page 50: Mise En Place De La Lunette D'oxygène
Fonctionnement opération Mise en place de la lunette d’oxygène 1 Introduire les deux embouts courts dans les narines. 2 Faire passer les tuyaux derrière les oreilles. 3 Déplacer le manchon jusqu’à ce que la lunette d’oxygène soit en position stable. 4 Brancher l'extrémité... -
Page 51: Entretien
Entretien Entretien A domicile En milieu hospitalier Tous les jours: Respecter les consignes d’hygiène de l’hôpital. Renouveler l’eau de la bouteille de l’humidificateur. Utiliser une nouvelle lunette d’oxygène pour chaque Rincer la bouteille de l’humidificateur et le capuchon à l’eau nouveau patient afin d'éviter les infections. -
Page 52: Maintenance
A remplacer pour chaque nouvel utilisateur ou selon les instructions du médecin. Elimination de l’appareil A la fin de la phase d'utilisation: Eliminer le Permox SilentCare en accord avec les règlements applicables, après consultation de l'entreprise spécialisée compétente. Observer les dispositions légales applicables. -
Page 53: Défaut - Cause - Remède
Défaut – Cause – Remède Défaut – Cause – Remède En cas de défaut, suivre pas à pas les recommandations pour y remédier. Défaut Cause Remède L'appareil ne fonctionne pas, L'appareil a été mis en marche, mais le 1. Vérifier si le cordon d'alimentation le signal sonore continu retentit cordon d'alimentation n'est pas branché. -
Page 54: Nomenclature
Nomenclature Nomenclature Face avant 1 Poignée télescopique 2 Deuxième poignée pour soulever l’appareil 3 Humidificateur amovible avec débitmètre Face arrière 4 Filtre à poussière pour la filtration de l'air aspiré 5 Orifice d'évacuation d'air 6 Prise de raccordement du cordon d'alimentation 7 Compteur d'heures fonctionnement 8 Plaque signalétique This "Instructions for Use"... -
Page 55: Tableau De Commande
Nomenclature Tableau de commande 9 Sortie d'oxygène 10 Interrupteur MARCHE/ARRET » « 11 Voyant vert » « indiquant que l'appareil est en marche 12 Voyant rouge » « d'alarme Symbole : Lire la notice d'utilisation 13 Symbole : Interdiction de fumer, pas de flammes nues ni de feu Humidificateur amovible 14 Rallonge de tuyau... -
Page 56: Caractéristiques Techniques
C et 50 % d’humidité rel. 3) mesuré à une distance de 1 m 4) Le Permox SilentCare donne l'alarme s'il ne fonctionne par correctement. La concentration en oxygène peut dans ce cas descendre en- dessous de 82 Vol. %. -
Page 57: Description Du Fonctionnement
La régénération alternée des deux tamis moléculaires permet une oxygénation continue. Pour vos commandes Désignation/description Référence Appareil de base Permox SilentCare 57 30 289 comprenant: Concentrateur, cordon d'alimentation, humidificateur portable 6 L, tuyau de rallonge de 7,5 m, lunette d’oxygène Unités spécifiques disponibles pour les... - Page 58 Contenuto ® Permox SilentCare Concentratore di ossigeno Istruzioni per l’uso Contenuto Per la vostra sicurezza ..............59 Elenco dei componenti ............... 68 Avvertenze per un uso sicuro............59 Vista frontale ..................68 Vista posteriore ................68 Impiego previsto ................59 Pannello di comando ..............
-
Page 59: Per La Vostra Sicurezza
Per i pazienti che necessitano di una costante concentrazione della Dräger Medical oppure se l'apparecchio viene usato per di ossigeno, Permox SilentCare deve essere impiegato solo in usi non conformi allo scopo previsto. combinazione con un sistema di alimentazione d'emergenza, La Dräger Medical declina ogni responsabilità... -
Page 60: Prima Dell'uso
Non trascinare l'apparecchio sopra gradini di scale, pericolo di danni. Sollevamento dell'apparecchio Permox SilentCare ha un peso di circa 25 kg. Se possibile, evitare di sollevare l'apparecchio. Se è necessario sollevare l'apparecchio: 1 Premere il tasto e spingere completamente in dentro il manico telescopico. -
Page 61: Preparazione
Preparazione Preparazione Passo 1 Installazione dell'apparecchio L'umidificatore amovibile rende possibile un vasto campo d'impiego e l'apparecchio può rimanere installato sul posto. Per un'erogazione ottimale dell'ossigeno si devono osservare le avvertenze seguenti: Installare sempre l'apparecchio in un locale ben ventilato, secco, fresco e senza polvere. Evitare sostanze nocive e fumo. -
Page 62: Preparazione Dell'umidificatore
Passo 4 Installazione dell'umidificatore L'umidificatore è amovibile e può essere installato nel luogo desiderato. Estrarre l'umidificatore dal Permox SilentCare, 4 Svolgere dall'aspo la prolunga flessibile e installare l'umidificatore nel luogo desiderato. Assicurarsi che il tubo flessibile non sia né piegato né... -
Page 63: Impiego
2 La spia rossa si accende brevemente e viene emesso un allarme acustico. 3 La spia verde si accende. Dopo circa 10 secondi l'apparecchio si avvia. Se Permox SilentCare viene acceso senza aver inserito il connettore del cavo di alimentazione viene emesso un allarme acustico continuo. Quindi: Inserire il connettore del cavo di alimentazione, dopodiché... -
Page 64: Applicazione Del Connettore Di Raccordo
Impiego Passo 7 Applicazione del connettore di raccordo 1 Inserire i due raccordi corti del tubo flessibile nelle narici. 2 Far passare i tubi flessibili sopra le orecchie. 3 Spostare il manicotto fino a quando il connettore di raccordo non abbia una sede di appoggio stabile. 4 Inserire l'estremità... -
Page 65: Cura
Cura Cura A casa In ospedale Ogni giorno: Osservare le norme igieniche dell'ospedale! Cambiare l'acqua della bottiglia dell'umidificatore. Per ogni paziente si deve usare un nuovo connettore di Risciacquare la bottiglia dell'umidificatore ed il coperchio raccordo per evitare infezioni. con acqua tiepida e pulita. Risciacquare la superficie esterna del connettore di raccordo con acqua tiepida e pulita, orientare verso il basso Ogni settimana:... -
Page 66: Manutenzione
Manutenzione Manutenzione I lavori di riparazione e ispezione devono essere eseguiti solo da personale del servizio assistenza tecnica della Dräger Medical o da personale autorizzato dalla Dräger Medical. Una volta all'anno oppure ogni 5000 ore di funzionamento si deve sottoporre l'apparecchio ai lavori di ispezione e manutenzione (con relativo protocollo). -
Page 67: Guasto - Causa - Rimedi
Guasto – Causa – Rimedi Guasto – Causa – Rimedi In caso do errore seguire passo passo le raccomandazioni sugli interventi correttivi. Guasto Causa Rimedio L'apparecchio non funziona, L'apparecchio è acceso, ma il connettore 1. Assicurarsi che il connettore del cavo viene emesso un tono continuo del cavo di alimentazione non è... -
Page 68: Elenco Dei Componenti
Elenco dei componenti Elenco dei componenti Vista frontale 1 Manico telescopico 2 Secondo manico telescopico per sollevare 3 Umidificatore amovibile con flussimetro Vista posteriore 4 Filtro antipolvere per filtrare l'aria aspirata 5 Uscita dell'aria viziata 6 Presa apparecchio per cavo di alimentazione 7 Contatore ore di funzionamento 8 Targhetta dati delle prestazioni This "Instructions for Use"... -
Page 69: Pannello Di Comando
Elenco dei componenti Pannello di comando 9 Uscita dell'ossigeno 10 Interruttore ON/OFF ” “ 11 Spia verde ” “ per apparecchio acceso 12 Spia rossa ” “ per allarmi Simbolo : Leggere le istruzioni per l'uso 13 Simbolo : Fuoco, fiamme libere e fumo Umidificatore amovibile 14 Prolunga flessibile 15 Aspo per prolunga flessibile... -
Page 70: Dati Tecnici
C e 50 % umidità rel. 3) misurato ad 1 m di distanza 4) Permox SilentCare emette un allarme se esso non funziona correttamente. In tal caso, la concentrazione di ossigeno può scendere fino a sotto l'82 vol.% 5) Universal Medical Device Nomenclature System – Nomenclatura per apparecchi medicinali This "Instructions for Use"... -
Page 71: Descrizione Del Funzionamento
Codici per l'ordinazione Denominazione/descrizione No. di ordinazione 57 30 289 Apparecchio base Permox SilentCare composto di: Concentratore, cavo di alimentazione, umidificatore portatile 6 L, prolunga flessibile di 7,5 m e catetere insufflatore Sono disponibili unità specifiche dei vari... - Page 72 Índice ® Permox SilentCare Concentrador de oxígeno Instrucciones de uso Índice Anomalías, causas y soluciones..........81 Para su seguridad................73 Indicaciones para el uso seguro ..........73 ¿Qué es qué? ................. 82 Aplicación médica .................73 Vista frontal ..................82 Vista posterior.................. 82 Antes del uso ..................74 Panel de mando ................
-
Page 73: Para Su Seguridad
Para su seguridad Para su seguridad Aplicación médica Permox SilentCare – para el enriquecimiento con oxígeno del Observar las instrucciones de uso aire de respiración en la terapia de oxígeno de larga duración Cualquier forma de utilización y aplicación del aparato implica en el hogar y en hospitales. -
Page 74: Antes Del Uso
No arrastrar el aparato por escalones; peligro de daños. Levantar el aparato Permox SilentCare tiene un peso de aprox. 25 kg. A ser posible, no se debería levantar el aparato. Si fuera necesario levantarlo: 1 Pulsar la tecla e introducir por completo el asa telescópica. -
Page 75: Preparación
Preparación Preparación Paso 1 Colocación del aparato El humidificador extraíble posibilita un amplio campo de aplicación, pudiendo el aparato permanecer colocado en el mismo sitio. Para un óptimo rendimiento de oxígeno, observe las siguientes indicaciones: Colocar el aparato en un recinto ventilado, seco, fresco y con poco polvo. -
Page 76: Preparación Del Humidificador
Colocación del humidificador El humidificador es extraíble y se puede colocar en el lugar deseado. Retirar el humidificador del Permox SilentCare, 4 desenrollar la manguera de prolongación del enrollador y colocar el humidificador en el lugar deseado. Cerciorarse de que la manguera no quede estrangulada ni aplastada;... -
Page 77: Funcionamiento
3 El piloto verde se enciende. Al cabo de aprox. 10 segundos arranca el aparato. Si Permox SilentCare se ha conectado sin enchufe eléctrico conectado, suena un tono de alarma continuo. Entonces: Conectar el enchufe eléctrico; el tono de alarma cesa. -
Page 78: Colocación De Las Gafas Nasales
Funcionamiento Paso 7 Colocación de las gafas nasales 1 Introducir las dos canulas cortas en los orificios nasales. 2 Pasar las cámelas por encima de las orejas. 3 Desplazar el manguito hasta que las gafas nasales se encuentren en una posición firme. 4 Acoplar el extremo de la manguera a la boquilla del humidificador. -
Page 79: Conservación
Conservación Conservación En el hogar En el hospital Diariamente: Observar las normas de higiene del hospital. Cambiar el agua de la botella del humidificador. Utilizar para cada nuevo paciente nuevas gafas nasales Aclarar la botella del humidificador y la caperuza en agua para evitar infecciones. -
Page 80: Mantenimiento
Cambiar con cada nuevo usuario o según las instrucciones del médico. Eliminación del aparato Al final de la vida útil: Destinar al Permox SilentCare a una eliminación correcta previa consulta con la empresa de eliminación de residuos competente. This "Instructions for Use" manual is published for public use and is only meant for your information. -
Page 81: Anomalías, Causas Y Soluciones
Anomalías, causas y soluciones Anomalías, causas y soluciones En caso de fallo, seguir las recomendaciones de corrección paso a paso. Anomalías Causas Soluciones El aparato no funciona, El aparato está conectado, pero el cable 1. Cerciorarse de que el cable de suena una señal acústica permanente de conexión a la red no está... -
Page 82: Qué Es Qué
¿Qué es qué? ¿Qué es qué? Vista frontal 1 Asa telescópica 2 Segunda asa para levantar 3 Humidificador extraíble con medidor de flujo Vista posterior 4 Filtro para polvo para el filtrado del aire aspirado 5 Salida para el aire 6 Toma de corriente del aparato para el cable de conexión a la red 7 Contador de horas de funcionamiento... -
Page 83: Panel De Mando
¿Qué es qué? Panel de mando 9 Salida de oxígeno 10 Interruptor CON/DESCON » « 11 Piloto verde » « para el aparato conectado 12 Piloto rojo » « para alarmas Símbolo : Leer las instrucciones de uso 13 Símbolo : Prohibición de fumar o usar fuego o llamas abiertas Humidificador extraíble... -
Page 84: Características Técnicas
C, 50 % humedad relativa 3) medido a una distancia de 1 m 4) Permox SilentCare produce una alarma si no funciona correctamente. En este caso, la concentración de oxígeno puede descender por debajo del 82 % en vol. 5) Universal Medical Device Nomenclature System – Nomenclatura para Aparatos de medicina This "Instructions for Use"... -
Page 85: Descripción Del Funcionamiento
Lista para pedidos Denominación / descripción Núm. de referencia 57 30 289 Permox SilentCare unidad base compuesta de: Concentrador, cable de conexión a la red, unidad del humidificador portátil 6 L, manguera de prolongación 7,5 m, gafas nasales. Están disponibles unidades específicas para los distintos países... - Page 86 This "Instructions for Use" manual is published for public use and is only meant for your information. We do not guarantee the accuracy of these instructions with respect to your specific device type or status. Only the "Instructions for Use" manual delivered together with a device is officially published for the use of that specific device.
- Page 87 This "Instructions for Use" manual is published for public use and is only meant for your information. We do not guarantee the accuracy of these instructions with respect to your specific device type or status. Only the "Instructions for Use" manual delivered together with a device is officially published for the use of that specific device.
- Page 88 ç Directive 93/42/EEC concerning Medical Devices Dräger Medical b.v. Kanaaldijk 29 5683 CR Best, The Netherlands Phone +31 (0) 499 331 332 +31 (0) 499 331 333 e-mail medical.best@draeger.com 57 30 442 90 37 295 – GA 6241.701 de, en, nl, fr, it, es ©...