Table des Matières
Publicité
Les langues disponibles
Les langues disponibles
Liens rapides
Publicité
Chapitres
Table des Matières

Manuels Connexes pour Nupi EloFit 00E8500L

Sommaire des Matières pour Nupi EloFit 00E8500L
- Page 1 MANUALE D’USO USER’S HANDBOOK MANUEL D’EMPLOY HANDLEIDING 00E8500L - LIGHT SALDATRICE MANUALE MANUAL WELDING MACHINE MACHINE A’ SOUDEUR MANUEL LASAUTOMAAT ø20÷160 mm SAL MOD43 VER1 00E8500L it en fr nl...
- Page 2 Le illustrazioni e le schermate della presente guida hanno scopo esplicativo e potrebbero essere leggermente diverse rispetto alle operazioni reali.
-
Page 3: Table Des Matières
Sommario Caratteristiche della saldatrice ................2 Specifiche tecniche ................... 3 Condizioni d’uso ....................3 Alimentazione ....................3 Preparazione della saldatura ................4 Inserimento dati generali ………………………………………………………… .. 5 Impostazione lingua ……………………………………..………………………..5 Saldatura ......................6 Codici d’errore / Problemi tipici ................. 8 Condizioni di Garanzia .................. -
Page 4: Caratteristiche Della Saldatrice
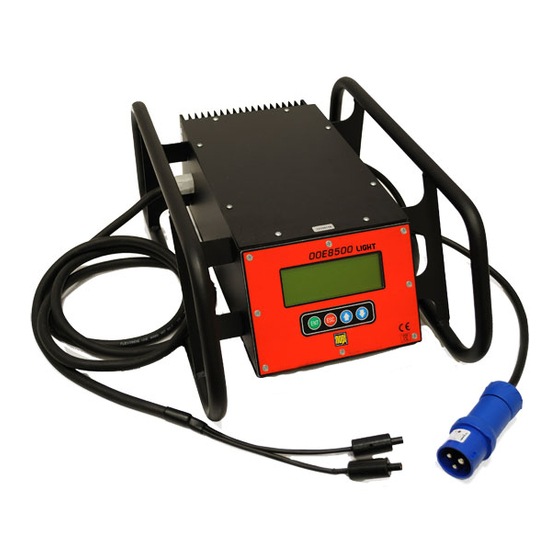
Caratteristiche della saldatrice Schema della macchina 1. Corpo della macchina 2. Sensore di controllo della temperatura ambiente 3. Schermo a cristalli liquidi a 4 righe 4. Interruttore generale 5. Tastiera con tasti: per confermare un dato inserito per cancellare un dato inserito o tornare alla schermata precedente oppure per scorrere i valori dei menu 6. -
Page 5: Specifiche Tecniche
Specifiche tecniche Saldatrice multi funzione Peso 230/115V 15,6 kg (35 lb) Dimensioni 310 x 350 x 160 mm (11” x 12” x 6” ) Potenza massima assorbita 1000 VA Alimentazione 230/115V 50Hz / 60Hz Temperatura d’utilizzo Da -18 °C a + 52 °C (da 0 °F a 125 °F) Campo d’impiego 20÷160 mm (1/2”... -
Page 6: Preparazione Della Saldatura
Preparazione della saldatura Per eseguire una saldatura corretta è necessario seguire TUTTE le seguenti istruzioni: Tagliare tubo perpendicolarmente utilizzando l'apposito tagliatubo. Raschiare la superficie del tubo in modo uniforme e almeno 1cm in più rispetto alla lunghezza inserimento all’interno del raccordo utilizzando il raschietto. -
Page 7: Inserimento Dati Generali
Inserimento dati generali NOTA PRELIMINARE: se all’accensione della saldatrice sul display compare la dicitura REVISIONE COME DA UNI 10566, contattare il centro assistenza per programmare l’intervento di manutenzione Una volta accesa la saldatrice agendo sull’interruttore generale, lo schermo della macchina mostra la videata a lato: Benvenuto (I) messaggio di benvenuto Benvenuto... -
Page 8: Saldatura
Saldatura Nella successiva videata vi verrà richiesto di inserire i dati di saldatura indicati sul codice a barre del raccordo, utilizzando i tasti e ENTER per confermare. Una volta inseriti i dati, sul display apparirà la seguente videata: Tipo Simbolo del raccordo Raccordo Descrizione raccordo... - Page 9 Premendo il tasto ENTER parte il ciclo di saldatura mostrandovi la seguente videata: Tempo residuo di Tensione di saldatura in secondi saldatura in Volt Potenza T.rem = _____ U = ____ emessa in P = _______ E = ______ Watt Energia dissipata in ■■■■□□□□□□□...
-
Page 10: Codici D'errore / Problemi Tipici
Codici d’errore / problemi tipici La saldatrice 00E8500L ha diversi sistemi di sicurezza che controllano la saldatura e l’inserimento dei relativi parametri. Il codice d’errore compare sempre sullo schermo. Per cancellare un codice d’errore , scollegare il raccordo e premere ESCAPE ESC quando indicato. -
Page 11: Condizioni Di Garanzia
Porto Assegnato. Prima di ogni spedizione, prendere contatto con l’Ufficio Regionale NUPI INDUSTRIE ITALIANE S.P.A. per ricevere l’autorizzazione alla spedizione. Nupi Industrie Italiane S.p.A. declina ogni responsabilità per eventuali danni, diretti o indiretti, a persone o cose, che avvengano durante l’utilizzo della saldatrice. - Page 12 Copyright © 2009 by NUPI INDUSTRIE ITALIANE S.P.A. All rights reserved...
- Page 13 The illustrations and on-screen displays in this guide are for explanation purposes and may vary slightly from the actual operations.
- Page 14 Contents Welding unit characteristics ................2 Technical specifications ..................3 Working conditions .................... 3 Input........................3 Preparing for welding ..................4 Entering general information………… ............... 5 Language setting ……………………………………..………………………..5 Welding ......................6 Error codes / Common problems ..............8 Guarantee Terms ....................
-
Page 15: Welding Unit Characteristics
Welding unit characteristics Machine diagram 1. Machine body 2. Ambient temperature detecting sensor 3. 4-line LCD 4. Power switch 5. Button strip with: to confirm entered data to delete entered data or return to previous display to scroll up/down menu figures 6. -
Page 16: Technical Specifications
Technical specifications Polyvalent welding unit Weight 230/115V 15,6 kg (35 lb) Dimensions 310 x 350 x 160 mm (11” x 12” x 6” ) Max power absorption 1000 VA Input 230/115V 50Hz / 60Hz Working temperature -18 °C to + 52 °C (0 °F to 125 °F) Application range 20÷160 mm (1/2”÷6”) Power cable... -
Page 17: Preparing For Welding
Preparing for welding To carry out welding correctly, ALL the following steps must be implemented: Cut the pipe at right angles with the special nippers. Scrape pipe surface homogeneously down to at least 1 cm (0.39 in) in excess of the pipe inserting length in the fitting by using the scraper. -
Page 18: Entering General Information
Entering general information PRELIMINARY NOTE: if, on powering on the processor, the display reads MAINTAIN ACC. TO UNI 10566, please contact our Customer Service Representative staff to organise maintenance. After powering on your welding unit via the main switch, the machine display unit will look as is shown opposite: Welcome (UK) welcome message... -
Page 19: Welding
Welding In the next screen display, you will be prompted to enter the welding details contained in the fitting bar code can be entered, by using the keys and then ENTER confirm. After completing data entry, the display unit will show the following screen: Type of Fitting symbol Fitting... - Page 20 By pressing ENTER you will control the welding cycle start and the following screen page will be displayed: Residual welding time Welding voltage in in seconds Volts Power T.rem = _____ U = ____ output in P = _______ E = ______ Watts Dissipated energy in ■■■■□□□□□□□...
-
Page 21: Error Codes / Common Problems
Error codes / common problems The welder 00E8500L has a number of safety systems to monitor welding and welding parameter entry. Error codes are always displayed on the screen. To delete a displayed error code, disconnect the fitting and press ESCAPE ESC when prompted. additional information please... -
Page 22: Guarantee Terms
INDUSTRIE ITALIANE S.P.A. local office to obtain the required authorisation to return an item. Nupi Industrie Italiane S.p.A. shall not be held responsible for any direct or consequential damage to people or property which may occur during welding unit use. - Page 23 Copyright © 2009 by NUPI INDUSTRIE ITALIANE S.P.A... All rights reserved.
- Page 24 Les illustrations et affichages à l'écran de ce mode d'emploi sont fournis à titre explicatif et peuvent étre légèrement différents des opérations réelles.
- Page 25 Sommaire Caractéristiques de la machine à soudeur ............2 Spécifications techniques .................. 2 Conditions d’utilisation ..................3 Alimentation ....................... 3 Préparation du soudage ..................4 Entrée des paramètres généraux ………………………………………………… 5 Réglage de la langue ……………………………………..………………………. . 5 Soudage ......................6 Codes d’erreur / Problèmes typiques ..............
-
Page 26: Caractéristiques De La Machine À Soudeur
Caractéristiques de la machine à soudeur Description de la machine 1. Corps de la machine 2. Sonde de contrôle de la température ambiante 3. Ecran cristaux liquides 4 lignes 4. Interrupteur d’alimentation générale 5. Clavier avec les boutons : pour confirmer l’entrée des données pour annuler une entrée ou pour revenir à... -
Page 27: Spécifications Techniques
Spécifications techniques Poids 230/115V 13 kg (35lb) Dimensions 310 x 350 x 160 mm (11” x 12” x 6” ) Puissance max. absorbée 1000 VA Alimentation 230/115V 50Hz / 60Hz Températures d’utilisation Da -18 °C a + 52 °C (da 0 °F a 125 °F) Gamme d'applications 20÷160 mm (1/2”÷6”) Câbles d’alimentation... -
Page 28: Préparation Du Soudage
Préparation du soudage Pour effectuer un soudage correct, TOUTES les étapes suivantes doivent être scrupuleusement suivies : Couper le tube perpendiculairement en utilisant un coupe tube approprié Gratter la superficie du tube de façon uniforme et au moins 1 cm de plus que la longueur d’emboîture du raccord en utilisant un gratteur adéquat. -
Page 29: Entrée Des Paramètres Généraux
Entrée des paramètres généraux NOTE PREMIMINAIRE: si lors de la mise sous tension de la machine à souder il apparaît le message « REVISION SUIVANT UNI 10566 », contacter le centre d’assistance pour programmer l’intervention de maintenance. Après la mise sous tension de la machine à souder l’écran de la machine montre la vision ci contre: NUPIGECO (F) Nom du fournisseur de la machine à... -
Page 30: Soudage
Soudage Dans la fenêtre suivante il est demandé d’insérer les paramètres de soudage indiqués sur le code à barre du raccord en utilisant les touches puis sur ENTER pour confirmer. Après avoir terminé l’entrée des données l’écran montrera les indications suivantes: Type de Symbole du raccord Raccord... - Page 31 Diamètre du raccord à souder Temps de __________ soudure en Temps = ________ secondes Voltage = ________ Voltage de ENT= OK ESC=Annuler soudure en Volts En appuyant su ENTER vous allez commander le départ du cycle de soudage et l’écran suivant s’affichera: Temps restant en Tension de seconde...
-
Page 32: Codes D'erreur / Problèmes Typiques
Codes d’erreur / problèmes typiques La machine 00E8500L Small possède plusieurs systèmes de sécurité qui contrôlent le soudage mais aussi la saisie des paramètres. Les codes d’erreur sont toujours affichés à l’écran. Pour effacer un message d’erreur, débrancher le raccord et appuyer sur ESC lorsque c’est demandé. -
Page 33: Conditions De Garantie
à une personne ou une chose, qui pourrait survenir lors de l’utilisation de la machine à souder. Déclaration de conformité NUPI Industrie Italiane S.p.A.- Via Stefano Ferrario snc, Z.I. Sud Ovest, Loc Sacconago Busto Arsizio (VA) DECLARE Que la machine à souder 00E8500L Small/ …… Volt N°... - Page 34 De afbeeldingen en beeldschermdisplays in deze gebruiksaanwijzing zijn uitsluitend bedoeld als uitleg bij de tekst en kunnen enigszins verschillen van de feitelijke aanduidingen op het schermo.
- Page 35 Inhoudstafel Eigenschappen van de lasmachine ..............3 Technische gegevens . ……………………………………………………………..4 Gebruiksvoorwaarden ..................4 Voeding ..................4 Voorbereidingen ....................5 Algemene gegevens invoeren ................6 De taal wijzigen ....................6 Lassen.......................7 Storingcodes/Bijzondere storingen ..............9 Garantievoorwaarden ..................10 CE Conformiteitverklaring ................10...
-
Page 36: Eigenschappen Van De Lasmachine
Eigenschappen van de lasmachine Overzicht van de lasmachine 1. Behuizing van de machine 2. Controlesensor voor de omgevingstemperatuur 3. LCD-display met 4 regels 4. Hoofdschakelaar 5. Toetsenbord met de volgende toetsen: om een ingevoerd gegeven te bevestigen om een ingevoerd gegeven te wissen of terug te keren naar het vorige scherm om door de menu’s te bladeren 6. -
Page 37: Technische Gegevens
Technische gegevens Gewicht 230/115V 13 kg (29 lb) Afmetingen 310 x 350 x 160 mm (11” x 12” x 6” ) Max. opgenomen 1000 VA vermogen Voeding 230/115V 50Hz / 60Hz Aantal toepassingen 20÷160 mm (1/2”÷6”) Bedrijfstemperatuur Da -18 °C a + 52 °C (da 0 °F a 125 °F) Voedingskabel 4 m lang (13 ft) Laskabel... -
Page 38: Voorbereidingen
Voorbereidingen Voor correcte lasresultaten is het belangrijk ALLE hieronder vermelde instructies nauwkeurig op te volgen: 1. Snijd de buis loodrecht door met behulp van een hiervoor geschikte leidingsnijder. 2. Schraap uniform over het oppervlak van de buis met behulp van een geschikte schraper geoxideerde... -
Page 39: Algemene Gegevens Invoeren
Algemene gegevens invoeren Wanneer bij het inschakelen van het toestel de vermelding “ REVISIE UNI 10566” veschijnt, contacteer dan de technische dienst voor herprogrammering. Zodra de lasmachine wordt ingeschakeld door de hoofdschakelaar, verschijnt het rechts afgebeelde scherm op de display van de machine, waarbij NUPIGECO verwijst naar het type lasproduct (NL) -
Page 40: Lassen
Opmerking (L.S.): Lassen In het volgende venster wordt er gevraagd om de parameters die vermeld staan op de barcode in te vullen, gebruik makend van de toetsen en ENTER om deze gegevens te bevestigen. Nadien zal het scherm de volgende gegevens aangeven: Elofit-systeem Symbool van de koppeling Type... - Page 41 Nominale diameter van de koppeling in mm Nominale ________ lastijd in Time = ________ seconden Voltage = ________ Lass panning in volt ENT= Vervolg ESC= Cancel Effectieve lastijd in seconden Bij het drukken op ENTER zal U lasprocédé opstarten en hetvolgende scherm: Resterende lastijd Lasspanning in seconden...
-
Page 42: Storingcodes/Bijzondere Storingen
Storingcodes/Bijzondere storingen De 00E8500L lasmachine beschikt over meerdere veiligheidssystemen, die het lasproces en het instellen van de lasparameters controleren. In voorkomende gevallen wordt de storingcode steeds op het lichtscherm weergegeven. Om een storingcode te wissen, moet, indien daarom gevraagd, de koppeling worden verwijderd en op ESCAPE (ESC) worden gedrukt. -
Page 43: Garantievoorwaarden
NUPI Industrie Italiane S.p.A.is niet aansprakelijk voor directe of indirecte schade aan personen of voorwerpen tijdens het gebruik van de lasmachine. CE Conformiteitsverklaring NUPI Industrie Italiane S.p.A.. - Via Stefano Ferrario snc, Z.I. Sud Ovest, Loc. Sacconago - Busto Arsizio (VA) VERKLAART dat de lasmachine 00E8500L Serienummer ……………………….. - Page 44 Copyright © 2009 by NUPI Industrie Italiane S.p.A.. All rights reserved.
- Page 45 Sede Legale e Operativa Sede Operativa Sede Operativa via Stefano Ferrario via dell’Artigianato 13 via Colombarotto 58 21052 Busto Arisio (VA) 40023 Castel Guelfo (BO) 40026 Imola (BO) tel. 0331-344211 tel. 0542-624911 tel. 0542-624911 fax 0331-351860 fax 0542-670851 fax 0542-670851 info@nupinet.com info@nupinet.com info@nupinet.com...