Table des Matières
Publicité
Les langues disponibles
Les langues disponibles
Liens rapides
Publicité
Chapitres
Table des Matières
Dépannage

Sommaire des Matières pour Hive Active
- Page 1 Hive Active Thermostat Install guide Guide d’installation...
- Page 2 Hive Hub. For quick and efficient set up, install Hive Active Thermostat in the order shown below. Hot tip: If you already have a Hive Hub you can start from step 2! Install hub Install the thermostat...
-
Page 3: Table Des Matières
Contents Installing your hub page 3 Installing your thermostat page 5 Pairing your hub and thermostat page 11 Controlling your thermostat remotely page 13 Meet your new Hive thermostat page 14 Multizone installations page 15 Troubleshooting page 16... -
Page 4: Installing Your Hub
Ethernet cable provided. Hot tip: Position your hub on a shelf or table rather than on the floor to help it talk to your other Hive devices. Fit the power cable into the hub and plug it into a power outlet. - Page 5 If no lights are displayed immediately after installing the hub check all cables are connected, the power outlet is working, and that you have an internet connection. If the problem still persists please contact Hive Technical Support on +1-866-470-9133 or visit hivehome.com/support...
-
Page 6: Installing Your Thermostat
Installing your thermostat Switch off the power Before installing, switch the power off to the heating and/or cooling system at your electrical breaker box. Confirm it is powered off and secured in the OFF position for the duration of the installation. You can test your fan to see if the system will turn on, if not the power is off. - Page 7 Remove your existing thermostat from the wall and take a picture of the wires for reference Your Hive thermostat needs a permanent connection to the ‘C’ or ‘Common’ terminal. If there is no wire connected to the C terminal on your existing thermostat you should request a professional install.
- Page 8 Optional decoration plate If there are holes and marks that will not be covered by your new Hive thermostat, use the optional decoration plate provided. Fix the decoration plate to the wall then attach the thermostat backplate using the small screws provided.
- Page 9 Wiring diagram as an example only Connect the wires to the Hive thermostat backplate Hive is compatible with wire thicknesses AWG 16-22. If your existing thermostat had a jumper between the RC and RH terminals this is no longer required. An R wire can go into either RC or RH.
- Page 10 Terminal descriptions G – Fan C – Common wire W – 1st, 2nd and 3rd stage heating for conventional systems. W3/AUX is used for auxiliary or emergency heat for heat pump systems. Y – 1st and 2nd stage cooling or 1st and 2nd stage of heat pump compressor RC –...
- Page 11 Attach the thermostat body to the thermostat backplate W3/AUX Clip thermostat front plate onto the wall mounted back plate.
-
Page 12: Pairing Your Hub And Thermostat
Pairing your hub and thermostat If you already have other Hive devices connected, you can follow the ‘install devices’ section of your app or online dashboard to pair the hub and thermostat. If not, follow the steps below. Check the hub is flashing amber –... - Page 13 Welcome to Hive. take you through guided set-up Let's take a tour. (Press back button to skip tour) The first time you connect your Hive thermostat, it will walk you through the set-up process. • Firstly, you’ll need to confirm the wires shown in green are the ones you want to connect.
-
Page 14: Controlling Your Thermostat Remotely
Controlling your thermostat remotely Hive Active Thermostat is now installed, there is one final step to link your thermostat to your Hive account. Download the Hive app Login using the email address and password you registered with OR If you haven’t already got a Hive account, tap ‘Create Account’ on the app Login screen or create one at hivehome.com/register. -
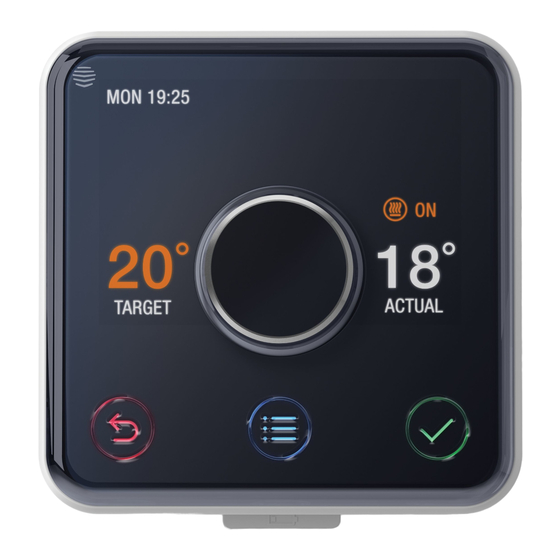
Page 15: Meet Your New Hive Thermostat
Meet your new Hive thermostat Quick Cool Quick Heat Day/Time System MON 3.25pm HOLD Mode Humidity ° ° Target Actual Temperature Temperature TARGET ACTUAL Dial Back Save Menu... -
Page 16: Multizone Installations
Multizone installation Hive Multizone can support up to five zones for heating and/or cooling. Hot tip: We recommend that you install the thermostat closest to the hub first and then install each additional thermostat one at a time. When installing each thermostat, repeat steps 1-6 from the Installing your thermostat sections on pages 5-9. -
Page 17: Troubleshooting
Troubleshooting To remotely control your heating and/or cooling with Hive, both the thermostat and hub need to be connected. When this service isn’t available, the thermostat can also be installed without a hub. This is known as ‘stand-alone’ mode. In ‘stand-alone’ mode the thermostat acts as a standard programmable thermostat without the remote control features and functionality of Hive. - Page 18 Industry Canada (IC) / FCC Compliance Notice This device complies with Part 15 of the FCC Rules and with Industry Canada’ s (IC) licence-exempt RSSs. Operation is subject to the following two conditions: (1) This device may not cause interference. (2) This device must accept any interference received, including interference that may cause undesired operation.
- Page 19 Ordre d’installation Pour contrôler à distance le chauffage et le refroidissement grâce à Hive Active Thermostat, le thermostat doit être installé et relié à un boîtier de contrôle (hub) Hive. Pour une mise en place rapide et efficace, installez Hive Active ThermostatMC selon l’...
- Page 20 Installation de votre hub Page 20 Installation de votre thermostat Page 22 Relier votre hub au thermostat Page 28 Contrôlez votre thermostat à distance Page 30 Rencontrez votre nouveau thermostat Hive Page 31 Installations à zones multiples Page 32 Dépannage Page 33...
- Page 21 étagère ou une table plutôt qu’ a u sol, afin qu’il puisse communiquer plus facilement avec vos autres appareils Hive. Insérez le câble d’ a limentation dans le hub et branchez-le dans une prise de courant.
- Page 22 Si aucun voyant ne s’ a ffiche après avoir installé le hub, assurez-vous que les câbles soient bien connectés, que la prise de courant fonctionne et que vous avez une connexion Internet. Si le problème persiste, veuillez contacter l’ a ssistance technique de Hive au +1-866-470-9133 ou visitez hivehome.com/support...
-
Page 23: Installation De Votre Thermostat
Installation de votre thermostat Coupez l’alimentation électrique Avant l’installation, coupez le courant électrique du système de chauffage et/ou de refroidissement dans votre boîte électrique. Assurez-vous que le courant soit bien coupé, et maintenez-le dans une position bloquée (OFF) pour toute la durée de l’installation. Vous pouvez tester le ventilateur pour voir si le système se met en marche;... - Page 24 Retirez votre thermostat actuel du mur, et prenez une photo des fils, à titre de référence Votre thermostat Hive requiert une connexion permanente C ou borne commune. Si aucun fil n’est relié à la borne C de votre thermostat actuel, vous devriez recourir à une installation professionnelle. Identifiez les fils de votre thermostat actuel en utilisant les étiquettes ci-dessous.
- Page 25 Plaque décorative optionnelle Si des trous et des marques sont visibles parce qu’ils ne sont pas recouverts par votre nouveau thermostat Hive, utilisez la plaque décorative optionnelle fournie. Installez la plaque décorative au mur, puis fixez la plaque arrière du thermostat à...
- Page 26 Schéma de filage fourni à titre d’exemple seulement Reliez les fils à la plaque arrière du thermostat Hive est compatible avec des épaisseurs de fil de AWG 16-22. Si votre thermostat actuel a un raccordement entre les bornes RC et RH, ce n’est...
- Page 27 Description des bornes G – Ventilateur C – Câble commun W – Les 1er, 2e et 3e stades de chauffage pour les systèmes conventionnels. W3/AUX est utilisé pour le chauffage auxiliaire ou d’urgence pour les systèmes de thermopompe Y – 1er et 2e stade de refroidissement ou 1er et 2e stade de thermopompe compresseur RC –...
- Page 28 Fixez le boîtier du thermostat à la plaque arrière du thermostat W3/AUX Fixez la plaque avant du thermostat à la plaque arrière murale.
-
Page 29: Relier Votre Hub Au Thermostat
Relier votre hub au thermostat Si vous avez d’ a utres appareils Hive déjà reliés au hub, vous pouvez consulter la section « Installer les appareils » sur votre application ou votre tableau de bord en ligne afin de relier le hub au thermostat. - Page 30 (Press back button to skip tour) la configuration guidée La première fois que vous connecterez votre thermostat Hive, il vous guidera dans le processus de configuration. • D’abord, vous aurez à confirmer que les fils qui apparaissent en vert sont ceux que vous souhaitez connecter.
-
Page 31: Contrôlez Votre Thermostat À Distance
Contrôlez votre thermostat à distance Le chauffage Hive Active est maintenant installé, il vous reste une dernière étape pour relier votre thermostat à votre compte Hive. Téléchargez l'application Hive Connectez-vous en utilisant l'adresse courriel et le mot de passe avec lesquels vous vous êtes inscrits... - Page 32 Voici votre nouveau thermostat Hive Refroidissement Chauffage rapide rapide Jour/Heure Mode MON 3.25pm HOLD système Humidité ° ° Température Température ciblée actuelle TARGET ACTUAL Cadran Endos Enregistrer Menu...
-
Page 33: Installations À Zones Multiples
Installations à zones multiples Les zones multiples Hive permettent de chauffer et/ou de refroidir jusqu’à cinq zones. Un bon truc : Nous recommandons de commencer par installer le thermostat le plus proche du boitier control, puis d’ a jouter les autres thermostats un par un. -
Page 34: Dépannage
Dépannage Pour contrôler à distance votre chauffage et/ou votre refroidissement grâce à Hive, le thermostat et le hub doivent être connectés. Lorsque ce service n’est pas disponible, le thermostat peut aussi être installé sans le hub. Il s’ a git du modèle dit « autonome ». En mode autonome, le thermostat agit de la même façon qu’un thermostat programmable... - Page 35 Déclaration de conformité Industrie Canada (IC) / FCC Le présent appareil est conforme à la partie 15 des Règles de la FCC et aux CNR d’Industrie Canada (IC) applicables aux appareils radio exempts de licence. L’exploitation est autorisée aux deux conditions suivantes : 1) l’...
- Page 36 We’re here to help You can view our handy how-to-use videos along with hints and tips at hivehome.com/support Or you can contact us: help.CAN@hivehome.com +1-866-470-9133 Nous sommes là pour vous aider Vous pouvez visionner nos tutoriels vidéo pratiques regorgeant de trucs et d’astuces à...