Table des Matières
Publicité
Les langues disponibles
Les langues disponibles
Liens rapides
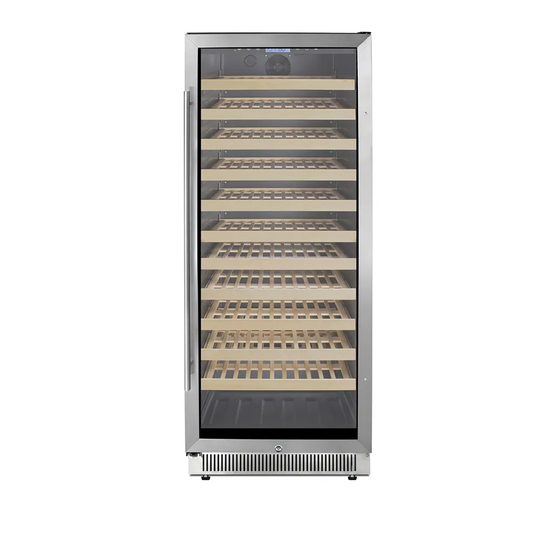
WINE CELLAR
Models:
SWC1127B
SWCP2116
SWC1926B
SWC1996B
SWCP2163
LWC1Z96
LWC2Z97
LWC1Z193
LWC2Z194
LWC2Z195
User Manual/Mode d'emploi
BEFORE USE, PLEASE READ AND FOLLOW ALL SAFETY RULES AND OPERATING
INSTRUCTIONS IN THIS MANUAL.
AVANT L'UTILISATION, VEUILLEZ LIRE ET SUIVRE TOUTES LES RÈGLES DE SÉCURITÉ ET LES
INSTRUCTIONS D'UTILISATION DE CE MANUEL.
Write Model and Serial Numbers here:
Summit Division of Felix Storch, Inc.
Model: _____________________
An ISO 9001:2015 registered company
770 Garrison Avenue
Serial No.: __________________
Bronx, NY 10474
www.summitappliance.com
Publicité
Chapitres
Table des Matières
Dépannage

Manuels Connexes pour Summit SWC1127B

Sommaire des Matières pour Summit SWC1127B
- Page 1 AVANT L'UTILISATION, VEUILLEZ LIRE ET SUIVRE TOUTES LES RÈGLES DE SÉCURITÉ ET LES INSTRUCTIONS D'UTILISATION DE CE MANUEL. Write Model and Serial Numbers here: Summit Division of Felix Storch, Inc. Model: _____________________ An ISO 9001:2015 registered company 770 Garrison Avenue Serial No.: __________________...
-
Page 2: Table Des Matières
TABLE OF CONTENTS Appliance Safety Important Safeguards Location of Parts Installation Instructions 9-16 Before Using your Appliance Installing your Appliance Installing the Door Handle Reversing the Door Swing Built-in Cabinet Instructions 12-13 Electrical Connection Extension Cord Rearranging the Shelves Placement and Storage of Wine 15-16 Operating your Appliance 17-18... -
Page 3: Appliance Safety
APPLIANCE SAFETY Your safety and the safety of others are very important. We have provided many important safety messages in this manual and on your appliance. Always read and obey all safety messages. This is the Safety Alert Symbol. This symbol alerts you to potential hazards that can kill or injure you and others. -
Page 4: Important Safeguards
IMPORTANT SAFEGUARDS Before the appliance is used, it must be properly positioned and installed as described in this manual, so read the manual carefully. To reduce the risk of fire, electrical shock or injury when using the appliance, follow basic precaution, including the following: •... - Page 5 FOLLOW WARNING CALL OUTS BELOW ONLY WHEN APPLICABLE TO YOUR MODEL • Use two or more people to move and install appliance. Failure to do so can result in back or other injury. • To ensure proper ventilation for your appliance, the front of the unit must be completely unobstructed.
-
Page 6: Location Of Parts
LOCATION OF PARTS SWC1127B/LWC1Z96 SWC1926B/LWC1Z193 Right Upper Hinge Control Panel Door Door Seal Door Handle Charcoal Filters Wooden Shelf Air Channel Plate Vent Kick Plate Right Lower Hinge Adjustable Feet... - Page 7 SWC1966B/LWC2Z194 Right Upper Hinge Air Channel Plate Control Panel Door Door Seal Door Handle Wooden Shelf Charcoal Filters Vent Kick Plate Right Lower Hinge Adjustable Feet...
- Page 8 SWCP2116/ LWC2Z97 SWCP2163/ LWC2Z195 Right Upper Hinge Wire Shelf with S.S. Front Edge Door Door Seal Door Handle Air Channel Plate Control Panel Slide Light Rolling Slideway Charcoal Filters Vent Kick Plate Right Lower Hinge Adjustable Feet...
-
Page 9: Installation Instructions
INSTALLATION INSTRUCTIONS Before Using your Appliance Remove the exterior and interior packaging, and check to make sure you have the following parts: SWC1127B & SWC1926B & SWC1966B SWCP2116 & SWCP2163 (LWC1Z96 & LWC1Z193 & LWC2Z194) (LWC2Z97 & LWC2Z195) Instruction Manual... -
Page 10: Installing The Door Handle
Installing the Door Handle This cooler includes one stainless steel handle that is not installed by the factory. NOTE: The door handle is packaged inside, between the inner foam and the outer box. Do not discard packaging until you have removed the handle. To install the handle please follow these instructions: 1. -
Page 11: Reversing The Door Swing
Reversing the Door Swing The diagram below will explain how to reverse the door swing of your beverage cooler. Be careful to pay attention to the numbering of the steps below. Before reversing the door, please make sure unplug the appliance and must be let it stand upright for approximately 2 hours before connecting to the power source. -
Page 12: Built-In Cabinet Instructions
This unit is designed for both built-in and freestanding installation. If you plan to use this unit in a built-in application, please follow the requirements shown below. Be sure that airflow under the appliance is not blocked. SWC1127B/LWC1Z96 and SWCP2116/LWC2Z97 Cabinet Opening Dimensions IN (min) - Page 13 SWC1926B/LWC1Z193. SWC1966B/LWC2Z194, and SWCP2163/LWC2Z195 Cabinet Opening Dimensions IN (min) CM (min) Width 23 7/8” 60.5 cm 28” Depth 71.2 cm Height 70 3/4” 180 cm...
-
Page 14: Electrical Connection
Electrical Connection Improper use of the grounded plug can result in the risk of electrical shock. If the power cord is damaged, have it replaced by a service center authorized by Felix Storch, Inc. This appliance should be properly grounded for your safety. The power cord of this appliance is equipped with a three-prong plug which mates with standard three prong wall outlets to minimize the possibility of electrical shock. -
Page 15: Rearranging The Shelves
Rearranging the Shelves These instructions are intended for models SWCP2116/LWC2Z97 and SWCP2163/LWC2Z195. First remove all wine and/or beverages from the shelf. Pull the shelf out to its limit, and then press DOWN on the left lever on the sliding rail and press UP on the right one simultaneously as shown to the left. - Page 16 • SWC1127B/ LWC1Z96 was designed to store a maximum of 127 Bordeaux bottles in total. • SWCP2116/ LWC2Z97 was designed to store a maximum of 116 Bordeaux bottles in total. • SWC1926B/ LWC1Z193 was designed to store a maximum of 165 Bordeaux bottles in total.
-
Page 17: Operating Your Appliance
Upper Zone: 41 - 54º F Upper Zone: 5 - 12º C Lower Zone: 54 - 65º F Lower Zone: 12 -18º C Control Panel for SWC1127B/LWC1Z96 and SWC1926B/LWC1Z193 Control Panel for SWCP2116/LWC2Z97, SWC1966B/ LWC2Z194 and SWCP2163/LWC2Z195 Recommended Temperatures for Chilling Wine •... - Page 18 Warning System • The door alarm will beep three times every five seconds, and the LCD screen will display when the door is open for over 5 minutes. Press any key or close the door to stop the alarm. • When the temperature inside the appliance is below 35.6ºF (2ºC) for over 3 hours, the alarm will sound and the LCD screen will display .
-
Page 19: Care And Maintenance
CARE AND MAINTENANCE Cleaning your Appliance 1. Turn off the power, unplug the appliance, and remove all items, including the shelves. 2. Wash the inside surfaces with a warm water and baking soda solution. The solution should be about 2 tablespoons of baking soda to a quart of water. 3. -
Page 20: Troubleshooting
TROUBLESHOOTING You can solve many common problems easily, saving you the cost of a possible service call. Try the suggestions below to see if you can solve the problem before calling the service technician. Problem Possible Causes • The appliance is not plugged in. The appliance is not running. -
Page 21: Limited Warranty
OR FITNESS, SO THESE EXCLUSIONS OR LIMITATIONS MAY NOT APPLY TO YOU. THIS WARRANTY GIVES YOU SPECIFIC LEGAL RIGHTS AND YOU MAY ALSO HAVE OTHER RIGHTS, WHICH VARY FROM STATE TO STATE. Summit Division of Felix Storch, Inc. An ISO 9001:2015 registered company 770 Garrison Avenue For parts and accessory ordering,... - Page 22 AVANT L'UTILISATION, VEUILLEZ LIRE ET SUIVRE TOUTES LES RÈGLES DE SÉCURITÉ ET LES INSTRUCTIONS D'UTILISATION DE CE MANUEL. Écrivez ici les numéros de modèle et de série Summit Division of Felix Storch, Inc. An ISO 9001:2015 registered company Modèle : ______________________...
- Page 23 TABLE DES MATIÈRES Sécurité de l’Appareil Garanties Importantes 25-26 Emplacement des Pièces 27-29 Instructions d'Installation 30-36 Avant d'Utiliser votre Appareil Installation de votre Appareil Installation de la Poignée de Porte Inverser la Porte Battante Instructions d'Armoire Intégrée 33-34 Connexion Électrique Rallonge Réorganiser les Étagères Placement et Stockage du Vin...
-
Page 24: Sécurité De L'appareil
SÉCURITÉ DE L'APPAREIL Votre sécurité et celle des autres sont très importantes. Nous avons fourni de nombreux messages de sécurité importants dans ce manuel et sur votre appareil. Lisez et respectez toujours tous les messages de sécurité. C'est le symbole d'alerte de sécurité. Ce symbole vous avertit des dangers potentiels qui peuvent vous tuer ou vous blesser, ainsi que d'autres personnes. -
Page 25: Garanties Importantes
GARANTIES IMPORTANTES Avant d'utiliser l'appareil, il doit être correctement positionné et installé comme décrit dans ce manuel, alors lisez-le attentivement. Pour réduire le risque d'incendie, de choc électrique ou de blessure lors de l'utilisation de l'appareil, suivez les précautions de base, notamment les suivantes: •... - Page 26 SUIVEZ L'APPEL D'ALERTE CI-DESSOUS SEULEMENT QUAND S'APPLIQUE À VOTRE MODÈLE • Utilisez deux personnes ou plus pour déplacer et installer l'appareil. Ne pas le faire peut entraîner des blessures au dos ou autres. • Pour assurer une bonne ventilation de votre appareil, l'avant de l'appareil doit être complètement dégagé.
-
Page 27: Emplacement Des Pièces
EMPLACEMENT DES PIÈCES SWC1127B/LWC1Z96 SWC1926B/LWC1Z193 Charnière Supérieure Droite Panneau de Configuration Porte Joint de Porte Poignée de Porte Filtres à Charbon Étagère en Bois Plaque de Canal d'Air Plaque de Ventilation Charnière Inférieure Droite Pieds Réglables... - Page 28 SWC1966B/LWC2Z194 Charnière Supérieure Droite Plaque de Canal d'Air Panneau de Configuration Porte Joint de Porte Poignée de Porte Étagère en Bois Filtres à Charbon Plaque de Ventilation Charnière Inférieure Droite Pieds Réglables...
- Page 29 SWCP2116/ LWC2Z97 SWCP2163/ LWC2Z195 Charnière Supérieure Droite Tablette Métallique Avec Bord Avant S.S. Porte Joint de Porte Poignée de Porte Plaque de Canal d'Air Panneau de Configuration Lumière Latérale Glissière Roulante Filtres à Charbon Plaque de Ventilation Charnière Inférieure Droite Pieds Réglables...
-
Page 30: Instructions D'installation
INSTRUCTIONS D'INSTALLATION Avant d'utiliser votre appareil Retirez l'emballage extérieur et intérieur et vérifiez que vous disposez des pièces suivantes: SWC1127B & SWC1926B & SWC1966B SWCP2116 & SWCP2163 (LWC1Z96 & LWC1Z193 & LWC2Z194) (LWC2Z97 & LWC2Z195) Manuel d'instructions Manuel d'instructions Étagères en Bois Tablettes Grillagées Avec Glissières Roulantes... -
Page 31: Installation De La Poignée De Porte
Installation du Poignée de la Porte Cette glacière comprend une poignée en acier inoxydable qui n'est pas installée par l'usine. REMARQUE: La poignée de porte est emballée à l'intérieur, entre la mousse intérieure et la boîte extérieure. Ne jetez pas l'emballage avant d'avoir retiré la poignée. Pour installer la poignée, veuillez suivre ces instructions: 4. - Page 32 Porte Battante Inversante Le diagramme ci-dessous vous expliquera comment inverser l'ouverture de la porte de votre refroidisseur de boissons. Faites attention à la numérotation des étapes ci-dessous (! Avant de renverser la porte, assurez-vous de débrancher l'appareil et de le laisser debout pendant environ 2 heures avant de le connecter à...
-
Page 33: Instructions D'armoire Intégrée
Cette unité est conçue pour une installation intégrée et indépendante. Si vous prévoyez d'utiliser cet appareil dans une application intégrée, veuillez suivre les exigences indiquées ci-dessous. Assurez- vous que le flux d'air sous l'appareil n'est pas bloqué. SWC1127B/LWC1Z96 et SWCP2116/LWC2Z97 Dimensions d'Ouverture de l'Armoire IN (min) - Page 34 SWC1926B/LWC1Z193. SWC1966B/LWC2Z194, et SWCP2163/LWC2Z195 Dimensions d'Ouverture de l'Armoire IN (min) CM (min) Largeur 23 7/8” 60.5 cm 28” Profondeur 71.2 cm Hauteur 70 3/4” 180 cm...
-
Page 35: Connexion Électrique
Connexion Électrique Une mauvaise utilisation de la prise mise à la terre peut entraîner un risque de choc électrique. Si le cordon d'alimentation est endommagé, faites-le remplacer par un centre de service agréé par Felix Storch, Inc. Cet appareil doit être correctement mis à la terre pour votre sécurité. Le cordon d'alimentation de cet appareil est équipé... -
Page 36: Réorganiser Les Étagères
Réorganiser les Étagères Ces instructions sont destinées aux modèles SWCP2116/LWC2Z97 et SWCP2163/LWC2Z195. Retirez d'abord tous les vins et/ou les boissons de l'étagère. Tirez la tablette jusqu'à sa limite, puis appuyez BAS sur le levier gauche du rail coulissant et appuyez simultanément sur HAUT sur la droite comme illustré... - Page 37 • SWC1127B/LWC1Z96 a été conçu pour stocker au maximum 127 bouteilles de Bordeaux au total. • SWCP2116/LWC2Z97 a été conçu pour stocker au maximum 116 bouteilles de Bordeaux au total. • SWC1926B/LWC1Z193 a été conçu pour stocker au maximum 165 bouteilles de Bordeaux au total.
-
Page 38: Utilisation De Votre Appareil
1ºF ou 1ºC. • Appuyez sur pour changer l'affichage de la température de Celsius à Fahrenheit ou de Fahrenheit à Celsius pour les modèles SWC1127B/LWC1Z96 et SWC1926B/LWC1Z193. • Appuyez simultanément sur les touches puis maintenez-les enfoncées pendant 3 secondes pour changer l'affichage de la température de Celsius à... - Page 39 Système d'Alarme • L'alarme de porte émet trois bips toutes les cinq secondes et l'écran LCD affiche lorsque la porte est ouverte pendant plus de 5 minutes. Appuyez sur n'importe quelle touche ou fermez la porte pour arrêter l'alarme. • Lorsque la température à...
-
Page 40: Entretien Et Maintenance
ENTRETIEN ET MAINTENANCE Nettoyage de votre Appareil 1. Coupez l'alimentation, débranchez l'appareil et retirez tous les articles, y compris les étagères. 2. Lavez les surfaces intérieures avec une solution d'eau tiède et de bicarbonate de soude. La solution doit être d'environ 2 cuillères à soupe de bicarbonate de soude pour un litre d'eau. 3. -
Page 41: Dépannage
DÉPANNAGE Vous pouvez facilement résoudre de nombreux problèmes courants, vous épargnant ainsi le coût d'un éventuel appel de service. Essayez les suggestions ci-dessous pour voir si vous pouvez résoudre le problème avant d'appeler le technicien de service. Problem Causes Possibles •... -
Page 42: Garantie Limitée
Pour plus d'informations, allez à www.P65Warnings.ca.gov Remarque: Le nickel est un composant de tous les acier inoxydable et de certains autres composants métalliques. Summit Division de Felix Storch, Inc. Une compagnie enregistrée ISO 9001:2015 Pour commander des pièces et des accessoires, résoudre des problèmes et obtenir des conseils utiles,...