Publicité
Les langues disponibles
Les langues disponibles
Liens rapides
Publicité

Sommaire des Matières pour Bury technologies CC 3100
- Page 1 CC 3100 QUICK USER GUIDE GUÍA RÁPIDA GUIDE DE DÉMARRAGE...
-
Page 3: Introductory Information
Introductory information Dear customer, Congratulations on purchasing a BURY hands-free car kit. You have chosen a high quality product that is extremely easy to use. Estimado Cliente: Usted ha adquirido un kit de telefonía manos libres de la marca BURY, optando con ello por un producto de alta calidad y máximo confort de manejo. - Page 4 Installation of the hands-free car kit Scope of supply Alcance de suministro Fourniture...
- Page 5 Scope of delivery: Contenido: 1. Electronic box 1. Caja electrónica 2. Multifunction display with cradle and mount, 2. Pantalla multifuncional con soporte y pie de screws for the holder and rubber cover, montaje, tornillo para el soporte y cubierta adhesive tape de caucho, cinta adhesiva 3.
- Page 6 Installation of the hands-free car kit Installation overview Plano general de montaje Vue d’ensemble du montage...
- Page 7 Connections on the electronics box: Mini-USB Power supply/Muting using Mute via 24-Pin Molex to jack connector cable Microphone LINE-IN Multifunction display Conexiones en la caja electrónica: Mini USB Suministro de corriente/Silenciamiento a través del mazo Molex de 24 pines en arnés de cables jack Micrófono LINE-IN Pantalla multifuncional...
- Page 8 Installation of the hands-free car kit Installation of the system Montaje del sistema Montage du système...
- Page 10 Installation of the hands-free car kit PWR/LSP/LINE OUT Step 1: The power supply of the hands-free car kit is established via a 4-core cable. Connect the black (clamp 31 – mi- nus), the red (clamp 30 – steady plus) and the blue cable (clamp 15 – ignition plus) to the power supply of your radio (where required via the cigarette lighter or the fuse box).
- Page 11 - Installation of the cables: the ignition (blue) and the power (red) - Ground (black) - 12/24V Ignition (blue) - 12V Power (red)
- Page 12 Installation of the hands-free car kit Step 3: Please connect an external speaker to the connection harness’ socket (B) with the Jack plug. Step 4: If you want music to be fed via the LINE cable (C), you must adjust it accordingly to the respective type of radio and its connections (PHONE-IN or AUX-IN).
- Page 13 Connection diagram for 24 pin Molex to jack connector - Ground (black) - 12/24V Ignition (blue) - 12V Power (red) - 24-Pin Molex - connection to the electronic box (HFCK) - connection to the external loudspeaker - connection to the Line in - connection to the car radio - MUTE - connection to the vehicle’s power supply...
- Page 14 Installation of the hands-free car kit 3 - C LF- 15 - C LF+ 9 - LINE R+ 21 - LINE R- 10 - LINE L+ 22 - LINE L- 11 - R-Mute 23 - Ignition 12 - Ground 24 - Power...
- Page 15 PWR/LSP/LINE OUT Paso 1: La alimentación eléctrica del kit manos libres se establece a través de un cable de 4 hilos. Conecte el negro (bor- ne 31 - negativo), el rojo (borne 30 - positivo permanente) y el azul (borne 15 - positivo de encendido) a la alimen- tación de su radio (a través del encendedor de cigarrillos o la caja de fusibles, según sea el caso).
- Page 16 Installation of the hands-free car kit Paso 4: Si quiere transferir música con el cable LINE (C) este debe adaptarse a la radio correspondiente y a sus conexio- nes (entrada PHONE o entrada AUX). Puede adquirir los adaptadores correspondientes en los comercios espe- cializados.
- Page 17 PORT PWR/LSP/LINE OUT Étape 1 : L’alimentation électrique du kit mains-libres est à réaliser avec un câble à 4 conducteurs. Reliez le câble noir (borne 31 – moins), le câble rouge (borne 30 – pôle positif permanent) et le câble bleu (borne 15 – pôle d’allu- mage) à...
- Page 18 Installation of the hands-free car kit Étape 4 : Si vous souhaitez transférer la musique à travers le câble LINE (C), alors il faut le faire correspondre à l’autoradio respectif et l’adapter à ses ports de connexion (PHONE-IN ou AUX-IN). Les adaptateurs appropriés sont dispo- nibles auprès de votre revendeur.
- Page 19 Operating guidelines Establishing a Bluetooth connection Establecer una conexión Bluetooth Etablir une connexion Bluetooth “CC 3100” PIN: 1234...
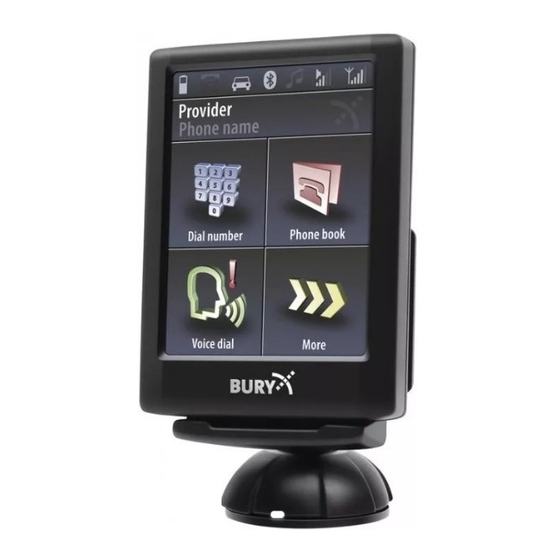
- Page 20 Operating guideline You can enter a telephone number here You can open the telephone book here Aquí puede introducir un número de teléfono Aquí puede abrir la agenda de teléfonos Ce sous-menu vous permet de saisir un numéro Ce sous-menu vous permet d’ouvrir le répertoire de téléphone You can start the voice control here You can flick through more functions here...
- Page 21 Handling via Touch screen The operation can be carried out via possibly existing arrow keys. With the red symbols you can cancel an action or go a step back. If you press long you will return to the main menu. With the green symbols you can confirm actions.
- Page 22 Further Information A detailed instructions manual for the CC 3100 is available on our website under the follow- ing address: www.bury.com Have a good trip! Encontrará un manual de instrucciones más detallado sobre el CC 3100 de BURY en nuestra pági- na web con la dirección: www.bury.com...
- Page 23 Permisos y declaraciones de conformidad Comisión Federal de Comunicaciones (FCC) Declaración de Conformidad – Estados Unidos Este dispositivo cumple con la parte 15 de las reglas FCC. La operación está sujeta a las siguientes dos condiciones: 1 Este dispositivo no puede causar interterencia perjudicial, y 2 el dispositivo debe aceptar cualquier interferencia recibida, incluyendo interferencia que pueda causar operaciones no deseables.
- Page 24 Version 06/2016 60.0911.0-01-070616...


