
Manuels Connexes pour Bury technologies CC 9056 Plus


Sommaire des Matières pour Bury technologies CC 9056 Plus
- Page 1 CC 9056 Plus KURZANLEITUNG GUIDA RAPIDA 056 Plus QUICK USER GUIDE BEKNOPTE HANDLEIDING STRUČNŶ NÁVOD KRÓTKA INSTRUKCJA OVERSIGTSVEJLEDNING BREVE MANUAL КРАТКАЯ ИНСТРУКЦИЯ GUÍA RÁPIDA GUIDE DE DÉMARRAGE ÖVERSIKTSINSTRUKTION למשתמש מהיר מדריך ÖZET KILAVUZ...
-
Page 2: Introductory Information
Introductory information Sehr geehrte Kundin, sehr geehrter Kunde, Sie haben eine Freisprecheinrichtung der Marke BURY erworben und sich so für ein Produkt mit hoher Qualität sowie höchstem Bedienungskomfort entschieden. Dear customer, Congratulations on purchasing a BURY hands-free car kit. You have chosen a high quality product that is extremely easy to use. - Page 3 Geachte klant, U heeft een handsfreeset van het merk BURY gekocht en dus gekozen voor een product met hoge kwa- liteit alsmede maximaal bedieningsgemak. Szanowna Klientko, szanowny Kliencie, kupując zestaw głośnomówiący marki BURY zdecydowali się Państwo na produkt wysokiej jakości, ce- chujący się...
- Page 4 Installation of the hands-free car kit Lieferumfang Scope of supply Rozsah dodávky Leveringsomfang ערכ התקנת Alcance de suministro Fourniture האריזה תכולת Contenuto della fornitura Leveringsomvang Zawartość Âmbito de fornecimento Комплектность Leveransomfattning Sevkiyatın İçeriği...
-
Page 5: Ekstraudstyr
Beschreibung der Komponenten: Scope of delivery: 1. Elektronikbox 1. Electronic box 2. Multifunktionsdisplay mit Halterung und 2. Multifunction display with cradle and mount, Montagefuß, Schraube für Halterung und screws for the holder and rubber cover, adhe- Gummiabdeckung, Klebestreifen sive tape 3. - Page 6 Installation of the hands-free car kit Contenido: Contenu de la livraison : 1. Caja electrónica 1. Boîtier électronique 2. Pantalla multifuncional con soporte y pie de 2. Écran multifonctionnel avec support et pied de montaje, tornillo para el soporte y cubierta de montage, vis pour le support et cache en caucho, cinta adhesiva caoutchouc, ruban adhésif...
-
Page 7: Material Fornecido
Leveringsomvang: W komplecie: 1. Elektronicabox 1. Centralka elektroniczna 2. Multifunctio neel display met houder en 2. Monitor wielofunkcyjny z uchwytem i stopką montagevoet, schroef voor houder en montującą, śruba do uchwytu i nakładka rubberafdekking, plakstrip gumowa, taśma mocująca 3. Microfoon 3. -
Page 8: Leveransens Omfattning
Installation of the hands-free car kit Leveransens omfattning: Paket kapsamı: 1. Elektronisk box 1. Elektronik kutusu 2. Multifunktionsdisplay med hållare 2. Çok amaçlı ekran, tutuculu ve montaj ayaklı, & monteringsfot, skruvar för hållaren och sabitleme civatası, tutma elemanı ve lastik gummihöljet, klistertejp kapak civatası, Yapışkan şerit 3. - Page 9 Einbauübersicht Sommario del montaggio Installation overview Inbouwoverzicht Nákres instalace Schemat montażu Monteringsoversigt Plano geral de montagem ער התקנת Plano general de montaje Монтажная схема Vue d’ensemble du montage Monteringsöversikt ההתקנה סקירת Montaj hakkında özet bilgi...
- Page 10 Installation of the hands-free car kit Anschlüsse an der Elektronikbox: Mini-USB Stromversorgung/Stummschaltung über ISO-Kabelbaum Mikrofon LINE-IN Multifunktionsdisplay Connections on the electronics box: Mini-USB Power supply/Muting using Mute via ISO cable tree Microphone LINE-IN Multifunction display Připojení elektronické skříňky: Tilslutning af elektronikboks: Mini USB Mini-USB Napájení...
- Page 11 Conexiones en la caja electrónica: Connexions au boîtier électronique : Mini USB Mini-USB Suministro de corriente/Silenciamiento Alimentation/Mise en sourdine via a través del mazo de cables ISO le harnais de câbles ISO Micrófono Microphone LINE-IN LINE-IN Pantalla multifuncional Écran multifonctionnel האלקטרוניקה...
- Page 12 Installation of the hands-free car kit Ligação da caixa electrónica: Подсоединение электронного блока: Mini-USB Mini-USB Alimentação de corrente /Modo silencioso Электропитание/Отключение звука através da cablagem ISO с помощью кабельной разводки Microfone согласно ISO Микрофон LINE-IN Visor multifunções LINE-IN Мультифункциональный дисплей Anslutning av elektronikdosan: Elektronik Kutusundaki Bağlantılar: Mini-USB...
- Page 13 Montaggio del sistema Montage des Systems Installation of the system Montage van het systeem Montáž systému Montaż systemu Installation af systemet Montagem do sistema ערכ התקנת Montaje del sistema Монтаж системы Montage du système Montering av handsfree-enheten המערכת התקנת Eller serbest araç kitinin montajı...
- Page 14 Installation of the hands-free car kit...
- Page 15 PWR/LSP/LINE OUT Schritt 1: Ziehen Sie die ISO-Stecker hinten am Radio ab und ersetzen Sie diese durch die Stecker des ISO-Kabelbaums. Die nun freien ISO-Stecker verbinden Sie bitte mit den beiden Buchsen vom ISO-Kabelbaum (siehe Abbildung).
- Page 16 Installation of the hands-free car kit Möchten Sie die Musik oder die Sprache über die vier LINE-Kabel übertragen, dann sind diese entsprechend an das jeweilige Radio und dessen Anschlüsse (PHONE-IN bzw. AUX-IN) zu adaptieren. Entsprechende Adapter sind im Fachhandel erhältlich. Schritt 2: Die FSE unterstützt die Radio-Stummschaltfunktion, falls diese ebenfalls vom Radio unterstützt wird.
- Page 17 - 12V Power - 12/24V Ignition - Ground - Line-out 1 - Line-out 2 1-Line L + / Phone L + 1-Line R + / Phone R + 2-Line L - / Phone L - 2-Line R - / Phone R - Anschlussplan für ISO-Kabelbaum...
- Page 18 Installation of the hands-free car kit - Micro Molex 24 - ISO - connection to the electronic box (HFCK) - connection to the vehicle’s speakers - connection to the vehicle’s power supply - connection to the car radio - connection to the car radio 1 - Mute 3 2 - Mute 2 3 - Mute 1...
- Page 19 PWR/LSP/LINE OUT Step 1: Pull the ISO jacks at the back of the radio off and replace them with the jacks at the ISO cable harness. Connect the now free ISO jacks with both sockets from the ISO cable harness (see picture). If you want music or voice signals to be fed via the four LINE cables, you must adjust them accordingly to the respective type of radio and its connections (PHONE-IN or AUX-IN).
- Page 20 Installation of the hands-free car kit PWR/LSP/LINE OUT Krok 1: Odpojte konektor ISO na zadní straně rádia a místo něj připojte konektor z kabelového svazku ISO. Nyní volný konektor ISO připojte k oběma zdířkám kabelového svazku ISO (viz obrázek). Pokud chcete přenášet hudbu nebo hlas po čtyřech kabelech LINE, musíte je upravit podle daného rádia a jeho připojení...
- Page 21 PWR/LSP/LINE OUT Trin 1: Træk ISO-stikket ud bag på radioen, og udskift dette med stikket fra ISO-kabelsættet. Det nu ledige ISO-stik skal du forbinde med de to bøsninger fra ISO-kabelsættet (se figur). Hvis du vil overføre musik eller tale gennem de fire LINE-kabler, skal disse forsynes med adaptere, der passer til den pågældende radio og dennes tilslutninger (PHONE-IN eller AUX-IN).
- Page 22 Installation of the hands-free car kit PWR/LSP/LINE OUT Paso 1: Retire el conector ISO de detrás de la radio y sustitúyalo por el conector del arnés de cables ISO. Conecte el conector ISO que ha quedado libre con las dos hembrillas del arnés de cables ISO (véase figura). Si desea transferir música o voz a través de los cuatro cables LINE, estos deberán adaptarse a la radio corres- pondiente y a sus conectores (PHONE-IN o AUX-IN).
- Page 23 PORT PWR/LSP/LINE OUT Étape 1 : Retirez le connecteur ISO à l’arrière de l’autoradio et remplacez-le avec le connecteur du faisceau de câbles ISO. Le connecteur ISO est maintenant libre. Veuillez le connecter avec les deux ports du faisceau de câbles ISO (voir la figure).
- Page 24 לרכב הדיבורית ערכת התקנת Installation of the hands-free car kit PWR/LSP/LINE OUT PWR/LSP/LINE OUT חובה להתאים אותם בהתאם לסוג אם תרצה להעביר אותות מוזיקה וקול דרך ארבעת כבלי LINE צעד ניתן לרכוש מתאמים מחנויות המתמחות בכך או הרדיו והחיבורים שלו AUX-IN PHONE-IN חבר...
- Page 25 לרכב הדיבורית ערכת התקנת לרמקול רדיו המכונית מתח לרדיו הצתה 12/24V הארקה Line-out 2 Line-out 1 Phone R + Line R + Phone R - Line R - Phone L + Line L + Phone L - Line L - אפשרויות...
- Page 26 Installation of the hands-free car kit חיבור לקופסת האלקטרוניקה (HFCK) Micro Molex 24 - ISO חיבור לרמקולי הרכב חיבור לאספקת המתח של הרכב חיבור לרדיו הרכב חיבור לרדיו הרכב Mute 3 Mute 2 Mute 1 הצתה אנטנה C RR+ C RR- תאורה...
- Page 27 PWR/LSP/LINE OUT Fase 1: Estrarre i connettori ISO dietro alla radio e sostituirli con i connettori del fascio di cavi ISO. Collegare quindi i connettori ISO con le due prese del fascio di cavi ISO (v. figura). Se volete trasmettere musica o voce attraverso i quattro cavi LINE, questi devono essere adatti alla vostra radio e alle relative prese di collegamento (PHONE-IN o AUX-IN).
- Page 28 Installation of the hands-free car kit PWR/LSP/LINE OUT Stap 1: Trek de ISO-stekers achter op de radio eruit en vervang deze door de stekers van de ISO-bedrading. De nu vrije ISO-stekers verbindt u met de beide bussen van de ISO-bedrading (zie afbeelding). Mocht u de muziek of de spraak via de vier LINE-kabels willen overdragen, dan moeten deze dienovereenkomstig aan de betreffende radio en de aansluitingen ervan (PHONE-IN resp.
- Page 29 PWR/LSP/LINE OUT Krok 1: Proszę wyciągnąć wtyczki ISO podłączone do radia, na tylnej ściance i zastąpić je wtyczkami od wiązki kabla ISO. Wolne wtyczki ISO proszę połączyć z obydwoma gniazdami od wiązki kabla ISO (patrz rysunek). Jeśli muzyka i głos mają być transmitowane poprzez 4 kable LINE, to należy je podłączyć za pomocą adaptera do radia i jego gniazd (PHONE-IN lub AUX-IN).
- Page 30 Installation of the hands-free car kit PWR/LSP/LINE OUT Passo 1: Retirar a ficha ISO da parte de trás do rádio e substituí-la pela ficha da cablagem ISO. Ligar as fichas ISO agora livres aos dois conectores da cablagem ISO (ver figura). Caso deseje transferir música e voz pelos quatro cabos LINE, deve adaptar os cabos correspondentes ao res- pectivo rádio e suas portas (PHONE-IN adequado a AUX-IN).
- Page 31 PWR/LSP/LINE OUT Шаг 1: Извлеките штекеры ISO на задней панели радиоприемника и вставьте вместо них штекеры кабельного жгута ISO. Отсоединенные штекеры ISO вставьте в оба гнезда кабельного жгута ISO (см. рисунок). Для передачи аудио или голоса по четырем кабелям с маркировкой LINE подсоедините их к соответ- ствующим...
- Page 32 Installation of the hands-free car kit PWR/LSP/LINE OUT Steg 1: Dra ur ISO-anslutningen på radions baksida och ersätt den med kontakten för ISO-kablaget. Den nu lösa ISO- anslutningen kopplar du ihop med de båda anslutningarna från ISO-kablaget (se bild). Om du vill överföra musik eller tal över de fyra LINE-kablarna skall dessa anslutas på motsvarande sätt till den aktuella radion och dess anslutningar (PHONE-IN resp.
- Page 33 PWR/LSP/LINE OUT 1. adım: Radyonun arkasında bulunan ISO fişlerini çıkartın ve bunları ISO kablo demetinde bulunan fişler ile değiştirin. Açıkta bulunan ISO fişlerini, ISO kablo demetinde bulunan iki yuvaya bağlayın (bkz. resim). Müziği ya da konuşma sesini dört adet LINE kablosu üzerinden aktarmak istiyorsanız, bunları ilgili radyoya ve radyo bağlantılarına uygun bir şekilde bağlayın (PHONE-IN veya AUX-IN).
- Page 34 הנחיות Establecer una conexión Bluetooth Создать соединение Bluetooth הפעלה הנחיות Etablir une connexion Bluetooth Ansluta Bluetooth חיבור יצירת Bluetooth Bluetooth bağlantısı kurma חיבור יצירת Bluetooth “CC 9056 Plus” זיהוי מספר PIN: 1234 אישי (PIN) זיהוי מספר 1234 אישי (PIN) 1234...
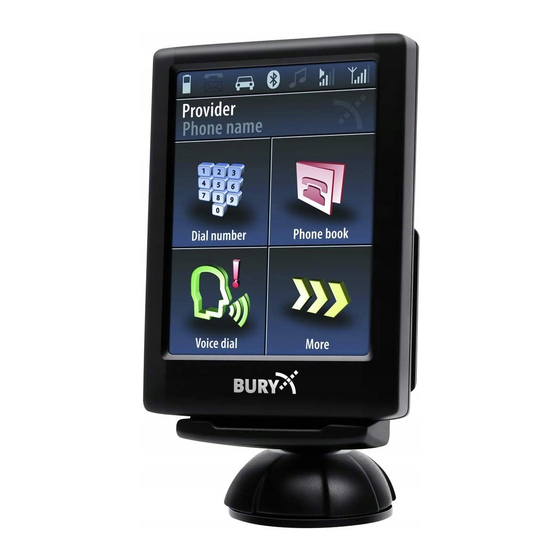
- Page 35 Hier können Sie eine Telefonnummer eingeben Hier können Sie das Telefonbuch öffnen You can enter a telephone number here You can open the telephone book here Zde můžete zadat telefonní číslo Zde můžete otevřít telefonní seznam Her kan indtastes et telefonnummer Her åbnes telefonbogen Aquí...
- Page 36 Operating guideline Tutaj można wybierać numer telefonu Tutaj można przejść do innych funkcji Aqui pode introduzir um número de telefone Aqui pode abrir a agenda telefónica Здесь Вы можете ввести номер телефона Здесь Вы можете открыть телефонную книгу Här kan du slå in ett telefonnummer Här kan du öppna telefonboken Burada bir telefon numarası...
- Page 37 Bedienung via Touchscreen Die Navigation erfolgt über die ggfs. vorhandenen Pfeiltasten. Mit den roten Symbolen können Sie Akti- onen abbrechen oder einen Schritt zurückgehen bzw. wenn Sie etwas länger drücken, kommen Sie direkt ins Hauptmenü zurück. Mit den grünen Symbolen werden Aktionen bestätigt oder ausgeführt.
- Page 38 Operating guideline Bediening via touchscreen Navigeren kunt u via de evt. aanwezige pijlknoppen. Met de rode symbolen kunt u handelingen afbreken of een stap teruggaan. Als u de knop iets langer ingedrukt houdt, komt u direct terug in het hoofdmenu. Met de groene symbolen worden handelingen bevestigd of uitgevoerd.
- Page 39 Zurück zur Sprache auswählen Weiter -> Einstellungen -> Gerät -> Sprache Back to choose language More -> Settings -> Device -> Language Zpět na volbu jazyka Dalši -> Nastaveni -> Přistroj -> Jazyk Tilbage til Vælg Sprog Videre -> Indstillinger -> Apparat -> Sprog Volver a la selección de idioma Siguiente ->...
- Page 40 Operating guideline כאן ניתן להזין מספר מכאן ניתן לפתוח טלפון את ספר הטלפונים הפעלת תוויות קוליות כאן ניתן לדפדף לתפקודים אחרים המגע מסך באמצעות תפעול מאפשרים לבטל פעולה או הסמלים האדומים ניתן לבצע את הפעולות באמצעות מקשי החצים מאפשרים קים הסמלים...
-
Page 41: Further Information
Eine ausführliche Bedienungsanleitung für die CC 9056 Plus finden Sie auf unserer Webseite unter der Adresse: www.bury.com Wir wünschen Ihnen eine gute Fahrt. A detailed instructions manual for the CC 9056 Plus is available on our website under the following address: www.bury.com Have a good trip! Podrobný... - Page 42 Further Information Le istruzioni per l’uso complete per il CC 9056 Plus sono contenute nel nostro sito internet, all’indirizzo: www.bury.com Vi auguriamo buon viaggio. Een uitvoerige handleiding voor de CC 9056 Plus vindt u op onze website: www.bury.com Wij wensen u een goede reis.
- Page 43 EXPRESS WARRANTY AGAINST DEFECTS – AUSTRALIA: This product if imported by Point to Point Distributions Pty Ltd is warranted in Australia to be free from any defect in material and workmanship, subject to the following terms and conditions. Who provides this warranty: Point to Point Distributions Pty Ltd Unit 9, 7-8 Len Thomas Place Narre Warren Vic, 3805.
- Page 44 Refurbished parts may be used to repair the goods. Upon validation of your warranty claim, PTP will send your replacement unit, freight paid and include a pre-paid return bag for the return of the faulty product. If you choose do not wish to proceed with the warranty claim, you must return the replacement unit to us using the pre-paid return bag.
- Page 46 שירות ואחריות תמיכה חברת רונלייט דיגיטל שון לציון רא יוסף ספיר ronlight il . 073-244-6060 11.2012 רסה ג 60.0000.0-01-271112...
- Page 47 Version 05/2013 60.0837.0-02-160513...