Publicité
Liens rapides
210x440.qxp
24/11/2008
14:48
Robinet à fermeture automatique temporisée pour
Lavabos PRESTOMA T 2000 et 2010
T
imed flow control taps for
Wash-basins PRESTOMAT 2000 and 2010
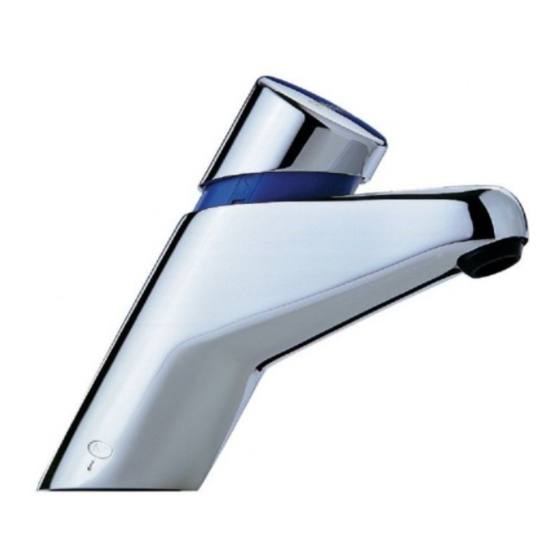
PRESTOMA T 2000
sur plage / basin-mounted
LES ROBINETS PRESTO
7, rue Racine - B.P. 551 - 92542 MONTROUGE Cedex FRANCE
Tél. : +33 (0) 1 46 12 34 56 - Fax : +33 (0) 1 40 92 00 12
Internet : http://www.presto.fr
FRANCAIS
1) Mise en service :
Il est absolument nécessaire de purger soigneusement les canalisations avant la
mise en service du robinet. Un dérèglement dans le fonctionnement du robinet ne
peut provenir que de débris, impuretées, etc.
dispositif de réglage de la temporisation
2)
• Un dispositif de réglage de la temporistion est incorporé dans la tête du robinet
(brevet PRESTO).
• Il permet, par rapport au réglage de livraison d'augmenter la temporisation d'environ
10% ou de la diminuer d'environ 40%.
démontage du bouton et jupe
3)
Accès au limiteur
4)
de débit :
6) Oter le limiteur
5) Démonter avec outil
avec une lame ou
spécial (90389).
un tournevis.
contrôle du débit par limiteur
8)
Ce robinet est équipé d'origine d'un limiteur automatique de débit situé dans le brise jet assu-
rant un débit de confort de 4 l/min environ pour une pression d'alimentation comprise entre 1
et 10 bar. En changeant ce limiteur, on peut obtenir des débits de 2, 3, 5, 6 l/min (sachets
pièces détachées).
Démontage du module hydraulique
9)
10) Dévisser le module avec une clé à
tube de 27 ou l'outil spécial.
Dispositif de réglage de la temporisation incorporé dans la tête du robinet
15)
Position de livraison N°1 donne la temporisation T1
16) Position
1
17) Butée
16) Position
2
19) Jupe
Position
2 2 0 0 ) )
1
2
3
4
Page 1
PRESTOMA T 2010
mural / wall mounted
Possibilité rallongé / Can be extended
PRESTOMAT 2000
PRESTOMAT 2010
3a) Oter la jupe
en tirant selon
son axe.
7) Changer le limiteur
et remonter.
Démontage cylindre-piston
11)
12) Appuyer
sur la tige
13) Bague de
réglage
14) Presser sur le cylindre
perpendiculairement aux
clips et tirer.
16) Position
18) Pour les positions 3 et
4 retourner la butée
16) Position
Temporisation
T1
T1 -15%
T1 -35%
T1 -55%
FRANCAIS
Contrôle du débit par
21)
bague de réglage
Ce contrôle doit être utilisé pour obtenir
un débit de confort à pression inférieure à
1 bar ou si on désire un débit supérieur à
6 l/min.
Oter le limiteur de débit (voir chapitre
"Accès au limiteur de débit")
Démonter le module hydraulique.
Positionner la bague de réglage selon le
débit désiré dans un cran d'arrêt.
NOTA - REGLAGE LIVRAISON S2
22)
16) POSITION
23) Ouverture visible
24) Débit à 1 bar en l/min.
25) Débit à 3 bar en l/min.
DEPANNAGE dans tous
26)
les cas d'anomalies de
fonctionnement
- Démonter le module hydraulique et net-
toyer le mécanisme à l'eau courante.
Le robinet ne se ferme pas
Vérifier
- la propreté du joint de clapet,
- le coulissement et le bon état du fil frein.
ENGLISH
1
IMPORTANT : Supplies must be flushed through before final connection.
1)
A disturbance in the functionning of the tap could only be due to debris, grids, etc..
Timing adjuster
2)
• There is a timing adjuster incorporated in the top of the tap (Presto patent).
• It enables the timing to be increased by 10% or decreased by 40%, compared to the standard
setting at delivery.
Disassembly of the button and the skirt
3)
3a) Remove the skirt by pulling it along its axis
Access flow regulator:
4)
Use a special tool to disassemble (90389).
5)
Remove the regulator with a blade or a screwdriver.
6)
Change the regulator and reassemble.
7)
flow regulator
8)
This valve is fitted at the factory with an automatic flow regulator located in the flow straightener
spout, providing a comfortable flow of about 4 litres/min at a pressure of between 1 and 10 bar.
By changing this flow regulator, flows of 2, 3, 5, 6 litres/min can be obtained (spare parts bags).
Disassembling the hydraulic module
9)
10) Unscrew the module using a 27 mm tube spanner or the special tool.
11) Cylinder-Piston disassembly
12) Press on the rod
13) Adjusting ring
14) Press on the cylinder at right angles to the clip and pull.
15) There is a timing adjuster incorporated in the top of the tap
Delivery position No. 1 provides timing T1
16) Position
17) Stop
18) For positions 3 and 4, turn the stop the other way round
19) Skirt
Position
20)
1
2
3
4
21) Flow rate contr ol with adjustig ring
This device should be used in case of running pressure below 1 bar or if a flow rate over 6 l/min. is required.
Remove the flow restrictor located in the flow straightener.
Pull out the hydraulic module.
Turn the adjusting ring forwards + or backwards - according to required flow rate.
22) TAP IS SUPPLIED ALREADY ADJUSTED IN POSITION S2
23) Visible aperture
24) Flow rate in l/min at 1 bar
25) Flow rate in l/min at 3 bar
What to do in case of any failure in the functionning
26)
- Pull out the hydraulic module and clean the mechanism under running water.
If tap doesn't shut off
- Check the cleanliness of the piston seal.
- Make sure the spindle spring slides freely in its aperture.
If tap shuts off too quickly
- Check the cleanliness of the sealing cap on the piston.
- Make sure the spindle spring is not damaged.
Protection against freezing
- After flushing of supplies press several times the push-button.
- Remove eventually the hydraulic module.
2
DEUTSCH
INBETRIEBNAHME : Vor Einbau und Inbetriebnahme der Ventile sind unbedingt die Leitungen
1)
zu spülen, denn nur Schmutzpartikel können Fehlfunktionen der Armaturen verursachen.
Einstellvorrichtung der Verzögerung
2)
• Eine Einstellvorrichtung der Verzögerung ist im Kopf des Wasserhahns eingebaut (Presto-
Patent).
• Damit kann die werksseitige Einstellung der Verzögerung um ca. 10% erhöht oder um ca. 40%
gesenkt geändert werden.
Ausbau des Knopfes und der Platte.
3)
3a) Entfernen Sie die Platte, indem Sie sie entlang ihrer Achse ziehen.
Zugang zum Mengenregler:
4)
Bauen Sie sie mit dem Spezialwerkzeug (90389) aus.
5)
Regler mit einem Schraubendre-her oder einer Klinge entfernen.
6)
Regler auswechseln und wieder einbauen.
7)
Durchflußkontrolle durch Mengenregler
8)
Dieses Ventil ist vom Werk aus mit einem automatischen Durchflußmengenregler im Strahlregler
ausgestattet, der einen Komfortdurchfluß von ca. 4 l/min bei einem Ließdruck zwischen 1 und 10
Bar gewährleistet.
Durch Auswechseln dieses Mengenreglers läßt sich ein Durchfluß von 2, 3, 5, 6 l/min erhalten
(Ersatzteilbeutel).
Demontage des Hydraulikmoduls
9)
10) Schrauben Sie das Modul mit einem 27er-Rohrschlüssel oder dem Spezialwerkzeug los.
11) Zerlegen des Kolben
12) Auf die Spindel drücken
13) Einstellring
14) Senkrecht zu den Clips auf den Kolben drücken und ziehen.
15) Einstellvorrichtung der Verzögerung im Kopf des Hahns eingebaut.
Lieferposition Nr. 1 entspricht der Verzögerung T1.
3
16) Position
17) Oberer Ring
18) Für Positionen 3 und 4 kehren Sie zum Anschlag zurück.
19) Unterer Ring
Position
20)
1
2
3
4
21) Durchflussmengen- Einstellung durch Einstellring
Eine Änderung der Durchflußmenge ist zweckmässig bei einem Wasserdruck weniger als 1 bar oder
wenn mehr als 6 l/min Durchfluß gewünscht werden.
Durchfluß - Mengenregler entfernen.
4
Oberteil abschrauben
Einstellring je nach gewünschter Durchflußmenge einstellen
22) NB - WERKSEINSTELLUNG S2
23) Sichtbare Öffnung
24) Durchfluss unter 1 bar in l/min
25) Durchfluss unter 3 bar in l/min
26) PANNENHILFE für jede Fehlfunktion
- Oberteil ausbauen und unter fließendem Wasser säubern.
Das Ventil schliesst nicht
Prüfen Sie : - ob der Kolben – O - Ring sauber ist.
- ob die Reinigungsnadel richtig arbeitet.
Das Ventil schliesst zu schnell
Prüfen Sie :
- ob die Lippendichtung des Kolbens sauber ist.
- ob die Reinigungsnadel in die Spritzdüsenöffnung des Kolbens richtig eingeführt wird und ob sie
nicht gebrochen ist.
Frostschutz
- Nach Entleeren der Zuleitung mehrmals den Knopf betätigen.
- Wenn nötig Oberteil abschrauben.
PRESTOMAT 2000
PRESTOMAT 2010
S1
S2
S3
2
4
6
4
7
11
Le robinet se ferme trop rapidement
Vérifier
- la propreté de la calotte d'étanchéité
du piston,
- la présence et l'état du fil frein
(cassé).
Protection contre le gel
- Appuyer plusieurs fois sur le bouton
après vidange.
- Eventuellement enlever le module
hydraulique.
PRESTOMAT 2000
basin-mounted
PRESTOMAT 2010
wall mounted / Can be extended
Flush time
T1
T1 -15%
T1 -35%
T1 -55%
PRESTOMAT 2000
Einbau auf Armaturenbank
PRESTOMAT 2010
Wandmontage
Spülzeitschaltung
T1
T1 -15%
T1 -35%
T1 -55%
3
S4
S5
8
10
14
18
/
Verlängerung möglich
Publicité

Manuels Connexes pour Presto MAT 2000


Sommaire des Matières pour Presto MAT 2000
- Page 1 Timing adjuster mise en service du robinet. Un dérèglement dans le fonctionnement du robinet ne • There is a timing adjuster incorporated in the top of the tap (Presto patent). peut provenir que de débris, impuretées, etc. • It enables the timing to be increased by 10% or decreased by 40%, compared to the standard setting at delivery.
- Page 2 Afstelmechanisme van de vertraging • Een afstelmechanisme van de vertraging is ingebouwd in de kraankop (octrooi Presto). • Hiermee kan, met betrekking tot de afstelling van de voeding, de vertraging worden verhoogd met ongeveer 10 % of verlaagd met ongeveer 40 %.