Publicité
Liens rapides
OIO84A00FB
NL Gebruiksaanwijzing | Kookplaat
EN User Manual | Hob
FR Notice d'utilisation | Table de cuisson
DE Benutzerinformation | Kochfeld
IT
Istruzioni per l'uso | Piano cottura
ES Manual de instrucciones | Placa de cocción
aeg.com\register
aeg.com/register
2
24
44
66
90
112
Publicité

Manuels Connexes pour AEG OIO84A00FB


Sommaire des Matières pour AEG OIO84A00FB
- Page 1 NL Gebruiksaanwijzing | Kookplaat EN User Manual | Hob FR Notice d'utilisation | Table de cuisson DE Benutzerinformation | Kochfeld Istruzioni per l’uso | Piano cottura ES Manual de instrucciones | Placa de cocción OIO84A00FB aeg.com\register...
- Page 2 Welkom bij AEG! Hartelijk dank dat je voor onze apparatuur hebt gekozen. Advies over gebruik, brochures, het oplossen van problemen, service- en reparatie- informatie: www.aeg.com/support Wijzigingen voorbehouden. INHOUDSOPGAVE 1. VEILIGHEIDSINFORMATIE................2 2. VEILIGHEIDSVOORSCHRIFTEN..............5 3. INSTALLATIE....................7 4. BESCHRIJVING VAN HET PRODUCT............9 5.
- Page 3 worden gehouden, tenzij ze voortdurend onder toezicht staan. • Houd toezicht op kinderen, om te voorkomen dat zij gaan spelen met het apparaat. • Houd alle verpakking uit de buurt van kinderen en gooi het op passende wijze weg. • WAARSCHUWING: Het apparaat en de toegankelijke onderdelen ervan worden heet tijdens het gebruik.
- Page 4 het elektriciteitsbedrijf regelmatig aan en uit wordt geschakeld. • OPGELET: Tijdens het kookproces moet u in de buurt blijven Een kort kookproces moet voortdurend bewaakt worden. • WAARSCHUWING: Brandgevaar: Bewaar geen voorwerpen op de kookoppervlakken. • Metalen voorwerpen, zoals messen, vorken, lepels en deksels mogen niet op het oppervlak van de kookplaat worden geplaatst, aangezien ze heet kunnen worden.
- Page 5 2. VEILIGHEIDSVOORSCHRIFTEN 2.1 Installeren 2.2 Elektrische aansluiting WAARSCHUWING! WAARSCHUWING! Alleen een erkende installatietechnicus Gevaar voor brand en elektrische mag dit apparaat installeren. schokken. • Alle elektrische aansluitingen moeten WAARSCHUWING! worden uitgevoerd door een Gevaar voor letsel of schade aan het gekwalificeerde elektricien.
- Page 6 • Als het stopcontact los zit, mag u de • Als u voedsel in hete olie plaatst, kan het stekker niet in het stopcontact steken. spatten. • Trek niet aan het netsnoer om het • Gebruik geen aluminiumfolie of andere apparaat los te koppelen.
- Page 7 • Schakel het apparaat uit en laat het fysieke omstandigheden in huishoudelijke afkoelen voordat u het schoonmaakt. apparaten, zoals temperatuur, trillingen, • Gebruik geen waterstralen en stoom om vochtigheid, of zijn bedoeld om informatie het apparaat te reinigen. te geven over de operationele status van •...
- Page 8 3. Sluit de uiteinden van zwarte en bruine 2. Verwijder een deel van de isolatie van de kabels aan. blauwe kabeluiteinden. 4. Breng een nieuwe draadeindhuls aan op 3. Sluit de uiteinden van twee blauwe kabels het uiteinde van de gedeelde draad aan.
- Page 9 Zoek de videotutorial "Hoe installeert u uw bevinden tijdens het bereidingsproces AEG inductiekookplaat - installatie op het opwarmen. aanrecht" door de volledige naam die in de onderstaande afbeelding staat in te typen.
- Page 10 4.2 Indeling van het bedieningspaneel Gebruik de tiptoetsen om het apparaat te bedienen. De displays, indicatielampjes en geluiden tonen welke functies worden gebruikt. Tiptoets Functie Opmerking Aan/Uit De kookplaat in- en uitschakelen. Blokkering / Kinderbeveili‐ Het bedieningspaneel vergrendelen/ontgrendelen. gingsinrichting Pauze De functie in- en uitschakelen.
- Page 11 Scherm Beschrijving PowerBoost werkt. Er is een storing. + cijfer OptiHeat Control (3-staps restwarmte-indicator): doorgaan met koken / warmhoud‐ stand / restwarmte. Blokkering / Kinderbeveiligingsinrichting werkt. Het kookgerei is niet geschikt of te klein, of er is geen kookgerei op de kookzone ge‐ plaatst.
- Page 12 • u iets hebt gemorst of iets langer dan 10 De inductiekookzones creëren de voor het seconden op het bedieningspaneel hebt kookproces benodigde warmte rechtstreeks gelegd (een pan, doek, etc.). Er klinkt een in de bodem van het kookgerei. Het geluidssignaal en de kookplaat wordt glaskeramiek wordt verwarmd door de uitgeschakeld.
- Page 13 inductiekookzone automatisch Om de kookzone in te stellen: tik teruggeschakeld naar de hoogste kookstand. herhaaldelijk op totdat het lampje van een kookzone verschijnt. Om de functie te activeren: tik op van de Zie het hoofdstuk 'Technische gegevens'. timer. verschijnt. Als het lampje van de Om de functie voor een kookzone in te kookzone gaat knipperen, wordt de tijd schakelen: raak...
- Page 14 2. Om de functie uit te schakelen, druk op branden. Raak van de timer aan om één van het volgende te kiezen: De vorige kookstand verschijnt. • - de signalen zijn uit • - de signalen zijn aan 6.9 Blokkering Om uw keuze te bevestigen moet u wachten U kunt het bedieningspaneel vergrendelen tot de kookplaat automatisch uitschakelt.
- Page 15 Automa‐ Koken 1) Bakken 2) tisch lampje Ventilator‐ snelheid 1 Ventilator‐ Ventilator‐ snelheid 1 snelheid 1 Ventilator‐ Ventilator‐ snelheid 1 snelheid 2 Ventilator‐ Ventilator‐ snelheid 2 snelheid 3 6.13 Hob²Hood De kookplaat detecteert het kookproces en activeert Het is een geavanceerde automatische de ventilatorsnelheid overeenkomstig de automatische functie die de kookplaat op een speciale kap modus.
- Page 16 ventilatorsnelheid handmatig wijzigen. Als je Het lampje inschakelen Je kunt de kookplaat instellen om het licht drukt, wordt de ventilatorsnelheid met automatisch te activeren wanneer je de één verhoogd. Als je een intensief niveau kookplaat activeert. Zet daarvoor de bereikt en weer op drukt, stel je de automatische modus op H1 –...
- Page 17 bedieningspaneel of onbedoeld de • klikken: er treedt elektrische schakeling kookplaatfuncties activeren. • sissen, zoemen: de ventilator werkt. • ritmisch geluid: kookgerei wordt gedetecteerd. Raadpleeg de technische gegevens. 7.3 Öko Timer (Eco-timer) 7.2 Geluiden tijdens bedrijf Om energie te besparen, wordt de verwarming van de kookzone uitgeschakeld voordat de afteltimer klinkt.
- Page 18 Voor het volledige assortiment afzuigkappen afzuigkap niet af. dat met deze functie werkt, raadpleeg je onze • Onderbreek het signaal tussen de website van de consument. De AEG- kookplaat en de afzuigkap niet afzuigkappen die met deze functie werken, (bijvoorbeeld met een hand, een handgreep van een pan of een grote pan).
- Page 19 8. ONDERHOUD EN REINIGING 8.2 Het kookplaat reinigen WAARSCHUWING! • Verwijder onmiddellijk: gesmolten Raadpleeg de hoofdstukken Veiligheid. kunststof, plastic folie, zout, suiker en suikerhoudend voedsel, anders kan dit 8.1 Algemene informatie schade aan de kookplaat veroorzaken. Doe voorzichtig om brandwonden te •...
- Page 20 Probleem Mogelijke oorzaak Oplossing Je hebt 2 of meer sensorvelden te‐ Raak slechts één sensorveld aan. gelijkertijd aangeraakt. Pauze is in werking. Zie "Pause". Water of vetvlekken op het bedie‐ Reinig het bedieningspaneel. ningspaneel. Je kunt een constant piepgeluid De elektrische aansluiting is ver‐ Trek de stekker van de kookplaat uit horen.
- Page 21 (bevindt zich in de hoek van het glazen oppervlak) en een 10. TECHNISCHE GEGEVENS 10.1 Typeplaatje Model OIO84A00FB: PNC 949 598 355 00 Type 62 D4A 01 AA 220 - 240 V / 400 V 2N, 50 - 60 Hz Inductie 7.2 kW...
- Page 22 Gebruik voor een optimale warmteoverdracht en kookresultaat kookgerei met een 11. ENERGIEZUINIGHEID 11.1 Productinformatie volgens de EU Ecodesign regulering Modelnummer OIO84A00FB Type kookplaat Inbouwkookplaat Aantal kookzones Verwarmingstechnologie Inductie Diameter van ronde kookzones (Ø) Links voor 21.0 cm...
- Page 23 12. MILIEUBESCHERMING Gooi apparaten gemarkeerd met het symbool Recycleer de materialen met het symbool niet weg met het huishoudelijk afval. Gooi de verpakking in een geschikte Breng het product naar het milieustation bij u afvalcontainer om het te recycleren. in de buurt of neem contact op met de Bescherm het milieu en de volksgezondheid gemeente.
- Page 24 Welcome to AEG! Thank you for choosing our appliance. Get usage advice, brochures, troubleshooting, service and repair information: www.aeg.com/support Subject to change without notice. CONTENTS 1. SAFETY INFORMATION................24 2. SAFETY INSTRUCTIONS................26 3. INSTALLATION.....................28 4. PRODUCT DESCRIPTION................31 5. BEFORE FIRST USE..................32 6.
- Page 25 • Children should be supervised to ensure that they do not play with the appliance. • Keep all packaging away from children and dispose of it appropriately. • WARNING: The appliance and its accessible parts become hot during use. Keep children and pets away from the appliance when in use and when cooling down.
- Page 26 • Metallic objects such as knives, forks, spoons and lids should not be placed on the hob surface since they can get hot. • Do not use the appliance before installing it in the built-in structure. • Do not use a steam cleaner to clean the appliance. •...
- Page 27 – Do not store any small pieces or • If the mains socket is loose, do not sheets of paper that could be pulled in, connect the mains plug. as they can damage the cooling fans • Do not pull the mains cable to disconnect or impair the cooling system.
- Page 28 • Switch off the appliance and let it cool WARNING! down before cleaning. • Do not use water spray and steam to Risk of fire and explosion. clean the appliance. • Fats and oil when heated can release • Clean the appliance with a moist soft flammable vapours.
- Page 29 • To replace the damaged mains cable, use One-phase connection the cable type: H05V2V2-F which 1. Remove the cable end sleeve from black, withstands a temperature of 90 °C or brown and blue wires. higher. A single wire must have a minimal 2.
- Page 30 Find the video tutorial "How to install your AEG Induction Hob - Worktop installation" by typing out the full name indicated in the graphic below. www.youtube.com/electrolux www.youtube.com/aeg min. min. 500mm How to install your AEG 50mm Induction Hob - Worktop installation...
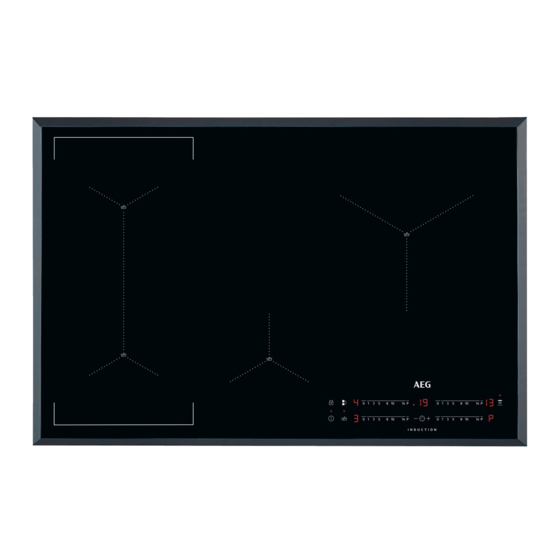
- Page 31 4. PRODUCT DESCRIPTION 4.1 Cooking surface layout Induction cooking zone Control panel 4.2 Control panel layout Use the sensor fields to operate the appliance. The displays, indicators and sounds tell which functions operate. Sensor Function Comment field On / Off To activate and deactivate the hob.
- Page 32 Sensor Function Comment field To select the cooking zone. To increase or decrease the time. PowerBoost To activate the function. Control bar To set a heat setting. 4.3 Heat setting displays Display Description The cooking zone is deactivated. The cooking zone operates. Pause operates.
- Page 33 • P25 — 2500 W CAUTION! • P30 — 3000 W • P35 — 3500 W Make sure that the selected power fits • P40 — 4000 W the house installation fuses. • P45 — 4500 W • P72 — 7200 W •...
- Page 34 You can use this function to set the length of - keep warm, a single cooking session. - residual heat. First set the heat setting for the cooking zone, then set the function. The indicator may also appear: • for the neighbouring cooking zones even if To set the cooking zone: touch you are not using them, repeatedly until the indicator of a cooking...
- Page 35 6.10 Child Safety Device To deactivate the function: touch This function prevents an accidental then touch . The indicator of the operation of the hob. cooking zone disappears. To activate the function: activate the hob • Minute Minder You can use this function when the hob is with .
- Page 36 • Cooking zones are grouped according to the location and number of the phases in the hob. Each phase has a maximum For most of the hoods the remote system electricity loading (3700 W). If the hob is originally deactivated. Activate it before reaches the limit of maximum available you use the function.
- Page 37 raise the fan speed by one. When you reach an intensive level and press again you will To operate the hood directly on the hood set fan speed to 0 which deactivates the hood panel deactivate the automatic mode of fan.
- Page 38 generated by the cooking zone which is made of different materials (a sandwich results in slower heating. construction). – For both safety reasons and optimal • humming: you use a high power level. cooking results, do not use cookware Hob-related noises: larger than indicated in "Cooking •...
- Page 39 • Do not interrupt the signal between the work with this function refer to our consumer hob and the hood (e.g. with the hand, a website. The AEG cooker hoods that work cookware handle or a tall pot). See the picture.
- Page 40 • Scratches or dark stains on the surface otherwise, the dirt can cause damage to have no effect on how the hob operates. the hob. Take care to avoid burns. Use a • Use a special cleaning agent suitable for special hob scraper on the glass surface the surface of the hob.
- Page 41 Problem Possible cause Remedy An acoustic signal sounds and You put something on one or more Remove the object from the sensor the hob deactivates. sensor fields. fields. An acoustic signal sounds when the hob is deactivated. The hob deactivates. You put something on the sensor Remove the object from the sensor field.
- Page 42 10. TECHNICAL DATA 10.1 Rating plate Model OIO84A00FB PNC 949 598 355 00 Typ 62 D4A 01 AA 220 - 240 V / 400 V 2N, 50 - 60 Hz Induction 7.2 kW Made in: Germany Ser.Nr.
- Page 43 Heating technology Induction Diameter of circular cooking zones (Ø) Left front 21.0 cm Left rear 21.0 cm Right front 21.0 cm Right rear 21.0 cm Energy consumption per cooking zone (EC electric Left front 179.6 Wh/kg cooking) Left rear 177.0 Wh/kg Right front 188.8 Wh/kg Right rear...
- Page 44 Bienvenue chez AEG ! Nous vous remercions d’avoir choisi l’un de nos appareils. Obtenir des conseils d’utilisation, des brochures, un dépanneur, des informations sur le service et les réparations : www.aeg.com/support Sous réserve de modifications. TABLE DES MATIÈRES 1. INFORMATIONS DE SÉCURITÉ..............44 2.
- Page 45 comprennent les risques encourus. Les enfants de moins de 8 ans et les personnes ayant un handicap très important et complexe doivent être tenus à l'écart de l’appareil, à moins d'être surveillés en permanence. • Veillez à ce que les enfants ne jouent pas avec l’appareil. •...
- Page 46 • AVERTISSEMENT : L'appareil ne doit pas être branché à l'alimentation en utilisant un appareil de connexion externe comme un minuteur, ou branché à un circuit qui est régulièrement activé/désactivé par un fournisseur d'énergie. • ATTENTION : Le processus de cuisson doit être supervisé Une cuisson courte doit être surveillée en permanence.
- Page 47 2. CONSIGNES DE SÉCURITÉ 2.1 Installation 2.2 Branchement électrique AVERTISSEMENT! AVERTISSEMENT! L’appareil doit être installé uniquement Risque d'incendie ou d'électrocution. par un professionnel qualifié. • Tous les raccordements électriques doivent être effectués par un électricien AVERTISSEMENT! qualifié Risque de blessure ou de dommages •...
- Page 48 • Ne tirez pas sur le câble secteur pour • N’utilisez que les accessoires débrancher l'appareil. Tirez toujours sur la recommandés pour cet appareil par le fiche de la prise secteur. fabricant. • N'utilisez que des systèmes d'isolation AVERTISSEMENT! appropriés : des coupe-circuits, des fusibles (les fusibles à...
- Page 49 • Nettoyez l’appareil avec un chiffon doux et température, les vibrations, l’humidité, ou humide. Utilisez uniquement des produits sont conçues pour signaler des de lavage neutres. N’utilisez pas de informations sur le statut opérationnel de produits abrasifs, de tampons à récurer, l’appareil.
- Page 50 4. Appliquez un nouveau manchon 2. Retirez une partie de l’isolation des d'extrémité à l'extrémité des fils partagés extrémités des câbles bleu. (outil spécial requis). 3. Branchez les extrémités des deux câbles 5. Branchez les extrémités des deux câbles bleus. bleus.
- Page 51 Consultez le tutoriel vidéo « Comment installer votre table de cuisson à induction AEG - Installation du plan de travail » en tapant le nom complet indiqué dans le graphique ci-dessous. www.youtube.com/electrolux min. 50 www.youtube.com/aeg How to install your AEG Induction Hob - Worktop installation min.
- Page 52 Les touches sensitives permettent de faire fonctionner l'appareil. Les affichages, les voyants et les signaux sonores indiquent les fonctions activées. Touche Fonction Commentaire sensitive En fonctionnement/A l’arrêt Pour allumer et éteindre la table de cuisson. Touches Verrouil/ Dispositif Pour verrouiller ou déverrouiller le bandeau de com‐ de sécurité...
- Page 53 Afficheur Description Arrêt automatique est activé. 5. AVANT LA PREMIÈRE UTILISATION 4. Appuyez sur . P72 apparaît. AVERTISSEMENT! 5. Appuyez sur du minuteur pour Reportez-vous aux chapitres concernant régler le niveau de puissance. la sécurité. Niveaux de puissance 5.1 Limitation de puissance Reportez-vous au chapitre «...
- Page 54 cuisson. Au bout de quelques instants, - chaleur résiduelle. s'allume et la table de cuisson s'éteint. L’indicateur peut également s’allumer : La relation entre le niveau de cuisson et la • pour les zones de cuisson voisines, même durée après laquelle la table de cuisson si vous ne les utilisez pas, s'éteint : •...
- Page 55 Pour désactiver la fonction : modifiez le ce que l'indicateur d’une zone de cuisson niveau de cuisson. apparaisse. Pour activer la fonction : appuyez sur la 6.7 Minuteur touche du minuteur. apparaît. Lorsque • Minuteur à rebours le voyant de la zone de cuisson commence à Vous pouvez utiliser cette fonction pour régler clignoter, le minuteur démarre.
- Page 56 pouvez utiliser la table de cuisson. Lorsque s’affiche. Le niveau de cuisson est réduit à vous éteignez la table de cuisson avec , la 2. Pour désactiver la fonction, appuyez fonction est de nouveau activée. 6.11 OffSound Control (Activation et Le réglage précédent du niveau de cuisson désactivation des signaux sonores) apparaît.
- Page 57 précédemment activées dans l’ordre Utiliser automatiquement la fonction inverse de sélection. Pour utiliser la fonction automatiquement, • L’affichage du niveau de cuisson des réglez le mode automatique sur H1 – H6. La zones réduites oscille entre le niveau de table de cuisson est initialement réglée sur cuisson sélectionné...
- Page 58 ventilateur. En appuyant sur la touche , la vitesse du ventilateur est augmentée d'un Pour faire fonctionner la hotte palier. Lorsque vous atteignez un niveau directement depuis le panneau de la intensif et que vous appuyez sur la touche hotte, désactivez le mode automatique à...
- Page 59 « Caractéristiques des zones de cuisson » Bruits liés aux récipients : pour connaître les dimensions correctes • craquement : le récipient est composé de des récipients. Placez le récipient au différents matériaux (conception centre de la zone de cuisson sélectionnée. «...
- Page 60 Réglages de la Utilisez pour : Durée Conseils température (min) 1 - 3 Sauce hollandaise ; faire fondre : beur‐ 5 - 25 Mélangez de temps en temps. re, chocolat, gélatine. 2 - 3 Solidifier : omelettes, œufs cocotte. 10 - 40 Cuisinez avec un couvercle.
- Page 61 à notre site Web. Les hottes AEG dotées de cette fonction doivent afficher le D'autres appareils contrôlés à distance symbole peuvent bloquer le signal. N'utilisez pas ce type d'appareil à proximité de la table de cuisson lorsque Hob²Hood est actif.
- Page 62 9.1 Que faire si... Problème Cause possible Solution Vous ne pouvez pas activer la ta‐ La table de cuisson n’est pas bran‐ Vérifiez que la table de cuisson est ble de cuisson ni la faire fonction‐ chée à une source d’alimentation correctement branchée à...
- Page 63 (situé dans le coin de la surface en verre) et 10. CARACTÉRISTIQUES TECHNIQUES 10.1 Plaque signalétique Modèle OIO84A00FB: PNC 949 598 355 00 Type 62 D4A 01 AA 220 - 240 V / 400 V 2N, 50 à 60 Hz...
- Page 64 à celui 11. RENDEMENT ÉNERGÉTIQUE 11.1 Informations produits conformément aux réglementations d’écoconception de l’UE Identification du modèle OIO84A00FB Type de table de cuisson Plan de cuisson intégré Nombre de zones de cuisson Technologie de chauffage Induction Diamètre des zones de cuisson circulaires (Ø)
- Page 65 11.2 Économie d'énergie • Placez les récipients directement au centre de la zone de cuisson. Vous pouvez économiser de l’énergie • Utilisez la chaleur résiduelle pour garder pendant la cuisson quotidienne si vous suivez les aliments au chaud ou pour les faire les conseils ci-dessous.
- Page 66 Willkommen bei AEG! Danke, dass Sie sich für unser Gerät entschieden haben. Um Anwendungshinweise, Prospekte, Informationen zu Fehlerbehebung, Service und Reparatur zu erhalten: www.aeg.com/support Änderungen vorbehalten. INHALTSVERZEICHNIS 1. SICHERHEITSHINWEISE................66 2. SICHERHEITSANWEISUNGEN..............69 3. MONTAGE....................71 4. GERÄTEBESCHREIBUNG................74 5. VOR DER ERSTEN VERWENDUNG............75 6.
- Page 67 Gerät sicher zu bedienen ist und welche Gefahren bei nicht ordnungsgemäßer Bedienung bestehen. Kinder unter 8 Jahren und Personen mit schweren Behinderungen oder Mehrfachbehinderung sollten vom Gerät ferngehalten werden, wenn sie nicht ständig beaufsichtigt werden. • Kinder sollten beaufsichtigt werden, um sicherzustellen, dass sie nicht mit dem Gerät.
- Page 68 Sie das Gerät aus und löschen Sie Flammen beispielsweise mit einer Löschdecke oder einem Deckel. • WARNUNG: Das Gerät darf nicht durch ein externes Schaltgerät, wie eine Zeitschaltuhr, mit Strom versorgt oder an einen Schaltkreis angeschlossen werden, der von einem Programm regelmäßig ein- und ausgeschaltet wird.
- Page 69 2. SICHERHEITSANWEISUNGEN 2.1 Montage • Entfernen Sie Trennplatten, die im Küchenmöbel unter dem Gerät installiert sind. WARNUNG! Nur eine qualifizierte Fachkraft darf die 2.2 Elektrischer Anschluss Montage des Geräts vornehmen. WARNUNG! WARNUNG! Brand- und Stromschlaggefahr. Andernfalls besteht Verletzungsgefahr und das Gerät könnte beschädigt •...
- Page 70 müssen so befestigt werden, dass sie • Ist die Oberfläche des Geräts gesprungen, nicht ohne Werkzeug entfernt werden trennen Sie das Gerät sofort von der können. Stromversorgung. So vermeiden Sie einen • Stecken Sie den Netzstecker erst nach elektrischen Schlag. Abschluss der Montage in die Steckdose.
- Page 71 • Schalten Sie die Kochzonen nicht mit Dabei dürfen ausschließlich leerem Kochgeschirr oder ohne Originalersatzteile verwendet werden. Kochgeschirr ein. • Bezüglich der Lampe(n) in diesem Gerät • Kochgeschirr aus Gusseisen oder mit und separat verkaufter Ersatzlampen: einem beschädigten Boden kann Kratzer Diese Lampen müssen extremen an dem Glas / der Glaskeramik physikalischen Bedingungen in...
- Page 72 4. Bringen Sie eine neue Aderendhülse am VORSICHT! Ende des gemeinsamen Drahts an (Spezialwerkzeug erforderlich). Verbindungen über Kontaktstecker sind 5. Verbinden Sie die Enden zweier blauer verboten. Kabel. 6. Bringen Sie eine neue Aderendhülse am VORSICHT! Ende des gemeinsamen Drahts an Bohren oder löten Sie die Kabelenden (Spezialwerkzeug erforderlich).
- Page 73 Sie finden das Video-Tutorial „So installieren Sie Ihr AEG Induktionskochfeld - Arbeitsflächeninstallation“, indem Sie den vollständigen Namen eingeben, der in der folgenden Grafik angegeben ist. www.youtube.com/electrolux min. www.youtube.com/aeg min. 500mm 50mm How to install your AEG Induction Hob - Worktop installation Ist das Gerät über einer Schublade installiert,...
- Page 74 4. GERÄTEBESCHREIBUNG 4.1 Anordnung der Kochflächen Induktionskochzone Bedienfeld 4.2 Bedienfeldlayout Bedienen Sie das Gerät über die Sensorfelder. Die Anzeigen, Kontrolllampen und akustischen Signale informieren Sie über die aktiven Funktionen. Sensorfeld Funktion Kommentar Ein / Aus Ein- und Ausschalten des Kochfeldes. Sperren / Kindersicherung Verriegeln / Entriegeln des Bedienfelds.
- Page 75 Sensorfeld Funktion Kommentar Auswählen der Kochzone. Erhöhen oder Verringern der Zeit. PowerBoost Einschalten der Funktion. Einstellskala Einstellen der Kochstufe. 4.3 Anzeige der Kochstufen Display Beschreibung Die Kochzone ist ausgeschaltet. Die Kochzone ist eingeschaltet. Pause ist eingeschaltet. Automatisches Aufheizen ist eingeschaltet. PowerBoost ist eingeschaltet.
- Page 76 • P25 — 2500 W VORSICHT! • P30 — 3000 W • P35 — 3500 W Achten Sie darauf, dass die gewählte • P40 — 4000 W Leistungsstufe für die Sicherungen in der • P45 — 4.500 W Hausinstallation geeignet ist. •...
- Page 77 Die Anzeigen erscheinen, wenn eine Kochzone heiß ist. Sie zeigen den Restwärmegrad der Kochzonen an, die Sie Siehe Kapitel „Technische Daten“. gerade verwenden: Einschalten der Funktion für eine – Kochen fortsetzen, Kochzone: Berühren Sie leuchtet auf. – Warmhalten, Ausschalten der Funktion: Ändern Sie die Kochstufe.
- Page 78 Mit dieser Funktion können Sie feststellen, Die Funktion unterbricht nicht die Timer- wie lange eine Kochzone bereits in Betrieb Funktionen. ist. 1. Zum Aktivieren der Funktion: Drücken Auswählen der Kochzone: Berühren Sie wiederholt, bis die Anzeige der gewünschten leuchtet. Die Kochstufe wird auf 1 Kochzone erscheint.
- Page 79 Sekunden lang. Stellen Sie die Kochstufe zuvor eingeschalteten Kochzonen in innerhalb von 10 Sekunden ein. Das umgekehrter Reihenfolge aufgeteilt. Kochfeld kann jetzt bedient werden. Wenn • Die Kochstufenanzeige der reduzierten Zonen wechselt zwischen der anfangs Sie das Kochfeld mit ausschalten, wird gewählten Kochstufe und der reduzierten diese Funktion wieder eingeschaltet.
- Page 80 ein. Das Kochfeld ist ursprünglich eingestellt auf H5. Die Dunstabzughaube reagiert, wenn Sie das Kochfeld bedienen. Das Kochfeld Schalten Sie den Automatikmodus der misst die Temperatur des Kochgeschirrs Funktion aus, um die Dunstabzugshaube automatisch und passt die Geschwindigkeit direkt einzuschalten. des Lüfters an.
- Page 81 7. TIPPS UND HINWEISE • Die Kochzoneneffizienz hängt vom WARNUNG! Durchmesser des Kochgeschirrs ab. Verwenden Sie für eine optimale Siehe Kapitel Sicherheitshinweise. Wärmeübertragung Kochgeschirr mit einem Bodendurchmesser, der der Größe 7.1 Kochgeschirr der Kochzone entspricht (d. h. der maximale Kochgeschirrdurchmesserwert in „Technische Daten“...
- Page 82 unterschiedlichen Materialien Kochstufe und der Dauer des Garvorgangs (Sandwichkonstruktion). • Summen: Sie haben die Kochzone auf 7.4 Vereinfachter Kochleitfaden eine hohe Stufe geschaltet. Kochfeldbezogene Geräusche: Das Verhältnis zwischen der Kochstufe und • Klicken: Elektrisches Umschalten:. dem Energieverbrauch der Kochzone ist nicht •...
- Page 83 Dunstabzugshauben, die mit dieser Funktion nicht ab. ausgestattet sind, finden Sie auf unserer • Unterbrechen Sie den Signalfluss Kunden-Website. AEG Dunstabzugshauben, zwischen dem Kochfeld und der die mit dieser Funktion ausgestattet sind, Dunstabzugshaube nicht (z. B. mit der Hand, einem Kochgeschirrgriff oder haben das Symbol großen Topf).
- Page 84 8.2 Reinigen der Kochfelds metallische Verfärbung. Reinigen Sie das Kochfeld mit einem feuchten Tuch und • Sofort entfernen: Geschmolzenen einem nicht scheuernden Kunststoff, Plastikfolie, Salz, Zucker und Reinigungsmittel. Wischen Sie das Lebensmittel mit Zucker, sonst kann der Kochfeld nach der Reinigung mit einem Schmutz das Kochfeld beschädigen.
- Page 85 Störung Mögliche Ursache Problembehebung Das Kochfeld wird ausgeschaltet. Sie haben etwas auf das Sensorfeld Entfernen Sie den Gegenstand von dem Sensorfeld. gestellt. Die Restwärmeanzeige funktio‐ Die Kochzone ist nicht heiß, da sie Wenn die Kochzone lange genug be‐ niert nicht. nur kurze Zeit in Betrieb war oder trieben wurde, um heiß...
- Page 86 Garantiebroschüre. Ecke der Glasoberfläche) und eine 10. TECHNISCHE DATEN 10.1 Typenschild Modell OIO84A00FB Produkt-Nummer (PNC) 949 598 355 00 Typ 62 D4A 01 AA 220 - 240 V / 400 V 2N, 50 - 60 Hz Induktion 7.2 kW Hergestellt in: Deutschland Ser.-Nr.
- Page 87 Tabelle). Verwenden Sie kein Kochgeschirr, das größer als der Durchmesser der Kochzone ist. 11. ENERGIEEFFIZIENZ 11.1 Produktinformationen gemäß der Ökodesign-Richtlinie der EU Modellbezeichnung OIO84A00FB Kochfeldtyp Einbau-Kochfeld Anzahl der Kochzonen Heiztechnik Induktion Durchmesser der kreisförmigen Kochzonen (Ø) Vorne links 21.0 cm Hinten links 21.0 cm...
- Page 88 Rücknahmepflichten der Vertreiber in Deutschland Wer auf mindestens 400 m² Verkaufsfläche Elektro- und Elektronikgeräte vertreibt oder sonst geschäftlich an Endnutzer abgibt, ist verpflichtet, bei Abgabe eines neuen Geräts ein Altgerät des Endnutzers der gleichen Geräteart, das im Wesentlichen die gleichen Funktionen wie das neue Gerät erfüllt, am Ort Dieses Elektro- bzw.
- Page 89 Endnutzer gewährleisten; das gilt auch für Darüber hinaus ist jeder, der Elektro- und kleine Elektrogeräte (s.o.), die der Endnutzer Elektronikgeräte auf einer Verkaufsfläche von zurückgeben will, ohne ein neues Gerät zu mindestens 400 m² verkauft, verpflichtet, kaufen. Altgeräte, die in keiner äußeren Abmessung größer als 25 cm sind (Elektrokleingeräte), im Rücknahmepflichten von Vertreibern und Ladengeschäft oder in unmittelbarer Nähe...
- Page 90 Benvenuto in AEG! Grazie per aver scelto di acquistare questo prodotto. Ricevere consigli, scaricare i nostri opuscoli, eliminare eventuali anomalie, ottenere informazioni sull'assistenza e la riparazione: www.aeg.com/support Con riserva di modifiche. INDICE 1. INFORMAZIONI DI SICUREZZA..............90 2. ISTRUZIONI DI SICUREZZA................ 93 3.
- Page 91 dall’elettrodomestico, a meno che non vi sia una supervisione continua. • Sorvegliare i bambini per assicurarsi che non giochino con l’apparecchiatura. • Tenere gli imballaggi lontano dai bambini e smaltirli in modo adeguato. • AVVERTENZA: L’elettrodomestico e le parti accessibili si riscaldano molto durante l'uso.
- Page 92 o collegata a un circuito regolarmente acceso e spento da un'azienda. • ATTENZIONE! Si deve sorvegliare il processo di cottura I processi di cottura brevi devono essere sorvegliati continuamente. • AVVERTENZA: Pericolo di incendio: Non conservare alcun oggetto sulle superfici di cottura. •...
- Page 93 2. ISTRUZIONI DI SICUREZZA 2.1 Installazione 2.2 Collegamento elettrico AVVERTENZA! AVVERTENZA! L’installazione dell’apparecchiatura deve Rischio di incendio e scossa elettrica. essere eseguita da personale qualificato. • Tutti i collegamenti elettrici devono essere effettuati da un elettricista qualificato . AVVERTENZA! • Il dispositivo deve essere messo a terra. Rischio di lesioni o danni •...
- Page 94 • Servirsi unicamente di dispositivi di pentole, se non diversamente specificato isolamento adeguati: interruttori dal produttore di questa apparecchiatura. automatici, fusibili (quelli a tappo devono • Usare esclusivamente accessori essere rimossi dal portafusibile), consigliati dal produttore per questa sganciatori per correnti di guasto a terra e apparecchiatura.
- Page 95 • Non nebulizzare acqua né utilizzare temperatura, vibrazioni, umidità, o sono vapore per pulire l’apparecchiatura. destinate a segnalare informazioni sullo • Pulire l’apparecchiatura con un panno stato operativo dell'apparecchio. Non sono inumidito e morbido. Utilizzare solo destinate ad essere utilizzate in altre detergenti neutri.
- Page 96 2. Rimuovere una parte dell’isolamento Collegamento bifase delle estremità dei cavi marrone, nero e 1. Rimuovere il manicotto terminale del cavo blu. dai cavi blu. 3. Collegare le estremità del cavo nero e di 2. Rimuovere una parte dell’isolamento quello marrone. delle estremità...
- Page 97 Trova il video tutorial "Come installare il piano cottura a induzione AEG: installazione del piano di lavoro" digitando il nome completo indicato nell'immagine sottostante. www.youtube.com/electrolux www.youtube.com/aeg min. 50 How to install your AEG Induction Hob - Worktop installation min. min.
- Page 98 Utilizzare i tasti sensore per mettere in funzione l'apparecchiatura. I display, gli indicatori ed i segnali acustici mostrano quali funzioni sono attive. Tasto sen‐ Funzione Commento sore In data / Spento Per attivare e disattivare il piano di cottura. Blocco / Dispositivo di sicurez‐ Per bloccare/sbloccare il pannello dei comandi.
- Page 99 5. PRIMA DEL PRIMO UTILIZZO 4. Premere . P72 compare. AVVERTENZA! 5. Premere del timer per impostare il Fare riferimento ai capitoli sulla livello di potenza. sicurezza. Livelli di potenza 5.1 Limitazione potenza Fare riferimento al capitolo "Dati tecnici". Limitazione potenza definisce quanta potenza ATTENZIONE! viene utilizzata dal piano cottura in totale, Assicurarsi che la potenza selezionata...
- Page 100 La spia scompare quando la zona di cottura si è raffreddata. Livello di potenza Il piano di cottura si disattiva dopo 6.5 Riscaldamento automatico 4 - 7 5 ore Usare questa funzione per ottenere 8 - 9 4 ore un'impostazione di calore desiderata in un tempo più...
- Page 101 Per prima cosa, impostare il livello di calore Per controllare per quanto tempo è in per la zona di cottura, quindi impostare la funziona la zona di cottura: sfiorare funzione. impostare la zona di cottura. La spia della zona di cottura inizia a lampeggiare. Il display Per impostare la zona di cottura: sfiorare mostra per quanto tempo è...
- Page 102 Per confermare la selezione, attendere finché Per attivare la funzione: sfiorare il piano di cottura non si disattiva accende per 4 secondi. Il Timer rimane automaticamente. acceso. Quando la funzione è impostata su Per disattivare la funzione: sfiorare . Il segnali acustici saranno udibili soltanto livello di potenza precedente si accende.
- Page 103 Luce au‐ Bollitu‐ Frittura 2) tomatica ra 1) Velocità ventola 1 Velocità Velocità ventola 1 ventola 1 Velocità Velocità ventola 1 ventola 2 Velocità Velocità ventola 2 ventola 3 6.13 Hob²Hood Il piano cottura rileva il processo di ebollizione e atti‐ va la velocità...
- Page 104 il piano cottura è attivo. Questo disattiva il Attivazione della luce funzionamento automatico della funzione e È possibile impostare il piano cottura per consente di modificare la velocità della attivare la luce automaticamente ogni volta che si attiva il piano cottura. Per farlo ventola manualmente.
- Page 105 cottura e ciò causa un riscaldamento pentole di materiali diversi (costruzione a più lento. sandwich). – Per motivi di sicurezza e risultati di • ronzio: si stanno utilizzando livelli di cottura ottimali, non utilizzare pentole potenza elevati. di dimensioni maggiori rispetto a Rumore correlato al piano di cottura: quelle indicate nelle "Specifiche delle •...
- Page 106 Cappe da cucina con la Hob²Hood funzione Per trovare l'intera gamma di cappe per cucina che dispongono di questa funzione, consultare il nostro sito web per consumatori. Le cappe da cucina AEG compatibili con questa funzione presentano il simbolo ITALIANO...
- Page 107 8. MANUTENZIONE E PULIZIA 8.2 Pulizia della piano cottura AVVERTENZA! • Togliere immediatamente: plastica Fare riferimento ai capitoli sulla sciolta, pellicola in plastica, sale, zucchero sicurezza. e alimenti contenenti zucchero, in caso contrario la sporcizia potrebbe causare 8.1 Informazioni generali danni al piano cottura.
- Page 108 Problema Causa possibile Soluzione Sono stati toccati 2 o più tasti senso‐ Toccare solo un tasto sensore. re contemporaneamente. Sospendi è in funzione. Fare riferimento a "Sospensione". C’è acqua o macchie di grasso sul Pulire il pannello dei comandi. pannello dei comandi. Si sente un bip costante.
- Page 109 (si trova nell'angolo della 10. DATI TECNICI 10.1 Targhetta identificativa Modello OIO84A00FB: PNC 949 598 355 00 Tipo 62 D4A 01 AA 220 - 240 V / 400 V 2N, 50 - 60 Hz Induzione 7.2 kW...
- Page 110 11. EFFICIENZA ENERGETICA 11.1 Informazioni sul prodotto in base alla normativa dell’UE sulla progettazione ecocompatibile Identificazione modello OIO84A00FB Tipo di piano cottura Piano cottura a incasso Numero di zone di cottura Tecnologia di riscaldamento Induzione Diametro delle zone di cottura circolari (Ø)
- Page 111 11.3 Informazioni sul prodotto per il consumo energetico e il tempo massimo per raggiungere la modalità a bassa potenza applicabile Consumo di potenza in modalità spento 0.3 W Tempo massimo necessario al dispositivo per raggiungere automaticamente la mo‐ 2 min dalità...
- Page 112 Le damos la bienvenida a AEG. Gracias por elegir nuestro aparato. Obtener consejos, folletos, soluciones a problemas e información de servicio y reparación: www.aeg.com/support Salvo modificaciones. CONTENIDO 1. INFORMACIÓN SOBRE SEGURIDAD............112 2. INSTRUCCIONES DE SEGURIDAD............115 3. INSTALACIÓN.................... 117 4. DESCRIPCIÓN DEL PRODUCTO..............119 5.
- Page 113 personas con minusvalías importantes y complejas, salvo que estén bajo supervisión continua. • Es necesario vigilar a los niños para que no jueguen con el aparato. • Mantenga todo el material de embalaje fuera del alcance de los niños y deséchelo de forma adecuada. •...
- Page 114 temporizador, ni conectarse a un circuito que se encienda y apague regularmente por un servicio público. • PRECAUCIÓN: El proceso de cocción debe hacerse bajo supervisión El proceso de cocción breve debe ser supervisado permanentemente. • ADVERTENCIA: Peligro de incendio: No guarde objetos sobre las superficies de cocción.
- Page 115 2. INSTRUCCIONES DE SEGURIDAD 2.1 Instalación • Todas las conexiones eléctricas deben ser realizadas por un electricista cualificado. • El aparato debe conectarse a tierra. ADVERTENCIA! • Antes de efectuar cualquier tipo de Solo un técnico cualificado puede instalar operación, compruebe que el aparato esté el aparato.
- Page 116 • Use únicamente dispositivos de • Utilice únicamente en este aparato aislamiento apropiados: línea con accesorios recomendados por el protección contra los cortocircuitos, fabricante. fusibles (tipo tornillo que puedan retirarse ADVERTENCIA! del soporte), dispositivos de fuga a tierra y contactores. Riesgo de incendio y explosión.
- Page 117 • No utilice agua pulverizada ni vapor para como la temperatura, la vibración, la limpiar el aparato. humedad, o están destinadas a señalar • Limpie el aparato con un paño suave información sobre el estado de humedecido. Utilice solo detergentes funcionamiento del aparato.
- Page 118 4. Coloque un manguito nuevo en cada 2. Retire parte de la cubierta de los extremo del cable (se necesita una extremos del cable azul. herramienta especial). 3. Conecte los extremos de los dos 5. Conecte los extremos de los dos conductores azules.
- Page 119 Para encontrar el tutorial de vídeo "Cómo instalar la placa de inducción AEG - Instalación en encimera", escriba el nombre completo indicado en el gráfico siguiente. www.youtube.com/electrolux www.youtube.com/aeg min. 50 How to install your AEG Induction Hob - Worktop installation min.
- Page 120 Utilice el aparato con los sensores. Las pantallas, indicadores y señales acústicas indican qué funciones están en funcionamiento. Sensor Función Comentario Encendido/Apagado Para activar y desactivar la placa. Bloqueo/ Dispositivo de segu‐ Para bloquear y desbloquear el panel de control. ridad para niños Pausa Para activar y desactivar la función.
- Page 121 5. ANTES DEL PRIMER USO 4. Pulse . P72 aparece. ADVERTENCIA! 5. Pulse del temporizador para Consulte los capítulos sobre seguridad. ajustar el nivel de potencia. Niveles de potencia 5.1 Limitación de energía Consulte el capítulo “Datos técnicos”. Limitación de energía define cuánta energía consume la placa en total, dentro de los PRECAUCIÓN! límites de los fusibles de la instalación...
- Page 122 • cuando la placa está desactivada pero la zona de cocción sigue caliente. Ajuste del nivel de La placa de cocción calor se apaga El indicador desaparece cuando la zona de cocción se enfría. 4 - 7 5 horas 6.5 Calentamiento automático 8 - 9 4 horas 10 - 14...
- Page 123 Para seleccionar la zona de cocción: toque de la zona de cocción comienza a parpadear. La pantalla muestra cuánto tiempo ha estado varias veces hasta que parpadee el funcionado la zona. indicador de la zona de cocción que desee. Para desactivar la función: toque Para activar la función: toque la parte del temporizador para programar el tiempo después...
- Page 124 Para confirmar su selección, espere hasta Para activar la función: toque que la placa de cocción se desactive enciende durante 4 segundos. El automáticamente. temporizador se mantiene activo. Cuando esta función se ajusta en , solo se Para desactivar la función: toque .
- Page 125 Luz auto‐ Hervir 1) Freír 2) mática Encendido Velocidad Velocidad del ventila‐ del ventila‐ dor 1 dor 1 Encendido Apagado Velocidad del ventila‐ dor 1 Encendido Velocidad Velocidad del ventila‐ del ventila‐ dor 1 dor 1 6.13 Hob²Hood Encendido Velocidad Velocidad del ventila‐...
- Page 126 y vuelva a pulsar , se ajustará la velocidad del ventilador a 0 y se apagará. Pulse Cuando termine de cocinar y apague la para volver a poner en marcha el ventilador a placa de cocción, el ventilador de la velocidad 1.
- Page 127 zona de cocción (es decir, el valor máximo • silbidos: está utilizando una zona de de diámetro de los utensilios de cocina cocción con una potencia muy elevada y indicados en "Datos técnicos" > con utensilios de cocina cuya base está "Especificaciones de las zonas de hecha de distintos materiales cocción").
- Page 128 Ajuste de tem‐ Usar para: Tiempo Consejos peratura (min) 3 - 5 Arroces y platos cocinados con leche, 25 - 50 Añadir al menos el doble de líquido calentar comidas preparadas. que de arroz; los platos lácteos deben removerse a media cocción. 5 - 7 Verduras al vapor, pescado, carne.
- Page 129 Campanas extractoras con la función nuestro sitio web del consumidor. Las Hob²Hood campanas extractoras AEG que usan esta Para encontrar toda la gama de campanas función deben tener el símbolo extractoras que usan esta función, consulte 8. MANTENIMIENTO Y LIMPIEZA 8.2 Limpieza de la placa...
- Page 130 Problema Posible causa Solución No ha ajustado la temperatura antes Vuelva a encender la placa y ajuste el de que transcurran 10 segundos. nivel de calor en menos de 10 segun‐ dos. Ha pulsado 2 o más sensores al Toque solo un sensor. mismo tiempo.
- Page 131 10. DATOS TÉCNICOS 10.1 Placa de datos técnicos Modelo OIO84A00FB: Número de producto (PNC) 949 598 355 00 Tipo 62 D4A 01 AA 220 - 240 V / 400 V 2N, 50 - 60 Hz Inducción 7.2 kW...
- Page 132 óptimos utilice 11. EFICACIA ENERGÉTICA 11.1 Información del producto conforme a la normativa de diseño ecológico UE Ecodesign Identificación del modelo OIO84A00FB Tipo de placa Placa empotrada Número de zonas de cocción Tecnología de calentamiento Inducción Diámetro de las zonas de cocción circulares (Ø)
- Page 133 11.3 Información de producto sobre consumo de energía y el tiempo máximo para alcanzar el modo de bajo consumo aplicable Consumo de energía en modo apagado 0.3 W Tiempo máximo necesario para que el equipo alcance automáticamente el modo de 2 min bajo consumo aplicable 12.
- Page 136 867385492-A-172024...