
Manuels Connexes pour Soozier A71-047V01


Sommaire des Matières pour Soozier A71-047V01
- Page 1 IN240800797V01_US_CA A71-047V01 FR: INSTRUCTIONS D’ASSEMBLAGE EN: ASSEMBLY INSTRUCTION FR: IMPORTANT: A LIRE ATTENTIVEMENT ET A CONSERVER POUR VOUS Y REFRERER ULTERIEUREMENT EN: IMPORTANT, RETAIN FOR FUTURE REFERENCE: READ CAREFULLY.
- Page 2 This product is recommended for ages over 14 years. The maximum load is 100kg. Product Size: L114*W114*H132cm Attention:The trampoline must be assembled by an adult according to the assembly instructions and inspected before first use. Attention:Follow the manufacturer's instructions when jumping with/without shoes Attention:Empty your pockets and hands before jumping Attention:Always jump in the middle of the mat, not on the sides.
- Page 5 PART LIST ① ② ③ ④ ⑤ ⑥ ⑦ ⑧ ⑨ ⑩...
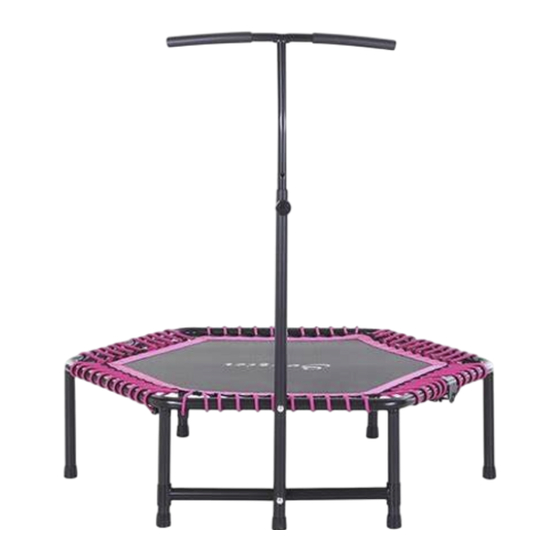
- Page 6 EXPLOSION FIGURE...
- Page 7 INSTALLATION STEPS 1. Place all trampoline sections on the floor (figure 1). 2. Connect the round frame and install the tube feet one by one. 3. Install the elastic springs to the other sides of the frame, continue to install other ropes, as shown in Figure 3. Note: To install the jump pad, follow the assembly instruc- tions below.
- Page 8 INSTALLATION STEPS Handrail Installation Instructions 1. Please find the hole on one side of the frame tube (see picture 1, then remove the two foot caps (see picture 2) 2. Please connect the bottom of the stabilizer to the rod (picture 3), and install the rod to each side of the leg.
- Page 9 Multifunctional Remote, Handy Operation Up to 32.8ft control Distance Turn on/off Timer setting 12 color option 8 Modes Use two batteries Friendly Reminder: PIs remove the transparent protective film when using. OFF: press normally for 3 seconds to close.
- Page 10 Ce produit est recommandé pour les plus de 14 ans. La charge maximale est de 100 kg. Taille du produit : L114*W114*H132cm Attention : Le trampoline doit être assemblé par un adulte selon les instructions de montage et inspecté avant la première utilisation. Attention : Suivez les instructions du fabricant lorsque vous sautez avec ou sans chaussures.
- Page 13 LISTE DES PIÈCES ① ② ③ ④ ⑤ ⑥ ⑦ ⑧ ⑨ ⑩...
- Page 14 FIGURE D'EXPLOSION...
- Page 15 ÉTAPES D'INSTALLATION 1. Placez toutes les sections du trampoline sur le sol (Figure 2. Connectez le cadre rond et installez les pieds du tube un par un. 3. Installez les ressorts élastiques sur les autres côtés du cadre, continuez à installer les autres cordes, comme indiqué à...
- Page 16 ÉTAPES D'INSTALLATION Instructions d'installation de la main courante 1. Trouvez le trou d'un côté du tube du cadre (voir image 1), puis retirez les deux embouts (voir image 2). 2. Connectez le bas du stabilisateur à la tige (image 3), puis installez la tige de chaque côté de la jambe.
- Page 17 Télécommande multifonctionnelle, opération pratique jusqu'à 10 mètres de distance Allumer/éteindre Programmation de minuterie 12 options de couleur 8 modes Utilise deux piles AAA Veuillez retirer le film protecteur transparent avant utilisation. Éteindre : appuyez normalement pendant 3 secondes pour fermer.