Publicité
Les langues disponibles
Les langues disponibles
Liens rapides
M1.2.BDP50-BDP70-BDP90.NLFREN - 03042024
BDP50
P.02 Gelieve te lezen en voor later gebruik bewaren
NL
P.08 Veuillez lire et conserver pour consultation ultérieure
FR
P.14 Please read and keep for future reference
EN
BDP70
HANDLEIDING - MODE D'EMPLOI - MANUAL
BDP50 (722313789)
BDP70 (722313790)
BDP90 (722313791)
Bouwdroger
Déshumidificateur
Dehumidifier
BDP90
Publicité

Manuels Connexes pour MW TOOLS BDP50


Sommaire des Matières pour MW TOOLS BDP50
- Page 1 M1.2.BDP50-BDP70-BDP90.NLFREN - 03042024 BDP50 BDP70 BDP90 HANDLEIDING - MODE D’EMPLOI - MANUAL BDP50 (722313789) BDP70 (722313790) BDP90 (722313791) Bouwdroger Déshumidificateur Dehumidifier P.02 Gelieve te lezen en voor later gebruik bewaren P.08 Veuillez lire et conserver pour consultation ultérieure P.14 Please read and keep for future reference...
- Page 2 M1.2.BDP50-BDP70-BDP90.NLFREN - 03042024 Inhoud 1 Algemene informatie ............................... 2 2 Veiligheidsvoorschriften ............................2 3 Omschrijving van de machine ..........................3 4 Technische gegevens .............................. 3 5 Installatie................................4 6 Bedieningspaneel ..............................5 7 Gebruiksinstructies ..............................5 7.1 Algemeen gebruik ............................5 7.2 Toetsen vergrendelen ............................
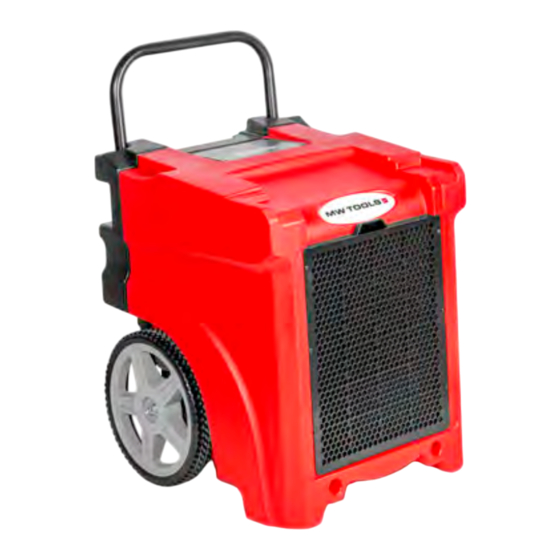
- Page 3 M1.2.BDP50-BDP70-BDP90.NLFREN - 03042024 RODUCT INENTIFICATION RODUCT INENTIFICATION 3 Omschrijving van de machine 1. Metalen handgreep 2. Bedieningspaneel 3. Wielen 4. Luchtinlaatrooster 5. Luchtuitlaatrooster 6. Stroomkabel AANDACHT! Zorg ervoor, de luchtinlaat en -uitlaat niet te belemmeren. 4 Technische gegevens WARNING Model...
- Page 4 M1.2.BDP50-BDP70-BDP90.NLFREN - 03042024 5 Installatie BELANGRIJK! Plaats de bouwdroger rechtop. Na het transport, laat de bouwdroger 30 minuten staan alvorens deze in te schakelen, om het koelsysteem te stabiliseren en schade te voorkomen. Installatie van de bouwdroger Gebruik de bouwdroger in een gesloten ruimte, om een droogkamer te creëren. Sluit alle deuren, vensters en openingen naar buiten, om de efficiëntie te maximaliseren.
- Page 5 M1.2.BDP50-BDP70-BDP90.NLFREN - 03042024 6 Bedieningspaneel 1. ON/OFF toets 2. Toetsen naar BOVEN en BENEDEN 3. AFVOER controlelampje 4. ONTDOOIEN controlelampje 5. AFVOER toets 6. VOCHTIGHEID en TIJD weergave 7. TIJD toets 8. Werking controlelampje ON/OFF: Druk op de ON/OFF toets om de machine in en uit te schakelen.
- Page 6 M1.2.BDP50-BDP70-BDP90.NLFREN - 03042024 7.2 Toetsen vergrendelen Als u tegelijkertijd gedurende 2 seconden op de toetsen T en P, zal het controlelampje voor ontdooien op een frequentie van 50 Hz branden, en alle toetsen van het bedieningspaneel zullen worden vergrendeld. Ga op dezelfde manier te werk om de toetsen te ontgrendelen.
- Page 7 M1.2.BDP50-BDP70-BDP90.NLFREN - 03042024 9 Problemen oplossen en foutcodes Probleem Oorzaak Oplossing De bouwdroger werkt niet De machine is niet aangesloten Sluit de machine aan De machine is niet ingeschakeld Druk op de ON/OFF toets De foutcode E4 wordt weergegeven Controleer de afvoer...
- Page 8 M1.2.BDP50-BDP70-BDP90.NLFREN - 03042024 Table des matières 1 Informations générales ............................8 2 Consignes de sécurité .............................8 3 Description de l’appareil ............................9 4 Données techniques ..............................9 5 Installation ................................10 6 Panneau de commande ............................11 7 Consignes d’utilisation ............................11 7.1 Utilisation générale ............................11 7.2 Verrouillage des touches ..........................12...
- Page 9 M1.2.BDP50-BDP70-BDP90.NLFREN - 03042024 RODUCT INENTIFICATION RODUCT INENTIFICATION 3 Description de l’appareil 1. Poignée métallique 2. Panneau de commande 3. Roues 4. Grille d’entrée d’air 5. Grille de sortie d’air 6. Câble d’alimentation AVERTISSEMENT ! Veillez à ne jamais obstruer l’entrée et la sortie d’air.
- Page 10 M1.2.BDP50-BDP70-BDP90.NLFREN - 03042024 5 Installation IMPORTANT! Placez le déshumidificateur en position verticale. Après le transport du déshumidificateur, laissez- le poser 30 minutes avant de l’allumer, pour laisser le système réfrigérant se stabiliser et éviter des dommages. Installation du déshumidificateur Utilisez le déshumidificateur dans un espace clos, pour créer une chambre de séchage. Fermez toutes les portes, fenêtres et autres issues vers l’extérieur, pour maximiser l’efficacité...
- Page 11 M1.2.BDP50-BDP70-BDP90.NLFREN - 03042024 6 Panneau de commande 1. Touche ON/OFF 2. Touches vers le HAUT et vers le BAS 3. Voyant de purge 4. Voyant de dégivrage 5. Touche PURGE 6. Affichage d’HUMIDITÉ et de TEMPS 7. Touche de TEMPS 8.
- Page 12 M1.2.BDP50-BDP70-BDP90.NLFREN - 03042024 7.2 Verrouillage des touches Si vous pressez en même temps les touches T et P pendant 2 secondes, le voyant de dégivrage va s’allumer à une fréquence de 50 Hz et toutes les touches du panneau de commande seront verrouillées. Procédez de même pour les déverrouiller.
- Page 13 M1.2.BDP50-BDP70-BDP90.NLFREN - 03042024 9 Résolution des pannes et codes d’erreurs Panne Cause Solution Le déshumidificateur ne fonctionne pas L’appareil n’est pas branché Branchez la fiche dans la prise de courant L’interrupteur n’est pas enclenché Pressez le bouton ON/OFF Le code d’erreur E4 est affiché...
- Page 14 M1.2.BDP50-BDP70-BDP90.NLFREN - 03042024 Contents 1 General information .............................14 2 Safety instructions ..............................14 3 Product identification ............................15 4 Technical data ..............................15 5 Setting up instructions ............................16 6 Control panel ...............................17 7 Operating instructions ............................17 7.1 Operation for general use ..........................17 7.2 Key lock function ............................18 7.3 Pipe function ..............................18...
- Page 15 M1.2.BDP50-BDP70-BDP90.NLFREN - 03042024 RODUCT INENTIFICATION RODUCT INENTIFICATION 3 Product identification 1. Metal handle 2. Control panel 3. Wheels 4. Air inlet grille 5. Air outlet grille 6. Power cord WARNING! Do not obstruct the air inlet or outlet. 4 Technical data...
- Page 16 M1.2.BDP50-BDP70-BDP90.NLFREN - 03042024 5 Setting up instructions IMPORTANT! Place humidifier in the upright position. When transporting a dehumidifier to site, allow it to stand for 30 minutes before switching ON. This is necessary to allow the refrigerant system to stabilise and avoid system damage.
- Page 17 M1.2.BDP50-BDP70-BDP90.NLFREN - 03042024 6 Control panel 1. ON/OFF key 2. UP and DOWN key 3. Purging indicator 4. Defrosting indicator 5. PURGE key 6. HUMIDITY and TIME display 7. TIME key 8. Operating indicator ON/OFF: Press the ON/OFF key to turn the unit ON or OFF.
- Page 18 M1.2.BDP50-BDP70-BDP90.NLFREN - 03042024 7.2 Key lock function If the keys T and P are pressed for 2 seconds at the same time, the defrost light will keep shining at the speed of 50 Hz, and all the keys on the control panel will be in lock, but it can be unlocked by the same action again.
- Page 19 M1.2.BDP50-BDP70-BDP90.NLFREN - 03042024 9 Trouble shooting and fault codes Problem Cause Solution Dehumidifier does not operate No power to appliance Connect plug to power socket Switch no turned on Switch on E4 error is displayed Check drainage flow Dehumidifier collects little water...
- Page 20 M1.2.BDP50-BDP70-BDP90.NLFREN - 03042024 10 EG conformiteitsverklaring 10 Déclaration de conformité CE 10 EC declaration of conformity BDP50 Fabrikant/Invoerder CUBIX Business sa Fabricant/Importateur Avenue Patrick Wagnon, 7 B-7700 Mouscron Manufacturer/Retailer Verklaart hierbij dat het volgende product : Déclare par la présente que le produit suivant :...
- Page 21 M1.2.BDP50-BDP70-BDP90.NLFREN - 03042024 BDP70 - BDP90 Fabrikant/Invoerder CUBIX Business sa Fabricant/Importateur Avenue Patrick Wagnon, 7 Manufacturer/Retailer B-7700 Mouscron Verklaart hierbij dat het volgende product : Déclare par la présente que le produit suivant : Hereby declares that the following product :...