
Manuels Connexes pour Xnomad X3 PRO

Sommaire des Matières pour Xnomad X3 PRO
- Page 1 X 3 P R O NOTICE D’UTILISATION Français & Anglais Booster votre productivité où que vous soyez, grâce à nos solutions nomades.
- Page 2 15 W (5 V/3A) a n de permettre that the notebook USB-C or USB-A port can sustain 10W (5V/2A). l'a chage et l'alimentation du X3 Pro. Si ce n'est pas le cas, vous devrez utiliser une alimentation secteur pour alimenter l'écran.
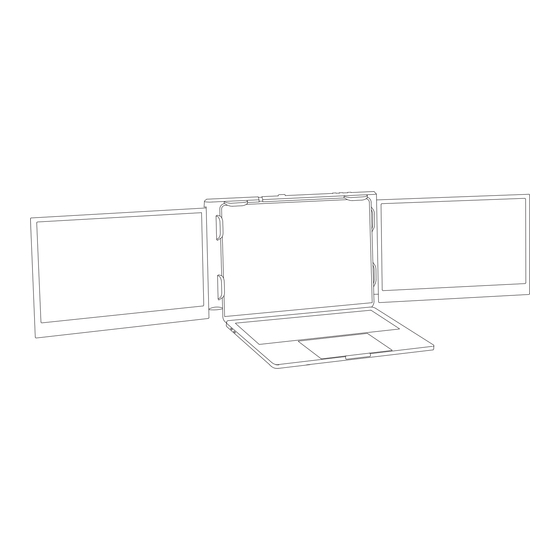
- Page 3 INSTRUCTION Le X3 Pro est un moniteur portable à écran double portable et pliable, doté de ports externes multifonctionnels et prêt à l'emploi, ce qui permet de créer rapidement un bureau mobile. Il o re aux utilisateurs une résolution d'a chage multi-écran parfaite (mode étendu ou mode miroir) et améliore l'e cacité...
- Page 4 SOMMAIRE Contenu du produit 1.X3 PRO 2. Accessoires du produit 3. Spéci cations Installation et rangement 1. Mode d’ouverture 2. Etirer le support 3. Utilisation du pied 4. Orientation en cours d'utilisation 4.1 . Mode standard 4.2. Mode triangulaire 4.3. Mode portrait simple 4.4.
- Page 5 CONTENU DU PRODUIT Product Contents Product Contents X3 PRO P2 PRO P2 PRO Interrupteur Haut de verrouillage Lock switch Power DOWN POWER Lock switch DOWN POWER MicroSD USB-C Carte SD Témoin USB-C Indicator LED Alim Note: Indicator LED turns red when the device is powered on, and then blue when the...
- Page 6 INSTALLATION ET RANGEMENT Installation and Storage MODE D'OUVERTURE Unfolding Swquence Note : Veuillez suivre la séquence d'ouverture telle qu'indiquée sur le schéma a n Note: The correct sequence must be performed to avoid damaging the device. d'éviter d'endommager l'appareil. OUVRIR LE SUPPORT Releasing the Holding Clamp Note : Note: Lightly press the lock button, and the...
- Page 7 MODE D’OUVERTURE DE L'ÉCRAN X3 PRO Front-facing Orientation Tips: The maximum folding angle of the screen is 207 degrees. When opened to the Conseils : L'écran de ce produit peut être plié jusqu'à un angle maximal de 207 degrés. Lorsqu'il est ouvert à...
- Page 8 Note: A er the display driver is installed, 10W of sustained power is required for the P2 PRO to watts pour que le X3 Pro puisse fonctionner via un seul câble de connexion. Dans le cas contraire, il sera nécessaire de brancher l'écran sur une source d'alimentation secteur..
- Page 9 Driver Installa on Driver Installa on INSTALLATION DU PILOTE 1. Driver Installa on for Computers 1. Driver Installa on for Computers 1. INSTALLATION DU PILOTE POUR LES ORDINATEURS Note:Insert microSD card. Note : Insérer la carte microSD. Note:Insert microSD card. Note: When connected, your computer should automatically Note: fois...
- Page 10 PARAMÈTRES D'AFFICHAGE POUR Windows 10/MacOS Display Se ngs for Windows 10/MacOS 1. PARAMÈTRES ET CONFIGURATION DE L'AFFICHAGE SUR WINDOWS 10 1.Cliquez avec le bouton droit de la souris sur une zone vide du bureau. Dans la boîte de dialogue qui 1.Windows 10 Display Se ngs and C ra on s'a che, sélectionnez "Paramètres d'a chage".
- Page 11 L'utilisateur peut régler la sortie, la rotation, le taux de rafraîchissement et la The user can set the display Output. luminosité de l'écran. X3 PRO X3 PRO Best for X3 PRO X3 PRO Scaled Best for X3 PRO Scaled H"!L*$)+(<C00/,%-3-,'<($,('&-(31,$'10(7-''$,%(3-,5;(/,6(/(6$74*/>(.1:(/7(7&1@,($,('&-(2$%50-(@$**(...
- Page 12 3. Dans ce menu, l'utilisateur peut ajuster l'orientation de l'appareil en cliquant et en faisant glisser les the windows to their desired posi ons. Clicking ‘Display Se ngs’ will then take you fenêtres vers les positions souhaitées. En cliquant sur "paramètres d'a chage", vous accéderez à d'autres options. op ons. X3 PRO X3 PRO X3 PRO...
- Page 13 RÉGLAGES OSD Note : Appuyez sur la touche DOWN pour a cher le Note: Press the DOWN key to display menu OSD sur l'écran de gauche. the OSD menu on the left screen Note : Appuyez sur la touche UP pour a cher le menu Note: Press the UP key to display the OSD sur l'écran de droite.
- Page 14 EXIGENCES EN MATIÈRE DE TRANSPORT, DE STOCKAGE ET D'UTILISATION A n de garantir une utilisation normale de ce produit et d'éviter les accidents tels que les chocs électriques, les incendies, etc., veuillez lire attentivement et comprendre toutes les exigences et procédures d'utilisation du produit.
- Page 15 USER’S GUIDE Tips: 1. Please install the included display driver provided. Brie y turning o your anti-virus software to allow the installation may be required. Tips: Please install the included display driver provided. Brie turning 2. Ensure that all connected cables are secure and not loose prior to usage. your an -virus so ware to allow the installa n may be required.
- Page 16 50%, e ectively enabling multitasking. The X3 Pro stand is sturdy and easy to use. Simply press the lock button lightly, and the stand will automatically deploy. It attaches to the top of the computer screen and adjusts to the required size, making it easy and secure to hang.
- Page 17 4. In-use Orientation 4.1 . Front-facing Orientation 4.2. Triangular Orientation 4.3. Single Portrait Display Orientation 4.4. Storing the X3 PRO Connecting the X3 PRO 1. Single USB-C Cable Connection Method 2. Dual USB-C and USB-A Cable Connection Method Driver Installation 1.
- Page 18 PRODUCT CONTENTS Product Contents Product Contents X3 PRO P2 PRO P2 PRO Lock switch Lock switch Down UP Power DOWN POWER Lock switch DOWN POWER MicroSD USB-C TF cards Indicator LED Indicator LED USB-C Power Note: Indicator LED turns red when the device is powered on, and then blue when the...
- Page 19 INSTALLATION AND STORAGE Installation and Storage UNFOLDING SWQUENCE Unfolding Swquence Note : The correct sequence must be performed to avoid damaging the device. Note: The correct sequence must be performed to avoid damaging the device. RELEASING THE HOLDING CLAMP Releasing the Holding Clamp Note : Lightly press the lock button, and the Note: Lightly press the lock button, and the spring-loaded holder will extend.
- Page 20 SINGLE PORTRAIT DISPLAY ORIENTATION Triangular Orientation Single Portrait Display Orientation STORING THE X3 PRO Storing the P2 PRO Note: The correct sequence must be performed to avoid damaging the device. Note : The correct sequence must be performed to avoid damaging the device.
- Page 21 Note: A er the display driver is installed, 10W of sustained power is required for the P2 PRO to SINGLE CONNECTION METHODS receive signal. Note : After the display driver is installed, ≥15W of sustained power is required for the X3 PRO to receive signal. Single USB-C Cable Connec on...
- Page 22 Driver Installa on Driver Installa on DRIVER INSTALLATION 1. Driver Installa on for Computers 1. Driver Installa on for Computers 1. DRIVER INSTALLATION FOR COMPUTERS Note:Insert microSD card. Note : Insert microSD card. Note:Insert microSD card. Note: When connected, your computer should automatically Note : When connected, your computer should automatically install the necessary drivers.
- Page 23 DISPLAY SETTINGS FOR WINDOWS 10/MACOS Display Se ngs for Windows 10/MacOS 1. WINDOWS 10 DISPLAY SETTINGS AND CONFIGURATION 1.Windows 10 Display Se ngs and C ra on 1. Right-click a blank area of the desktop. In the pop-up dialog box, select “Display Settings”. Left click “Display Settings”...
- Page 24 2.3 Select "Display" in the pop-up dialog box, and a display box as shown in the figure will pop up. F&-(57-0()/,(7-'('&-(6$74*/>(M5'45'N#1'/'$1,N#-20-7&(0/'-NG0$%&',-77" set the display Output. The user can set the display Output. X3 PRO X3 PRO Best for X3 PRO X3 PRO Scaled Best for X3 PRO Scaled H"!L*$)+(<C00/,%-3-,'<($,('&-(31,$'10(7-''$,%(3-,5;(/,6(/(6$74*/>(.1:(/7(7&1@,($,('&-(2$%50-(@$**( 414(54;(((((@&-0-('&-(57-0()/,(7-'('&-(C00/,%-3-,'NJ$0010(12('&-(-:'-,6-6(7)0--,...
- Page 25 !"!#$%&'(%)&(*+,-%&.(/'&0&'&$123 4 5 267( the windows to their desired posi ons. Clicking ‘Display Se ngs’ will then take you to their desired positions. Clicking ‘Display Settings’ will then take you to further options. op ons. X3 PRO X3 PRO X3 PRO...
- Page 26 OSD SETTINGS Note : Press the DOWN key to display the OSD menu Note: Press the DOWN key to display on the left screen the OSD menu on the left screen Note : Press the UP key to display the OSD menu on Note: Press the UP key to display the the right screen OSD menu on the right screen...
- Page 27 7. Disconnect any power cables when the device is not in use. 8. The maximum folding angle of the X3 PRO is 207 degrees. When at the maximum angle, the screen should not be further bent or squeezed to avoid damage.
- Page 28 X 3 P R O Booster votre productivité où que vous soyez, grâce à nos solutions nomades www.xnomad.com contact@xnomad.com The Compagny OÜ, Narva mnt 5, 10117 Tallinn, Estonie...