Publicité
Liens rapides
Notice de montage de la serre
FR
Greenhouse assembly instructions
EN
Montageanleitung für das Gewächshaus
DE
Instrucciones de montaje del invernadero
ES
Istruzioni per il montaggio della serra
IT
Instrukcja montażu szklarni
PL
Dimensions (LxlxH) : 304x244x224 cm | Dimensions: 304x244x224 cm
Abmessungen (LxBxH): 304x244x224 cm | Dimensiones (LxAxA): 304x244x224 cm
Dimensioni: ( LxPxH): 304x244x224 cm | Wymiary (Dług. x Szer. x Wys.): 304x244x224 cm
2
28
54
80
106
132
11181
Publicité

Manuels Connexes pour GREEN PROTECT 11181

Sommaire des Matières pour GREEN PROTECT 11181
- Page 1 Istruzioni per il montaggio della serra Instrukcja montażu szklarni Dimensions (LxlxH) : 304x244x224 cm | Dimensions: 304x244x224 cm Abmessungen (LxBxH): 304x244x224 cm | Dimensiones (LxAxA): 304x244x224 cm Dimensioni: ( LxPxH): 304x244x224 cm | Wymiary (Dług. x Szer. x Wys.): 304x244x224 cm 11181...
- Page 2 FRANÇAIS Cher client Félicitations pour l’achat de votre nouvelle serre de jardin. Merci de lire attentivement les instructions suivantes avant de procéder au montage. Attention : avant d’attaquer la construction de votre serre, prenez le temps nécessaire pour identifier tous les dangers ⚠...
- Page 3 FRANÇAIS Pièce Qté Pièce Qté L01A 1473 L01B 1473 L01C 1473 L01D 1473 L01E 1325 L13A L01F 1325 L03A 1745 L13B L03B 1745 2440 L06A 1393 L06B L06C 1869 L07A 2383 L07B 2987 L07C L07D L08A 1759 L08B 1759 L08C 2150 L08D L22A...
- Page 4 FRANÇAIS Pièce Qté Pièce Qté ∅ ∅ 6*1.5 J04L Ø12*28 J04R M6*10 M6*16 M6*40 ┐╠Â╚ 25.400 Ø6.5*20 M6*14 M5*25 1.88M M6*60 Ø4*16 Ø4*6 W07A W07B Conseil important : Vous n’aurez pas besoin W07C 3038 de tout démonter si vous avez oublié de mettre les vis S01, vous pouvez les remplacer W07D 2435...
- Page 5 FRANÇAIS Assemblage de la base Il est essentiel que la base de la serre soit parfaitement carrée afin que les mesures diagonales soient identiques. La serre L07A/L07B doit également être uniformément à niveau de la façade avant à la façade arrière, l’aplomb doit être parfait. Lambourde en bois 25x20 mm L’ancrage de la serre dans le sol est essentiel.
- Page 6 FRANÇAIS Assemblage de la base Note : Veuillez retirer le film de protection sur la surface des pièces W08 et W07 A (B/C/D) avant d’assembler la base W07C ASM_DEF_CSYS W07B(A) PRT_CSYS_DEF PRT_CSYS_DEF ASM_DEF_CSYS A SM_DEF_CSYS PRT_CSYS_DEF PRT_CSYS_DEF P RT_CSYS_DEF P RT_CSYS_DEF W07A(B) ASM_DEF_CSYS PRT_CSYS_DEF...
- Page 7 FRANÇAIS Assemblage porte gauche L13A L11B L11A L13B L13B Remarque: L11A ce côté vers le haut L13A L13B L11A(B) L11A(B) Pose de la bande de caoutchouc de la porte L11A L13A L11A L13A...
- Page 8 FRANÇAIS Assemblage porte droite L13A L11B L11A L13B L13B L11A Remarque: ce côté vers le haut L13A L13B L11A(B) L11A(B) Pose de la bande de caoutchouc de la porte L11B L13A L11B L13A...
- Page 9 FRANÇAIS Assemblage de la fenêtre...
- Page 10 FRANÇAIS Assemblage du pignon avant Ne pas serrer les écrous avant d’avoir assemblé correctement assemblé Ne pas serrer les écrous avant d’avoir assemblé...
- Page 11 FRANÇAIS Assemblage du pignon avant...
- Page 12 FRANÇAIS Assemblage du pignon arrière Par anticipation, faire glisser deux S01 vers le centre de L08A (B), ce sera nécessaire lors de la prochaine étape de montage Par anticipation, faire glisser deux S01 vers le centre de L08C, ce sera nécessaire lors de la prochaine étape de montage...
- Page 13 FRANÇAIS Assemblage de la paroi latérale...
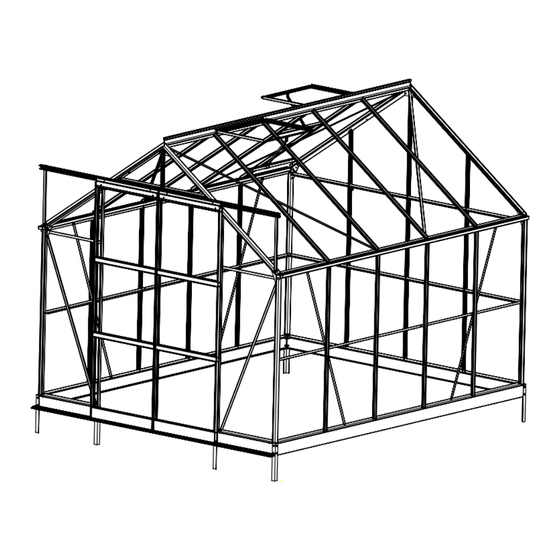
- Page 14 FRANÇAIS Pignon arrière Paroi latérale Pignon avant Paroi latérale...
- Page 15 FRANÇAIS Vue de l’extérieur...
- Page 16 FRANÇAIS...
- Page 17 FRANÇAIS...
- Page 18 FRANÇAIS...
- Page 19 FRANÇAIS Vue de l’extérieur...
- Page 20 FRANÇAIS Pose du joint caoutchouc J19 Pose des verres Faites attention à ne pas vous blesser en manipulant et en ajustant les verres Faites attention à ne pas vous blesser VERRE VERRE VERRE en posant les clips...
- Page 21 FRANÇAIS Avant Arrière Crochets W11 S Clips W14 Pièce Réf Qté Pièce Réf Qté...
- Page 22 FRANÇAIS...
- Page 23 FRANÇAIS Porte gauche Porte droite Porte Porte...
- Page 24 FRANÇAIS...
- Page 25 FRANÇAIS Fenêtre Fenêtre Fenêtre...
- Page 26 FRANÇAIS...
- Page 27 FRANÇAIS ┐╠Â╚ 25.400...
- Page 28 ENGLISH Dear customer Congratulations on the purchase of your new garden greenhouse. Please read the following instructions carefully before proceeding with the assembly. Please note: before starting the construction of your greenhouse, take the necessary time to identify all possible hazards such as buried or overhead cables or pipes, etc...
- Page 29 ENGLISH Part Part 1473 L01A L01B 1473 L01C 1473 L01D 1473 L01E 1325 L13A L01F 1325 1745 L03A L13B L03B 1745 2440 L06A 1393 L06B L06C 1869 L07A 2383 L07B 2987 L07C L07D L08A 1759 L08B 1759 L08C 2150 L08D L22A 2373 L08E...
- Page 30 ENGLISH Part Part ∅ ∅ 6*1.5 J04L Ø12*28 J04R M6*10 M6*16 M6*40 ┐╠Â╚ 25.400 Ø6.5*20 M6*14 M5*25 1.88M M6*60 Ø4*16 Ø4*6 W07A Important tip: W07B You don’t need to disassemble everything if W07C 3038 you forgot to put in the S01 screws, you can W07D 2435 replace them with the S04 screws!
- Page 31 ENGLISH Assembling the base It is essential that the base of the greenhouse is perfectly square so that the diagonal measurements are identical. The L07A/L07B greenhouse must also be uniformly level on the front and back sides, the plumbness must be perfect. Wooden joist 25x20 mm Anchoring the greenhouse to the ground is essential.
- Page 32 ENGLISH Assembling the base Note: Please remove the protective film on the surface of parts W08 and W07 A (B/C/D) before assembling the base W07C ASM_DEF_CSYS W07B(A) PRT_CSYS_DEF PRT_CSYS_DEF ASM_DEF_CSYS A SM_DEF_CSYS PRT_CSYS_DEF PRT_CSYS_DEF P RT_CSYS_DEF P RT_CSYS_DEF W07A(B) ASM_DEF_CSYS PRT_CSYS_DEF PRT_CSYS_DEF ASM_DEF_CSYS...
- Page 33 ENGLISH Left door assembly L13A L11B L11A L13B L13B Note: this side up L11A L13A L13B L11A(B) L11A(B) Installing the rubber door gasket L11A L13A L11A L13A...
- Page 34 ENGLISH Right door assembly L13A L11B L11A L13B L13B Note: this side up L11A L13A L13B L11A(B) L11A(B) Installing the rubber door gasket L11B L13A L11B L13A...
- Page 35 ENGLISH Window assembly...
- Page 36 ENGLISH Front gable assembly Please do not tighten the nuts before installing part L10 W02 properly assembled Please do not tighten the nuts before positioning part L09...
- Page 37 ENGLISH Front gable assembly...
- Page 38 ENGLISH Assembly of the rear gable In anticipation, slide two S01s to the center of LO8A(B), this will be necessary in the next assembly step In anticipation, slide two S01s to the center of LO8C, this will be necessary in the next assembly step...
- Page 39 ENGLISH Sidewall assembly...
- Page 40 ENGLISH Rear gable Side wall Front gable Side wall...
- Page 41 ENGLISH View from the outside...
- Page 42 ENGLISH...
- Page 43 ENGLISH...
- Page 44 ENGLISH...
- Page 45 ENGLISH View from the outside...
- Page 46 ENGLISH Installation of the J19 rubber gasket Installing the glasses Be careful not to injure yourself when handling and adjusting the glasses Be careful not to injure yourself GLASS GLASS GLASS when installing the W14 clips...
- Page 47 ENGLISH Front Back Hooks W11 S Clips W14 Parts Parts...
- Page 48 ENGLISH...
- Page 49 ENGLISH Left door Right door Door Door...
- Page 50 ENGLISH...
- Page 51 ENGLISH Window Window Window...
- Page 52 ENGLISH...
- Page 53 ENGLISH ┐╠Â╚ 25.400...
- Page 54 DEUTSCH Sehr geehrter Kunde, wir gratulieren Ihnen zum Kauf Ihres Gewächshauses. Bitte lesen Sie die folgenden Anweisungen sorgfältig durch, bevor Sie mit der Montage beginnen. Stellen Sie vor dem Aufbau des Gewächshauses sicher, dass mögliche Gefahrenquellen, wie unterirdische oder oberirdische ⚠...
- Page 55 DEUTSCH Teil Anzahl Teil Anzahl L01A 1473 L01B 1473 L01C 1473 L01D 1473 L01E 1325 L13A L01F 1325 L03A 1745 L13B L03B 1745 2440 L06A 1393 L06B L06C 1869 L07A 2383 L07B 2987 L07C L07D L08A 1759 L08B 1759 L08C 2150 L08D L22A...
- Page 56 DEUTSCH Teil Anzahl Teil Anzahl ∅ ∅ 6*1.5 J04L Ø12*28 J04R M6*10 M6*16 M6*40 ┐╠Â╚ 25.400 Ø6.5*20 M6*14 M5*25 1.88M M6*60 Ø4*16 Ø4*6 W07A W07B Wichtiger Hinweis: Sie brauchen nicht alles zu demontieren, wenn Sie vergessen haben, W07C 3038 die S01-Schrauben einzubauen, Sie können W07D 2435 sie durch die S04-Schrauben ersetzen!
- Page 57 DEUTSCH Montage des Fundaments Es ist wichtig, dass das Fundament des Gewächshauses L07A/L07B perfekt quadratisch ist, so dass die diagonalen Maße identisch sind. Das Gewächshaus muss außerdem an der Vorder- und Rückseite gleichmäßig waagerecht und perfekt lotrecht sein. Holzbalken 25x20 mm Die Verankerung des Gewächshauses im Boden ist unerlässlich.
- Page 58 DEUTSCH Montage des Fundamentrahmens Hinweis: Bitte entfernen Sie die Schutzfolie auf der Oberfläche der Teile W08 und W07 A (B/C/D) bevor Sie mit der Montage des Rahmens beginnen W07C ASM_DEF_CSYS W07B(A) PRT_CSYS_DEF PRT_CSYS_DEF ASM_DEF_CSYS A SM_DEF_CSYS PRT_CSYS_DEF PRT_CSYS_DEF P RT_CSYS_DEF P RT_CSYS_DEF W07A(B) ASM_DEF_CSYS...
- Page 59 DEUTSCH Montage der Tür links L13A L11B L11A L13B L13B Hinweis: diese Seite nach L11A oben L13A L13B L11A(B) L11A(B) Anbringen der Türdichtung L11A L13A L11A L13A...
- Page 60 DEUTSCH Montage Tür rechts L13A L11B L11A L13B L13B Hinweis: diese Seite nach L11A oben L13A L13B L11A(B) L11A(B) Anbringen der Türdichtung L11B L13A L11B L13A...
- Page 61 DEUTSCH Montage des Fensters...
- Page 62 DEUTSCH Montage des vorderen Giebels Ziehen Sie die Muttern erst an, wenn L10 montiert ist W02 korrekt montiert Ziehen Sie die Muttern erst an, wenn L09 montiert ist...
- Page 63 DEUTSCH Montage des vorderen Giebels...
- Page 64 DEUTSCH Montage des hinteren Giebels Schieben Sie vorsorglich zwei S01-Schrauben in die Mitte von L08A(B), diese werden im nächsten Schritt benötigt Schieben Sie vorsorglich zwei S01-Schrauben in die Mitte von L08C, diese werden im nächsten Schritt benötigt...
- Page 65 DEUTSCH Montage der Seitenwand...
- Page 66 DEUTSCH Pignon arrière Seitenwand Vorderer Giebel Seitenwand...
- Page 67 DEUTSCH Außenan- sicht...
- Page 68 DEUTSCH...
- Page 69 DEUTSCH...
- Page 70 DEUTSCH...
- Page 71 DEUTSCH Außenan- sicht...
- Page 72 DEUTSCH Anbringung der J19-Gummidichtung Einsetzen der Scheiben Achten Sie darauf, sich bei der Handhabung und Anpassung der Scheiben nicht zu verletzen Achten Sie darauf, sich bei GLAS GLAS GLAS der Montage der Klammern W14 nicht zu verletzen...
- Page 73 DEUTSCH Vorderseite Rückseite Haken W11 S Klammern W14 Teile Anzahl Teile Anzahl...
- Page 74 DEUTSCH...
- Page 75 DEUTSCH Tür links Tür rechts Tür Tür...
- Page 76 DEUTSCH...
- Page 77 DEUTSCH Fenster Fenster Fenster...
- Page 78 DEUTSCH...
- Page 79 DEUTSCH ┐╠Â╚ 25.400...
- Page 80 ESPAÑOL Estimado cliente Enhorabuena por la compra de su nuevo invernadero de jardín. Lea atentamente las siguientes instrucciones antes del montaje. Nota: antes de comenzar la construcción de su invernadero, tómese el tiempo necesario para identificar todos los posibles ⚠ riesgos, como por ejemplo, cables o tuberías enterrados o aéreos, etc.
- Page 81 ESPAÑOL Pieza Cant. Pieza Cant. L01A 1473 L01B 1473 L01C 1473 L01D 1473 L01E 1325 L13A L01F 1325 1745 L03A L13B L03B 1745 2440 L06A 1393 L06B L06C 1869 L07A 2383 L07B 2987 L07C L07D L08A 1759 L08B 1759 L08C 2150 L08D L22A...
- Page 82 ESPAÑOL Pieza Cant. Pieza Cant. ∅ ∅ 6*1.5 J04L Ø12*28 J04R M6*10 M6*16 M6*40 ┐╠Â╚ 25.400 Ø6.5*20 M6*14 M5*25 1.88M M6*60 Ø4*16 Ø4*6 W07A W07B Consejo importante: no necesitará W07C 3038 desmontar todo si olvidó poner los tornillos W07D 2435 S01, puede reemplazarlos con tornillos S04!
- Page 83 ESPAÑOL Montaje de la base Es esencial que la base del invernadero esté perfectamente cuadrada para que las medidas diagonales sean idénticas. L07A/L07B El invernadero también debe estar uniformemente nivelado con la parte delantera y la parte trasera, la plomada debe ser perfecta.
- Page 84 ESPAÑOL Montaje de la base Nota: Por favor, retire la película protectora de la superficie de las piezas W08 y W07 A (B/C/D) antes de montar la base W07C ASM_DEF_CSYS W07B(A) PRT_CSYS_DEF PRT_CSYS_DEF ASM_DEF_CSYS A SM_DEF_CSYS PRT_CSYS_DEF P RT_CSYS_DEF PRT_CSYS_DEF P RT_CSYS_DEF W07A(B) ASM_DEF_CSYS...
- Page 85 ESPAÑOL Montaje de la puerta izquierda L13A L11B L11A L13B L13B Nota: esta cara es la de L11A arriba L13A L13B L11A(B) L11A(B) Montaje de la puerta izquierda L11A L13A L11A L13A...
- Page 86 ESPAÑOL Conjunto de puerta derecha L13A L11B L11A L13B L13B Nota: esta cara es la de L11A arriba L13A L13B L11A(B) L11A(B) Montaje de la puerta izquierda L11B L13A L11B L13A...
- Page 87 ESPAÑOL Montaje de la ventana...
- Page 88 ESPAÑOL Montaje del piñón delantero No apriete las tuercas hasta que tenga montado L10 correctamente montado No apriete las tuercas antes del montaje de la pieza L09...
- Page 89 ESPAÑOL Conjunto de piñón delantero...
- Page 90 ESPAÑOL Montaje del piñón trasero En previsión, desliza dos S01 al centro de L08A (B), será necesario durante el siguiente paso de montaje En previsión, deslice dos S01 en el centro de L08C, esto será necesario en el siguiente paso de montaje...
- Page 91 ESPAÑOL Montaje de la pared lateral...
- Page 92 ESPAÑOL Piñón trasero Pared lateral Piñón frontal Pared lateral...
- Page 93 ESPAÑOL Vista desde el exterior...
- Page 94 ESPAÑOL...
- Page 95 ESPAÑOL...
- Page 96 ESPAÑOL...
- Page 97 ESPAÑOL Vista desde el exterior...
- Page 98 ESPAÑOL Montaje de la junta de goma J19 Cómo colocar los cristales Tenga cuidado de no lesionarse cuando esté manipulando o ajustando los cristales Tenga cuidado de no lesionarse al VIDRIO VIDRIO VIDRIO colocar los clips...
- Page 99 ESPAÑOL Frente Posterior Ganchos W11 S Clips W14 Piezas Cant. Piezas Cant.
- Page 100 ESPAÑOL...
- Page 101 ESPAÑOL Puerta izquierda Puerta derecha Puerta Puerta...
- Page 102 ESPAÑOL...
- Page 103 ESPAÑOL Ventana Ventana Ventana...
- Page 104 ESPAÑOL...
- Page 105 ESPAÑOL ┐╠Â╚ 25.400...
- Page 106 ITALIANO Caro cliente Congratulazioni per l’acquisto della tua nuova serra da giardino. Leggere attentamente le seguenti istruzioni prima procedere al montaggio. Attenzione: prima di procedere al montaggio della serra, prendetevi il tempo necessario per identificare tutti i pericoli ⚠ possibili come cavi o tubi interrati o aerei, ecc... Luogo di installazione Una posizione soleggiata, aperta, esposta a nord, protetta dai venti forti, è...
- Page 107 ITALIANO Parte Qtà Parte Qtà L01A 1473 L01B 1473 L01C 1473 L01D 1473 L01E 1325 L13A L01F 1325 L03A 1745 L13B L03B 1745 2440 L06A 1393 L06B L06C 1869 L07A 2383 L07B 2987 L07C L07D L08A 1759 L08B 1759 L08C 2150 L08D L22A...
- Page 108 ITALIANO Parte Qtà Parte Qtà 6*1.5 ∅ ∅ J04L Ø12*28 J04R M6*10 M6*16 M6*40 ┐╠Â╚ 25.400 Ø6.5*20 M6*14 M5*25 1.88M M6*60 Ø4*16 Ø4*6 W07A Suggerimento importante: W07B Non è necessario smontare tutto se avete W07C 3038 dimenticato di mettere le S01 viti, potete W07D 2435 sostituirle con le viti S04!
- Page 109 ITALIANO Montaggio della base È essenziale che la base della serra sia perfettamente quadrata in modo tale che le misure delle diagonali siano identiche. L07A/L07B La Serra deve essere uniformemente livellata anche in corrispondenza della facciata anteriore e della facciata posteriore, la perpendicolarità...
- Page 110 ITALIANO Montaggio della base Nota: rimuovere la pellicola protettiva dalla superficie delle parti W08 e W07 A (B/C/D) prima di montare la base W07C W07B(A) ASM_DEF_CSYS PRT_CSYS_DEF PRT_CSYS_DEF ASM_DEF_CSYS PRT_CSYS_DEF P RT_CSYS_DEF A SM_DEF_CSYS PRT_CSYS_DEF P RT_CSYS_DEF W07A(B) ASM_DEF_CSYS PRT_CSYS_DEF PRT_CSYS_DEF ASM_DEF_CSYS A SM_DEF_CSYS...
- Page 111 ITALIANO Montaggio della porta sinistra L13A L11B L11A L13B L13B Nota: questo lato in alto L11A L13A L13B L11A(B) L11A(B) Installazione della guarnizione in gomma della porta L11A L13A L11A L13A...
- Page 112 ITALIANO Montaggio della porta destra L13A L11B L11A L13B L13B Nota: questo lato in alto L11A L13A L13B L11A(B) L11A(B) Installazione della guarnizione in gomma della porta L11B L13A L11B L13A...
- Page 113 ITALIANO Montaggio della finestra...
- Page 114 ITALIANO Assemblaggio timpano anteriore Non stringere i bulloni prima di avere assemblato L10 correttamente assemblato Non stringere i bulloni prima di avere assemblato L09...
- Page 115 ITALIANO Montaggio del timpano anteriore...
- Page 116 ITALIANO Montaggio del timpano posteriore Far scorrere due S01 verso centro di L08A(B): questo passaggio sarà necessario per la fase di montaggio successiva Far scorrere due S01 verso centro di L08C: questo passaggio sarà necessario per la fase di montaggio successiva...
- Page 117 ITALIANO Montaggio della parete laterale...
- Page 118 ITALIANO Timpano posteriore Parete laterale Timpano anteriore Parete laterale...
- Page 119 ITALIANO Vista dall’esterno...
- Page 120 ITALIANO...
- Page 121 ITALIANO...
- Page 122 ITALIANO...
- Page 123 ITALIANO Vista dall’esterno...
- Page 124 ITALIANO Installazione della guarnizione in gomma J19 Installazione delle vetrate Fare attenzione a non ferirvi nel maneggiare e regolare i vetri Fate attenzione a non ferirvi durante VETRO VETRO VETRO l’installazione delle Clip W14...
- Page 125 ITALIANO Anteriore Posteriore Ganci W11 S Clips W14 Parti Qtà Parti Qtà...
- Page 126 ITALIANO...
- Page 127 ITALIANO Porta sinistra Porta destra Porta Porta...
- Page 128 ITALIANO...
- Page 129 ITALIANO Finestra Finestra Finestra...
- Page 130 ITALIANO...
- Page 131 ITALIANO ┐╠Â╚ 25.400...
- Page 132 POLSKI Szanowny kliencie Gratulujemy zakupu nowej szklarni ogrodowej. Prosimy o uważne przeczytanie poniższych instrukcji przed montażem. Uwaga: przed rozpoczęciem montażu szklarni należy poświęcić odpowiednią ilość czasu na rozpoznanie wszystkich możliwych ⚠ zagrożeń, takich jak wystające z ziemi kable bądź rury itp. Miejsce montażu Słoneczne, otwarte, skierowane na północ miejsce, zabezpieczone przed silnymi wiatrami, jest najodpowiedniejszym miejscem do uzyskania najlepszych efektów w prowadzeniu upraw w szklarni.
- Page 133 POLSKI Część Ilość Część Ilość 1473 L01A L01B 1473 L01C 1473 L01D 1473 L01E 1325 L13A L01F 1325 L03A 1745 L13B L03B 1745 2440 L06A 1393 L06B L06C 1869 L07A 2383 L07B 2987 L07C L07D L08A 1759 L08B 1759 L08C 2150 L08D L22A...
- Page 134 POLSKI Część Ilość Część Ilość ∅ ∅ 6*1.5 J04L Ø12*28 J04R M6*10 M6*16 M6*40 ┐╠Â╚ 25.400 Ø6.5*20 M6*14 M5*25 1.88M M6*60 Ø4*16 Ø4*6 W07A Ważna wskazówka: Nie musisz demontować W07B wszystkiego, jeśli zapomniałeś umieścić W07C 3038 śruby S01, można ich używać zamiennie ze W07D 2435 śrubami S04!
- Page 135 POLSKI Montaż podstawy Ważne jest, aby podstawa szklarni była idealnie prostopadła, tak aby wymiary przekątnych były identyczne. Szklarnia musi L07A/L07B być również równomiernie wypoziomowana z przodu i z tyłu oraz idealnie pionowa. Belka drewniana 25x20 mm Zakotwiczenie szklarni w gruncie jest niezbędne. Zalecamy użycie kotew mocujących, a jeśli mamy do czynienia z płytą...
- Page 136 POLSKI Montaż podstawy Uwaga: Proszę usunąć folię ochronną z powierzchni części W08 i W07 A (B/C/D) przed montażem podstawy W07C W07B(A) ASM_DEF_CSYS PRT_CSYS_DEF PRT_CSYS_DEF ASM_DEF_CSYS PRT_CSYS_DEF P RT_CSYS_DEF A SM_DEF_CSYS PRT_CSYS_DEF P RT_CSYS_DEF W07A(B) ASM_DEF_CSYS PRT_CSYS_DEF PRT_CSYS_DEF ASM_DEF_CSYS A SM_DEF_CSYS P RT_CSYS_DEF PRT_CSYS_DEF PRT_CSYS_DEF...
- Page 137 POLSKI Montaż drzwi lewych L13A L11B L11A L13B L13B Uwaga: tą stroną do góry L11A L13A L13B L11A(B) L11A(B) Montaż gumowej uszczelki do drzwi L11A L13A L11A L13A...
- Page 138 POLSKI Montaż drzwi prawych L13A L11B L11A L13B L13B Uwaga: tą stroną do góry L11A L13A L13B L11A(B) L11A(B) Montaż gumowej uszczelki do drzwi L11B L13A L11B L13A...
- Page 139 POLSKI Montaż okna...
- Page 140 POLSKI Montaż fasady - przedniej ramy ściennej Nie dokręcaj nakrętek, dopóki L10 nie zostanie zamontowany W02 prawidłowo zamontowane Nie dokręcaj nakrętek, dopóki L09 nie zostanie zamontowany...
- Page 141 POLSKI Montaż fasady - przedniej ramy ściennej...
- Page 142 POLSKI Montaż tylnej ramy ściennej Przesuń dwa elementy S01 w kierunku środka części LO8A(B), będzie to niezbędne w kolejnym etapie montażu Przesuń dwa elementy S01 w kierunku środka części LO8C, będzie to niezbędne w kolejnym etapie montażu...
- Page 143 POLSKI Montaż ścian bocznych...
- Page 144 POLSKI Ściana tylna Ściana boczna Ściana przednia Ściana boczna...
- Page 145 POLSKI Widok z zewnątrz...
- Page 146 POLSKI...
- Page 147 POLSKI...
- Page 148 POLSKI...
- Page 149 POLSKI Widok z zewnątrz...
- Page 150 POLSKI Montaż gumowej uszczelki J19 Dopasowanie szyb Należy uważać, aby nie zranić się podczas obchodzenia się ze szklanymi płytami i w czasie ich montażu Uważaj, aby nie zranić się podczas SZKŁO SZKŁO SZKŁO montażu klipsów W14...
- Page 151 POLSKI Przód Tył Haki W11 S Klipsy W14 Części Ilość Części Ilość...
- Page 152 POLSKI...
- Page 153 POLSKI Lewe drzwi Drzwi prawe Drzwi Drzwi...
- Page 154 POLSKI...
- Page 155 POLSKI Okno Okno Okno...
- Page 156 POLSKI...
- Page 157 POLSKI ┐╠Â╚ 25.400...