
Manuels Connexes pour Classe CA-3200


Sommaire des Matières pour Classe CA-3200
- Page 1 Owner’s Manual CA-3200 Power Amplifier Manuel d’utilisation CA-3200 Amplificateur de Puissance...
- Page 2 (Electromagnetic Compatibility) and LVD (Low Voltage Directive) standards of the European Community. Classe products are designed to comply with international directives on the Restriction of Hazardous Substances (RoHS) in electrical and electronic equipment and the disposal of Waste Electrical and Electronic Equipment (WEEE).
-
Page 3: Important Safety Instructions
Important Safety Instructions Caution: Please read and observe all warnings and instructions in this owner’s manual and all those marked on the unit. Retain this owner’s manual for future reference. 1. Do not attempt to service this product yourself. Do not open the cover for any reason. There are no user-serviceable parts inside. -
Page 4: Table Des Matières
Contents Welcome to the Classé family................5 a word about installation ..................5 Unpacking and Placement................6 unpacking your amplifier ..................6 placement......................6 ventilation ......................6 custom installations ....................7 serial number......................7 register your purchase!...................7 operating voltage ....................7 warm up/break-in period ..................8 please read this manual…..................8 Special Design Features ...................9 highly refined circuit design...................9 extensive listening tests ..................9... -
Page 5: Welcome To The Classé Family
You will find the warranty registration card at the end of the separate warranty policy booklet, enclosed. a word about installation Every effort has been made to make the Classé CA-3200 simple and straightforward to install and use. Still, we have no way to evaluate many other variables such as the size and shape of your room, its acoustics, and the associated equipment you have chosen to use with your amplifier. -
Page 6: Unpacking And Placement
The vents on both the bottom and the top of the CA-3200 must be kept free from any obstruction which would reduce the flow of air through the unit. Avoid... -
Page 7: Custom Installations
It will take only a minute or so. Please complete the card now, before you forget. operating voltage The CA-3200 power amplifier is set at the factory (internally) for 100V, 120V, 230V, or 240V AC mains operation, as appropriate for the country in which it is to be sold (230V only in European Union countries, in compliance with CE regulations). -
Page 8: Warm Up/Break-In Period
The CA-3200 includes protection circuitry that will prevent the amplifier from operating at dangerously high or low voltages. • At startup: the AC mains voltage must be within a range of approximately -15% to +10% of its nominal value at startup, or the amplifier will not turn on. -
Page 9: Special Design Features
Special Design Features highly refined All Classé analog amplification stages are based on circuits that have been circuit design extensively optimized over many years of continuous development. By starting with excellent circuit designs and working with them over the years, we are able to discover the many small refinements that add up to superlative performance, in a variety of applications. -
Page 10: Extraordinary Longevity
extraordinary longevity Another benefit of having worked with highly refined circuit designs so extensively over many years is that we have vast experience in what works well over the long term. By using only the highest quality parts to begin with, and then using them in an informed way as a result of both accelerated aging experiments and actual long- term experience, we are able to design and manufacture products which we are confident will stand the test of time. -
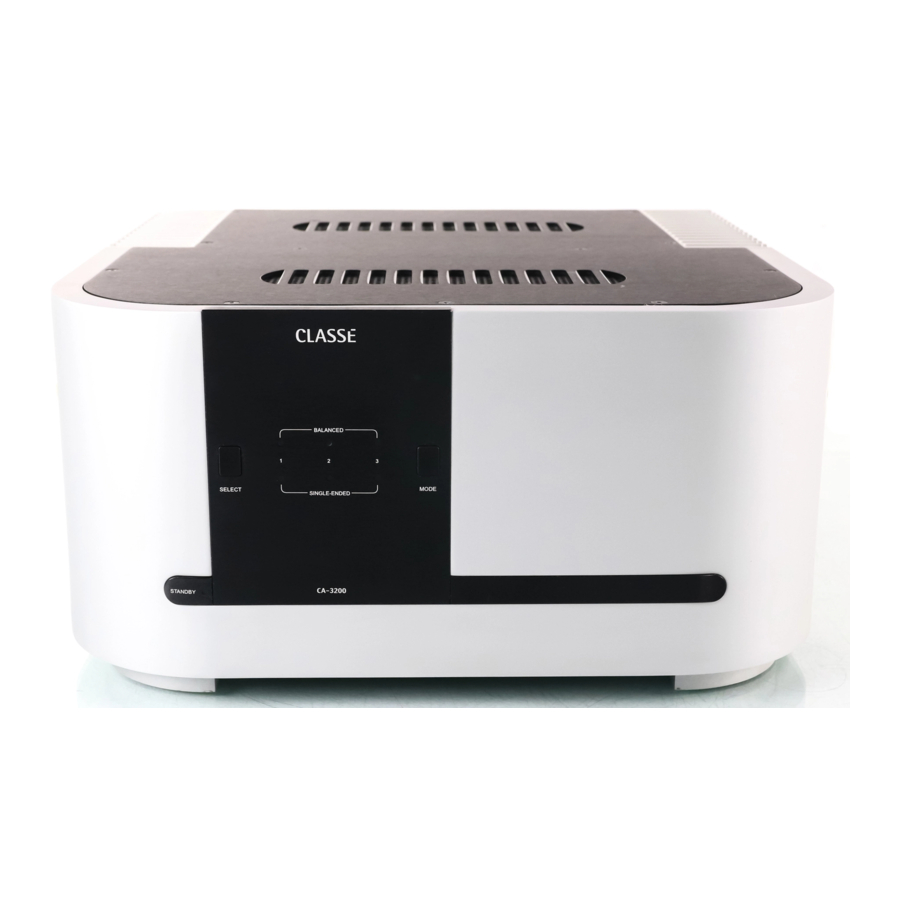
Page 11: Front Panel
Front Panel Standby button & LED indicator The front panel Standby button will toggle the amplifier between operate, its fully operational state, and a standby mode that leaves the amplifier off, yet ready to respond to system commands via any of the supported control options (e.g. - Page 12 Also, it is a good practice to physically disconnect any and all valuable electronics from the AC mains during electrical storms, as a lightning strike anywhere near your home can put a tremendous surge on the AC mains that can easily damage any piece of electronics, no matter how well designed and protected.
-
Page 13: Rear Panel
Rear Panel The following descriptions are intended as a quick reference, should you have any questions about your new product. Please see the next section (entitled Initial Setup) for specific advice on incorporating your new amplifier into your system. Balanced (XLR) Input Balanced audio interconnections were originally developed in the professional audio world, for preserving the delicate nuances of extremely small microphone-level signals. - Page 14 For this reason, we strongly recommend using the balanced analog interconnections between your Classé components wherever possible. The pin assignments of these XLR input connectors are: Pin 1: Signal ground Pin 2: Signal + (non-inverting) Pin 3: Signal – (inverting) Connector ground lug: chassis ground These pin assignments are consistent with the standard adopted by the Audio Engineering Society (AES14-1992).
- Page 15 Classé CAN Bus Control Ports These RJ-45 connectors are reserved for future control and communication applications using Classé Audio’s implementation of the Controller Area Network (CAN) Bus specification. IR Input and Output Your Classé amplifier includes two -inch mini mono-jacks in order to 8 th support the IR remote controls that are ubiquitous today.
- Page 16 For more information, please contact your dealer and ask about home automation systems. AC Mains Input An IEC standard power cord is used with the CA-3200. Plug the cord into the IEC receptacle on the rear panel, and the other end into a suitable wall outlet.
- Page 17 Danger! Potentially dangerous voltages and current capabilities exist within your power amplifier, even when disconnected from AC mains. Do not attempt to open any portion of the amplifier’s cabinet. There are no user-serviceable parts inside your power amplifier. All service of this product must be referred to a qualified Classé...
-
Page 18: Initial Setup
Initial Setup Your new Classé amplifier is quite simple to set up and enjoy. Please follow the steps outlined below in order to safely set up and use your new amplifier. Important: The AC mains connection should be the last connection you make on your new power amplifier. - Page 19 configuring amplifier In a system that contains multiple Classé amplifiers, you may set the turn-on delay/amp no. number of seconds of turn-on delay for each amplifier, allowing each to turn on in the order you have specified, rather than all at once. This number also acts as an ID when using the CAN Bus.
-
Page 20: Care And Maintenance
Double-check all your connections. We understand that this step sounds redundant, but it is worth the extra minute or two it might take just to ensure that all connections are correct and secure before plugging the power cables to the AC outlets. Turn on all the other components in your system, and then turn on your amplifier. -
Page 21: Troubleshooting
If the LED continues to blink, there is a fault condition in the amplifier itself. It should be powered down, disconnected from the AC mains and taken to your Classe dealer for service. • If it powers up without any difficulty, power it back down and reconnect only the inputs. - Page 22 The AC mains fuse is blown. There is a specific troubleshooting procedure for a blown AC mains fuse, since this rare occurrence sometimes indicates a significant problem. Please follow the following steps, in order: a. Disconnect your amplifier from the AC mains, as well as from its input connections and speaker connections, and remove the fuse cover on the rear of the unit.
-
Page 23: Specifications
Specifications Classé Audio reserves the right to make improvements without notice. ■ Power output 200W/ch continuous rms @ 8Ω (both channels driven) 390W/ch continuous rms @ 4Ω ■ Frequency response 10Hz – 22kHz (+0/-0.1dB) 10Hz – 155kHz (+0/-3.0dB) ■ Phase better than -10°... - Page 24 Cet appareil a été testé et satisfait totalement aux normes concernant les appareils numériques de Classe B, selon le chapitre 15 des normes FCC. Ces limites concernent une protection raisonnable contre les risques d’interférences dans une installation résidentielle. Cet appareil génère, utilise et peut rayonner une énergie radiofréquence, ce qui, s’il n’est pas installé...
-
Page 25: Importantes Instructions Concernant La Sécurité
Importantes instructions concernant la sécurité Attention : Veuillez lire et observer toutes les instructions et recommandations de ce manuel d’utilisation, ainsi que celles inscrites sur l’appareil lui-même. Conservez soigneusement ce manuel d’utilisation. 1. Ne tentez pas de réparer vous-même l’appareil. Ne jamais retirer son capot, pour quelque raison que ce soit. - Page 26 Sommaire Bienvenue dans la famille Classé ..............27 Un mot concernant l’installation................27 Déballage et installation ................28 Déballage de votre amplificateur .................28 Installation......................28 Ventilation ......................28 Installations particulières ..................29 Numéro de série ....................29 Enregistrez votre achat !..................29 Tension d’alimentation..................29 Période de rodage/mise en chauffe ..............30 Veuillez lire ce manuel d’utilisation…...
-
Page 27: Bienvenue Dans La Famille Classé
Vous trouverez cette carte de garantie à la fin du livret de garantie séparé contenu dans l’emballage. Un mot concernant Tous les efforts nécessaires ont été accomplis pour rendre le Classé CA-3200 l’installation simple et évident à utiliser. Cependant, nous n’avons aucun moyen de connaître et évaluer certaines vari- ables telles que la taille et la forme de votre pièce d’écoute, son acoustique et... -
Page 28: Déballage Et Installation
Déballage et installation Déballage de Veuillez déballer soigneusement votre amplificateur de puissance suivant les votre amplificateur instructions fournies, et retirez tous ses accessoires du carton d’emballage. Prenez garde lorsque vous soulevez l’amplificateur, car il est assez lourd. Important ! Conservez tous les éléments du carton d’emballage et ce dernier pour tout transport futur. -
Page 29: Installations Particulières
Cela ne vous prendra qu’une minute. Veuillez s’il vous plaît compléter la carte maintenant. Ensuite, vous allez oublier… Tension d’alimentation L’amplificateur de puissance CA-3200 est réglé en usine (de manière interne) sur une tension d’alimentation de 100 V, ou 120 V, ou 230 V, ou 240 V, suivant le pays dans lequel il a été... -
Page 30: Période De Rodage/Mise En Chauffe
Le CA-3200 intègre un circuit de protection qui évite à l’amplificateur de fonctionner sous une tension d’alimentation trop forte ou trop faible. • À l’allumage : la tension d’alimentation doit se trouver dans une fourchette d’environ – 15 % à + 10 % de sa valeur nominale, ou l’amplificateur ne s’allumera pas. -
Page 31: Caractéristiques Particulières De La Conception
Caractéristiques particulières de la conception Conception très Tous les étages analogiques d’amplification Classé sont basés sur des circuits qui sophistiquée des circuits ont été grandement améliorés au fil des années d’un développement continuel. En débutant avec des schémas électroniques excellents et en les travaillant ensuite pendant des années, nous avons pu découvrir des raffinements subtils mais essentiels, garantissant des performances absolument exceptionnelles dans une grande variété... -
Page 32: Fiabilité Extraordinaire
Fiabilité extraordinaire Un des autres avantages de travailler depuis de nombreuses années sur des circuits électroniques sophistiqués, maintes et maintes fois améliorés, concerne l’expérience que nous avons de leur fiabilité à long terme. En utilisant uniquement des composants de très haute qualité, et en connaissant parfaitement leur comportement face à... -
Page 33: Face Avant
Face avant Touche de mise en veille Standby et diode LED indicatrice La touche de mise en veille Standby de la face avant permet de basculer l’amplificateur entre son mode de fonctionnement normal et son mode de veille Standby qui “ éteint ” l’amplificateur tout en lui permettant de réagir aux différents modes d’allumage qu’il supporte (télécommande infrarouge, commutation par courant continu DC Trigger, prise bus CAN, ou prise RS-232). - Page 34 C’est aussi une excellente habitude que de débrancher physiquement du secteur tous les appareils électroniques sophistiqués pendant un orage, car ses éclairs peuvent entraîner une surtension secteur importante capable de dépasser les limites d’un simple interrupteur général secteur. Une telle surtension (qui peut atteindre plusieurs centaines de volts) peut endommager n’importe quel appareil électronique, quelles que soient sa robustesse et sa qualité...
-
Page 35: Face Arrière
Face arrière Les descriptions qui suivent sont conçues pour vous servir de guide instantané en réponse aux questions que vous pourriez vous poser concernant votre nouvel appareil. Veuillez vous reporter au chapitre suivant (titré Réglage initial) pour de plus amples précisions, et pour l’intégration parfaite de votre nouvel amplificateur dans votre système. - Page 36 Pour cette raison, nous vous recommandons vivement d’utiliser les liaisons symétriques entre tous vos maillons Classé, à chaque fois que cela est possible. Le brochage des prises femelles XLR d’entrée est le suivant : Broche 1 : masse du signal Broche 2 : Signal + (non inversé) Broche 3 : Signal –...
- Page 37 Prises de commande Classé CAN Bus Ces prises de type RJ-45 sont réservées pour de futures applications concernant le contrôle et la communication entre maillons. Entrée et sortie IR (infrarouge) Votre amplificateur Classé intègre deux prises mini mono-jacks capables de véhiculer les signaux infrarouge de télécommande très répandus aujourd’hui.
- Page 38 Prise d’alimentation secteur AC Mains Le CA-3200 utilise un câble d’alimentation secteur normalisé IEC. Branchez ce câble IEC dans la prise correspondante à l’arrière de l’amplificateur, puis ensuite son autre extrémité dans une prise d’alimentation secteur murale.
- Page 39 Danger ! Il y a à l’intérieur de l’amplificateur des tensions et courants électriques potentiellement dangereux, même lorsque celui- ci est débranché de son alimentation secteur. Ne jamais essayer d’ouvrir tout ou partie du coffret de l’appareil. Il n’y a à l’intérieur de l’amplificateur aucun élément susceptible d’être changé...
-
Page 40: Réglage Initial
Réglage initial Votre nouvel amplificateur Classé est d’utilisation très simple. Veuillez simplement suivre les étapes suivantes pour garantir le réglage et l’utilisation sûrs et efficaces de votre nouvel amplificateur. Important : Le branchement de l’alimentation secteur doit toujours être le dernier effectué... -
Page 41: Configuration De L'allumage De L'amplificateur
Configuration de l’allumage Dans les systèmes utilisant plusieurs amplificateurs de puissance Classé, de l’amplificateur vous pouvez classer par ordre numérique tous les amplificateurs, qui porteront alors les numéros #1, #2, #3 et ainsi de suite. Lorsqu’ils sont reliés à un préamplificateur Classé via la prise CAN Bus ou par commutation Trigger, ils s’allumeront successivement dans l’ordre de leur numéro, et non tous en même temps. -
Page 42: Entretien & Maintenance
Vérifiez deux fois toutes les connexions Nous savons bien que ce paragraphe peut sembler inutile et agaçant, mais il n’est pourtant jamais inutile de dépenser une ou deux minutes pour bien vérifier chaque connexion, et éventuellement vérifier puis modifier celles qui semblent de qualité... -
Page 43: Dysfonctionnements
Dysfonctionnements En règle générale, consultez toujours votre revendeur agréé Classé en cas de problème. Avant cela, toutefois, vérifiez si le problème rencontré n’est pas évoqué ci-après. Essayez alors la ou les solutions proposées. Si rien ne résout votre problème, consultez votre revendeur agréé Classé. Pas de son, et les diodes LED des canaux ne s’allument pas. - Page 44 Le fusible d’alimentation secteur a fondu La procédure de résolution du problème “ fusible secteur fondu ” est particulière, d’autant que cet événement – très rare – indique généralement la présence d’un problème sérieux. Veuillez donc suivre les étapes suivantes, en respectant bien leur ordre : a.
-
Page 45: Spécifications
Spécifications ■ Puissance de sortie nominale : 200 W/canal RMS en continu @ 8 Ω 390 W/canal RMS en continu @ 4 Ω ■ Réponse en fréquence : 10 Hz à 22 kHz (+0/-0,1 dB) 10 Hz à 155 kHz (+0/-3 dB) ■... -
Page 46: Dimensions
Dimensions... - Page 48 Classé Audio 5070 François Cusson Lachine, Quebec Canada H8T 1B3 +1 (514) 636-6384 +1 (514) 636-1428 (fax) http://www.classeaudio.com email: cservice@classeaudio.com Copyright © 2005 Classé Audio Inc. Printed in Canada. v1.9 110405...