Table des Matières
Publicité
Liens rapides
Publicité
Table des Matières

Manuels Connexes pour Schubert Etude 450 USB


Sommaire des Matières pour Schubert Etude 450 USB
- Page 1 Etude 450 USB Keyboard Clavier Teclado Tastiera 10031456...
-
Page 3: Table Des Matières
Sehr geehrter Kunde, wir gratulieren Ihnen zum Erwerb Ihres Gerätes. Lesen Sie die folgenden Hinweise sorgfältig durch und befolgen Sie diese, um möglichen Schäden vorzubeugen. Für Schäden, die durch Missachtung der Hinweise und unsachgemäßen Gebrauch entstehen, übernehmen wir keine Haftung. Scannen Sie den folgenden QR-Code, um Zugriff auf die aktuellste Bedienungsanleitung und weitere Informationen rund um das Produkt zu erhalten. -
Page 4: Sicherheitshinweise
SICHERHEITSHINWEISE • Benutzen Sie nur den mitgelieferten Adapter. Sollte er kaputt gehen, ersetzen Sie ihn umgehend. • Das Keyboard darf nur von geschulten Fachkräften auseinander gebaut werden. Falls es nicht ordnungsgemäß funktioniert, spielen Sie nicht weiter und wenden Sie sich an einen Fachbetrieb in Ihrer Nähe. •... -
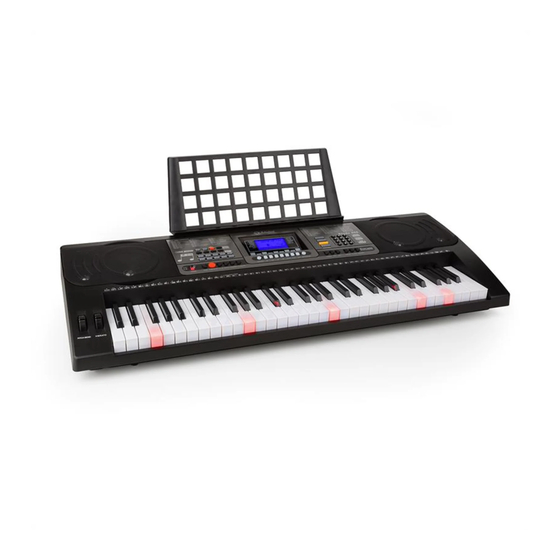
Page 5: Geräteübersicht
GERÄTEÜBERSICHT 1 Lautsprecher 15 Rhythmus 29 Sustain 2 LCD Display 16 Timbre 30 Dual 3 Power 17 Nummerntasten 31 SPLIT 4 Master-Lautstärke 18 Sync 32 One Key 5 Akkord-Lautstärke 19 Start/Stop 33 Follow 6 Rhythmus-Laustärke 20 Intermezzo 34 Ensemble 7 Transpose 21 Einzelakkord 35 Tonhöhenänderung 8 Tuning... -
Page 6: Anschlüsse
ANSCHLÜSSE Netzteil Verwenden Sie nur das mitgelieferten Netzteil. Verbinden Sie das Ende des Netzteils mit dem Netzanschluss auf der Rückseite des Keyboards und stecken Sie dann den Stecker in die Steckdose. Hinweis: Die Eingangsspannung des Adapters muss mit der Versorgungs- spannung übereinstimmen. -
Page 7: Bedienung Und Funktionen
Die USB-MIDI-Schnittstelle auf des Keyboards kann auch zum Anschluss von Musikgeräten und Computern mit MIDI-Schnittstelle verwendet werden. Melodien, die auf dem Keyboard gespielt werden können so auf dem Computer ausgegeben werden. Dadurch kann Aufnahme, Komposition und Bearbeitung durch den Computer und eine entsprechende Software realisiert werden. -
Page 8: Auto-Rhythmen
Schlagzeug aktivieren Drücken Sie [Keyboard Percussion], um die Schlagzeug-Funktion zu aktivieren. In diesem Modus können Benutzer die Tastatur des Keyboards nutzen, um bestimmte Schlaginstrumente zu spielen. Drücken Sie diese Taste erneut, um die Schlagzeug-Funktion zu deaktivieren. Demos abspielen Zur Auswahl stehen 65 Demo-Songs, von „000“ bis „064“. Drücken Sie [Demo Song], und die Demo-Songs werden nacheinander abgespielt. -
Page 9: Akkordbegleitung
Tempoeinstellung Drücken Sie [Tempo+] oder [Tempo-], um die Rhythmusgeschwindigkeit zu erhöhen oder zu verringern. Drücken Sie gleichzeitig auf beide Tasten, um die Standardeinstellung wiederherzustellen. Rhythmus-Lautstärkeeinstellung Drücken Sie [Rhythm Vol ] oder [Rhythm Vol ], um die Rhythmuslautstärke zu erhöhen oder zu verringern. Drücken Sie gleichzeitig [Rhythm Vol ] und [Rhythm Vol ], um die Standardeinstellung wiederherzustellen. -
Page 10: Effekt-Kontrolle
EFFEKT-KONTROLLE Transponieren Mit der Transpositionsfunktion können Sie die Tonhöhe bis zu 6 Stufen anheben oder absenken. Drücken Sie [Transpose ], um den Ton um eine halben Stufe abzusenken, die Melodie wechselt von der C-Stimmung in die zu B-Stimmung. Drücken Sie [Transpose ], um den Ton um eine halbe Stufe anzuheben, und die Melodie wechselt von der C-Stimmung in die #C-Stimmung oder bD-Stimmung. -
Page 11: Aufnahmefunktion
DOUBLE-TONE-Funktion Wenn die Doppeltonfunktion aktiviert ist, wird auf dem Bildschirm „Double“ angezeigt. In diesem Modus erzeugen Sie einen überlagerten Toneffekt. Drücken Sie [Tone], um zwischen Tone 1 und Tone 2 zu wechseln, und „TONE 1“ oder „TONE 2“ erscheinen auf dem Bildschirm. SPLIT-Funktion Wenn Sie die Funktion SPLIT aktivieren, wird „Split“... -
Page 12: Rhythmen Programmieren
RHYTHMEN PROGRAMMIEREN So programmieren Sie Rhythmen Drücken Sie auf [PROG], um die Programmierfunktion für Rhythmen zu starten. Das Display zeigt „Program“ an und die Schlagzeug-Tastatur wird aktiviert. In diesem Modus können Sie eigene Rhythmen einspielen, indem Sie auf die entsprechenden Tasten drücken. Sobald Sie den Rhythmus mit einem neuen Rhythmus überschreiben oder das Keyboard ausschalten wird der erstellte Rhythmus gelöscht. -
Page 13: Training Und Übungen
TRAINING UND ÜBUNGEN Die intelligente Trainingsfunktion besteht aus drei Schritten, die es dem Spieler ermöglichen, Schritt für Schritt die Tastatur zu erlernen. Zuerst beginnt der Lernende einzelnen Töne zu üben, indem er der lichtgesteuerten Tastatur folgt, um sich mit Tönen und Tasten vertraut zu machen. In Schritt 2 lernen Sie Melodien zu üben und nachzuspielen. -
Page 14: Klangtabelle
KLANGTABELLE Piano Bass Clarinet FX Effect 000 Acoustic Grand Piano 032 Acoustic Bass 064 Soprano Sax 096 FX 1 (rain) 001 Bright Acoustic Piano 033 Electric Bass(finger) 065 Alto Sax 097 FX 2 (soundtrack) 002 Electric Grand Piano 034 Electric Bass (pick) 066 Tenor Sax 098 FX 3 (crystal) 003 Honky-tonk Piano... - Page 15 Percussion instrument 163 Synth Banjo 199 Violin Lead 237 Bass Oboe 128 Percussion 164 Japan Synth 200 Cello Lead 238 Bright Oboe 165 Church Piano 201 Pizzicato rhythm 239 distortio oboe Nation tone 166 Church electric Piano 202 high Harp 240 English Horn ensemble 129 bangdi 167 Synth Piano...
- Page 16 271 Wind Lead 306 Baritone Xylophone 343 Jazz Electric Piano Bass synthesizer 272 Atmosphere Lead 307 Clean Piano 344 Rock Timpani 380 The bass 273 Sharp Lead 308 Bright Dulcimer 345 Fantasy Atmosphere 381 Bright bass 274 Bright Lead 309 Rhythm Grand Piano 346 Heavy metals Pad 382 Heavy bass 275 East Nation Pad...
-
Page 17: Rhythmustabelle
416 Music vocal ensemble 426 Clear syn Tuba 438 Baritone Sax 450 Heavy metal flute 417 Magic Ensemble 427 Bass France 439 Solo baritone Sax 451 Digital flute 418 Vocal percussion ensemble 428 Fantasy France 440 Distortion oboe 452 Synthesis voiceless clari 419 Oriental synthetic voice 429 Solo copper pipe 441 Heavy rock Oboe... - Page 18 Latin Polka Psychedelic Ballad 067 Baiao 105 Polka1 131 Psychedelic 1 161 Classical ballad1 068 Bolero 106 Polka2 132 Psychedelic 2 162 Classical ballad2 069 Bossanova1 107 Polka3 133 Goth Psychedelic 163 Light Ballad 070 Bossanova2 134 Soul Psychedelic 1 164 Rhythm Ballad C&W 071 Bossanova3...
- Page 19 190 Pop reggae1 209 Pop Bachata 1 World Music 244 China Pop13 191 Pop reggae2 210 Pop Bachata 2 225 World 1 245 Thailand Pop 192 Rock Tango1 211 Pop Bachata 3 226 World2 246 West Band 193 Rock Tango2 212 Enthusiasm Samba1 227 Blue 194 Rock Tango3...
-
Page 20: Spezielle Entsorgungshinweise Für Verbraucher In Deutschland
SPEZIELLE ENTSORGUNGSHINWEISE FÜR VERBRAUCHER IN DEUTSCHLAND Entsorgen Sie Ihre Altgeräte fachgerecht. Dadurch wird gewährleistet, dass die Altgeräte umweltgerecht verwertet und negative Auswirkungen auf die Umwelt und menschliche Gesundheit vermieden werden. Bei der Entsorgung sind folgende Regeln zu beachten: • Jeder Verbraucher ist gesetzlich verpflichtet, Elektro- und Elektronikaltgeräte (Altgeräte) sowie Batterien und Akkus getrennt vom Hausmüll zu entsorgen. - Page 21 • Bei einem Vertrieb unter Verwendung von Fernkommunikationsmitteln ist die unentgeltliche Abholung am Ort der Abgabe auf Elektro- und Elektronikgeräte der Kategorien 1, 2 und 4 gemäß § 2 Abs. 1 ElektroG, nämlich „Wärmeüberträger“, „Bildschirmgeräte“ (Oberfläche von mehr als 100 cm²) oder „Großgeräte“ (letztere mit mindestens einer äußeren Abmessung über 50 Zentimeter) beschränkt.
-
Page 22: Hinweise Zur Entsorgung
HINWEISE ZUR ENTSORGUNG Wenn es in Ihrem Land eine gesetzliche Regelung zur Entsorgung von elektrischen und elektronischen Geräten gibt, weist dieses Symbol auf dem Produkt oder auf der Verpackung darauf hin, dass dieses Produkt nicht im Hausmüll entsorgt werden darf. Stattdessen muss es zu einer Sammelstelle für das Recycling von elektrischen und elektronischen Geräten gebracht werden. - Page 23 Dear Customer, Congratulations on purchasing this device. Please read the following instructions carefully and follow them to prevent possible damages. We assume no liability for damage caused by disregard of the instructions and improper use. Scan the QR code to get access to the latest user manual and more product information.
-
Page 24: Safety Instructions
SAFETY INSTRUCTIONS • Dedicated power adapter shall be used, and in case of adaptor damage, replace it immediately • The keyboard can only be disassembled by professionals, and no change can be made to the internal structure. In case of any functional abnormality during performance, stop performing immediately and send the keyboard to professionals for maintenance. -
Page 25: Product Description
PRODUCT DESCRIPTION 1 Loudspeaker 15 Rhythm 29 Sustain 2 LCD display 16 Timbre 30 Dual 3 Power 17 Numbers 31 SPLIT 4 Master Volume 18 Sync 32 One Key 5 Chord Volume 19 Start/Stop 33 Follow 6 Rhythm Volume 20 Fill-in 34 Ensemble 7 Transpose 21 Single... -
Page 26: Connections
CONNECTIONS AC/DC Power adaptor A dedicated AC/DC power adapter shall be used. Connect the output end of the adaptor to the power port on the rear panel of the keyboard, and then the other end to the power socket. Note: The input voltage of the adaptor shall be compatible with the power supply voltage. -
Page 27: Operation And Functions
The USB-MIDI interface on the keyboard can also be used for connection with music equipment and computer with MIDI. Melody played with this keyboard can be output to the computer, and further recording, composing and editing can be realized through computer and software. In addition, MIDI music stored in the computer can be input to the keyboard for playing. -
Page 28: Auto Rhythm
Playing demos 65 demos are stored in the keyboard, from “000” to “064”, for your selection. Press [Demo Song], and the demo song will play in order, and you can press the “+” / “-” buttons to select other demo. When playing the songs, you can press the number buttons to select the corresponding demos, and the selected demos will play in a loop. -
Page 29: Auto Bass Chord
AUTO BASS CHORD Fingered chord Press [Fingered ] to enable the chord function, and “Finger” will show on the screen. Under the rhythm activated mode, you can play in the chord key zone (the 1st-19th key, from left) with fingered chord fingering to obtain automatic chord accompaniment;... -
Page 30: Effect Control
EFFECT CONTROL Transposing With the transposing function, you can play music of other tunes with C-tune fingering method. Press [Transpose ] to decrease the tone by half (minor second), and the tune in C-tune keyboard zone will change to B-tune. Press [Transpose ] to increase the tone by half (minor second), and the tune in C-tune keyboard zone will change to #C tune or bD tune. -
Page 31: Recording
Double-tone When the double-tone function is enabled, “Double” will show on the screen. Under this mode, you can obtain an overlaid tone effect. Press [Tone] to shift between Tone 1 and Tone 2 as needed, and the corresponding “TONE 1” and “TONE 2”... -
Page 32: Rhythm Programming
RHYTHM PROGRAMMING Rhythm programming Press [PROG] to enable the rhythm programming function. “Program” will show on the screen, and the keyboard percussion will be activated. Under this mode, you can create custom rhythms by playing the corresponding percussion keys. The programmed rhythm will be cleaned upon reprogramming or shutdown of the keyboard. -
Page 33: Intelligent Three-Step Training
INTELLIGENT THREE-STEP TRAINING The intelligent training function consists of three steps, which can guide the learner to play the keyboard step by step. Firstly, the learner can practice by following the guidance of step one “One Key” to get familiar with the melody and beat, and then move to the step two “Follow”. -
Page 34: Timbre Table
TIMBRE TABLE Piano Bass Clarinet FX Effect 000 Acoustic Grand Piano 032 Acoustic Bass 064 Soprano Sax 096 FX 1 (rain) 001 Bright Acoustic Piano 033 Electric Bass(finger) 065 Alto Sax 097 FX 2 (soundtrack) 002 Electric Grand Piano 034 Electric Bass (pick) 066 Tenor Sax 098 FX 3 (crystal) 003 Honky-tonk Piano... - Page 35 Percussion instrument 163 Synth Banjo 199 Violin Lead 237 Bass Oboe 128 Percussion 164 Japan Synth 200 Cello Lead 238 Bright Oboe 165 Church Piano 201 Pizzicato rhythm 239 distortio oboe Nation tone 166 Church electric Piano 202 high Harp 240 English Horn ensemble 129 bangdi 167 Synth Piano...
- Page 36 271 Wind Lead 306 Baritone Xylophone 343 Jazz Electric Piano Bass synthesizer 272 Atmosphere Lead 307 Clean Piano 344 Rock Timpani 380 The bass 273 Sharp Lead 308 Bright Dulcimer 345 Fantasy Atmosphere 381 Bright bass 274 Bright Lead 309 Rhythm Grand Piano 346 Heavy metals Pad 382 Heavy bass 275 East Nation Pad...
-
Page 37: Rhythm Table
416 Music vocal ensemble 426 Clear syn Tuba 438 Baritone Sax 450 Heavy metal flute 417 Magic Ensemble 427 Bass France 439 Solo baritone Sax 451 Digital flute 418 Vocal percussion ensemble 428 Fantasy France 440 Distortion oboe 452 Synthesis voiceless clari 419 Oriental synthetic voice 429 Solo copper pipe 441 Heavy rock Oboe... - Page 38 Latin Polka Psychedelic Ballad 067 Baiao 105 Polka1 131 Psychedelic 1 161 Classical ballad1 068 Bolero 106 Polka2 132 Psychedelic 2 162 Classical ballad2 069 Bossanova1 107 Polka3 133 Goth Psychedelic 163 Light Ballad 070 Bossanova2 134 Soul Psychedelic 1 164 Rhythm Ballad C&W 071 Bossanova3...
- Page 39 190 Pop reggae1 209 Pop Bachata 1 World Music 244 China Pop13 191 Pop reggae2 210 Pop Bachata 2 225 World 1 245 Thailand Pop 192 Rock Tango1 211 Pop Bachata 3 226 World2 246 West Band 193 Rock Tango2 212 Enthusiasm Samba1 227 Blue 194 Rock Tango3...
-
Page 40: Disposal Considerations
DISPOSAL CONSIDERATIONS If there is a legal regulation for the disposal of electrical and electronic devices in your country, this symbol on the product or on the packaging indicates that this product must not be disposed of with household waste. Instead, it must be taken to a collection point for the recycling of electrical and electronic equipment. - Page 41 Chère cliente, cher client, Toutes nos félicitations pour l’acquisition de ce nouvel appareil. Veuillez lire attentivement et respecter les instructions de ce mode d’emploi afin d’éviter d’éventuels dommages. Nous ne saurions être tenus pour responsables des dommages dus au non-respect des consignes et à...
-
Page 42: Consignes De Sécurité
CONSIGNES DE SÉCURITÉ • Utiliser uniquement l’adaptateur fourni. S’il se casse, le remplacer immédiatement. • Le synthétiseur doit être démonté uniquement par des techniciens qualifiés. S’il ne fonctionne pas correctement, ne pas continuer à en jouer et contacter une entreprise spécialisée à proximité. •... -
Page 43: Aperçu De L'appareil
APERÇU DE L’APPAREIL 1 Enceintes 15 Rythme 29 Soutien 2 Écran LCD 16 Timbre 30 Double tonalité 3 Marche/arrêt 17 Touches numérotées 31 SPLIT 4 Volume master 18 Sync 32 One Key 5 Volume des accords 19 Start/stop 33 Follow 6 Volume des rythmes 20 Interlude 34 Ensemble... -
Page 44: Branchements
BRANCHEMENTS Adaptateur secteur Utiliser uniquement l’adaptateur secteur fourni. Brancher une des extrémités de l’adaptateur secteur à l’arrière du synthétiseur puis brancher la fiche sur la prise. Remarque : La tension d’entrée de l’adaptateur doit correspondre à la tension d’alimentation. Sortie audio / casque externe Sortie audio : éteindre tout d’abord le clavier et les appareils audio •... -
Page 45: Utilisation Et Fonctions
L’interface USB-MIDI du synthétiseur peut servir à brancher des instruments de musique et des ordinateurs avec interface MIDI. Les mélodies jouées par le synthétiseur peuvent ainsi être diffusés sur l’ordinateur. De cette manière, il est possible de créer un enregistrement, une composition ou une variation grâce à... -
Page 46: Rythmes Auto
Activation de la batterie Apuyer sur [Keyboard Percussion] pour activer la fonction batterie. Ce mode permet à l’utilisateur d’utiliser le clavier du synthétiseur pour jouer des instruments de percussion précis Appuyer de nouveau sur cette touche pour désactiver la fonction batterie. Lecture des démos 65 morceaux de démo sont mis à... -
Page 47: Accompagnement D'accords
Réglage du tempo Appuyer sur [Tempo+] ou [Tempo-] pour augmenter ou diminuer le tempo. Appuyer simultanément sur les deux touches pour revenir aux paramètres par défaut. Réglage du volume des rythmes Appuyer sur [Rhythm Vol ] ou [Rhythm Vol ], pour augmenter ou diminuer le volume des rythmes. -
Page 48: Contrôle Des Effets
CONTRÔLE DES EFFETS Transposition La fonction de transposition permet de monter ou de descendre en tonalité sur 6 niveaux. Appuyer sur [Transpose ] pour baisser la tonalité d’un demi- ton, la mélodie est alors transposée de la tonalité C (Do) à B (Si). Appuyer sur [Transpose ] pour monter la tonalité... -
Page 49: Fonction D'enregistrement
Appuyer sur [Tone] pour passer de Tone 1 à Tone 2, et « TONE 1 » ou « TONE 2 » s’affichent à l’écran. Fonction SPLIT Si la fonction SPLIT est activée, « SPLIT » s’affiche à l’écran. Il est ainsi possible d’attribuer un autre son d’instrument à... -
Page 50: Programmer Des Rythmes
PROGRAMMER DES RYTHMES Comment programmer des rythmes Appuyer sur [PROG] pour démarrer la fonction de programmation de rythmes. L’écran affiche « Program » et le clavier de batterie est activé. Dans ce mode, il est possible de jouer ses propres rythmes en appuyant sur les touches appropriées. -
Page 51: Entraînement Et Exercices
ENTRAÎNEMENT ET EXERCICES La fonction d’entraînement intelligent est composée de trois étapes permettant à l’utilisateur d’apprendre à utiliser le clavier pas-à-pas. L’apprenant commence d’abord par s’entraîner avec des notes uniques en suivant les touches indiquées par un éclairage, pour apprendre à connaître les notes et les touches. -
Page 52: Tableau Des Sons
TABLEAU DES SONS Piano Bass Clarinet FX Effect 000 Acoustic Grand Piano 032 Acoustic Bass 064 Soprano Sax 096 FX 1 (rain) 001 Bright Acoustic Piano 033 Electric Bass(finger) 065 Alto Sax 097 FX 2 (soundtrack) 002 Electric Grand Piano 034 Electric Bass (pick) 066 Tenor Sax 098 FX 3 (crystal) - Page 53 Percussion instrument 163 Synth Banjo 199 Violin Lead 237 Bass Oboe 128 Percussion 164 Japan Synth 200 Cello Lead 238 Bright Oboe 165 Church Piano 201 Pizzicato rhythm 239 distortio oboe Nation tone 166 Church electric Piano 202 high Harp 240 English Horn ensemble 129 bangdi 167 Synth Piano...
- Page 54 271 Wind Lead 306 Baritone Xylophone 343 Jazz Electric Piano Bass synthesizer 272 Atmosphere Lead 307 Clean Piano 344 Rock Timpani 380 The bass 273 Sharp Lead 308 Bright Dulcimer 345 Fantasy Atmosphere 381 Bright bass 274 Bright Lead 309 Rhythm Grand Piano 346 Heavy metals Pad 382 Heavy bass 275 East Nation Pad...
-
Page 55: Tableau Des Rythmes
416 Music vocal ensemble 426 Clear syn Tuba 438 Baritone Sax 450 Heavy metal flute 417 Magic Ensemble 427 Bass France 439 Solo baritone Sax 451 Digital flute 418 Vocal percussion ensemble 428 Fantasy France 440 Distortion oboe 452 Synthesis voiceless clari 419 Oriental synthetic voice 429 Solo copper pipe 441 Heavy rock Oboe... - Page 56 Latin Polka Psychedelic Ballad 067 Baiao 105 Polka1 131 Psychedelic 1 161 Classical ballad1 068 Bolero 106 Polka2 132 Psychedelic 2 162 Classical ballad2 069 Bossanova1 107 Polka3 133 Goth Psychedelic 163 Light Ballad 070 Bossanova2 134 Soul Psychedelic 1 164 Rhythm Ballad C&W 071 Bossanova3...
- Page 57 190 Pop reggae1 209 Pop Bachata 1 World Music 244 China Pop13 191 Pop reggae2 210 Pop Bachata 2 225 World 1 245 Thailand Pop 192 Rock Tango1 211 Pop Bachata 3 226 World2 246 West Band 193 Rock Tango2 212 Enthusiasm Samba1 227 Blue 194 Rock Tango3...
-
Page 58: Conseils Pour Le Recyclage
CONSEILS POUR LE RECYCLAGE S‘il existe une réglementation pour l‘élimination ou le recyclage des appareils électriques et électroniques dans votre pays, ce symbole sur le produit ou sur l‘emballage indique que cet appareil ne doit pas être jeté avec les ordures ménagères. Vous devez le déposer dans un point de collecte pour le recyclage des équipements électriques et électroniques. - Page 59 Estimado cliente: Le felicitamos por la adquisición de este producto. Lea atentamente las siguientes instrucciones y sígalas para evitar posibles daños. No asumimos ninguna responsabilidad por los daños causados por el incumplimiento de las instrucciones y el uso inadecuado. Escanee el siguiente código QR para obtener acceso a la última guía del usuario y más información sobre el producto.
-
Page 60: Indicaciones De Seguridad
INDICACIONES DE SEGURIDAD • Utilice solamente el adaptador incluido. Si se avería, sustitúyalo inmediatamente. • El teclado solo debe desmontarse por parte de personal especializado. Si el aparato está averiado, no siga tocando y contacte con un servicio técnico de la zona. •... -
Page 61: Descripción Del Aparato
DESCRIPCIÓN DEL APARATO 1 Altavoz 15 Melodía 29 Sostenido 2 Display LCD 16 Timbre 30 Dual 3 Encendido 17 Teclado numérico 31 SPLIT (división) 4 Volumen general 18 Sincronización 32 One Key (una tecla) 5 Volumen de acordes 19 Start/Stop 33 Follor (seguir) 6 Volumen de melodía 20 Interludio... -
Page 62: Conexiones
CONEXIONES Cable de alimentación Utilice exclusivamente la fuente de alimentación incluida. Conecte el extremo de la fuente de alimentación a la toma de red situada en la parte trasera del teclado y conecte el enchufe a la toma de corriente. Nota: la tensión de entrada del adaptador debe coincidir con la tensión de suministro. -
Page 63: Funcionamiento Y Funciones
La interfaz USB MIDI del teclado también puede utilizarse para conectar dispositivos musicales y ordenadores con dicha interfaz. Las melodías que se pueden reproducir en el teclado también pueden realizarse desde el ordenador. Así puede grabar, componer y editar a través del ordenador y un software correspondiente. -
Page 64: Melodías Automáticas
Reproducir canciones de prueba Tiene a su disposición 65 canciones de prueba, desde «000» hasta «064». Pulse [Demo Song] y las canciones de prueba se reproducirán de manera consecutiva. También puede utilizar los botones [+] y [-] para seleccionar otra canción de prueba. -
Page 65: Acompañamiento De Acordes
ACOMPAÑAMIENTO DE ACORDES Acorde digitado Pulse [Fingered] para activar la función de acorde digitado, y «Finger» aparece en el display. En el modo de ritmo activado, puede pulsar una tecla de la zona de acordes (las teclas 1 a 19 desde la izquierda) para obtener un acompañamiento automático de acordes. -
Page 66: Control De Efectos
CONTROL DE EFECTOS Transposing Con la función de transposición puede elevar o bajar la notación hasta 6 niveles con. Pulse [Transpose ] para reducir medio tono, la melodía cambia de la notación Do a la notación Si. Pulse [Tranpose ] para aumentar medio tono y la melodía pasa de la notación Do a la notación do sostenido o re. -
Page 67: Función De Grabación
Tono doble Si la función de doble tono está activada, aparecerá en el monitor «double». En este modo, se genera un efecto sobrepuesto del tono. Pulse [Tone] para cambiar entre el tono 1 y el tono 2, y «TONE 1» o «TONE 2» aparecerán en el display. -
Page 68: Programar Melodías
PROGRAMAR MELODÍAS Cómo programar los ritmos Pulse [PROG] para iniciar la función de programación para ritmos. El display muestra «Program» y se activa el teclado de percusión. En este modo puede tocar sus propias melodías pulsando las teclas correspondientes. Cuando una melodía se haya sobrescrito sobre otra o si apaga el teclado, la melodía creada se eliminará. -
Page 69: Práctica Y Ejercicios
PRÁCTICA Y EJERCICIOS La función inteligente de práctica se compone de tres pasos, que permiten al usuario aprender a tocar el teclado paso a paso. Primero, el alumno comienza a practicar con tonos separados, siguiendo el teclado controlado por luz para familiarizarse con los tonos y las teclas. -
Page 70: Tabla De Tonos
TABLA DE TONOS Piano Bass Clarinet FX Effect 000 Acoustic Grand Piano 032 Acoustic Bass 064 Soprano Sax 096 FX 1 (rain) 001 Bright Acoustic Piano 033 Electric Bass(finger) 065 Alto Sax 097 FX 2 (soundtrack) 002 Electric Grand Piano 034 Electric Bass (pick) 066 Tenor Sax 098 FX 3 (crystal) - Page 71 Percussion instrument 163 Synth Banjo 199 Violin Lead 237 Bass Oboe 128 Percussion 164 Japan Synth 200 Cello Lead 238 Bright Oboe 165 Church Piano 201 Pizzicato rhythm 239 distortio oboe Nation tone 166 Church electric Piano 202 high Harp 240 English Horn ensemble 129 bangdi 167 Synth Piano...
- Page 72 271 Wind Lead 306 Baritone Xylophone 343 Jazz Electric Piano Bass synthesizer 272 Atmosphere Lead 307 Clean Piano 344 Rock Timpani 380 The bass 273 Sharp Lead 308 Bright Dulcimer 345 Fantasy Atmosphere 381 Bright bass 274 Bright Lead 309 Rhythm Grand Piano 346 Heavy metals Pad 382 Heavy bass 275 East Nation Pad...
-
Page 73: Tabla De Melodías
416 Music vocal ensemble 426 Clear syn Tuba 438 Baritone Sax 450 Heavy metal flute 417 Magic Ensemble 427 Bass France 439 Solo baritone Sax 451 Digital flute 418 Vocal percussion ensemble 428 Fantasy France 440 Distortion oboe 452 Synthesis voiceless clari 419 Oriental synthetic voice 429 Solo copper pipe 441 Heavy rock Oboe... - Page 74 Latin Polka Psychedelic Ballad 067 Baiao 105 Polka1 131 Psychedelic 1 161 Classical ballad1 068 Bolero 106 Polka2 132 Psychedelic 2 162 Classical ballad2 069 Bossanova1 107 Polka3 133 Goth Psychedelic 163 Light Ballad 070 Bossanova2 134 Soul Psychedelic 1 164 Rhythm Ballad C&W 071 Bossanova3...
- Page 75 190 Pop reggae1 209 Pop Bachata 1 World Music 244 China Pop13 191 Pop reggae2 210 Pop Bachata 2 225 World 1 245 Thailand Pop 192 Rock Tango1 211 Pop Bachata 3 226 World2 246 West Band 193 Rock Tango2 212 Enthusiasm Samba1 227 Blue 194 Rock Tango3...
-
Page 76: Retirada Del Aparato
INDICACIONES SOBRE LA RETIRADA DEL APARATO Si en su país existe una disposición legal relativa a la eliminación de aparatos eléctricos y electrónicos, este símbolo estampado en el producto o en el embalaje advierte que no debe eliminarse como residuo doméstico. - Page 77 Gentile cliente, La ringraziamo per aver acquistato il dispositivo. La preghiamo di leggere attentamente le seguenti istruzioni per l’uso e di seguirle per evitare possibili danni. Non ci assumiamo alcuna responsabilità per danni scaturiti da una mancata osservazione delle avvertenze di sicurezza e da un uso improprio del dispositivo.
-
Page 78: Avvertenze Di Sicurezza
AVVERTENZE DI SICUREZZA • Utilizzare solo l´adattatore incluso nella consegna. In caso di rottura dell´adattatore, sostituirlo immediatamente. • La tastiera può essere smontata solo da personale specializzato. Se la tastiera non funziona correttamente, non utilizzarla e rivolgersi ad un tecnico. •... -
Page 79: Descrizione Del Prodotto
DESCRIZIONE DEL PRODOTTO 1 Altoparlanti 15 Ritmo 29 Sustain 2 Display LCD 16 Timbro 30 Dual 3 Power 17 Tasti numerici 31 SPLIT 4 Volume Master 18 Sync 32 One Key 5 Volume accordo 19 Start/Stop 33 Follow 6 Volume ritmo 20 Intermezzo 34 Ensemble 7 Transpose... -
Page 80: Collegamenti
COLLEGAMENTI Alimentatore Utilizzare solo l´adattatore incluso nella consegna. Collegare l’estremità dell´alimentatore all´attacco posto sul retro della tastiera e inserire la spina nella presa. Nota: la tensione di ingresso dell´adattatore deve corrispondere alla tensione di alimentazione. Uscita audio / cuffie esterne Uscita audio: spegnere per prima cosa la tastiera e i dispositivi audio •... -
Page 81: Utilizzo E Funzioni
Come realizzare il collegamento: collegare la tastiera e il computer tramite un cavo USB e premere il tasto Power. Installare sul computer un software per modificare la musica. Avviare il software. Selezionare l´interfaccia MIDI nel software. UTILIZZO E FUNZIONI Premere il tasto Power, il display LCD si accende e indica il tono attuale, il tempo, il volume e altre impostazioni. -
Page 82: Auto-Ritmi
AUTO-RITMI Selezione del ritmo La tastiera offre 260 ritmi (da “000” a “259”). Il ritmo standard è “000”. Premere [Rhythm] per attivare la funzione di selezione ritmo e sul display compare “RHYM”. Premere i tasti numerici oppure [+] e [-] per selezionare altri ritmi. -
Page 83: Accompagnamento Accordo
ACCOMPAGNAMENTO ACCORDO Fingered Premere [Fingered] per attivare la funzione Fingered: sul display appare “Finger”. In modalità ritmo, premere un tasto nell´area dei tasti per l´accordo (tasti da 1 a 19 da sinistra) per ottenere un accompagnamento dell´accordo automatico. Se non si è in modalità ritmo, è possibile suonare accordi normali. Premere [Fingered] oppure [Chord OFF] per terminare la funzione di accordo e “Finger”... -
Page 84: Controllo Effetto
CONTROLLO EFFETTO Transposing Con la funzione di trasposizione, è possibile aumentare o abbassare i toni fino a 6 livelli. Premere [Transpose ], per abbassare il tono di mezzo livello, la melodia passa dal tono C al tono B. Premere [Transpose ], per aumentare il tono di mezzo livello e la melodia passa dal tono C a #C oppure al tono bD. -
Page 85: Funzione Di Registrazione
Funzione SPLIT Quando si attiva la funzione SPLIT, sul display compare “Split”. I 24 tasti a sinistra sono ora separati dal resto dei tasti, mentre i tasti di destra aumentano di un ottavo e mantengono il tono originale. Funzione TOUCH Premere [TOUCH] per attivare o disattivare la funzione touch. -
Page 86: Programmare I Ritmi
PROGRAMMARE I RITMI Come programmare i ritmi Premere [PROG] per avviare la funzione di programmazione dei ritmi. Sul display compare “Program” e si attivano le percussioni. In questa modalità è possibile creare i propri ritmi premendo i tasti corrispondenti. Appena si sovrascrive il ritmo con uno nuovo oppure si spegne la tastiera, il ritmo creato viene cancellato. -
Page 87: Training Ed Esercizi
TRAINING ED ESERCIZI La funzione di training intelligente è composta da tre fasi che consentono all´utente di prendere confidenza con la tastiera. L´utente inizia ad esercitarsi con i singoli toni seguendo i tasti che si illuminano per acquisire familiarità con i suoni e i tasti. -
Page 88: Tabella Timbri
TABELLA TIMBRI Piano Bass Clarinet FX Effect 000 Acoustic Grand Piano 032 Acoustic Bass 064 Soprano Sax 096 FX 1 (rain) 001 Bright Acoustic Piano 033 Electric Bass(finger) 065 Alto Sax 097 FX 2 (soundtrack) 002 Electric Grand Piano 034 Electric Bass (pick) 066 Tenor Sax 098 FX 3 (crystal) 003 Honky-tonk Piano... - Page 89 Percussion instrument 163 Synth Banjo 199 Violin Lead 237 Bass Oboe 128 Percussion 164 Japan Synth 200 Cello Lead 238 Bright Oboe 165 Church Piano 201 Pizzicato rhythm 239 distortio oboe Nation tone 166 Church electric Piano 202 high Harp 240 English Horn ensemble 129 bangdi 167 Synth Piano...
- Page 90 271 Wind Lead 306 Baritone Xylophone 343 Jazz Electric Piano Bass synthesizer 272 Atmosphere Lead 307 Clean Piano 344 Rock Timpani 380 The bass 273 Sharp Lead 308 Bright Dulcimer 345 Fantasy Atmosphere 381 Bright bass 274 Bright Lead 309 Rhythm Grand Piano 346 Heavy metals Pad 382 Heavy bass 275 East Nation Pad...
-
Page 91: Tabella Ritmi
416 Music vocal ensemble 426 Clear syn Tuba 438 Baritone Sax 450 Heavy metal flute 417 Magic Ensemble 427 Bass France 439 Solo baritone Sax 451 Digital flute 418 Vocal percussion ensemble 428 Fantasy France 440 Distortion oboe 452 Synthesis voiceless clari 419 Oriental synthetic voice 429 Solo copper pipe 441 Heavy rock Oboe... - Page 92 Latin Polka Psychedelic Ballad 067 Baiao 105 Polka1 131 Psychedelic 1 161 Classical ballad1 068 Bolero 106 Polka2 132 Psychedelic 2 162 Classical ballad2 069 Bossanova1 107 Polka3 133 Goth Psychedelic 163 Light Ballad 070 Bossanova2 134 Soul Psychedelic 1 164 Rhythm Ballad C&W 071 Bossanova3...
- Page 93 190 Pop reggae1 209 Pop Bachata 1 World Music 244 China Pop13 191 Pop reggae2 210 Pop Bachata 2 225 World 1 245 Thailand Pop 192 Rock Tango1 211 Pop Bachata 3 226 World2 246 West Band 193 Rock Tango2 212 Enthusiasm Samba1 227 Blue 194 Rock Tango3...
-
Page 94: Avviso Di Smaltimento
AVVISO DI SMALTIMENTO Se nel proprio paese si applicano le regolamentazioni inerenti lo smaltimento di dispositivi elettrici ed elettronici, questo simbolo sul prodotto o sulla confezione segnala che questi prodotti non possono essere smaltiti con i rifiuti normali e devono essere portati a un punto di raccolta di dispositivi elettrici ed elettronici.