
Manuels Connexes pour Parrot DISCO FPV


Sommaire des Matières pour Parrot DISCO FPV
- Page 1 All manuals and user guides at all-guides.com USER GUIDE GUIDA UTENTE GUIDE UTILISATEUR HANDLEIDING GUÍA DEL USUARIO GUIA DO USUÁRIO دليل المس ـ ـتخدم المختصر BENUTZERHANDBUCH...
- Page 2 All manuals and user guides at all-guides.com...
- Page 3 All manuals and user guides at all-guides.com English �����������������������������������������������������������������4 Français ������������������������������������������������������������ Español ������������������������������������������������������������� Deutsch ���������������������������������������������������������� Italiano ����������������������������������������������������������� Nederlands ����������������������������������������������������� Português ������������������������������������������������������� � ��������������������������������������������������������...
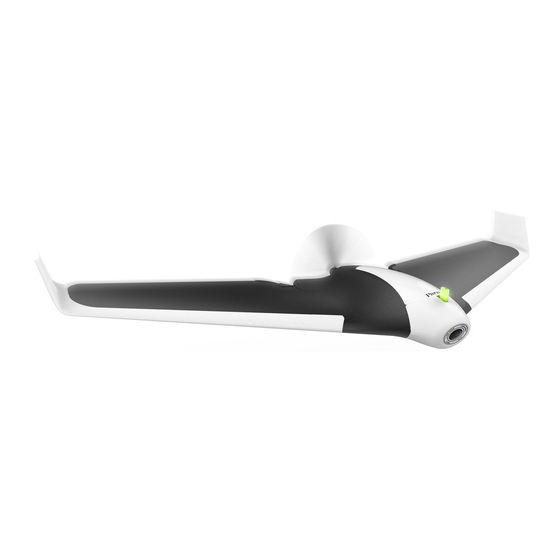
- Page 4 All manuals and user guides at all-guides.com PRESENTATION OF THE PARROT DISCO GENERAL Flap Servomotor Propeller Flap Servomotor Cowling Fisheye camera On/Off button, warning light and pitot tube...
- Page 5 All manuals and user guides at all-guides.com CHUCK AUTOPILOT UNIT RC remote port Battery connector Servomotor connectors Micro USB port Central engine connector...
- Page 6 All manuals and user guides at all-guides.com PRESENTATION OF THE PARROT SKYCONTROLLER 2 Location of the smartphone and tablet holder Antenna On/Off button During flight: take a photo Settings: Confirm Take off/ Settings Land Return home During flight: start/stop video recording...
- Page 7 All manuals and user guides at all-guides.com Switch to direct view or immersive view Set the camera exposure USB port Change the display mode on the application Vertical orientation of the camera...
- Page 8 • Samsung Galaxy S • LG G3 ® • Samsung Galaxy S • HTC One M8 ® • Samsung Galaxy S • Nexus 5 ® Never leave Parrot Cockpitglasses in the sun when not in use. This could damage your phone.
-
Page 9: Before Getting Started
FreeFlight Pro application to your smartphone or tablet. CHARGING THE PARROT DISCO’S BATTERY The battery must be disconnected from the Parrot Disco. 1. Select the plug for your country and put it on the charger. 2. Connect the cable to the charger. -
Page 10: Fitting The Battery
All manuals and user guides at all-guides.com FITTING THE BATTERY 1. Remove the Parrot Disco’s cowling. 2. Place the battery in the slot provided for this purpose. 3. Plug the battery into the Parrot Disco. 4. Close the Parrot Disco’s... - Page 11 All manuals and user guides at all-guides.com ATTACHING THE WINGS Attach the wings to either side of the Parrot Disco. Make sure the wings are properly secured in the servomotors. To remove the wings, pull on them. Do not move the servomotors with your hand to avoid damaging them.
-
Page 12: Pre-Flight Checks
Do not fly the Parrot Disco at night. Do not fly the Parrot Disco over an urban area or in certain places in the public domain (for example: train stations, airports, etc.). - Page 13 All manuals and user guides at all-guides.com PILOTING CONFIGURATIONS There are three piloting configurations. Familiarise yourself with no. 1 and no. 2 before using no. 3. Parrot Skycontroller 2 Parrot Skycontroller 2 alone and smartphone Parrot Skycontroller 2 and Parrot Cockpitglasses...
- Page 14 2. Press the Parrot Disco’s On/Off button. > The button flashes red and green once the GPS is connected. 3. Press the Parrot Skycontroller 2’s On/Off button to turn it on. 4. Wait until the warning light is a steady green.
- Page 15 CONNECTING YOUR PARROT SKYCONTROLLER 2 TO YOUR SMARTPHONE 1. Screw the smartphone holder onto the Parrot Skycontroller 2. You can rotate the holder to fit your smartphone’s dimensions. To do this, press on it and rotate it to the right.
- Page 16 4. Pass your smartphone’s USB cable through the opening in the drawer. 5. Plug one end of your smartphone’s USB cable into the Parrot Skycontroller 2 and the other end into your smartphone. > The FreeFlight Pro application will launch automatically on your smartphone.
- Page 17 0.0 m/s 0.000... 0.000... 8. Close the drawer and slide it into the Parrot Cockpitglasses. 9. Adjust the strap of the Parrot Cockpitglasses on your head. Note: Use the Parrot Skycontroller 2 to edit the FreeFlight Pro application’s settings when you are wearing Parrot Cockpitglasses.
- Page 18 You can take off. 4. Gently toss the Parrot Disco upward. > The Parrot Disco takes off. It goes up to 50 metres in altitude and then makes 60-metre diameter circles. Now you can fly it. Note: To stop the Parrot Disco’s engine, press the button again on your Parrot Skycontroller 2.
- Page 19 All manuals and user guides at all-guides.com PILOTING MODES AUTOPILOT This mode allows you to securely fly the Parrot Disco. During flight, the Parrot Disco maintains its speed and maintains its altitude. LEFT CONTROL RIGHT CONTROL Accelerate Go down Slow down...
-
Page 20: Manual Mode
All manuals and user guides at all-guides.com MANUAL MODE You can use an RC remote (not included) to fly the Parrot Disco. Manual mode offers no piloting assistance for the Parrot Disco. Configure the channels of your RC remote for the Parrot Disco. -
Page 21: Control Screen
All manuals and user guides at all-guides.com CONTROL SCREEN Return Home Take a photo Video recording Previous screen Parameters Map mode 00:00 mode 5848.6 45 % 95 % Parrot Disco’s Speed battery level Altitude GPS signal Parrot Skycontroller 2’s battery level Distance from your smartphone... -
Page 22: Fpv Mode
Parrot Disco without any other information. RETURN HOME To make the Parrot Disco return to its starting point, press the button on the Parrot Skycontroller 2 or on the FreeFlight Pro application. > The Parrot Disco sets its altitude to 50 meters, comes back towards its starting position and makes 60-meter diameter circles above this position. - Page 23 1. Position the Parrot Disco facing upwind. 2. Press the button on the Parrot Skycontroller 2. > The Parrot Disco descends in a straight line and then straightens and lands softly. Note: During the descent of the Parrot Disco, you can over-correct: go up, go down, turn left and turn right.
- Page 24 All manuals and user guides at all-guides.com CIRCULAR LANDING During circular landing, the Parrot Disco makes sure, by itself, that it 10 m lands facing upwind so as to limit its landing speed. 1. Make sure you have an area of at least 80 meters in diameter to 50 m land the Parrot Disco.
-
Page 25: Photos And Videos
TAKING PHOTOS On your Parrot Skycontroller 2, press the button to take a photo. The internal memory of the Parrot Disco has a capacity of 32 GB. The maximum number of stored photos depends on the format selected. For good quality photos, make sure the Parrot Disco is in photo mode. - Page 26 1. Make sure your flight plan is created and loaded. 2. Turn on your Parrot Disco. 3. Wait until the Parrot Disco’s warning light turns green. This means that the GPS is connected. 4. Connect your smartphone to the Parrot Disco and start the FreeFlight Pro application.
- Page 27 If the connection is not restored after 5 minutes, the Parrot Disco performs a circular landing. TURNING OFF THE PARROT DISCO To turn off the Parrot Disco, press and hold down the On/Off button. > The red light flashes, and then the Parrot Disco turns off. RETRIEVING YOUR PHOTOS...
- Page 28 4. Copy the photo and video recordings onto your computer. ON YOUR SMARTPHONE To retrieve photos and/or videos from the FreeFlight Pro application: 1. Turn on your Parrot Disco and connect it via Wi-Fi to your smart- phone. 2. On your smartphone, launch the FreeFlight Pro application and go to Menu >...
- Page 29 3. Copy this file to the root of your micro USB flash drive. 4. Turn on the Parrot Disco. 5. Connect the micro USB flash drive to one of the Parrot Disco’s ports. > The Parrot Disco automatically restarts and the warning light flashes yellow.
-
Page 30: Spare Parts
All manuals and user guides at all-guides.com SPARE PARTS You can buy spare parts for the Parrot Disco from our online store : www.parrot.com. For more information on the assembly of spare parts, see the video tutorials on our support page. - Page 31 • Linux & Open Source SDK for development BATTERY CHARGER • Input: 100-240V, 50h-60Hz, 1.2A • Output: Max 12.6Vdc, 3.5A • Maximum altitude: 2000m above sea level • Operating range: 0°C-40°C PARROT DISCO • Operating range: 0°C-40°C • Max current: 15A • Rated voltage: 11.1V...
-
Page 32: General Information
Keep the Parrot Disco away from high voltage power lines, buildings or any other potentially hazardous areas. Do not use this device near liquids. Do not place the Parrot Disco on water or on a wet surface as this could cause irreparable damage. - Page 33 Do not use Parrot Cockpitglasses when you are in a vehicle in motion, such as a car, bus or train, as this may increase the side effects.
- Page 34 Please separate your device from other types of waste to recycle it responsibly. This will help to foster the sustainable re-use of material resources. We invite you to contact your retailer or inquire at your local town hall to find out where and how the Parrot Skycontroller 2/Parrot Disco/Parrot Cockpitglasses can be recycled.
-
Page 35: Manufacturer Information
This transmitter must not be co-located or operating in conjunction with any other antenna or trans- mitter. TRADEMARKS Parrot Disco, Parrot Skycontroller, Parrot Cockpitglasses, Parrot C.H.U.C.K as well as their respective logos are trademarks of Parrot Drones SAS. Parrot and the Parrot logos are trademarks of Parrot S.A. - Page 36 All manuals and user guides at all-guides.com PRÉSENTATION DU PARROT DISCO GÉNÉRAL Aileron Servomoteur Hélice Aileron Servomoteur Capot Caméra Fisheye Switch On/Off et voyant lumineux...
- Page 37 All manuals and user guides at all-guides.com MODULE AUTOPILOTE C.H.U.C.K Port pour télécommande RC Connecteur batterie Connecteur servos Port micro-USB Connecteur moteur central...
-
Page 38: Présentation Du Parrot Skycontroller
All manuals and user guides at all-guides.com PRÉSENTATION DU PARROT SKYCONTROLLER 2 Emplacement du support pour smartphone Antenne Switch On/Off En vol : prendre une photo Décoller/ Paramètres Menu Paramètres : Atterrir valider Retour au point de départ En vol : démarrer /arrêter l’enregistrement vidéo... - Page 39 All manuals and user guides at all-guides.com Vue directe / Vue immersive Exposition de la caméra Port USB Mode d’affichage Orientation verticale de la caméra...
-
Page 40: Présentation Des Parrot Cockpitglasses
• LG G3 ® • Samsung Galaxy S • HTC One M8 ® • Samsung Galaxy S • Nexus 5 ® Ne laissez jamais les Parrot Cockpitglasses au soleil lorsque vous ne les utilisez pas. Cela pourrait endommager votre téléphone. -
Page 41: Avant De Commencer
FreeFlight Pro sur votre smartphone ou sur votre tablette. CHARGER LA BATTERIE DU PARROT DISCO La batterie doit être déconnectée du Parrot Disco. 1. Sélectionnez la prise correspondante à votre pays et insérez-la sur le chargeur. 2. Connectez le câble au chargeur. -
Page 42: Installer La Batterie
All manuals and user guides at all-guides.com INSTALLER LA BATTERIE 1. Retirez le capot du Parrot Disco. 2. Placez la batterie dans l’emplacement prévu à cet effet. 3. Branchez la batterie au Parrot Disco. 4. Refermez le capot du Parrot Disco. -
Page 43: Fixer Les Ailes
All manuals and user guides at all-guides.com FIXER LES AILES Fixez les ailes sur le Parrot Disco. Assurez-vous que l’aileron est entièrement emboité dans le bras du servomoteur. Pour retirer les ailes, tirez dessus. Ne bougez pas les servomoteurs à la main. -
Page 44: Vérifications Avant Vol
All manuals and user guides at all-guides.com VÉRIFICATIONS AVANT VOL Avant chaque session de vol avec le Parrot Disco, procédez aux vérifications suivantes : RÉGLEMENTATION Vérifiez que l’utilisation du Parrot Disco est autorisée sur votre lieu de vol. Renseignez-vous sur les restrictions d’utilisation des fréquences Wi-FI de votre lieu de vol. -
Page 45: Configurations De Pilotage
All manuals and user guides at all-guides.com CONFIGURATIONS DE PILOTAGE Il existe trois configurations de pilotage. Familiarisez-vous avec la n°1 et la n°2 avant d’utiliser la n°3. Parrot Skycontroller 2 Parrot Skycontroller 2 et seul smartphone Parrot Skycontroller 2 et Parrot Cockpitglasses... -
Page 46: Se Connecter Au Parrot Disco
2. Appuyez sur le switch On/Off du Parrot Disco. > Le voyant lumineux clignote rouge puis vert une fois le GPS fixé. 3. Appuyez sur le switch On/Off du Parrot Skycontroller 2. 4. Patientez jusqu’à ce que le voyant lumineux soit vert fixe. -
Page 47: Connecter Votre Smartphone Au Parrot Skycontroller
All manuals and user guides at all-guides.com CONNECTER VOTRE SMARTPHONE AU PARROT SKYCONTROLLER 2 1. Vissez le support pour smartphone sur le Parrot Skycontroller 2. Vous pouvez faire pivoter le support pour l’adapter aux dimensions de votre smartphone. Pour cela, appuyez dessus et faites-le pivoter à... - Page 48 > L’application FreeFlight Pro démarre automatiquement. Vous êtes connecté. UTILISER PARROT COCKPITGLASSES 1. Connectez votre Parrot Skycontroller 2 à votre drone. 2. Retirez le tiroir des Parrot Cockpitglasses. 3. Ouvrez le tiroir. 4. Faites passer le câble USB de votre smartphone dans l’ouverture du tiroir.
-
Page 49: Premier Vol : Utiliser La Fonction Flat Trim
PREMIER VOL : UTILISER LA FONCTION FLAT TRIM 1. Posez le Parrot Disco sur une surface plane. 2. Appuyez sur le switch On/Off pour allumer le Parrot Disco. 3. Sur votre smartphone, connectez-vous au Wi-Fi du Parrot Disco : ®... - Page 50 Vous pouvez décoller. 4. Lancez le Parrot Disco vers le haut. > Le Parrot Disco décolle. Il s’élève à 50 mètres d’altitude puis effectue des cercles de 60 mètres de diamètre. Vous pouvez alors le piloter. Note : Pour arrêter le moteur du Parrot Disco, appuyez à...
- Page 51 All manuals and user guides at all-guides.com PILOTER AUTOPILOTE Autopilote vous permet de piloter le Parrot Disco de façon sécurisée. Pendant le vol, le Parrot Disco maintient sa vitesse et conserve son altitude. COMMANDE GAUCHE COMMANDE DROITE Accélérer Descendre Ralentir...
-
Page 52: Mode Manuel
Le mode manuel ne propose aucune assistance au pilotage du Parrot Disco. Configurez les voies de votre télécommande RC pour le Parrot Disco. Pour cela, reportez-vous au manuel de votre télé- commande RC. Le Parrot Disco est difficile à piloter sans l’assistance de l’autopilote. -
Page 53: Ecran De Contrôle
Retour au point de départ Prendre une photo Enregistrement vidéo Ecran précédent Paramètres Mode carte 00:00 Mode Niveau 5848.6 45 % 95 % de batterie Vitesse du Parrot Disco Altitude Signal GPS Niveau de batterie du Parrot Skycontroller 2 Distance de votre smartphone... -
Page 54: Mode Fpv
• Plein écran : retour vidéo de la caméra du Parrot Disco sans autre information. RETOUR AU POINT DE DÉPART Pour faire revenir le Parrot Disco à son point de départ, appuyez sur le bouton du Parrot Skycontroller 2. > Le Parrot Disco revient vers sa position de départ et fait des cercles de 60 mètres de diamètre au-dessus de cette position. -
Page 55: Atterrissage Linéaire
: monter, descendre, tourner à gauche et tourner à droite. 10 m 50 m Pour annuler l’atterrissage, appuyez sur le bouton de votre Parrot Skycontroller 2. Le Parrot Disco s’élève à 50 mètres et fait des cercles de 60 mètres de diamètre. -
Page 56: Atterrissage Circulaire
All manuals and user guides at all-guides.com ATTERRISSAGE CIRCULAIRE Pendant l’atterrissage circulaire, le Parrot Disco s’assure seul d’arriver 10 m au sol face au vent afin de limiter sa vitesse d’atterrissage. 1. Assurez-vous que vous disposez d’une zone d’au moins 80 mètres 50 m de diamètre pour faire atterrir le Parrot Disco. -
Page 57: Photos Et Vidéos
All manuals and user guides at all-guides.com PHOTOS ET VIDÉOS Le Parrot Disco peut être utilisé en mode photo ou en mode vidéo. PRENDRE DES PHOTOS Sur votre Parrot Skycontroller 2, appuyez sur le bouton pour prendre une photo. La mémoire interne du Parrot Disco a une capacité de 32 Go. -
Page 58: Créer Un Plan De Vol
1. Assurez-vous que votre plan de vol est créé et chargé. 2. Allumez votre Parrot Disco. 3. Attendez que le voyant lumineux du Parrot Disco passe au vert. Cela signifie que le GPS a fixé. 4. Connectez votre smartphone au Parrot Disco et démarrez l’appli- cation FreeFlight Pro. -
Page 59: Perte De Connexion
All manuals and user guides at all-guides.com PERTE DE CONNEXION Pendant le vol, en cas de perte de connexion, le Parrot Disco fait des cercles de 60 mètres de diamètre pendant une période prédéfinie (10 secondes par défaut). Lorsque la connexion n’est pas rétablie, le Parrot Disco revient vers sa position de départ puis fais des cercles de 60 mètres de diamètre. -
Page 60: Sur Smartphone
4. Copiez les enregistrements photo et vidéo sur votre ordinateur. SUR SMARTPHONE Pour récupérer des photos et/ou vidéos depuis l’application FreeFlight Pro : 1. Allumez votre Parrot Disco et connectez-le en Wi-Fi à votre ® smartphone. 2. Sur votre smartphone, lancez l’application FreeFlight Pro et allez >... -
Page 61: Via Une Clé Micro-Usb
1. Connectez votre clé micro-USB (non fournie) sur un ordinateur. Assurez-vous que votre clé ne contient pas de fichiers au format .plf. 2. Allez sur la page support du Parrot Disco sur www.parrot.com, et téléchargez le fichier de mise à jour disponible au format .plf. -
Page 62: Spécifications Techniques
• Point d’accès de réseau • Type Wi-Fi ac, 2 antennes bi-bande (2,4 et 5GHz), entrées et sorties multiples • Jusqu’à 2 km de portée avec le Parrot Skycontroller et le Parrot Skycontroller 2 BATTERIE AMOVIBLE • 2700 mAh / 25A 3 cellules LipoBattery •... - Page 63 • Output : Max 12,6Vdc, 3.5A • Altitude maximale : 2000 m au-dessus du niveau de la mer • Plage de fonctionnement : 0°C-40°C PARROT DISCO • Plage de fonctionnement : 0°C-40°C • Courant max : 15A • Tension nominale : 11,1V...
-
Page 64: Informations Générales
PRÉCAUTIONS D’UTILISATION ET ENTRETIEN PARROT DISCO Le Parrot Disco est un aéromodèle conçu à des fins récréatives et de loisirs. Le pilote doit, à tout ins- tant, conserver un contact visuel avec le Parrot Disco et contrôler sa trajectoire. Le Parrot Disco doit être utilisé conformément aux règles de l’aviation civile de votre pays. Les lieux d’utilisation doivent être adaptés à... -
Page 65: Risques De Convulsions (Parrot Cockpitglasses)
Si du sable ou de la poussière pénètre dans les Parrot Cockpitglasses, ces dernières peuvent ne plus fonctionner correctement, de manière irréversible. Ne laissez pas les Parrot Cockpitglasses sous la pluie et ne les exposez pas de façon prolongée au soleil. -
Page 66: Garantie
GARANTIE Pour connaître les conditions de garanties, merci de vous référer aux Conditions Générales de vente du revendeur auprès de qui vous avez acheté le Parrot Disco, le Parrot Skycontroller 2 et les Parrot Cockpitglasses. COMMENT RECYCLER CE PRODUIT (PARROT DISCO ET PARROT SKYCONTROLLER 2) Ce symbole sur le produit ou sa documentation indique qu’il ne doit pas être éliminé... -
Page 67: Marques Déposées
Toutes autres marques mentionnées dans ce guide sont la propriété de leurs titulaires respectifs. INFORMATIONS FABRICANT Le Parrot Disco est fabriqué par : Parrot Drones SAS - 174 Quai de Jemmapes - 75010 Paris (France) - RCS Paris 808 408 074 - www.parrot.com... - Page 68 All manuals and user guides at all-guides.com PRESENTACIÓN DE PARROT DISCO GENERAL Alerón Servomotor Hélice Alerón Servomotor Cubierta Cámara ojo de pez Botón de encendido, piloto luminoso y sonda piloto...
- Page 69 All manuals and user guides at all-guides.com MÓDULO AUTOPILOTO C.H.U.C.K Puerto para mando de radiocontrol Conector batería Conector servos Puerto micro Conector motor central...
- Page 70 All manuals and user guides at all-guides.com PRESENTACIÓN DEL PARROT SKYCONTROLLER 2 Emplazamiento del soporte para móvil y tableta Antena Botón de encendido Durante el vuelo: iniciar/detener Despegar/ Ajustes la grabación en vídeo Aterrizar En los ajustes: volver Regreso al punto de despegue...
- Page 71 All manuals and user guides at all-guides.com Pasar de visión directa a visión inmersiva Exposición de la cámara Puerto USB Modificar el tipo de visualización en la aplicación Orientación vertical de la cámara...
- Page 72 • LG G3 ® • Samsung Galaxy S • HTC One M8 ® • Samsung Galaxy S • Nexus 5 ® No dejes nunca las Parrot Cockpitglasses al sol cuando no las estés utilizando, porque se podría estropear el teléfono.
-
Page 73: Antes De Comenzar
® cación gratuita FreeFlight Pro en tu móvil o tableta. CARGA DE LA BATERÍA DEL PARROT DISCO La batería tiene que estar desconectada del Parrot Disco. 1. Selecciona el enchufe que se corresponda a tu país y conéctalo al cargador. -
Page 74: Instalación De La Batería
All manuals and user guides at all-guides.com INSTALACIÓN DE LA BATERÍA 1. Retira la cubierta del Parrot Disco. 2. Coloca la batería en el compartimento previsto a tal efecto. 3. Conecta la batería al Parrot Disco. 4. Vuelve a cerrar la cubierta... - Page 75 All manuals and user guides at all-guides.com FIJACIÓN DE LAS ALAS Coloca las alas a un lado y otro del Parrot Disco. Comprueba que estén bien fijadas a los servomotores. Tira de las alas si quieres quitarlas. No muevas los servomotores con la mano para no estropearlos.
- Page 76 All manuals and user guides at all-guides.com VERIFICACIONES ANTES DEL VUELO Antes de cada sesión de vuelo con el Parrot Disco, hay que llevar a cabo estas comprobaciones: LEGISLACIÓN Comprueba que el uso del Parrot Disco esté autorizado allí donde vayas a volar con él.
- Page 77 All manuals and user guides at all-guides.com CONFIGURACIONES DE PILOTAJE Existen tres configuraciones de pilotaje. Familiarízate con la n.º 1 y la n.º 2 antes de utilizar la n.º 3. Parrot Skycontroller 2 Parrot Skycontroller 2 solo y teléfono móvil...
- Page 78 > El botón parpadea en rojo y después en verde cuando capta el GPS. 3. Pulsa en el botón de encendido del Parrot Skycontroller 2. 4. Espera a que el piloto luminoso permanezca iluminado en verde. Parrot Disco ya está conectado.
- Page 79 All manuals and user guides at all-guides.com CONECTAR EL MÓVIL AL PARROT SKYCONTROLLER 2 1. Atornilla el soporte para móvil en el Parrot Skycontroller 2. Gira el soporte para adaptarlo a las dimensiones de tu móvil. Solo tienes que pulsar encima y girarlo hacia la derecha.
- Page 80 All manuals and user guides at all-guides.com 4. Vuelve a ajustar el soporte al móvil. 5. Con el cable USB del móvil, conecta el móvil al puerto USB del Parrot Skycontroller 2. > La aplicación FreeFlight Pro se inicia automáticamente. Ya estás conectado.
- Page 81 0.0 m/s 0.000... 0.000... 8. Vuelve a cerrar el compartimento y deslízalo en las Parrot Cockpitglasses. 9. Ajusta la correa de las Parrot Cockpitglasses a la cabeza. Nota: utiliza el Parrot Skycontroller 2 para modificar los ajustes de la aplicación FreeFlight Pro cuando estés usando las Parrot Cockpitglasses.
- Page 82 Ya puedes despegar. 4. Lanza el Parrot Disco ligeramente hacia arriba. > Parrot Disco despega. Asciende a 50 metros de altitud y efectúa círculos de 60 metros de diámetro. Ya puedes empezar a pilotarlo. Nota: Para detener el motor del Parrot Disco, vuelva a pulsar en en el Parrot Skycontroller 2.
- Page 83 All manuals and user guides at all-guides.com MODOS DE PILOTAJE AUTOPILOTO Este modo te permite pilotar el Parrot Disco de manera segura. Durante el vuelo, Parrot Disco mantiene su velocidad y conserva su altitud. COMANDO IZQUIERDO COMANDO DERECHO Acelerar Bajar...
-
Page 84: Modo Manual
Parrot Disco. El modo Manual no ofrece ninguna asistencia al pilotaje del Parrot Disco. Configura las vías de tu mando de radiocontrol para el Parrot Disco. Para eso, consulta el manual del mando. Parrot Disco es difícil de pilotar sin la ayuda del autopiloto. El... -
Page 85: Pantalla De Control
Regreso al punto de despegue Hacer una foto Grabación en vídeo Ajustes Pantalla anterior Modo mapa 00:00 Modo Nivel de 5848.6 45 % 95 % batería del Velocidad Parrot Disco Altitud Señal GPS Nivel de batería del Parrot Skycontroller 2 Distancia del móvil... - Page 86 • Pantalla completa: Regreso del vídeo de la cámara del Parrot Disco sin otra información. REGRESO AL PUNTO DE DESPEGUE Para que el Parrot Disco regrese a su punto de despegue, pulsa en el botón del Parrot Skycontroller 2 o en la aplicación FreeFlight Pro.
- Page 87 10 m 50 m Para anular el aterrizaje, pulsa en el botón del Parrot Skycontroller 2. Parrot Disco asciende hasta los 50 metros y se mueve en círculos de 60 m de diámetro.
- Page 88 All manuals and user guides at all-guides.com ATERRIZAJE CIRCULAR Durante el aterrizaje circular, Parrot Disco se encarga de llegar él 10 m solo al suelo frente al viento para limitar la velocidad del aterrizaje. 1. Asegúrate de disponer de una zona de al menos 80 metros de 50 m diámetro para que aterrice el Parrot Disco.
- Page 89 All manuals and user guides at all-guides.com FOTOS Y VÍDEOS El Parrot Disco se puede utilizar en modo foto o modo vídeo. SACAR FOTOS En el Parrot Skycontroller 2, pulsa en el botón para hacer una foto. La memoria interna del Parrot Disco tiene una capacidad de 32 GB.
- Page 90 1. Comprueba que tu plan de vuelo esté creado y cargado. 2. Enciende el Parrot Disco. 3. Espera a que el piloto luminoso del Parrot Disco se ponga en verde (significa que ha captado la señal GPS). 4. Conecta el móvil al Parrot Disco y abre la aplicación FreeFlight Pro.
-
Page 91: Pérdida De Conexión
Si la conexión se vuelve a restablecer, Parrot Disco regresa a su posición de salida y vuela en círculos de 60 metros de diámetro. Si la conexión no se restablece al cabo de 5 minutos, Parrot Disco efectúa un aterrizaje circular. - Page 92 EN UN MÓVIL Para recuperar las fotos o los vídeos desde la aplicación FreeFlight Pro: 1. Enciende el Parrot Disco y conéctalo al teléfono por Wi-Fi. 2. En el móvil, abre la aplicación FreeFlight Pro y entra en Menú > Memoria interna.
- Page 93 3. Copia ese archivo en el directorio raíz de la unidad micro USB. 4. Enciende el Parrot Disco. 5. Conecta la unidad micro USB en uno de los puertos del Parrot Disco. > Parrot Disco se reinicia automáticamente y el piloto luminoso parpadea en amarillo.
-
Page 94: Características Técnicas
• Tipo Wi-Fi ac, 2 antenas bibanda (2,4 y 5 GHz), entradas y ® salidas múltiples. • Hasta 2 km de alcance con Parrot Skycontroller y Parrot Skycontroller 2. BATERÍA EXTRAÍBLE • 2700 mAh / 25 A de 3 células LipoBattery •... - Page 95 • Salida: 12,6 Vdc máximo, 3,5 A • Altitud máxima: 2000 m por encima del nivel del mar • Intervalo de funcionamiento: 0-40 °C PARROT DISCO • Intervalo de funcionamiento: 0-40 °C • Corriente máxima: 15 A • Tensión nominal: 11,1 V...
-
Page 96: Información General
PARROT SKYCONTROLLER 2 Parrot Skycontroller 2 sirve para pilotar un Bebop Drone, Bebop 2 y un Parrot Disco. No es un disposi- tivo apto para menores de 14 años. Consulta la lista de drones compatibles con Parrot Skycontroller 2 en la sección «Soporte» en www. - Page 97 Los niños menores de 14 años no deben utilizar unas Parrot Cockpitglasses. Los adultos deben super- visar a los niños (de 14 años o más) que estén utilizando unas Parrot Cockpitglasses para asegurarse de que no padezcan síntomas como los descritos anteriormente y deberán limitarles el tiempo de uso de las Parrot Cockpitglasses e imponer descansos.
- Page 98 De este modo, se contribuye al reaprovechamiento sostenible de los recursos materiales. Ponte en contacto con la tienda o solicita información en tu ayuntamiento para saber cómo y dónde se puede reciclar el Parrot Skycontroller 2/ Parrot Disco/Parrot Cockpitglasses.
-
Page 99: Información Del Fabricante
MT, NL, PL, PT, CZ, RO, GB, SK, SI, SE. Parrot Drones, sito en 174, quai de Jemmapes, 75010 París (Francia), declara bajo su única responsabilidad que el producto descrito en el presente manual del usuario cumple con las normas técnicas EN 301489-17, EN300328, EN71-1, EN71-2, EN71-3, EN62115, EN 50566: 2013 (SAR), de... - Page 100 All manuals and user guides at all-guides.com ÜBERSICHT ÜBER IHRE PARROT DISCO GESAMTÜBERSICHT Landeklappe Servomotor Propeller Landeklappe Servomotor Abdeckung Fisheye-Kamera On/Off-Knopf, Leuchtanzeige und Staudrucksonde...
- Page 101 All manuals and user guides at all-guides.com AUTOPILOT-MODUL C.H.U.C.K Anschluss für die Fernbedienung vom Typ RC Akku-Konnektor Servo-Konnektor Micro-USB- Anschluss Mittelmotor-Konnektor...
- Page 102 All manuals and user guides at all-guides.com ÜBERSICHT ÜBER DEN PARROT SKYCONTROLLER 2 Platz für die Smartphone- und Tablet-Halterung Antenne On/Off - Knopf Während des Fluges: Foto aufnehmen Starten/ Einstellungen In den Einstellungen: Landen bestätigen Rückkehr zum Ausgangspunkt Während des Fluges: Videoaufnahme starten/ stoppen In den Einstellungen: zurück...
- Page 103 All manuals and user guides at all-guides.com In die Direktansicht oder Immersivansicht wechseln Kameraausrichtung einstellen USB-Anschluss Anzeigemodus in der App ändern Vertikale Ausrichtung der Kamera...
- Page 104 • LG G3 ® • Samsung Galaxy S • HTC One M8 ® • Samsung Galaxy S • Nexus 5 ® Lassen Sie die Parrot Cockpitglasses niemals in der Sonne liegen, wenn Sie sie nicht benutzen. Dies könnte Ihr Telefon beschädigen.
-
Page 105: Vor Dem Start
Sie die kostenlose App FreeFlight Pro auf Ihr Smartphone oder Ihr Tablet herunter. AUFLADEN DES AKKUS DER PARROT DISCO Der Akku muss von der Parrot Disco getrennt sein. 1. Wählen Sie den Ihrem Land entsprechenden Adapter und stecken Sie ihn auf das Ladegerät. -
Page 106: Einlegen Des Akkus
EINLEGEN DES AKKUS 1. Nehmen Sie die Abdeckung der Parrot Disco ab. 2. Legen Sie den Akku in das dafür vorgesehene Fach. 3. Schließen Sie den Akku an die Parrot Disco an. 4. Schließen Sie die Abdeckung der Parrot Disco wieder. - Page 107 All manuals and user guides at all-guides.com ANBRINGEN DER FLÜGEL Bringen Sie die Flügel auf beiden Seiten der Parrot Disco an. Bringen Sie die Flügel auf beiden Seiten der Parrot Disco an. Ziehen Sie an den Flügeln, um sie wieder abzunehmen.
- Page 108 Sichtflug verhindern könnte. Steuern Sie die Parrot Disco nicht im Dunkeln. Fliegen Sie mit der Parrot Disco nicht über einem Stadtgebiet oder in bestimmten öffentlichen Bereichen (z.B.: Bahnhof, Flughafen…). Überprüfen Sie die Witterungsbedingungen. Fliegen Sie mit der Parrot Disco nicht bei Regen, Nebel, Schnee oder starkem Wind mit über 12 Metern pro Sekunde bzw.
- Page 109 All manuals and user guides at all-guides.com STEUERUNGS-KONFIGURATIONEN Es gibt drei Steuerungs-Konfigurationen. Machen Sie sich mit der ersten und zweiten Konfiguration vertraut, bevor Sie die dritte verwenden. Parrot Skycontroller 2 Parrot Skycontroller 2 allein und Smartphone Parrot Skycontroller 2 und Parrot Cockpitglasses...
- Page 110 > Der Knopf blinkt erst rot, und wenn der Empfang des GPS- Signals stabil ist, blinkt er grün. 3. Drücken Sie den Knopf On/Off des Parrot Skycontroller 2, um ihn einzuschalten. 4. Warten Sie, bis die Leuchtanzeige dauerhaft grün leuchtet.
- Page 111 All manuals and user guides at all-guides.com VERBINDUNG IHRE SMARTPHONES MIT DEM PARROT SKYCONTROLLER 2 1. Schrauben Sie die Smartphone-Halterung an den Parrot Skycontroller 2. Sie können die Halterung drehen, um sie den Maßen Ihres Smartphones anzupassen. Hierzu drücken Sie darauf und drehen Sie sie nach rechts.
- Page 112 4. Führen Sie das USB-Kabel Ihres Smartphones durch die Öffnung des Schubfachs. 5. Schließen Sie das eine Ende des USB-Kabels Ihres Smartphones an den Parrot Skycontroller 2 an und das andere Ende an Ihr Smartphone. > Die App FreeFlight Pro startet automatisch auf Ihrem Smart- phone.
- Page 113 8. Schließen Sie das Schubfach wieder und schieben Sie es in die Parrot Cockpitglasses. 9. Passen Sie das Kopfband der Parrot Cockpitglasses an Ihren Kopf an. Hinweis: verwenden Sie den Parrot Skycontroller 2 zur Änderung der Einstellungen der App FreeFlight Pro, wenn Sie die Parrot Cockpitglasses tragen.
- Page 114 Ihres Smartphones angezeigt. Sie können starten. 4. Geben Sie der Parrot Disco einen leichten Schwung nach oben. > Die Parrot Disco hebt ab. Sie fliegt auf eine Höhe von 50 Metern über dem Boden, dann kreist sie in einem Durchmesser von 60 Metern.
- Page 115 All manuals and user guides at all-guides.com STEUER-MODI AUTOPILOT In diesem Modus können Sie die Parrot Disco sicher steuern. Während des Fluges behält die Parrot Disco ihre Geschwindigkeit und ihre Flughöhe bei. LINKER JOYSTICK RECHTER JOYSTICK Beschleunigen Nach unten fliegen...
-
Page 116: Manueller Modus
(nicht mitgeliefert) verwenden. Im manuellen Modus wird keinerlei Unterstützung zur Steuerung der Parrot Disco angeboten. Konfigurieren Sie die Kanäle Ihrer RC-Fernbedienung für die Parrot Disco. Lesen Sie hierzu bitte die Bedienungsanleitung Ihrer RC-Fernbedienung. Die Parrot Disco ist ohne die Unterstützung des Autopiloten schwierig zu steuern. - Page 117 All manuals and user guides at all-guides.com KONTROLLBILDSCHIRM Rückkehr zum Ausgangspunkt Ein Foto aufnehmen Videoaufnahme Vorheriger Bildschirm Einstellungen Kartenmodus 00:00 5848.6 45 % 95 % Akkulades- Geschwindigkeit tand der Parrot Disco Flughöhe GPS-Signal Akkuladestand der Parrot Skycontroller 2 Entfernung Ihres Smartphones...
- Page 118 Sie den Knopf des Parrot Skycontroller 2 oder der App Free- Flight Pro. > Die Parrot Disco stabilisiert sich 50 Meter über dem Boden, kehrt zu ihrer Ausgangsposition zurück und kreist im Durchmes- ser von 60 Metern über dieser Stelle.
- Page 119 Sie sie steuern: nach oben oder unten fliegen, nach links und nach rechts drehen. 10 m 50 m Um die Landung zu stoppen, drücken Sie den Knopf Ihres Parrot Skycontroller 2. Die Parrot Disco steigt auf 50 Meter und kreist auf einem Durch- messer von 60 Metern.
- Page 120 All manuals and user guides at all-guides.com ZIRKULARE LANDUNG Während der zirkularen Landung stellt die Parrot Disco allein sicher, dass Sie gegen den Wind auf dem Boden landet, um ihre Landungs- geschwindigkeit zu verringern. 10 m 1. Stellen Sie sicher, dass Sie über einen Bereich von mindestens 80 Metern Durchmesser verfügen, wenn Sie die Parrot Disco landen...
-
Page 121: Fotos Und Videos
FOTOS UND VIDEOS Die Parrot Disco kann im Foto- oder Videomodus verwendet werden. FOTOS AUFNEHMEN Zur Aufnahme eines Fotos drücken Sie auf Ihrem Parrot Skycontroller 2 auf den Knopf Der interne Speicher der Parrot Disco hat eine Speicherkapazität von 32 GB. Die maximale Anzahl der gespeicherten Fotos hängt vom gewählten Format ab. - Page 122 1. Vergewissern Sie sich, dass Ihr Flugplan erstellt und hochgeladen ist. 2. Schalten Sie Ihre Parrot Disco ein. 3. Warten Sie, bis die Leuchtanzeige der Parrot Disco grün wird. Das bedeutet, dass der GPS-Empfang stabil ist. 4. Verbinden Sie Ihr Smartphone mit der Parrot Disco und starten Sie die App FreeFlight Pro.
- Page 123 Support-Seite der Parrot Disco auf www.parrot.com. AUSSCHALTEN DER PARROT DISCO Zum Ausschalten der Parrot Disco drücken Sie länger auf den On/ Off-Knopf. > Die Leuchtanzeige blinkt rot, dann schaltet sich die Parrot Disco aus. IHRE FOTOS UND VIDEOS ÜBERTRAGEN AUF DEN COMPUTER Verwenden Sie immer den linken Micro-USB-Anschluss der Parrot C.H.U.C.K.
- Page 124 AUF DAS SMARTPHONE Zur Übertragung der Fotos und/ oder Videos von der App FreeFlight Pro: 1. Schalten Sie Ihre Parrot Disco ein und verbinden Sie sie über WLAN mit Ihrem Smartphone. 2. Starten Sie auf Ihrem Smartphone die App FreeFlight Pro und gehen Sie in Menü...
- Page 125 1. Verbinden Sie Ihren Micro-USB-Stick (nicht mitgeliefert) mit einem Computer. Vergewissern Sie sch, dass Ihr Stick keine Dateien im PLF-Format enthält. 2. Gehen Sie auf die Support-Seite der Parrot Disco auf www.parrot.com und laden Sie die Update-Datei herunter, die im PLF-Format verfügbar ist.
-
Page 126: Technische Daten
WI-FI (WLAN) UND TRANSMISSION • Netz-Zugangspunkt • Wi-Fi ac, 2 Bi-Band MIMO Antennen (abgestimmt auf 2,4 und 5 GHz) • Bis zu 2 km Reichweite mit dem Parrot Skycontroller und dem Parrot Skycontroller 2. HERAUSNEHMBARER AKKU • 2700mAh/ 25 A 3-Zellen-LiPo-Akku •... - Page 127 & SDK Open source für die Entwicklung ® LADEGERÄT • Input: 100-240V, 50h-60Hz, 1.2A • Output: Max 12,6Vdc, 3.5A • Maximale Höhe: 2000 m über dem Meeresspiegel • Betriebsbereich: 0°C-40°C PARROT DISCO • Betriebsbereich: 0°C-40°C • Max. Stromstärke: 15A • Nennspannung: 11,1V...
-
Page 128: Allgemeine Informationen
PARROT DISCO Die Parrot Disco ist ein Modellflugzeug, das zu Erholungs- und Freizeitzwecken entworfen wurde. Die Person, die sie steuert, muss die Parrot Disco zu jedem Zeitpunkt im Auge behalten und ihre Flugbahn überwachen. Die Parrot Disco muss unter Beachtung der Regeln der Zivilluftfahrt Ihres Landes verwendet werden. - Page 129 Wenn Sand oder Staub in die Parrot Cockpitglasses eindringen, kann es sein, dass sie unwiderruflich nicht mehr ordnungsgemäß funktionieren. Lassen die die Parrot Cockpitglasses nicht im Regen liegen, und setzten Sie sie nicht über längere Zeit der Sonne aus. Verwenden Sie sie nicht in der Nähe von flüssigen Substanzen.
-
Page 130: Garantie
Die Nutzungseinschränkung außerhalb der Mitgliedsstaaten der Europäischen Union betrifft nur das erste Unterband des 5Ghz-Frequenzbandes (5150-5250MHz). Parrot DRONES, 174 quai de Jemmapes, 75010 Paris, Frankreich, erklärt in alleiniger Verantwortung, dass das in der vorliegenden Gebrauchsanweisung beschriebene Produkt mit den technischen Normen EN 301489-1 (v1.9.2), EN 301489-3 (v1.6.1), EN301489-17 (v2.2.1), EN300440-1 (v1.6.1), EN... - Page 131 Dieses Gerät darf verwendet werden in: DE, AT, BE, BG, CY, HR, DK, ES, EE, FI, FR, GR, HU, IR, IT, LV, LT, LU, MT, NL, PL, PT, CZ, RO, GB, SK, SI, SE. Parrot Drones SAS, 174 quai de Jemmapes, 75010 Paris, Frankreich, erklärt auf eigene Verantwortung, dass das in der vorliegenden Gebrauchsanweisung beschriebene Produkt den folgenden technischen Normen entspricht: EN 301489-17, EN300328, EN71-1, EN71-2, EN71-3, EN62115, EN50566: 2013 (SAR) gemäß...
- Page 132 All manuals and user guides at all-guides.com PRESENTAZIONE DEL PARROT DISCO GENERALE Aletta Servomotore Elica Aletta Servomotore Cofano Fotocamera fisheye Pulsante on/off, indicatore luminoso e sonda pitot...
- Page 133 All manuals and user guides at all-guides.com MODULO PILOTA AUTOMATICO C.H.U.C.K Porta per telecomando RC Connettore della batteria Connettore servomotori Porta micro-USB Connettore del motore centrale...
- Page 134 All manuals and user guides at all-guides.com PRESENTAZIONE DEL PARROT SKYCONTROLLER 2 Posizione del supporto per smarpthone e tablet Antenna Pulsante On/Off Durante il volo: scattare una foto Decollo/ Impostazioni Nelle impostazioni: Atterraggio convalida Ritorno al punto di partenza Durante il volo:...
- Page 135 All manuals and user guides at all-guides.com Passare in vista diretta o in vista immersiva Regolare l’esposizione della fotocamera Porta USB Modalità di visualizzazione sull’applicazione Orientamento verticale della fotocamera...
- Page 136 • Samsung Galaxy S • LG G3 ® • Samsung Galaxy S • HTC One M8 ® • Samsung Galaxy S • Nexus 5 ® Non lasciare mai i Parrot Cockpitglasses al sole quando non li usi. Questo potrebbe danneggiare il tuo telefono.
-
Page 137: Prima Di Iniziare
® l’applicazione FreeFlight Pro sul tuo smartphone o tablet. CARICARE LA BATTERIA DEL PARROT DISCO La batteria deve essere scollegata dal Parrot Disco. Seleziona la presa corrispondente al tuo paese e inseriscila nel caricatore. 1. Collega il cavo al caricatore. -
Page 138: Installare La Batteria
All manuals and user guides at all-guides.com INSTALLARE LA BATTERIA 1. Rimuovi il cofano del Parrot Disco. 2. Posiziona la batteria nel vano previsto allo scopo. 3. Collega la batteria al Parrot Disco. 4. Richiudi il cofano del Parrot Disco. -
Page 139: Fissare Le Ali
All manuals and user guides at all-guides.com FISSARE LE ALI Fissa le ali su entrambi i lati del Parrot Disco. Assicurati che le ali siano fissate bene nei servomotori. Per rimuovere le ali, tira su. Non muovere i servomotori a mano per evitare di danneggiarli. - Page 140 All manuals and user guides at all-guides.com VERIFICHE PRIMA DEL VOLO Prima di ogni sessione di volo con il Parrot Disco, esegui le verifiche seguenti: NORMATIVA Verifica che l’uso del Parrot Disco sia consentito nel tuo luogo di volo. Informati sulle restrizioni di utilizzo delle frequenze Wi-Fi ®...
- Page 141 All manuals and user guides at all-guides.com CONFIGURAZIONI DI PILOTAGGIO Ci sono tre configurazioni di pilotaggio. Familiarizza con la n°1 e la n°2 prima di utilizzare la n°3. Parrot Skycontroller 2 Parrot Skycontroller 2 da solo e smartphone Parrot Skycontroller 2...
- Page 142 > Il pulsante lampeggia in rosso e poi in verde una volta che il GPS è fissato. 3. Premi il pulsante On/Off del Parrot Skycontroller 2 per accenderlo. 4. Attendi fino a quando l’indicatore luminoso è verde fisso. Ora sei collegato al Parrot Disco.
- Page 143 All manuals and user guides at all-guides.com COLLEGARE LO SMARTPHONE AL PARROT SKYCONTROLLER 2 1. Avvita il supporto per smartphone sul Parrot Skycontroller 2. Puoi far ruotare il supporto per adattarlo alle dimensioni del tuo smartphone. Per fare questo, premi e fallo ruotare a destra.
- Page 144 3. Apri il cassetto. 4. Fai passare il cavo USB dello smartphone nell’apertura del cassetto. 5. Collega un’estremità del cavo USB dello smartphone al Parrot Skycontroller 2 e l’altra estremità al tuo smartphone. > L’applicazione FreeFlight Pro si avvia automaticamente sul tuo smartphone.
- Page 145 0.0 m/s 0.000... 0.000... 8. Richiudi il cassetto e fallo scorrere nei Parrot Cockpitglasses. 9. Regola la cinghia dei Parrot Cockpitglasses sulla tua testa. Nota: usa il Parrot Skycontroller 2 per modificare le impostazioni dell’applicazione FreeFlight Pro mentre indossi i Parrot Cockpitglasses.
- Page 146 Puoi decollare. 4. Lancia il Parrot Disco leggermente verso l’alto. > Il Parrot Disco decolla. Sale a 50 metri di altezza, quindi esegue cerchi di 60 metri di diametro. Allora puoi pilotarlo. Nota: Per spegnere il motore del Parrot Disco, premi di nuovo il pulsante del Parrot Skycontroller 2.
- Page 147 All manuals and user guides at all-guides.com MODALITÀ DI PILOTAGGIO PILOTA AUTOMATICO Questa modalità permette di pilotare il Parrot Disco in modo sicuro. Durante il volo, il Parrot Disco mantiene la sua velocità e conserva la sua altitudine. COMANDO SINISTRO COMANDO DESTRO Accelerare...
-
Page 148: Modalità Manuale
Puoi utilizzare un telecomando RC (non incluso) per pilotare il Parrot Disco. La modalità manuale non propone alcuna assistenza al pilotaggio del Parrot Disco. Configura le vie del tuo telecomando RC per il Parrot Disco. Per fare questo, fai riferimento al manuale del tuo telecomando RC. -
Page 149: Schermo Di Controllo
Ritorno al punto di partenza Scattare una foto Registrazione video Impostazioni Schermo precedente Modalità mappa 00:00 Livello di 5848.6 45 % 95 % batteria del Velocità Parrot Disco Altitudine Segnale GPS Livello di batteria del Parrot Skycontroler Distanza dallo smartphone... - Page 150 Parrot Disco senza altra informazione. RITORNO AL PUNTO DI PARTENZA Per riportare il Parrot Disco al suo punto di partenza, premi il pulsante del Parrot Skycontroller 2 o l’applicazione FreeFlight Pro. > Il Parrot Disco si stabilizza all’altitudine di 50 metri, ritorna verso la sua posizione di partenza e fa dei cerchi di 60 metri di diametro al di sopra di questa posizione.
- Page 151 10 m 50 m Per annullare l’atterraggio, premi il pulsante del Parrot Skycontroller 2. Il Parrot Disco sale a 50 metri e fa cerchi di 60 metri di diametro.
- Page 152 All manuals and user guides at all-guides.com ATTERRAGGIO CIRCOLARE Durante l’atterraggio circolare, il Parrot Disco si assicura solo di raggiungere terra con faccia al vento per limitare la velocità di atterraggio. 10 m 1. Assicurati di disporre di una superficie di almeno 80 metri di diametro per far atterrare il Parrot Disco.
-
Page 153: Foto E Video
Sul tuo Parrot Skycontroller 2, premi il pulsante per scattare una foto. La memoria interna del Parrot Disco ha una capacità di 32 GB. Il nu- mero massimo di foto memorizzate dipende dal formato selezionato. Per foto di buona qualità, assicurati che il Parrot Disco sia impostato in modalità... - Page 154 2. Accendi il tuo Parrot Disco. 3. Attendi che l’indicatore luminoso del Parrot Disco diventi verde. Ciò significa che il GPS è fissato. 4. Collega il tuo smartphone al Parrot Disco e avvia l’applicazione FreeFlight Pro. 5. Nella schermata iniziale, premi Tabella di marcia.
- Page 155 PERDITA DI CONNESSIONE In caso di perdita della connessione durante il volo tra il Parrot Skycontroller 2 e il Parrot Disco, il Parrot Disco fa cerchi di 60 metri di diametro per un periodo determinato (10 secondi per imposta- zione predefinita).
- Page 156 4. Copia le registrazioni foto e video sul computer. SU SMARTPHONE Per recuperare le foto e/o i video dall’applicazione FreeFlight Pro: 1. Accendi il Parrot Disco e collegalo via Wi-Fi allo smartphone. 2. Sullo smartphone, avvia l’applicazione FreeFlight Pro e vai in >...
-
Page 157: Comportamento Dell'indicatore Luminoso
1. Collega la chiavetta micro-USB (non in dotazione) a un computer. Assicurati che la chiavetta non contenga file in formato .plf. 2. Vai alla pagina di supporto del Parrot Disco su www.parrot.com e scarica il file di aggiornamento disponibile nel formato .plf. -
Page 158: Pezzi Di Ricambio
• Punto di accesso alla rete • Tipo Wi-Fi ac, 2 antenne dual band (2,4 e 5GHz), entrate e uscite multiple • Fino 2km di portata con il Parrot Skycontroller e il Parrot Skycontroller 2 BATTERIA RIMOVIBILE • 2700mAh / 25A 3 celle LipoBattery •... - Page 159 CARICATORE • Input: 100-240V, 50h-60Hz, 1.2A • Output: Max 12,6Vdc, 3.5A • Altitudine massima: 2000m sopra il livello del mare • Intervallo di funzionamento: 0°C-40°C PARROT DISCO • Intervallo di funzionamento: 0°C-40°C • Corrente max: 15A • Tensione nominale: 11,1V...
-
Page 160: Informazioni Generali
PARROT SKYCONTROLLER 2 Il Parrot Skycontroller 2 è destinato a pilotare il Bebop Drone, il Bebop 2 e il Parrot Disco e non è adatto a bambini sotto i 14 anni. Consulta la lista dei dreni compatibili con il Parrot Skycontroller 2 nella sezione Supporto su www. - Page 161 I Parrot Cockpitglasses non devono essere utilizzati da bambini sotto i 14 anni. Gli adulti devono sor- vegliare i bambini (dai 14 anni in su) che utilizzano o hanno utilizzato i Parrot Cockpitglasses per assicu- rarsi dell’assenza di sintomi come quelli descritti in precedenza, e devono limitare la durata di utilizzo dei Parrot Cockpitglasses da parte dei bambini e imporre delle pause.
- Page 162 La limitazione d’uso all’aperto nei paesi membri dell’Unione europea riguarda solo la prima sottobanda della banda 5GHz (5150-5250MHz). Parrot DRONES, 174 quai de Jemmapes, 75010 Parigi, Francia, dichiara sotto la sua unica responsabilità che il prodotto descritto in questo manuale utente è conforme alle norme tecniche EN 301489-1 (v1.9.2), EN 301489-3 (v1.6.1), EN301489-17 (v2.2.1), EN300440-1 (v1.6.1), EN 62311, EN300328 (v1.9.1),...
-
Page 163: Informazioni Sul Produttore
Tutti gli altri marchi citati in questa guida sono di proprietà dei rispettivi proprietari. INFORMAZIONI SUL PRODUTTORE Il Parrot Skycontroller 2/Parrot Disco/Parrot Cockpitglasses è prodotto da: PARROT DRONES SAS - 174 Quai de Jemmapes - 75010 Parigi (Francia) - RCS Parigi 808 408 074... - Page 164 All manuals and user guides at all-guides.com PRESENTATIE VAN DE PARROT DISCO ALGEMEENHEDEN Regelplaat Servomotor Propellor Regelplaat Servomotor Behuizing Fisheye camera On/off-knop, lampje en pitotsonde...
- Page 165 All manuals and user guides at all-guides.com C.H.U.C.K STUURAUTOMAAT MODULE Portaal voor afstandsbediening Aansluiting voor de batterij Servo-aansluiting Portaal micro- Aansluiting voor de centrale motor...
- Page 166 All manuals and user guides at all-guides.com PRESENTATIE VAN DE PARROT SKYCONTROLLER 2 Houder voor smartphone en tablet Antenne On/Off- knop Tijdens de vlucht: een foto nemen Opstijgen/ Instellingen In de instellingen: Landen valideren Terug naar het beginpunt Tijdens de vlucht: video-opname starten/stoppen...
- Page 167 All manuals and user guides at all-guides.com Van Directe Weergave naar Immersieve Weergave gaan De blootstelling van de camera afstellen USB-portaal Wijzigen van de weergave op de applicatie Verticale oriëntatie van de camera...
- Page 168 • LG G3 ® • Samsung Galaxy S • HTC One M8 ® • Samsung Galaxy S • Nexus 5 ® aat de Parrot Cockpitglasses nooit in de zon liggen als u ze niet gebruikt. Dit kan uw telefoon beschadigen.
- Page 169 FreeFlight Pro op uw smartphone of tablet. LAAD DE BATTERIJ OP VAN DE PARROT DISCO De batterij moet niet aangesloten zijn op de Parrot Disco. 1. Kies de stekker geschikt voor uw land en doe deze in de oplader.
-
Page 170: De Batterij Plaatsen
All manuals and user guides at all-guides.com DE BATTERIJ PLAATSEN 1. Haal de behuizing van de Parrot Disco. 2. Plaats de batterij in het daarvoor voorzien compartiment. 3. Sluit de batterij aan op de Parrot Disco. 4. Doe de behuizing weer op... - Page 171 All manuals and user guides at all-guides.com DE VLEUGELS BEVESTIGEN Bevestig de vleugels aan beide kanten van de Parrot Disco. Zorg ervoor dat de vleugels goed vastzitten in de servomotoren. Trek aan de vleugels om ze te verwijderen. Beweeg de servomotoren niet met de hand, dit kan ze...
- Page 172 Voor elke vlucht met de Parrot Disco dient u de volgende controles uit te voeren: REGELGEVING Ga na of het gebruik van de Parrot Disco toegestaan is op de uitgekozen vluchtlocatie. Check de beperkingen op het gebruik van de Wi-FI -frequenties ®...
- Page 173 All manuals and user guides at all-guides.com CONFIGURATIE VAN DE BESTURING Er zijn drie besturingsconfiguraties. Raak vertrouwd met het gebruik van nr. 1 en nr. 2 voordat u nr. 3 gaat gebruiken. Parrot Skycontroller 2 Parrot Skycontroller 2 alleen en smartphone...
- Page 174 2. Druk op de On/Off-knop van de Parrot Disco. > De knop knippert eerst rood en groen als het GPS-signaal ont- vangen is. 3. Druk op de On/Off-knop van de Parrot Skycontroller 2 om deze aan te zetten. 4. Wacht totdat het lampje groen blijft.
- Page 175 UW SMARTPHONE AANSLUITEN OP DE PARROT SKYCONTROLLER 2 1. Schroef de houder voor smartphone op de Parrot Skycontroller 2. U kunt de houder draaien om deze aan te passen aan de afmetingen van uw smartphone. Op de houder drukken en deze naar rechts draaien.
- Page 176 4. Schroef de houder vast om uw smartphone. 5. Met behulp van de USB-kabel van uw smartphone sluit uw uw smart- phone aan op het USB-portaal van de Parrot Skycontroller 2. > De FreeFlight Pro-applicatie start automatisch. U bent nu aangesloten.
- Page 177 0.000... 0.000... 8. Doe de cassette dicht en terug in de Parrot Cockpitglasses. 9. Stel de band van de Parrot Cockpitglasses af en zet de bril op uw hoofd. Opmerking: gebruik de Parrot Skycontroller 2 om de instellingen van de FreeFlight Pro-applicatie te wijzigen terwijl u de Parrot Cockpitglasses draagt.
- Page 178 All manuals and user guides at all-guides.com OPSTIJGEN Stijg tegen de wind op. 1. Ga tegen de wind in staan en houd de romp van de Parrot Disco in één hand. 2. Zorg ervoor dat de motor van de Parrot Disco compleet vrij is.
- Page 179 All manuals and user guides at all-guides.com BESTURINGSMODI STUURAUTOMAAT Met deze modus kan de Parrot Disco veilig bestuurd worden. Tijdens de vlucht blijft de Parrot Disco op dezelfde snelheid en op dezelfde hoogte vliegen. LINKERKNOP RECHTERKNOP Versnellen Dalen Afremmen Stijgen...
-
Page 180: Handmatige Modus
De handmatige modus biedt geen enkele hulp bij het besturen van de Parrot Disco. Configureer uw afstandsbediening voor de Parrot Disco. Raadpleeg hiervoor de handleiding van uw afstandsbedie- ning. De Parrot Disco kan moeilijk te besturen zijn zonder hulp van de stuurautomaat. Deze modus is alleen geschikt voor ervaren piloten. - Page 181 Terug naar het beginpunt Een foto nemen Video-opname Vorige scherm Instellingen Kaartmodus 00:00 Opladingsni- 5848.6 45 % 95 % veau van de Snelheid Parrot Disco batterij Hoogte GPS-signaal Opladingsni- veau van de Parrot Skycontroller 2 batterij Afstand van uw smartphone...
- Page 182 Parrot Skycontroller 2 of op de FreeFlight Pro-applicatie. > De Parrot Disco zal op een hoogte van 50 meter gaan vliegen en teruggaan naar het beginpunt door rondjes van 60 meter doorsnede te vliegen boven deze positie.
-
Page 183: Linaire Landing
10 m 50 m Om de landing te annuleren, druk op de knop van uw Parrot Skycontroller 2. De Parrot Disco gaat op een hoogte van 50 meter vliegen en maakt rondjes van 60 meter doorsnede. -
Page 184: Circulaire Landing
All manuals and user guides at all-guides.com CIRCULAIRE LANDING Tijdens de circulaire landing zorgt de Parrot Disco er zelf voor te- gen de wind in te landen zodat de landingssnelheid beperkt wordt. 10 m 1. Zorg ervoor dat u zich op een locatie van ten minste 80 meter doorsnede bevindt om de Parrot Disco te laten landen. -
Page 185: Foto's En Video's
32 Go. Het maximum aantal opgeslagen foto’s hangt af van het gekozen formaat. Voor foto’s van goede kwaliteit dient u ervoor te zorgen dat de Parrot Disco in foto-modus staat. Voor meer informatie raadpleeg de helppagina van Parrot Disco op www.parrot.com. - Page 186 1. Zorg ervoor dat uw vliegplan aangemaakt en geladen is. 2. Zet uw Parrot Disco aan. 3. Wacht tot het lampje van de Parrot Disco groen is. Dit betekent dat het GPS-signaal ontvangen is. 4. Sluit uw smartphone aan op de Parrot Disco en start de FreeFlight Pro-applicatie.
- Page 187 All manuals and user guides at all-guides.com VERLIES VAN DE VERBINDING In geval van verlies van de verbinding tussen uw Parrot Skycontroller 2 en uw Parrot Disco tijdens de vlucht, zal de Parrot Disco rondjes gaan vliegen van 60 meter doorsnede voor een bepaalde periode (standaard 10 secondes).
- Page 188 OP DE SMARTPHONE Om foto’s en/of video’s vanaf de FreeFlight Pro-applicatie op te halen: 1. Zet uw Parrot Disco aan en sluit deze aan op uw smartphone via Wi-Fi. 2. Start de FreeFlight Pro-applicatie op uw smartphone en ga naar Menu >...
- Page 189 3. Kopieer dit bestand vanaf uw micro-USB sleutel zonder het in een folder zet. 4. Zet uw Parrot Disco aan. 5. Sluit de micro-USB sleutel aan op een van de portalen van de Parrot Disco. > De Parrot Disco gaat automatisch opnieuw aan en het lampje knippert geel.
-
Page 190: Reserveonderdelen
WI-FI EN TRANSMISSIE • Netwerk toegangspunt • Type Wi-Fi ac, 2 dualband antennes (2,4 en 5GHz), meerdere in- en uitgangen • Tot 2 km bereik met de Parrot Skycontroller en de Parrot Skycontroller 2 UITNEEMBARE BATTERIJ • 2700mAh / 25A 3-cel LipoBattery •... - Page 191 & Open source SDK voor de ontwikkeling ® OPLADER • Input: 100-240V, 50h-60Hz, 1.2A • Output: Max 12,6Vdc, 3.5A • Maximale hoogte : 2000 m boven de zeespiegel • Werkbereik: 0°C-40°C PARROT DISCO • Werkbereik: 0°C-40°C • Max. spanning: 15A • Nominale spanning: 11,1V...
-
Page 192: Accessoires En Reserveonderdelen
Parrot Disco tijdens het opstijgen. Gebruik alleen accessoires die door Parrot Drones SAS aan- bevolen worden. Als zand of stof in de Parrot Disco komt, kan het zijn dat het apparaat permanent beschadigd is en dus niet meer goed functioneert. - Page 193 Draag de Parrot Cockpitglasses nooit in een situatie die uw aandacht vergt, zoals lopen, fietsen of autorijden. Controleer dat de Parrot Cockpitglasses goed en stevig op uw hoofd zitten en dat het beeld helder is en niet dubbel. Gebruik de Parrot Cockpitglasses niet als u moe bent, slaaptekort hebt, onder invloed van alcohol of drugs bent, hoofdpijn hebt of spijsverteringsproblemen, als u gestrest, emotioneel of angstig bent, last hebt van verkoudheid, migraine of oorpijn aangezien dit de bijwerkingen kan vergroten.
- Page 194 Gelieve het afval te scheiden en op verantwoordelijke wijze te recy- cleren. Dit bevordert het duurzaam hergebruik van het materiaal. We nodigen u uit contact op te nemen met uw dealer of bij uw gemeentehuis na te vragen hoe de Parrot Disco/Parrot Skycontroller 2/Parrot Cockpitglasses gerecycled kan worden.
- Page 195 MERKEN Parrot Disco, Parrot Skycontroller, Parrot Cockpitglasses, Parrot C.H.U.C.K en de respectievelijke logo’s zijn merken van Parrot Drones SAS. Parrot en de logo’s van Parrot zijn geregistreerde merken van Parrot S.A.
- Page 196 All manuals and user guides at all-guides.com APRESENTAÇÃO DO PARROT DISCO GERAL Portada Servomotor Hélice Portada Servomotor Capota Câmara Fisheye Botão on/off, indicador luminoso e sonda piloto...
- Page 197 All manuals and user guides at all-guides.com MÓDULO PILOTO AUTOMÁTICO C.H.U.C.K Porta para telecomando RC Conector da bateria Conectores servos Porta micro-USB Conector do motor central...
- Page 198 All manuals and user guides at all-guides.com APRESENTAÇÃO DE PARROT SKYCONTROLLER 2 Localização do suporte para smarpthone e tablet Antena Botão On/Off Durante o voo: tirar uma foto Descolar/ Configurações Nas definições: Aterrar validar Regresso ao ponto de partida Durante o voo: iniciar/parar a gravação de vídeo...
- Page 199 All manuals and user guides at all-guides.com Passar para vista direta ou vista imersiva Ajustar a exposição da câmara Porta USB Alterar o modo de apresentação na aplicação Orientação vertical da câmara...
- Page 200 • Samsung Galaxy S • LG G3 ® • Samsung Galaxy S • HTC One M8 ® • Samsung Galaxy S • Nexus 5 ® Nunca deixe os Parrot Cockpitglasses ao sol quando não os utiliza. Isso poderia danificar o seu telefone.
-
Page 201: Antes De Começar
® gratuita FreeFlight Pro para o seu smartphone ou tablet. CARREGAR A BATERIA DO PARROT DISCO A bateria deve ser desconectada do Parrot Disco. 1. Selecione a ficha correspondente no seu país e inseri-a no carregador. 2. Conecte o cabo do carregador. -
Page 202: Instalar A Bateria
All manuals and user guides at all-guides.com INSTALAR A BATERIA 1. Retire a capota do Parrot Disco. 2. Coloque a bateria no espaço previsto para esse efeito. 3. Instale a bateria no Parrot Disco. 4. Instale a bateria no Parrot... - Page 203 All manuals and user guides at all-guides.com FIXAR AS ASAS Fixe as asas em ambos os lados do Parrot Disco. Certifique-se de que as asas ficam bem fixadas nos servomotores. Para retirar as asas, puxe por cima. Não movas os servomotores com a mão para não os danificar.
- Page 204 All manuals and user guides at all-guides.com VERIFICAÇÕES ANTES DO VOO Antes de cada sessão de voo com o Parrot Disco, proceda à seguintes verificações: REGULAMENTAÇÃO Confirme que a utilização do Parrot Disco está autorizada no seu local de voo.
- Page 205 All manuals and user guides at all-guides.com CONFIGURAÇÕES DE PILOTAGEM Existem três configurações de pilotagem. Familiarize-se com a n°1 e a n°2 antes de utilizar a n°3. Parrot Skycontroller 2 Parrot Skycontroller 2 e sozinho smartphone Parrot Skycontroller 2 e Parrot Cockpitglasses...
- Page 206 > O botão pisca a vermelho e depois a verde quando o GPS tiver sido fixado. 3. Prima o botão On/Off do Parrot Skycontroller 2 para o ligar. 4. Aguarde até que o indicador luminoso passe a verde fixo. Está conectado ao Parrot Disco.
- Page 207 All manuals and user guides at all-guides.com CONECTAR O SEU SMARTPHONE AO PARROT SKYCONTROLLER 2 1. Enrosque o suporte para o smartphone no Parrot Skycontroller 2. Pode girar o suporte para o adaptar às dimensões do seu smartphone. Para isso, pressione em coma e faça-o rodar para a direita.
- Page 208 > A aplicação FreeFlight Pro inicia automaticamente. Está conec- tado. UTILIZAR OS PARROT COCKPITGLASSES 1. Conecte o seu Parrot Skycontroller 2 ao seu drone. 2. Retire a gaveta dos Parrot Cockpitglasses. 3. Abra a gaveta. 4. Passe o cabo USB do seu smartphone na abertura da gaveta.
- Page 209 0.000... 0.000... 8. Feche a gaveta e deslize-a nos Parrot Cockpitglasses. 9. Ajuste a correia dos Parrot Cockpitglasses na sua cabeça. Nota: utilize o Parrot Skycontroller 2 para alterar as definições da aplicação FreeFlight Pro quando usa os Parrot Cockpitglasses.
- Page 210 Pode descolar. 4. Lance o Parrot Disco ligeiramente para cima. > O Parrot Disco descolou. Ele eleva-se a uma altitude de 50 metros e, em seguida, efetua círculos com 60 metros de diâmetro. Pode agora pilotá-lo.
-
Page 211: Piloto Automático
All manuals and user guides at all-guides.com MODOS DE PILOTAGEM PILOTO AUTOMÁTICO Este modo permite-lhe pilotar o Parrot Disco de forma segura. Durante o voo, o Parrot Disco mantém a sua velocidade e altitude. COMANDO ESQUERDO COMANDO DIREITO Acelerar Descer... - Page 212 Disco. O modo manual não oferece nenhuma assistência na pilotagem do Parrot Disco. Configure as vias do seu telecomando RC para o Parrot Disco. Para isso, consulte o manual do seu telecomando RC. O Parrot Disco é difícil de pilotar sem a assistência do piloto...
- Page 213 Regressar ao ponto de partida Tirar uma foto Gravar uma vídeo Ecrã anterior Parâmetros Modo mapa 00:00 Modo Nível de 5848.6 45 % 95 % bateria do Velocidade Parrot Disco Altitude Signal GPS Nível de bateria do Parrot Skycontroller 2 Distância do seu smartphone...
- Page 214 Parrot Disco sem mais informações. REGRESSAR AO PONTO DE PARTIDA Para fazer o Parrot Disco regressar ao seu ponto de partida, prima o botão do Parrot. > O Parrot Disco fixa-se à altitude de 50 metros, regressa para a sua posição de partida e efetua círculos de 60 metros de...
- Page 215 à esquerda e virar à direita. 10 m 50 m Para cancelar a aterragem, prima o botão do seu Parrot Skycontroller 2. O Parrot Disco sobe a 50 metros e efetua círculos com 60 metros de diâmetro.
- Page 216 All manuals and user guides at all-guides.com ATERRAGEM CIRCULAR Durante a aterragem circular, o Parrot Disco certifica-se apenas de chegar ao solo de feição ao vento para limitar a sua velocidade de 10 m aterragem. 1. Certifique-se de que dispõe de uma zona de, pelo menos, 80 50 m metros de diâmetro para fazer o Parrot Disco aterrar.
- Page 217 All manuals and user guides at all-guides.com FOTOS E VÍDEOS O Parrot Disco Le Parrot Disco pode ser utilizado no modo foto ou no modo vídeo. TIRAR FOTOS No seu Parrot Skycontroller 2, prima no botão para tirar uma foto.
- Page 218 3. Aguarde que o indicador luminoso do Parrot Disco passe para verde. Isto significa que o GPS foi fixado. 4. Conecte o seu smartphone ao Parrot Disco e inicie a aplicação FreeFlight Pro. 5. No ecrã inicial, prima em Folha de rota.
- Page 219 All manuals and user guides at all-guides.com PERDA DE LIGAÇÃO No caso de perda de ligação durante o voo entre o seu Parrot Skycontroller 2 e o seu Parrot Disco, o Parrot Disco realiza círculos com 60 metros de diâmetro durante um período definido (10 se- gundos por defeito).
- Page 220 4. Copie as gravações de foto e vídeo para o seu computador. NO SMARTPHONE Para recuperar fotos e/ou vídeos a partir da aplicação FreeFlight Pro: 1. Ligue o seu Parrot Disco conecte-o à rede Wi-Fi no seu smartphone. ® 2. No seu smartphone, inicie a aplicação FreeFlight Pro e aceda a >...
-
Page 221: Através De Uma Pen Micro-Usb
Certifique-se de que a sua pen não contém ficheiros no formato .plf. 2. Aceda à página de apoio de Parrot Disco em www.parrot.com, e transfira o ficheiro de atualização disponível no formato .plf. 3. Copie este ficheiro para a raiz da sua pen micro-USB. -
Page 222: Especificações Técnicas
All manuals and user guides at all-guides.com PEÇAS AMOVÍVEIS Pode comprar as peças amovíveis de Parrot Disco na nossa loja on-line: store.parrot.com. Para mais informações sobre a montagem das peças amovíveis, consulte os tutoriais em vídeo na nossa página de apoio. - Page 223 • Entrada: 100-240V, 50h-60Hz, 1.2A • Saída : Máx. 12,6Vdc, 3,5A • Altitude máxima: 2000m acima do nível do mar • Faixa de funcionamento: 0°C-40°C PARROT DISCO • Faixa de funcionamento: 0°C-40°C • Corrente máx.: 15A • Tensão nominal: 11,1V...
-
Page 224: Informações Gerais
PARROT SKYCONTROLLER 2 O Parrot Skycontroller 2 destina-se a pilotar o Bebop Drone, o Bebop 2 e o Parrot Disco e não é ade- quado para crianças com menos de 14 anos. Consulte a lista de drones compatíveis com Parrot Skycontroller 2 na secção Apoio em www.parrot.com. - Page 225 Nunca use os Parrot Cockpitglasses em situações que requeiram a sua atenção, como quando ca- minha, anda de bicicleta ou conduz. Verifique se os Parrot Cockpitglasses se adaptam de forma confortável e firme na sua cabeça, e que a imagem está nítida e não fracionada.
- Page 226 Deste modo estará a pro- mover a reutilização sustentável dos recursos materiais. Convidamo-lo a contactar o seu revendedor ou a informa-se junto da sua autarquia para saber onde e como o Parrot Disco/Parrot Skycontroller 2/ Parrot Cockpitglasses pode ser reciclado..
-
Page 227: Informações Do Fabricante
Todas as outras marcas mencionadas neste guia são propriedade dos seus respetivos titulares. INFORMAÇÕES DO FABRICANTE O Parrot Disco/Parrot Skycontroller 2/Parrot Cockpitglasses é fabricado por : PARROT DRONES SAS - 174 Quai de Jemmapes - 75010 Paris (França) - RCS Paris 808 408 074... - Page 228 All manuals and user guides at all-guides.com Parrot Disco تقديم جهاز عام مصراع م ُضاعف الحركة مروحة مصراع م ُضاعف الحركة غطاء خارجي Fisheye كاميرا sonde pitotزر تشغيل/إيقاف، مؤشر ضوئي ، و...
- Page 229 All manuals and user guides at all-guides.com C.H.U.C.K وحدة الطيار اآللي RC مدخل جهاز التحكم عن بعد موصل البطارية موصل م ُضاعفات الحركة USB-مدخل ميكرو موصل المحرك الرئيسي...
- Page 230 All manuals and user guides at all-guides.com تقديم جهاز Parrot Skycontroller 2 موضع الدعامة للهاتف الذكي والكمبيوتر اللوحي الهوائي /زر تشغيل إيقاف أثناء الطيران: التقاط صورة في اإلعدادات: التحقق من صحة إقالع\هبوط اإلعدادات العودة إلى نقطة اإلنطالق أثناء الطيران: بدء تشغيل\إيقاف تسجيل الفيديو...
- Page 231 All manuals and user guides at all-guides.com التحول من الرؤية المباشرة إلى الرؤية اإلندماجية ضبط عرض الكاميرا منفذ التوجيه العمودي للكاميرا تعديل وضع العرض في التطبيق...
- Page 232 • LG G3 ® • Samsung Galaxy S • HTC One M8 ® • Samsung Galaxy S • Nexus 5 ® . معر ض ًا ألشعة الشمس في حالة عدم استخدامهParrot Cockpitglasses ال تترك جهاز .فهذا قد يسبب التلف لهاتفك...
- Page 233 ® . المجاني على هاتفك الذكي أو جهاز الحاسوب اللوحي الخاص بكPro Parrot Disco شحن بطارية جهاز .Parrot Disco يجب فصل البطارية عن جهاز .اختر القابس المتوافق مع بلدك وأدخله في الشاحن .ق ُ م بتوصيل الكابل بالشاحن ق ُ م بتوصيل البطارية في كابل الشاحن، ثم توصيل الشاحن في التيار الكهربائي. يكون لون المؤشر...
- Page 234 All manuals and user guides at all-guides.com تركيب البطارية لنزع الغطاء الخارجي لجهاز .Parrot Disco ضع البطارية في المكان المخصص .لهذا الغرض ق ُ م بتوصيل البطارية بجهاز .Parrot Disco أعد غلق الغطاء الخارجي لجهاز .Parrot Disco...
- Page 235 All manuals and user guides at all-guides.com تثبيت األجنحة .Parrot Disco ق ُ م بتثبيت األجنحة على جانبي جهاز .تأكد من أن األجنحة تم تثبيتها تما م ًا في مضاعف الحركة .إلزالة األجنحة، ق ُ م بشدها ألعلى .ال ت ق ُ م بتحريك م ُضاعفات الحركة يدو ي ًا لتجنب تعرضها للتلف...
- Page 236 All manuals and user guides at all-guides.com عمليات التحقق قبل الطيران :، يجب التحقق من العناصر التاليةParrot Disco قبل القيام بكل رحلة طيران باستخدام جهاز اللوائح . مسموح به في مكان رحلة الطيرانParrot Disco تأكد من أن استخدام جهاز في مكان رحلةWi-FI استعلم...
- Page 237 All manuals and user guides at all-guides.com تكوينات توجيه الطيران .3 توجد ثالثة أنواع لتكوينات توجيه الطيران. تعرف جي د ً ا على رقم 1، ورقم 2، قبل استخدام رقم Parrot Skycontroller جهاز التوجيه Parrot جهاز التوجيه 2 فقط فقطSkycontroller 2 Parrot جهاز...
- Page 238 .انتظر حتى يتم تثبيت ضوء المؤشر الضوئي على اللون األخضر .Parrot Disco اآلن أنت متصل بجهاز .Parrot Disco اذا استمر المؤشر الضوئي في الوميض باللون األحمر، يجب عليك معايرة جهاز ،وللقيام بذلك .، انتقل إلى اإلعدادات > معايرة جهاز قياس المغناطيسيةFreeFlight Pro 1. في التطبيق...
- Page 239 All manuals and user guides at all-guides.com توصيل هاتفك الذكي بجهاز Parrot Skycontroller 2 Parrot Skycontroller 2 اربط الدعامة لهاتفك الذكي على جهاز يمكنك لف الدعامة لتكييفها مع أبعاد هاتفك الذكي. للقيام بهذا األمر، اضغط عليه واجعله يلف .جهة اليمين...
- Page 240 > مع جهاز التوجيهParrot Cockpitglasses استخدم أجهزة Parrot Skycontroller 2 . بالطائرة بدون طيار الخاصة بكParrot Skycontroller 2 ق ُ م بتوصيل جهاز التوجيه .Parrot Cockpitglasses اسحب درج جهاز .افتح الدرج . الخاص بهاتفك الذكي وأدخله في فتحة الدرجUSB ق ُ م بتمرير كابل...
- Page 241 .Parrot Cockpitglasses أغ ل ِق الدرج وأدخله في جهاز . على رأسكParrot Cockpitglasses اضبط حزام جهاز لتغيير إعدادات تطبيقParrot Skycontroller 2 ملحوظة: استخ د ِم جهاز التوجيه .Cockpitglasses Parrot في حين أنك ترتدي جهازFreeFlight Pro flat trim رحلة الطيران األولى: استخدام وظيفة...
- Page 242 .نافذة منبثقة «جاهز لإلقالع» تظهر على شاشة هاتفك الذكي يمكنك اإلقالع اآلن > . بلطف إلى األعلىParrot Disco أطلق الطائرة . باإلقالع. ترتفع حتى ارتفاع 05 مترً ا ثم تدور في دوائر قطرها 06 مترً اParrot Disco تقوم > .يمكنك إذن توجيهها...
- Page 243 All manuals and user guides at all-guides.com التوجيه الطيار اآللي بطريقة آمنة. أثناء الطيران، يحافظParrot Disco يسمح لكم هذا الوضع بتوجيه طيران جهاز . على ثبات سرعته ومدى ارتفاعهParrot Disco جهاز التحكم جهة اليمين جهاز التحكم جهة اليسار صعود...
- Page 244 .Parrot Disco (غير مزود) لتوجيه جهازRC يمكنك استخدام جهاز التحكم عن بعد . قم بتكوين القنوات بين جهاز التحكمParrot Disco الوضع اليدوي ال يقدم أي دعم في توجيه . للقيام بهذا األمر، ارجع إلى دليل جهاز التحكم عن بعدParrot Disco وطائرةRC عن بعد...
- Page 245 وضع الرؤية المباشرة استخدم وضع الرؤية المباشرة للنظر من خالل كاميرا الهاتف الذكي الخاص بك في حين أنك ترتدي .Parrot Cockpitglasses جهاز وذلك لالنتقال من وضعParrot Skycontroller 2 اضغط على السقاطة اليمنى لجهاز التوجيه .الرؤية الشاملة إلى وضع الرؤية المباشرة...
- Page 246 .Parrot Skycontroller 2 في جهاز التوجيه اضغط على الزر . في خط مستقيم ثم تعتدل أفق ي ًا ثم تهبط بهدوء على األرضParrot Disco تنزل طائرة > ، يمكنك توجيهها بشكل طارئ ومغاير التجاههاParrot Disco مالحظة : أثناء نزول طائرة...
- Page 247 Parrot Skycontroller 2 من جهاز التوجيه إللغاء الهبوط، اضغط على الزر . حتى 05 مترً ا وتدور في دوائر قطرها 06 مترً اParrot Disco ترتفع طائرة الهبوط الدائري وحدها من وصولها إلى األرض عكس اتجاهParrot Disco أثناء الهبوط الدائري، تتحقق طائرة...
- Page 248 .اللتقاط صورة ، اضغط على الزرParrot Skycontroller 2 على جهاز لديها قدرة 23 جيجابايت. الحد األقصى لعدد الصورParrot Disco الذاكرة الداخلية لطائرة .المخزنة يعتمد على التنسيق المحدد . على وضع الصورParrot Disco اللتقاط صور عالية الجودة، تأكد من ضبط...
- Page 249 .لتنشيط تحرير نقاط المرور اضغط على .على الخريطة، اضغط على المكان الذي تريد أن تضع فيه أولى نقاط المرور . عند مررورها عند هذه النقطةParrot Disco تظهر نافذة تلميح مرقمة. الرقم يمثل ارتفاع > .استمر في وضع نقاط المرور الخاصة بك...
- Page 250 إلى موضع إنطالقها ثم تدور فيParrot Disco إذا لم يتم استعادة االتصال، تعود طائرة .دوائر قطرها 06 مترً ا . بالهبوط دائر ي ًاParrot Disco إذا لم يتم استعادة االتصال خالل 5 دقائق، تقوم الطائرة Parrot للمزيد من المعلومات عن تهيئة هذه المدة، تفضل بزيارة صفحة الدعم الخاصة بطائرة...
- Page 251 . بهاتفك الذكيWi-FI وقم بتوصيله عبرParrot Disco قم بتشغيل . وانتقل إلى القائمة > الذاكرة الداخليةFreeFlight Pro على هاتفك الذكي، قم بتشغيل تطبيق .Parrot Disco تظهر قائمة الصور ومقاطع الفيديو المحفوظة على الذاكرة الداخلية لجهاز > .حدد صورة و\أو فيديو أو أكثر...
- Page 252 الخاص بكmicro-USB انسخ هذا الملف إلى جذر مفتاح .Parrot Disco قم بتشغيل .Parrot Disco بإحدى مداخل جهازmicro-USB قم بتوصيل مفتاح تلقائ ي ًا ويومض المؤشر الضوئي باللون األصفر. ثم يتمParrot Disco يتم تشغيل جهاز > . تلقائ ي ًاParrot Disco إعادة تشغيل...
- Page 253 يومض باللون األصفر Parrot Disco ال تقم بإيقاف تشغيل قطع الغيار : عبر متجرنا على شبكة اإلنترنتParrot Disco يمكنك شراء قطع الغيار الخاصة بجهاز .www.parrot.com للمزيد من المعلومات عن تركيب قطع الغيار، يرجى االطالع على دروس الفيديو التعليمية على .صفحة الدعم الخاصة بنا...
- Page 254 واإلرساالتWi-Fi • نقطة وصول الشبكة هوائي ذي نطاق مزدوج (4،2 و5 جيجاهرتز)، مداخل ومخارج متعددةWi-Fi ac، 2 • نوع Parrot وParrot Skycontroller • يصل النطاق إلى 2 كم مع جهاز التوجيه .Skycontroller 2 بطارية قابلة لإلزالة LipoBattery • 0072 مللي أمبير\ساعة \ 52 أمبير 3 خاليا...
- Page 255 لشاحن 100-240V, 50h-60Hz, 1.2A :• اإلدخال 12,6Vdc, 3.5A • اإلخراج: الحد األقصى • االرتفاع األقصى : 0002 متر فوق مستوى سطح البحر 0°C-40°CC :• نطاق التشغيل Parrot Disco 0°C-40°C :• نطاق التشغيل 15A :• التيار األقصى 11,1V :• الجهد االسمي...
- Page 256 . بعي د ً ا عن خطوط كهرباء الجهد العالي، والمباني أو أي منطقة أخرى يحتمل أن تكون خطرةParrot Disco ابق على جهاز على الماء أو على سطح مبلل، فقد يسبب ذلك ضررً ا ال يمكنParrot Disco ال تستخ د ِم هذا الجهاز بالقرب من المواد السائلة. ال تضع جهاز...
- Page 257 لألطفال الذين تقل أعمارهم عن 41 ع م ًا. يجب على البالغين مراقبة األطفال (البالغين أكثر منParrot Cockpitglasses ال يجب استخدام للتحقق من عدم وجود أي من األعراض الموصوفة ساب ق ً ا، ويجب تقليل مدة استخدامParrot Cockpitglasses 41 عا م ًا) الذين يستخدمون...
- Page 258 .)5250MHz-5Ghz )5150 تقييد االستخدام في الخارج في البالد األعضاء في اإلتحاد األوروبي ال يخص إال القطاع الفرعي األول كاي دي جيماب، 01057 باريس، فرنسا، تعلن تحت مسئوليتها الوحيدة أن المنتج الموصوف في دليل المستخدمParrot DRONES, 174 ،هذا مطابق للمعايير التقنية...
- Page 259 All manuals and user guides at all-guides.com...
- Page 260 All manuals and user guides at all-guides.com...